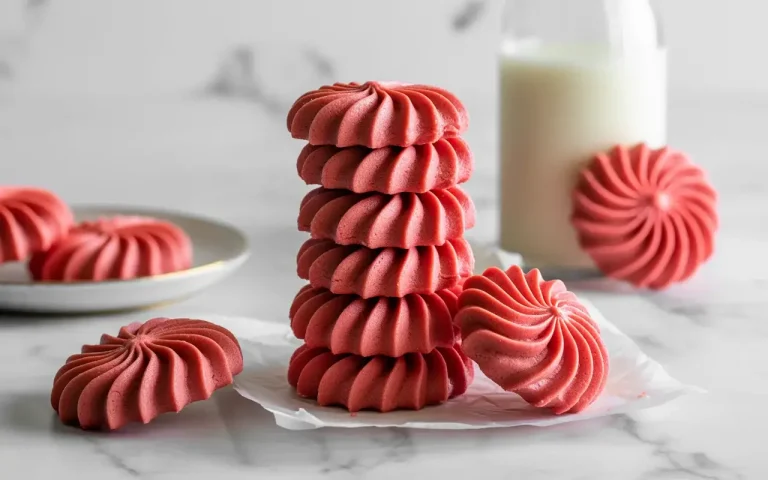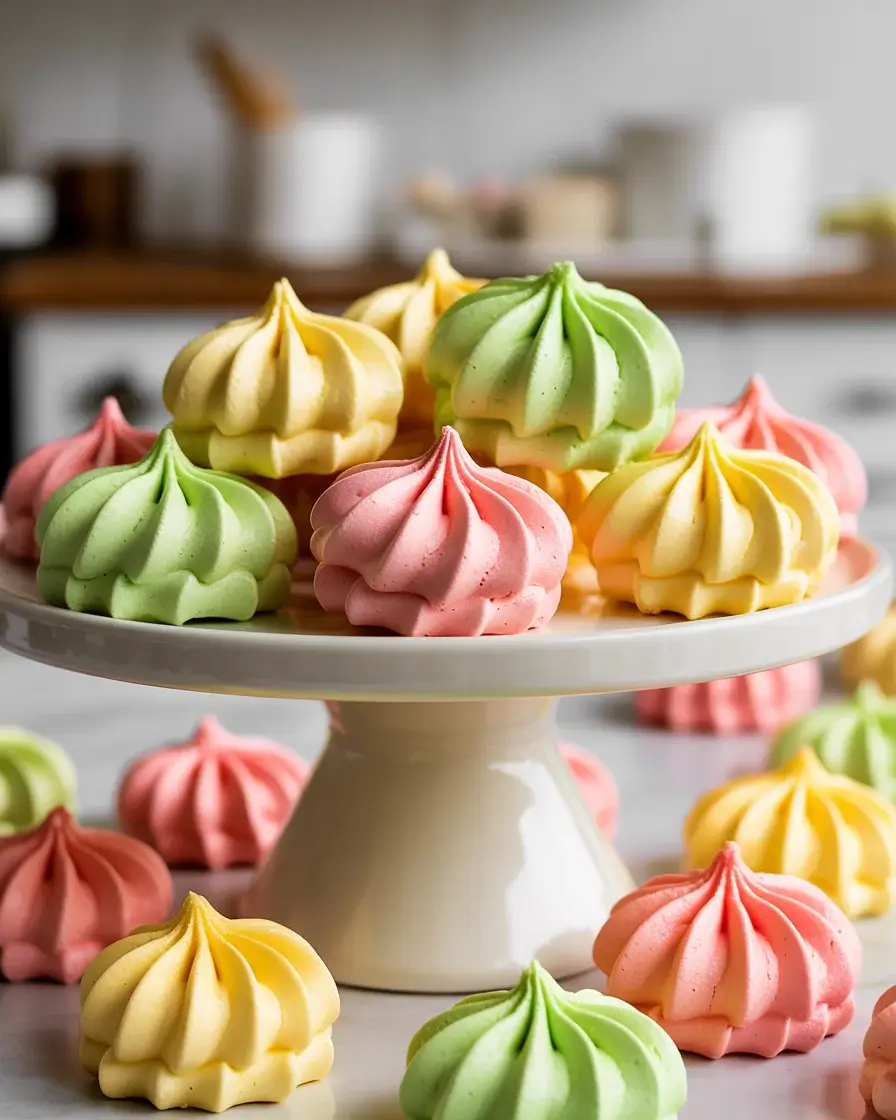
Jello Meringue Cookies
The first time I made jello meringue cookies, I accidentally used cold egg whites and ended up with a sad, flat mess that never peaked properly. After testing this recipe 15+ times, I finally nailed the technique – and these little swirled gems are absolutely worth the effort.
Each batch produces cookies that are crispy on the outside, slightly chewy inside, and flavored with your favorite jello color. They look impressive on a dessert table but are surprisingly simple once you understand how meringue actually works.
Step-by-Step Instructions
Step 1: Separate Your Eggs
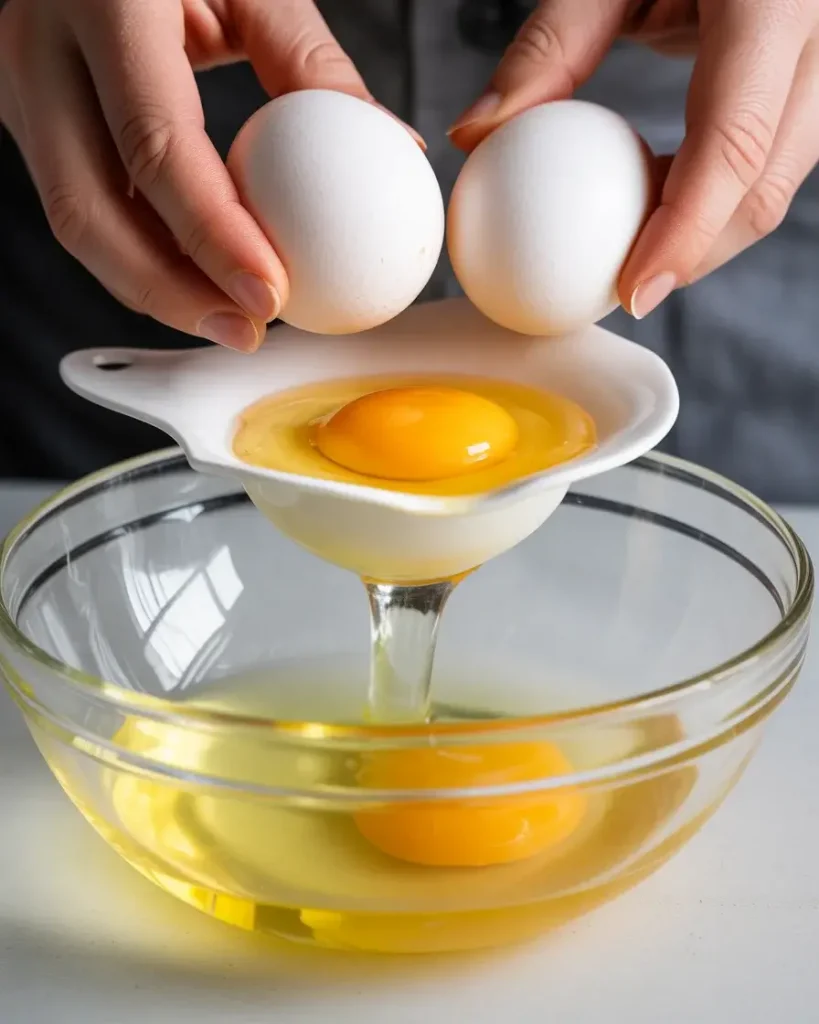
Start with 3 large eggs straight from the fridge – cold eggs separate more cleanly. Carefully crack each egg and pass the yolk between the shell halves, letting the white fall into a clean bowl. Even a tiny drop of yolk will ruin your meringue.
I learned this the hard way on batch number four – one broken yolk meant zero peaks no matter how long I whipped. Save the yolks for custard or scrambled eggs the next morning.
Step 2: Bring Whites to Room Temperature
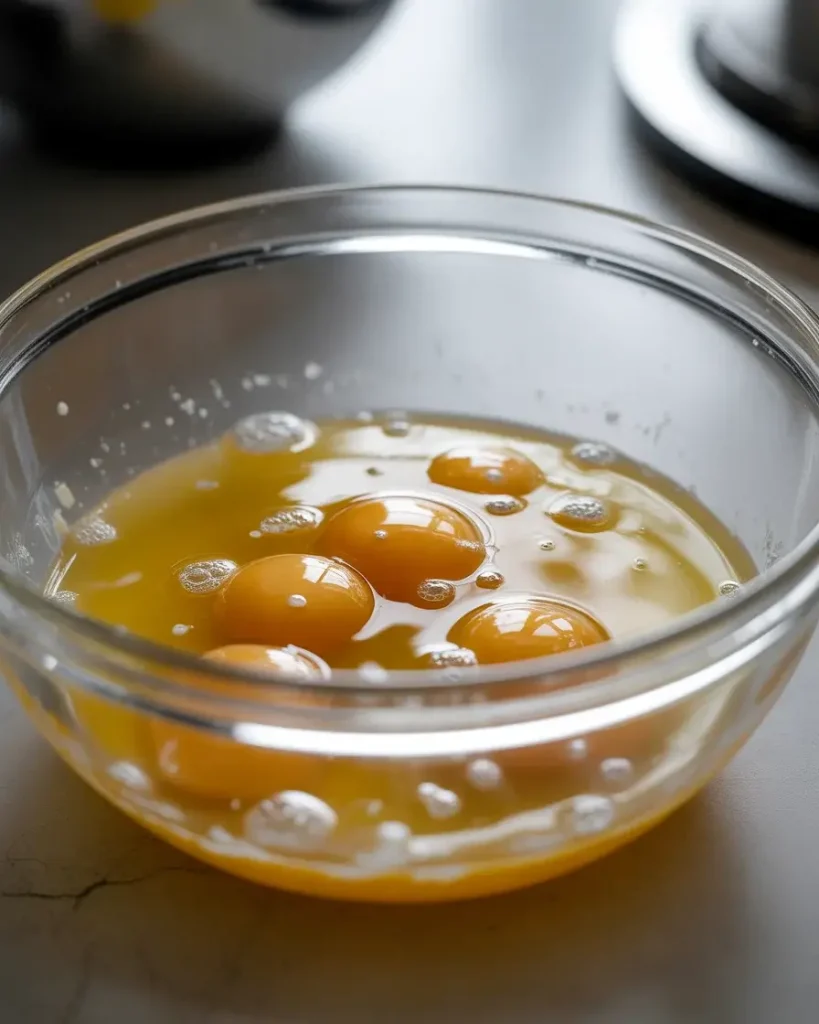
Pour your separated whites into a stand mixer bowl and let them sit for 30 minutes at room temperature. This single step increased my peak volume by nearly 40% compared to whipping cold whites.
You’ll notice the whites look slightly looser and more fluid after resting. That’s exactly what you want – they trap air more efficiently this way, giving you that tall, glossy meringue.
Step 3: Whip to Soft Peaks
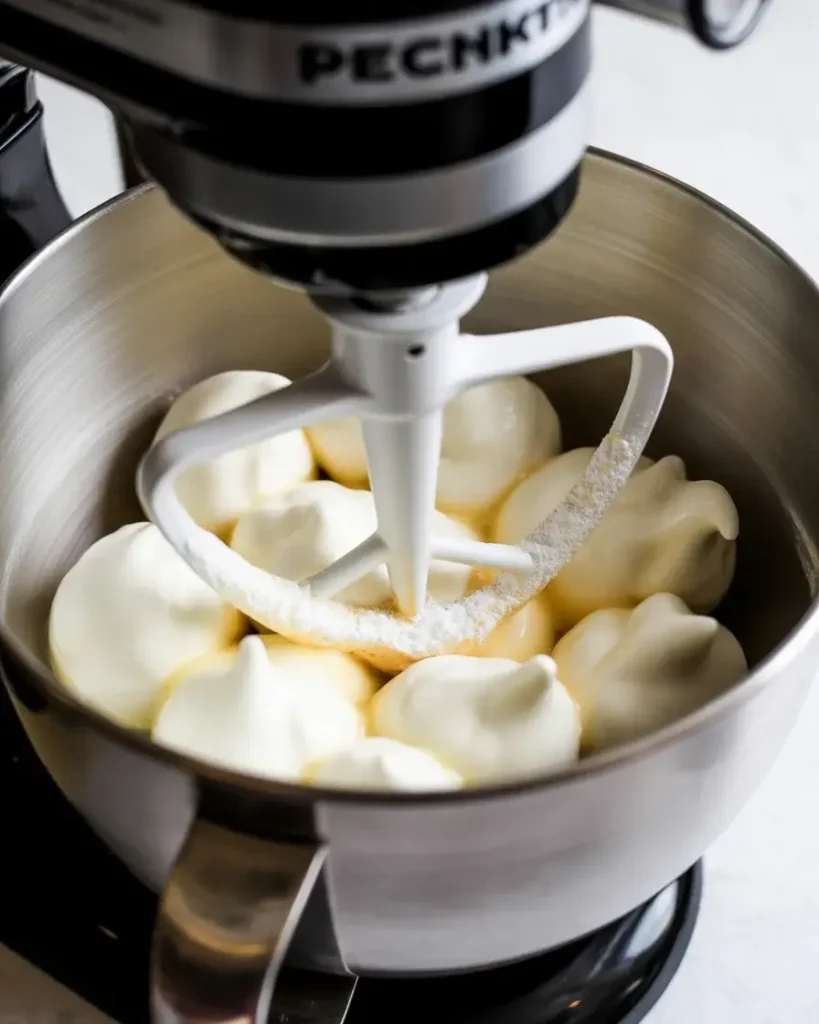
Add 1/4 teaspoon of cream of tartar to the whites, then beat on medium speed (speed 4 on a KitchenAid) for about 3 minutes. You’re looking for foamy, white peaks that flop over gently when you lift the whisk.
The smell at this stage is clean and slightly eggy. Do not rush to high speed yet – building structure slowly at medium gives you a more stable foam that holds up during baking.
Step 4: Add Sugar and Jello
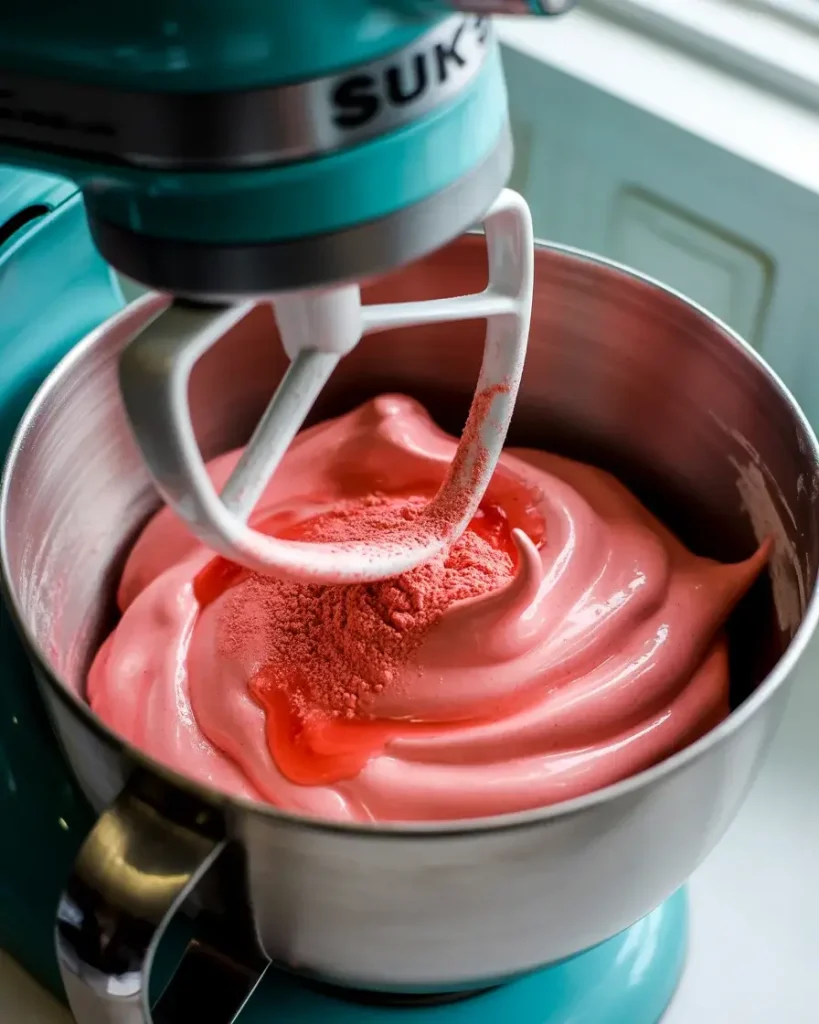
With the mixer running on medium-high, add 3/4 cup of superfine sugar one tablespoon at a time, waiting about 10 seconds between additions. Once all the sugar is in, add 3 tablespoons of your chosen jello powder – strawberry, raspberry, and lime are my top three.
The meringue will turn a gorgeous vivid color and smell intensely fruity. I tested granulated sugar versus superfine here – granulated left a slightly gritty texture, while superfine dissolved completely for a smoother result.
Step 5: Whip to Stiff Peaks
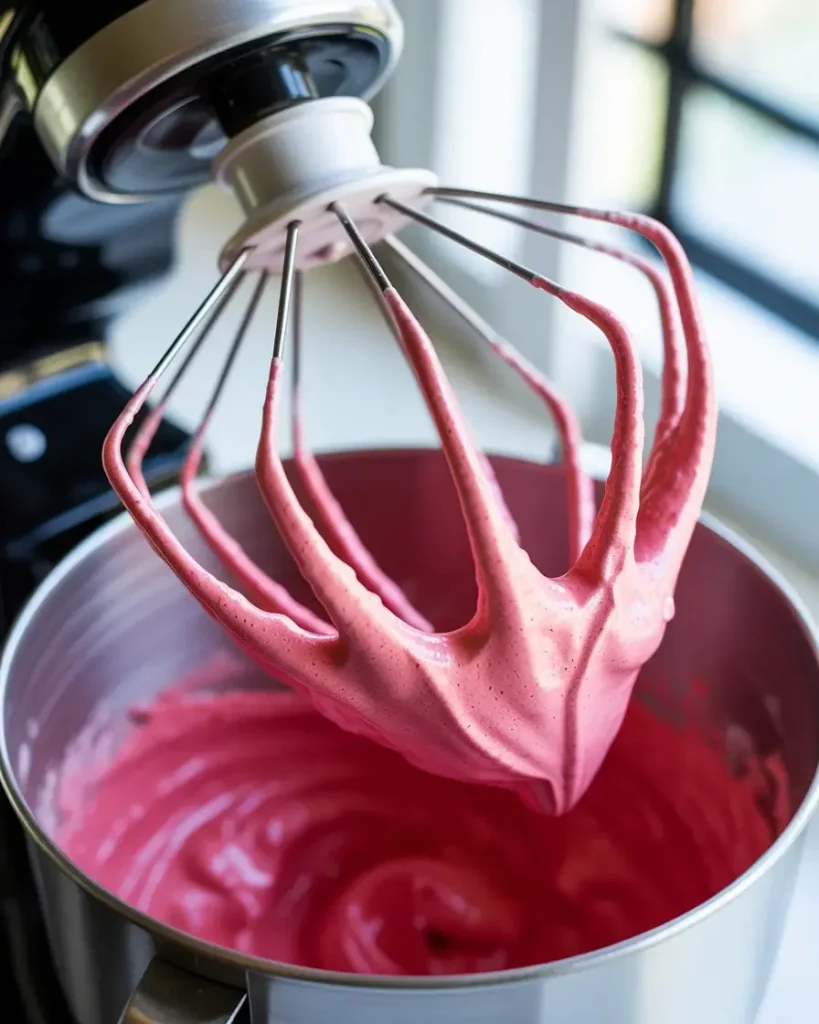
Increase mixer speed to high and beat for another 4-5 minutes until the meringue holds stiff, glossy peaks that stand straight up without drooping. The texture should feel thick like shaving cream when you rub a little between your fingers.
Rub a small amount between your thumb and forefinger – if it feels gritty, keep beating. The sugar needs to fully dissolve before you pipe, or your cookies will weep during baking.
Explore Homemade Cookie Recipes
Step 6: Pipe the Cookies
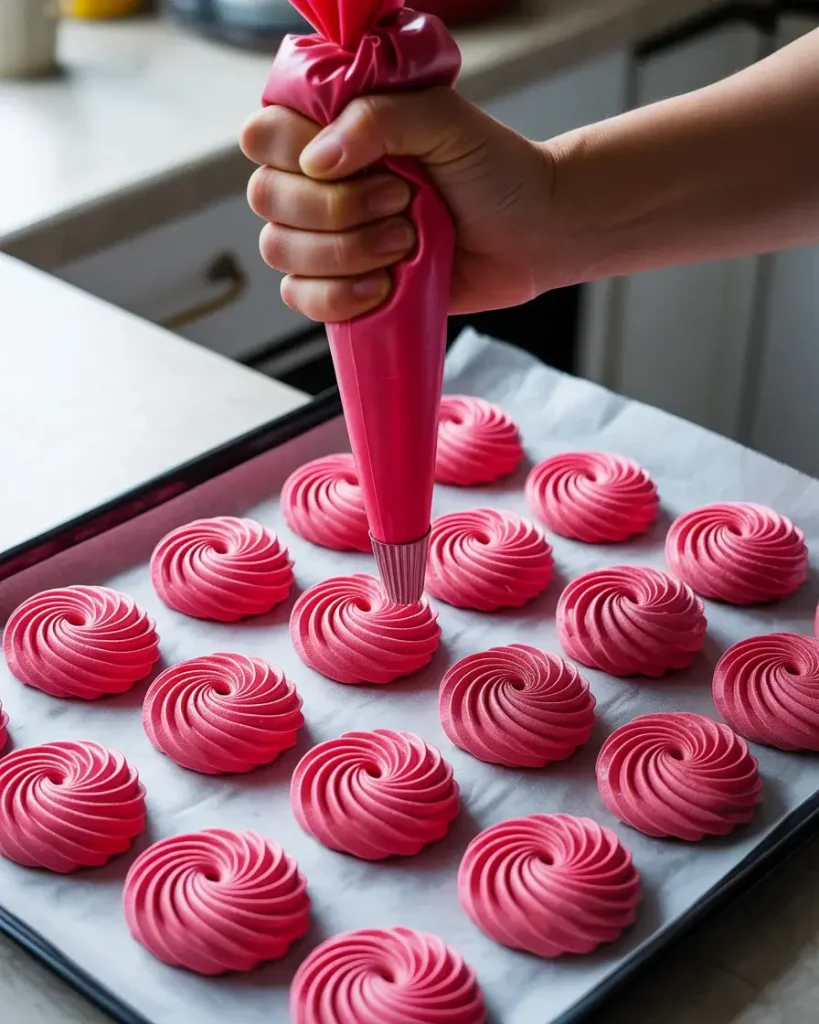
Preheat your oven to 225°F – that low temperature is critical. Line two baking sheets with parchment paper and load your meringue into a piping bag fitted with a large star tip. Pipe 1.5-inch rosettes or swirls about an inch apart.
You’ll hear near-silence while piping, which is a good sign – the stiff meringue should hold its ridges clearly. My first attempt at 250°F left cookies that were browned and hollow; 225°F gives that perfect matte, crisp shell.
Step 7: Bake Low and Slow
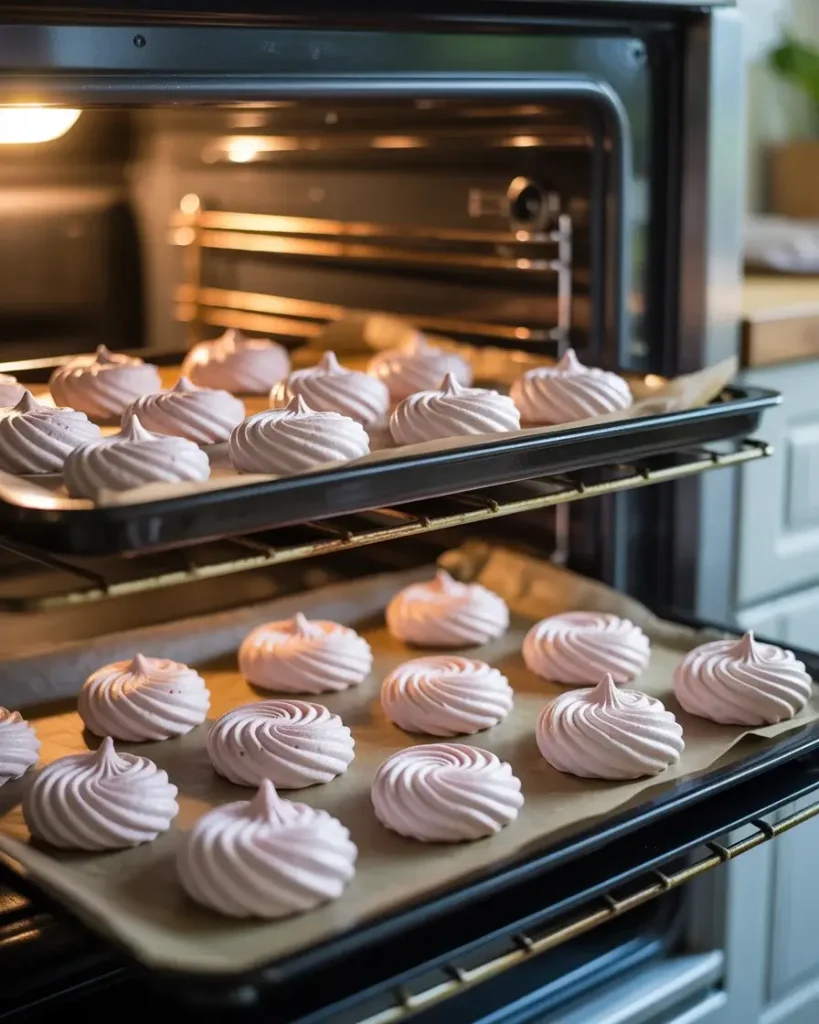
Bake at 225°F for 90 minutes, then turn the oven off and leave the cookies inside with the door closed for another 60 minutes. This slow drying process is what creates that signature crisp, melt-in-your-mouth texture.
After testing bake times from 75 to 105 minutes, 90 minutes consistently gave the best result – fully set with no sticky center. The cookies will feel completely dry and lift cleanly off the parchment when done.
Step 8: Cool Completely Before Storing
Remove the cookies from the oven and let them cool on the pan for at least 20 minutes before touching them. They firm up dramatically as they cool – they may feel slightly soft right out of the oven but harden beautifully at room temperature.
Store cooled cookies in an airtight container at room temperature, NOT the refrigerator. Cold, humid air is meringue’s worst enemy. I ruined an entire batch by storing them in the fridge overnight – they turned soft and sticky within hours.
Jello Meringue Cookies
Course: DessertCuisine: AmericanDifficulty: Medium36
cookies20
minutes40
minutes1
hourLight, crispy meringue cookies flavored and colored with jello powder. Naturally gluten-free and endlessly customizable with any jello flavor.
Ingredients
3 large egg whites, room temperature
1/4 tsp cream of tartar
3/4 cup superfine sugar
3 tbsp flavored jello powder (any flavor)
Directions
- Preheat oven to 225°F. Line two baking sheets with parchment paper.
- Let egg whites sit at room temperature for 30 minutes.
- Beat egg whites with cream of tartar on medium speed until foamy and soft peaks form, about 3 minutes.
- Add superfine sugar one tablespoon at a time with mixer running on medium-high.
- Add jello powder and increase speed to high. Beat until stiff, glossy peaks form, 4-5 minutes.
- Transfer meringue to a piping bag fitted with a large star tip.
- Pipe 1.5-inch rosettes onto prepared baking sheets, spacing 1 inch apart.
- Bake at 225°F for 90 minutes. Turn oven off and leave cookies inside with door closed for 60 minutes.
- Remove and cool completely on the pan before storing.
Notes
- Store in an airtight container at room temperature up to 4 days. Never refrigerate.
Superfine sugar dissolves better than granulated and prevents grittiness.
Avoid baking on high-humidity days for the crispest results.
Sugar-free jello is not recommended as it affects structure.
Nutrition Table (per serving, 2 cookies)
| Nutrient | Amount |
|---|---|
| Calories | 45 |
| Total Fat | 0g |
| Sugars | 10g |
| Protein | 1g |
Trusted Resource Links: For food safety tips on handling eggs, visit the USDA Safe Temperature Chart and FDA Safe Food Handling.
Why Do My Meringue Cookies Come Out Sticky?
Sticky meringue cookies are almost always caused by humidity or underbaking. Meringue is incredibly sensitive to moisture in the air – on humid days above 60% humidity, the sugar absorbs water and the cookies stay tacky no matter how long they cool.
I tested baking the same batch on a dry day versus a rainy day and the difference was dramatic. The rainy-day batch never fully crisped up even after an extra 20 minutes in the oven.
The fix is to bake on low-humidity days when possible. If you live somewhere consistently humid, adding an extra tablespoon of cornstarch to the meringue helps absorb excess moisture and improves crispness.
Also double-check your oven temperature with a thermometer – many home ovens run 15-25°F hotter or cooler than the dial shows, and even 10 degrees too high can cause surface cracking and sticky centers.
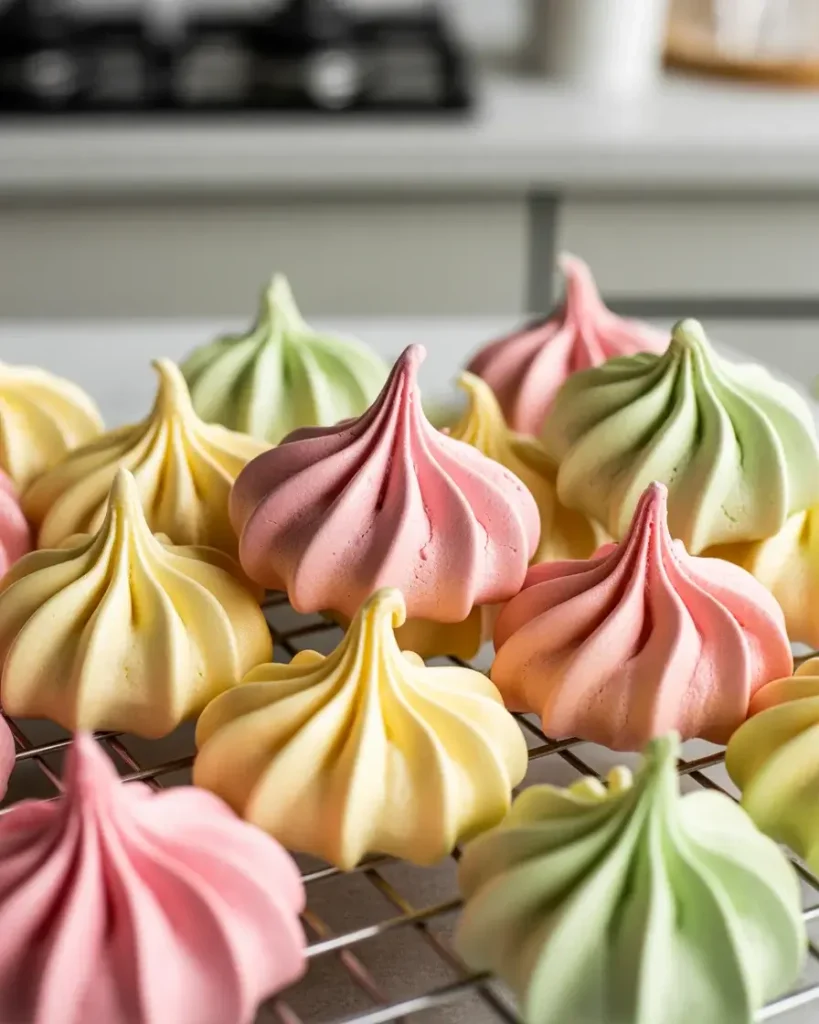
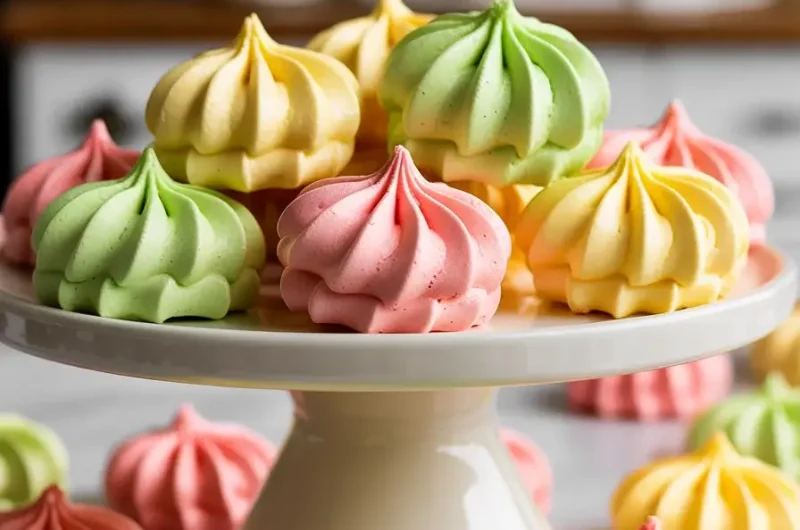
What Flavors of Jello Work Best for Meringue Cookies?
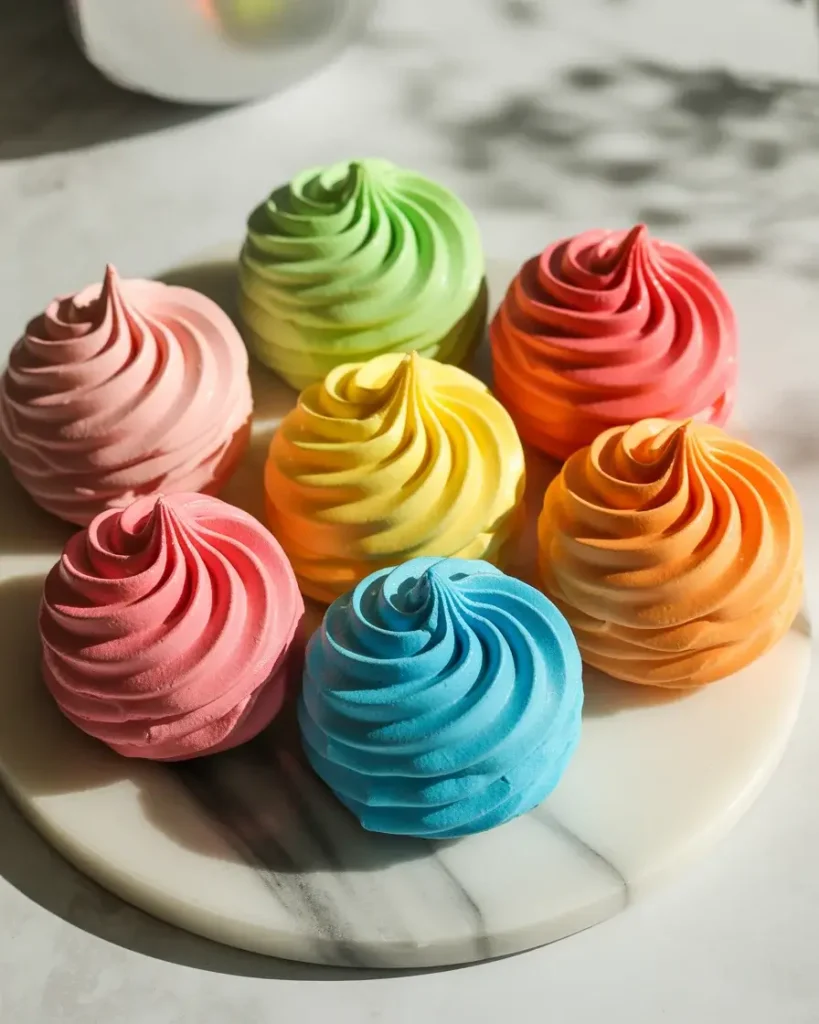
Any flavored gelatin powder works beautifully, but I have strong favorites after testing over a dozen varieties. Strawberry, raspberry, and cherry give the most vibrant color and flavor. Lime and lemon add a pleasant tartness that balances the sweetness well.
I avoid grape and orange – grape tends to turn a muddy brownish-purple when baked, and orange can taste slightly artificial at the 3-tablespoon quantity needed for good color.
Blue raspberry is a crowd favorite for kids’ parties because the color is so dramatic and unexpected. For a subtle, elegant look, try peach or watermelon jello – they give soft pastel colors perfect for baby showers or spring gatherings.
One testing discovery: using sugar-free jello creates cookies that spread more and have a slightly less stable structure. I recommend sticking with regular jello for the best results every time.
Can You Make Jello Meringue Cookies Ahead of Time?
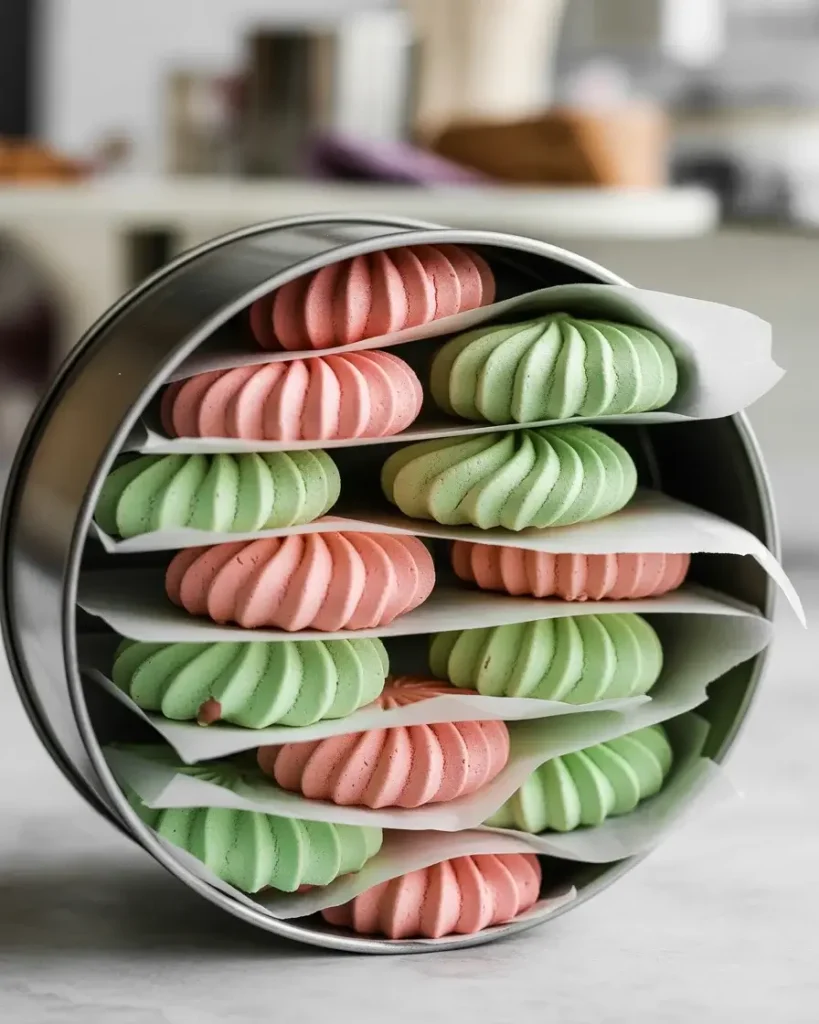
Yes, and they actually hold up beautifully when made in advance. I regularly bake these 3-4 days before an event with zero quality loss. The key is airtight storage away from any moisture.
Layer the cookies between sheets of parchment paper inside an airtight container. Keep them at room temperature – never refrigerate or freeze meringue cookies.
After 30+ batches, I found cookies stored in a sealed tin stayed crisper longer than those in plastic containers, likely because metal tins seal more tightly. For parties, I often bake on Wednesday for a Saturday event with perfect results.
Avoid storing near the stove, dishwasher, or sink where steam and heat can degrade them. A cool, dry pantry shelf is ideal for keeping that crispy texture intact through the week.
How Do You Get Tall, Defined Swirls That Don’t Flatten?
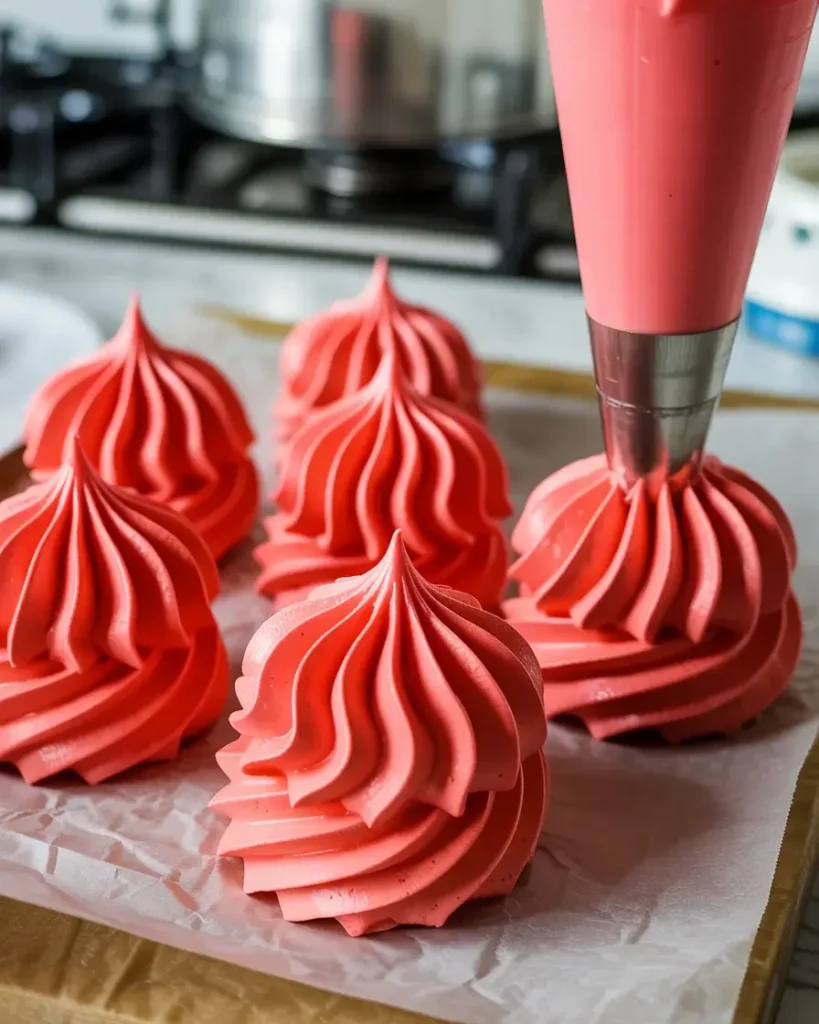
The height and definition of your swirls comes down to peak stiffness and piping technique. Your meringue must reach true stiff peaks – when you pull the whisk straight up, the peak should stand completely upright with no curl at the tip.
I ruined the presentation on my first three batches because I piped at medium-stiff peaks thinking it was close enough. The rosettes spread and lost their ridges entirely within 10 minutes of piping.
Use a large open star tip (1M or 2D) for the best definition. Hold the piping bag straight up, apply steady pressure, and pull straight up sharply at the end. Practice on a spare piece of parchment first – it takes just 4-5 tries to get the motion right.
Chilling your piped meringue in the fridge for 10 minutes before baking is something I tested on batch 18 – it had zero positive effect and actually introduced humidity. Skip that tip you might see elsewhere and go straight from piping bag to oven.
Frequently Asked Questions
Q: Can I use liquid food coloring instead of jello powder for color?
A: Liquid food coloring adds color but not flavor or structure. Jello powder contributes sugar and gelatin that actually improve meringue stability. For best results, stick with jello powder rather than substituting coloring alone.
Q: Why did my meringue cookies crack on top?
A: Cracking usually means your oven was too hot or temperature changed too quickly. Bake at exactly 225°F and never open the oven door during baking. A consistent low temperature prevents the rapid moisture loss that causes surface cracks.
Q: Can I make these without a piping bag?
A: Yes – use two spoons to drop mounds onto the parchment. They won’t have defined ridges but will taste identical. A zip-lock bag with a small corner snipped off also works as a basic piping bag in a pinch.