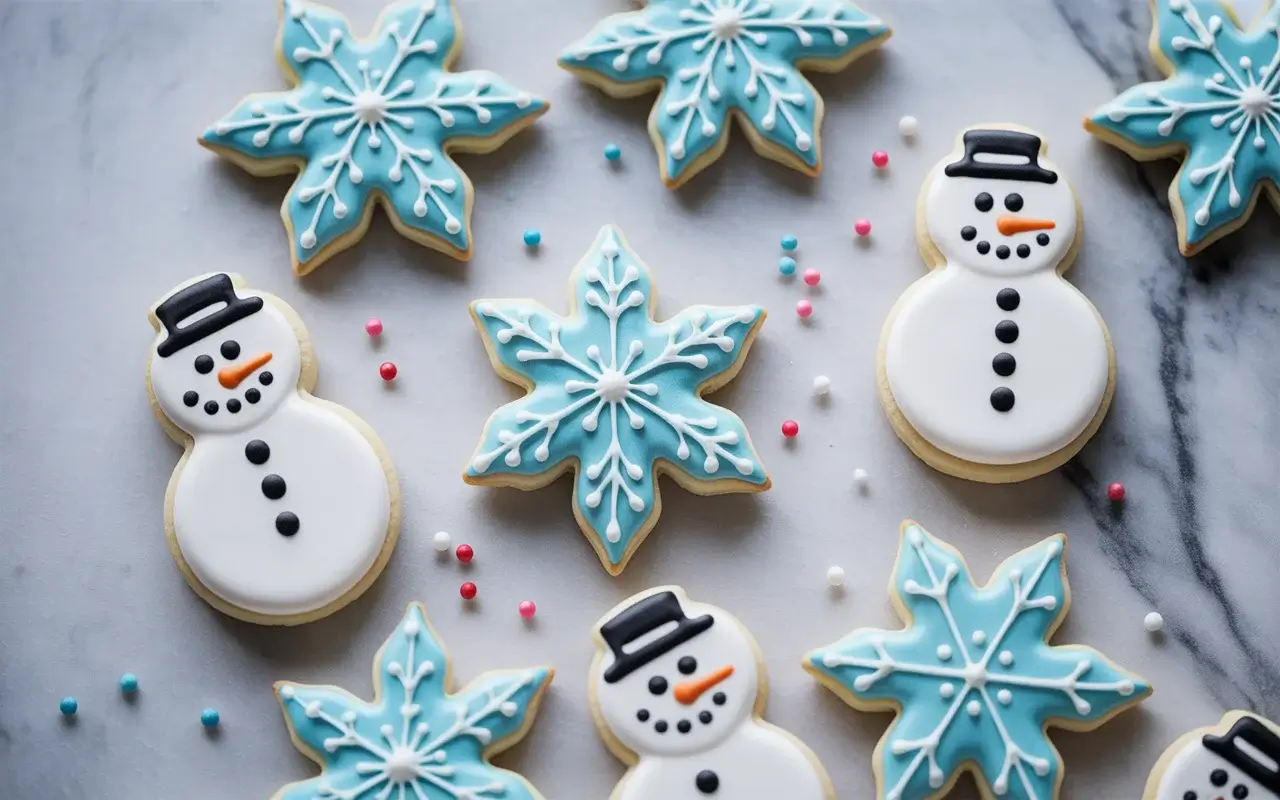
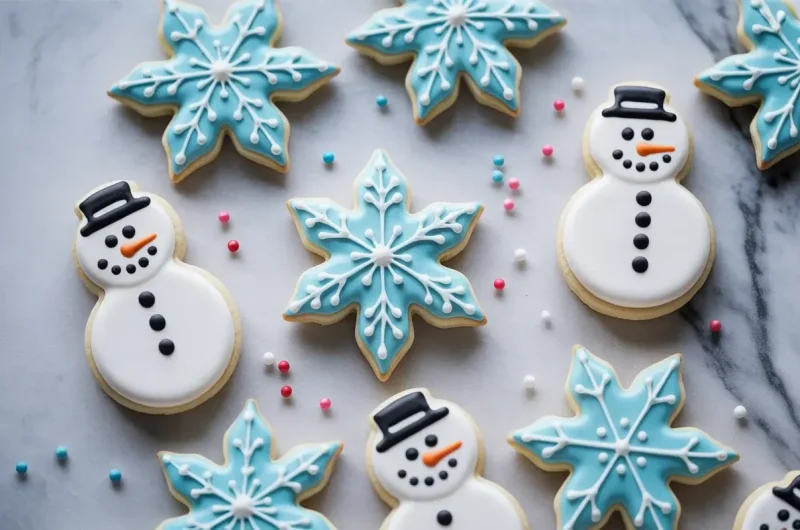
Snowman Snowflake Cookies
These adorable snowman snowflake cookies are the perfect holiday treat to bake with kids or bring to a winter party. Decorated with royal icing and candy details, they’re as fun to make as they are to eat.
Soft, buttery sugar cookies are cut into snowflake shapes and transformed into charming little snowmen. The best part? You can customize each one with different faces and accessories for a truly unique cookie platter.
Why You’ll Love This Recipe

These cookies combine two winter favorites snowmen and snowflakes into one delightful treat. The sugar cookie base holds its shape beautifully during baking, making decorating easy and stress-free.
They’re perfect for cookie exchanges, classroom parties, or cozy baking sessions at home. Plus, the decorating process is so simple that even beginner bakers can create impressive results.
Make them ahead and store in an airtight container for up to a week. They also freeze beautifully, so you can prep early for holiday gatherings.
Read More: Peppermint Chip Biscotti
Ingredients You’ll Need

The cookie dough uses pantry staples you likely already have on hand. All-purpose flour creates the perfect tender texture, while butter adds rich flavor.
For decorating, you’ll need royal icing (or store-bought works too), food coloring, and simple candies. Mini chocolate chips make perfect eyes, and orange sprinkles work great for carrot noses.
Don’t skip the almond extract in the dough it adds a subtle depth that makes these cookies extra special.
How to Make Snowman Snowflake Cookies
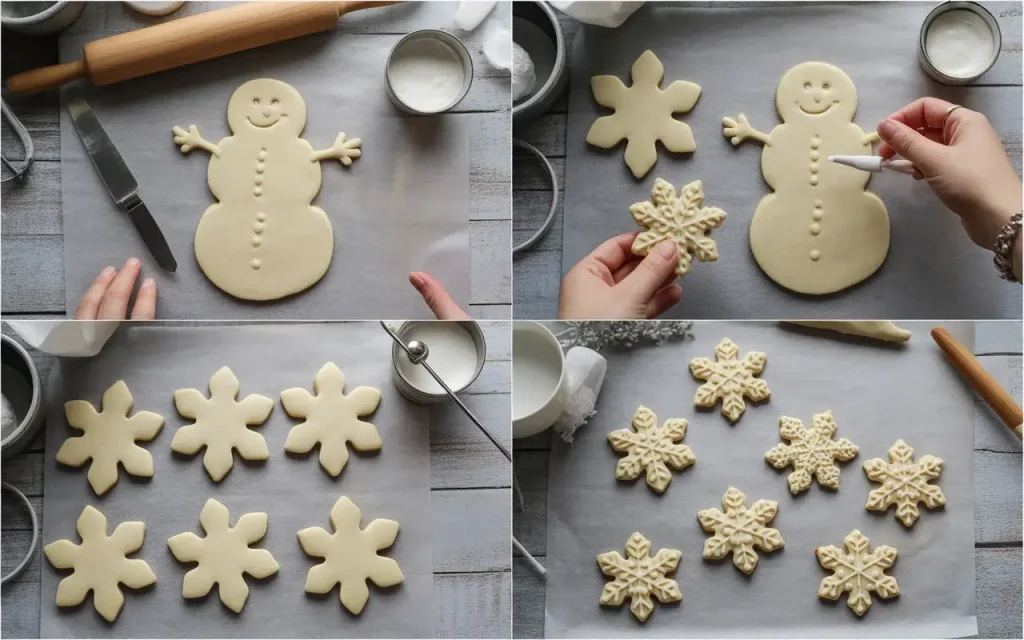
Start by making your sugar cookie dough and chilling it for at least an hour. This prevents spreading and makes rolling much easier.
Roll the dough to ¼-inch thickness and cut out snowflake shapes. Bake until edges just barely start to turn golden, then cool completely before decorating.
Use white royal icing as your base, then add faces and details once it’s set. Get creative with scarves, hats, and expressions to give each snowman personality.
Snowman Snowflake Cookies
Course: DessertCuisine: AmericanDifficulty: Easy24
cookies30
1
hour10
1
hour40
minutesDelightful sugar cookies shaped like snowflakes and decorated as adorable snowmen. Perfect for holiday baking with kids.
Ingredients
- For the Sugar Cookies
3 cups all-purpose flour
1½ teaspoons baking powder
½ teaspoon salt
1 cup unsalted butter, softened
1 cup granulated sugar
1 large egg
2 teaspoons vanilla extract
½ teaspoon almond extract
- For Decorating
2 cups royal icing (or store-bought white icing)
Blue food coloring
Mini chocolate chips (for eyes)
Orange sprinkles or small candies (for noses)
Pretzel sticks (optional, for arms)
Colored sprinkles (for scarves and decorations)
Directions
- Make the dough
- In a medium bowl, whisk together flour, baking powder, and salt. In a large bowl, beat butter and sugar until light and fluffy, about 3 minutes.
- Combine wet ingredients
- Beat in egg, vanilla, and almond extract until well combined. Gradually add dry ingredients, mixing until just combined.
- Chill the dough
- Divide dough in half, flatten into disks, wrap in plastic, and refrigerate for at least 1 hour or up to overnight.
- Preheat and roll
- Preheat oven to 350°F (175°C). Line baking sheets with parchment paper. Roll dough to ¼-inch thickness on a floured surface.
- Cut and bake
- Cut out snowflake shapes and place on prepared baking sheets 2 inches apart. Bake for 9–11 minutes until edges just start to turn golden. Cool on pan for 5 minutes, then transfer to wire rack.
- Decorate
- Once completely cool, pipe white royal icing to cover each snowflake. Let set for 30 minutes.
- Add details
- Add mini chocolate chips for eyes, orange sprinkles for noses, and pipe blue icing for scarves. Use colored sprinkles for buttons and other decorations. Let dry completely before serving.
Notes
- Make ahead: Unbaked dough can be frozen for up to 3 months. Baked cookies store in an airtight container for up to 1 week.
Royal icing substitute: Store-bought white icing works well if you’re short on time.
Consistency tip: For royal icing, aim for a thick but pipeable consistency—it should hold its shape but still be spreadable.
Variety: Try different snowflake cookie cutters in various sizes for a more dimensional cookie display.
Nutrition Information (Per Cookie)
| Nutrient | Amount |
|---|---|
| Calories | 165 |
| Total Fat | 7g |
| Sugars | 14g |
| Protein | 2g |
Decorating Tips
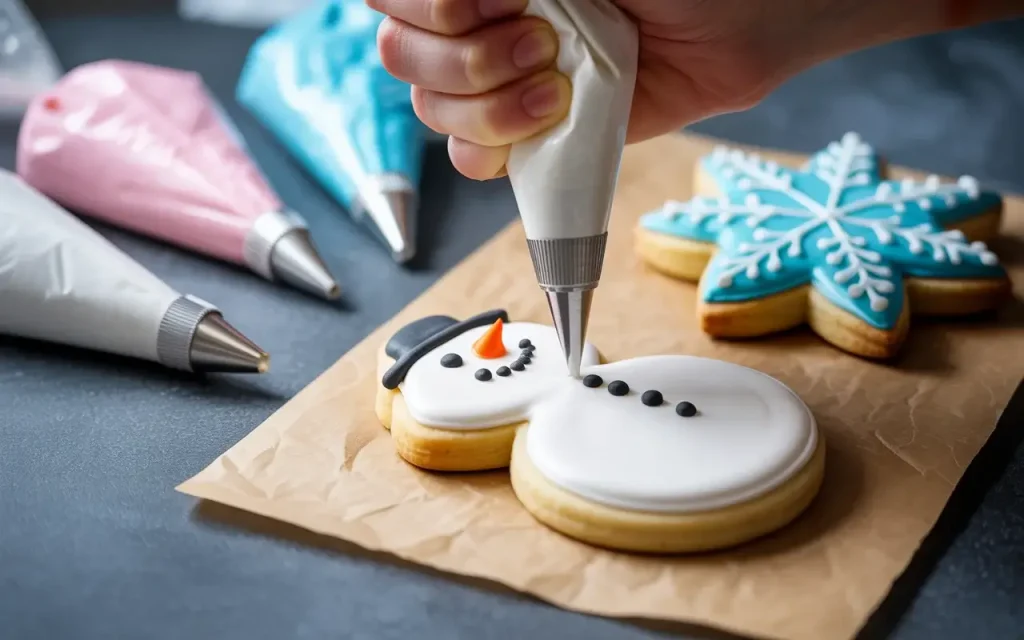
Royal icing is your best friend for these cookies because it dries hard and smooth. Prepare it to a medium consistency not too runny, not too stiff.
Work in stages: flood the base white first, let it dry, then add details. This prevents colors from bleeding together and gives you cleaner lines.
Use toothpicks to adjust placement of candies before the icing sets. Press mini chocolate chips gently into the wet icing for eyes that stay put.
Storage and Freezing

Store decorated cookies in a single layer in an airtight container at room temperature. They’ll stay fresh for up to one week.
For longer storage, freeze undecorated baked cookies for up to 3 months. Thaw at room temperature before decorating.
You can also freeze the raw cookie dough disks wrapped tightly in plastic wrap and foil. Thaw overnight in the refrigerator before rolling and cutting.
Frequently Asked Questions
Can I use regular frosting instead of royal icing?
Yes, but regular buttercream won’t dry as hard. It works fine if you’re serving the cookies immediately, but they won’t stack or package as neatly as those decorated with royal icing.
How do I prevent my cookies from spreading?
Make sure your dough is well-chilled before cutting and baking. Don’t skip the refrigeration time, and if your kitchen is warm, pop the cut cookies in the fridge for 10 minutes before baking.
Can I make these gluten-free?
Absolutely! Use a 1:1 gluten-free baking flour blend in place of all-purpose flour. The texture will be slightly different but still delicious. You may need to add 1-2 extra tablespoons of flour if the dough seems too sticky.