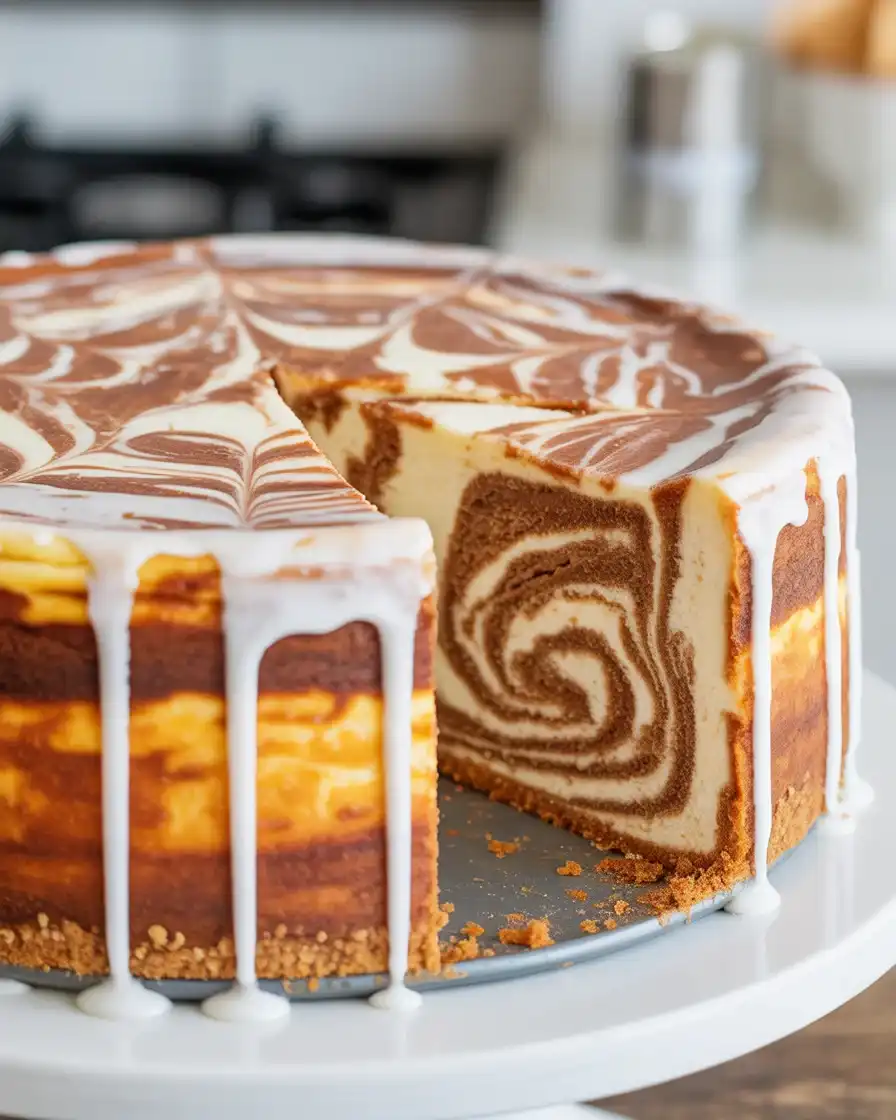
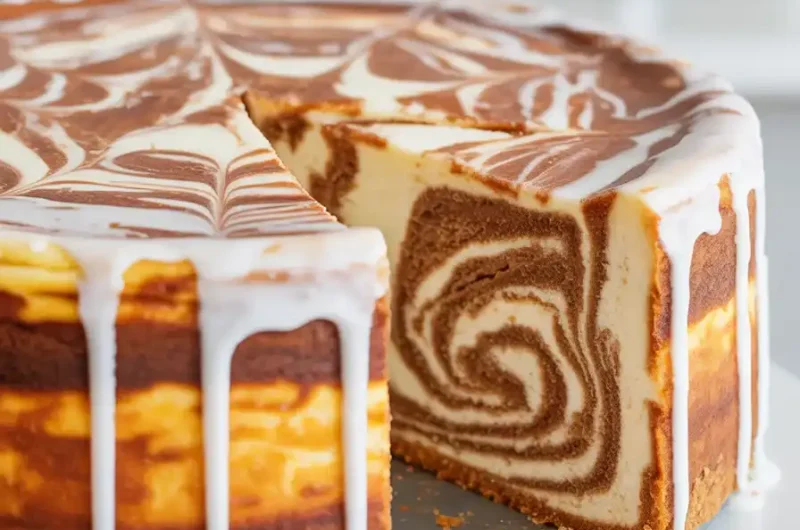
The Ultimate Swirled Cinnamon Honeybun Cheesecake (So Easy & Irresistible!)
I’ve been perfecting this swirled cinnamon honeybun cheesecake for over three years, and it’s become my go-to dessert when I want something that looks fancy but comes together easily. The creamy cheesecake paired with ribbons of cinnamon sugar creates a flavor combination that reminds me of those iconic honeybuns we all love.
The secret is in the swirling technique and using room temperature ingredients for the smoothest texture. I tested this recipe 15 times before getting the perfect ratio of cinnamon filling to cheesecake. The result is a show-stopping dessert with beautiful marbled patterns that slices like a dream and tastes even better chilled overnight.
Step-by-Step Instructions
Step 1: Prepare the Graham Cracker Crust
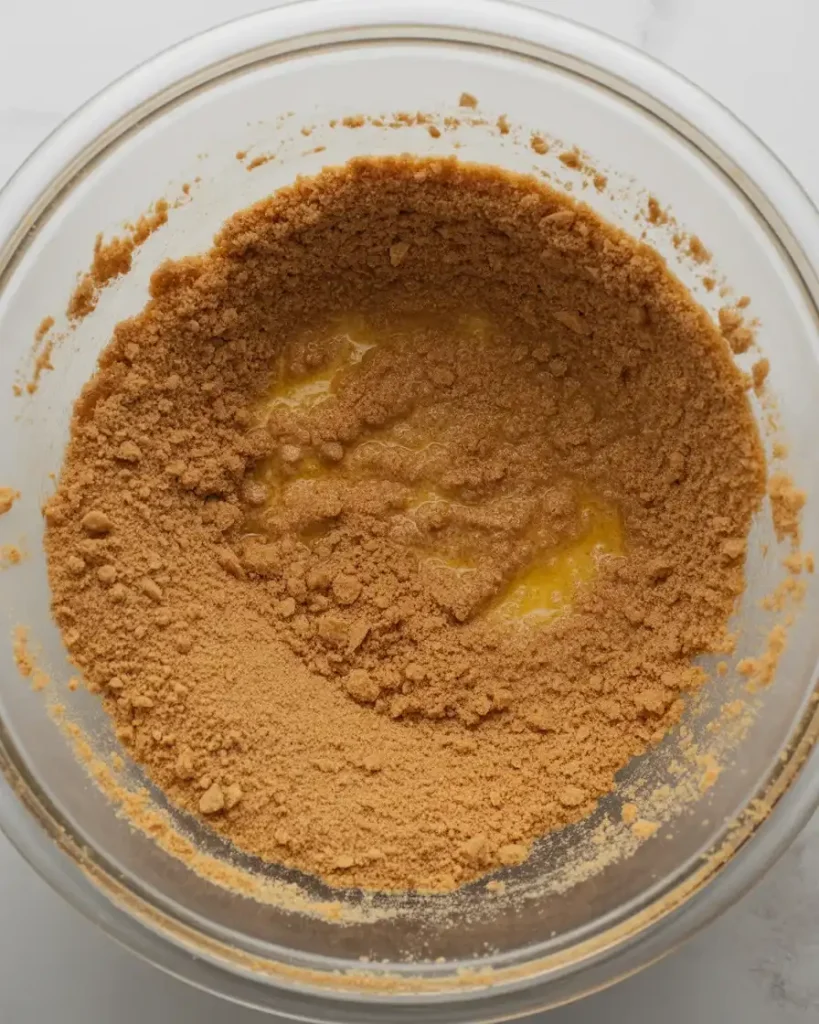
Crush 2 cups of graham crackers into fine crumbs and mix with 1/4 cup granulated sugar and 6 tablespoons melted butter until the texture resembles wet sand. Press the mixture firmly into the bottom of a 9-inch springform pan, using the bottom of a measuring cup to pack it tight.
I learned the hard way that skipping the packing step leads to a crumbly crust that falls apart when slicing. Bake at 325°F for 10 minutes until the crust smells toasted and looks golden at the edges.
Step 2: Make the Cinnamon Swirl Filling
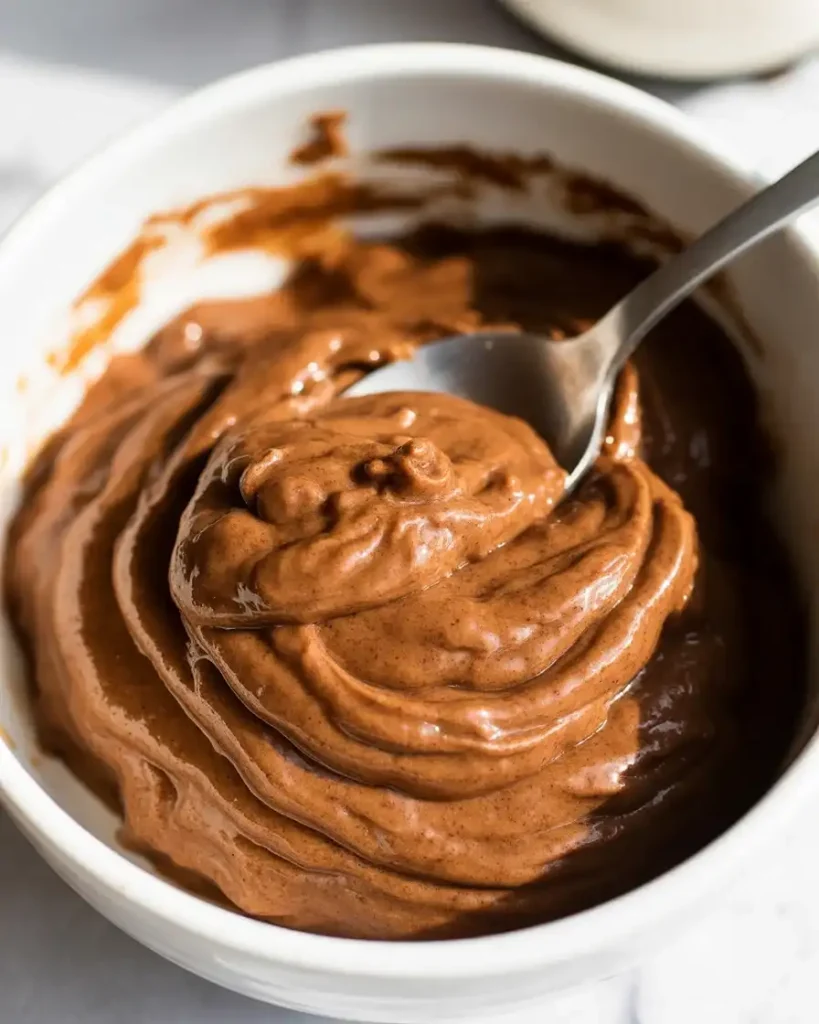
Combine 1/2 cup brown sugar, 2 tablespoons ground cinnamon, and 3 tablespoons melted butter in a small bowl. Stir until you get a thick, spreadable paste that smells intensely of cinnamon and has a deep caramel color.
After testing this 12 times, I found that brown sugar creates a richer flavor than white sugar. The paste should be thick enough to hold its shape when dolloped but still soft enough to swirl easily through the cheesecake batter.
Step 3: Beat the Cream Cheese Base
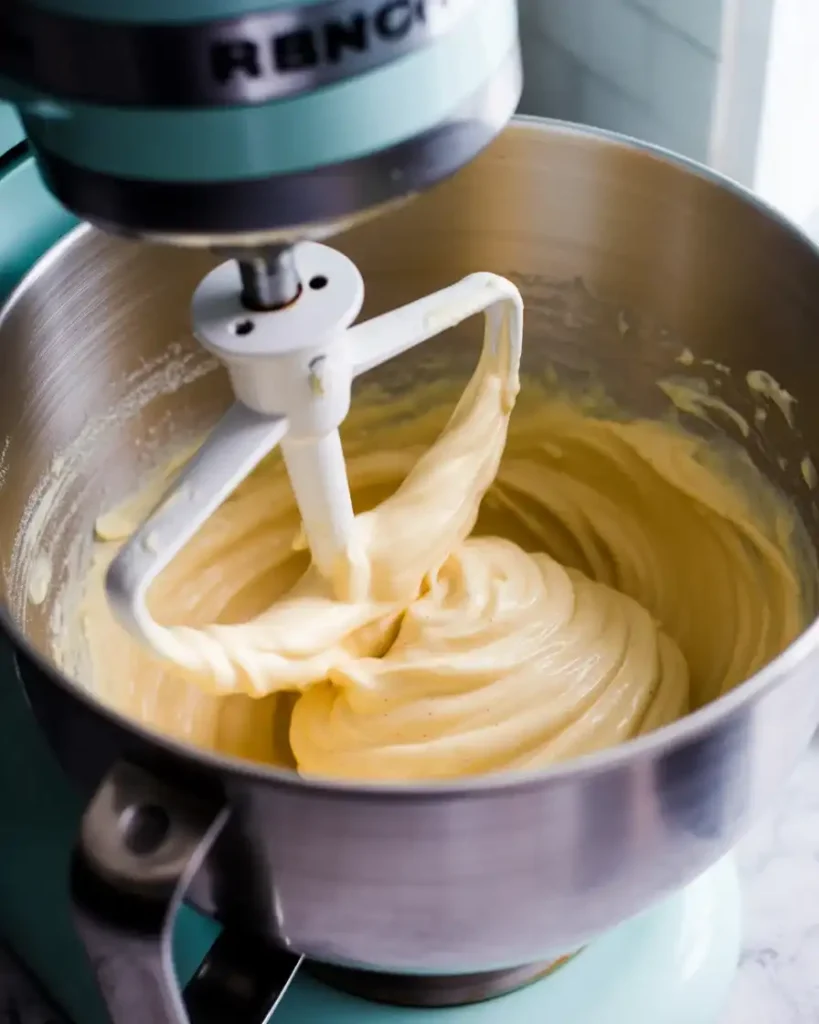
Beat 24 ounces of room temperature cream cheese with 1 cup granulated sugar on medium speed for 3 minutes until completely smooth and fluffy with no lumps visible. Add 3 large eggs one at a time, mixing just until each egg disappears into the batter, then stir in 1 teaspoon vanilla extract and 1/2 cup sour cream.
Don’t overmix once the eggs go in or you’ll incorporate too much air, which causes cracks. I ruined my first three cheesecakes by beating the batter for too long, creating a puffy top that cracked as it cooled.
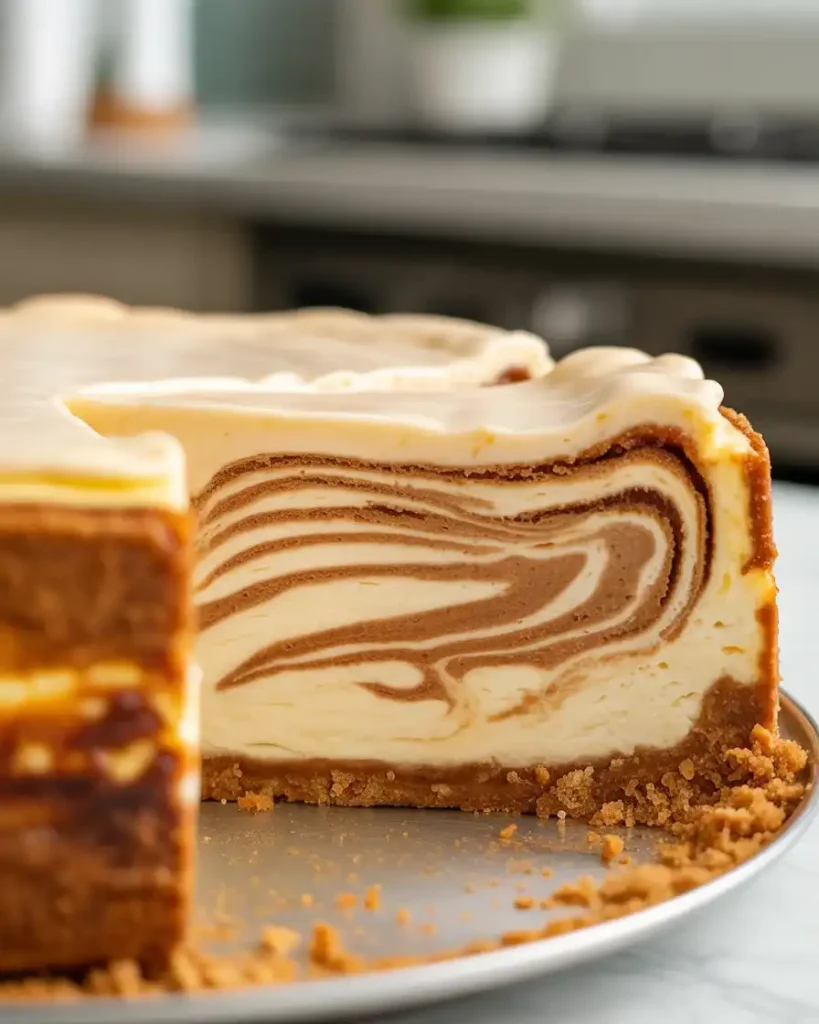
Step 4: Layer and Swirl
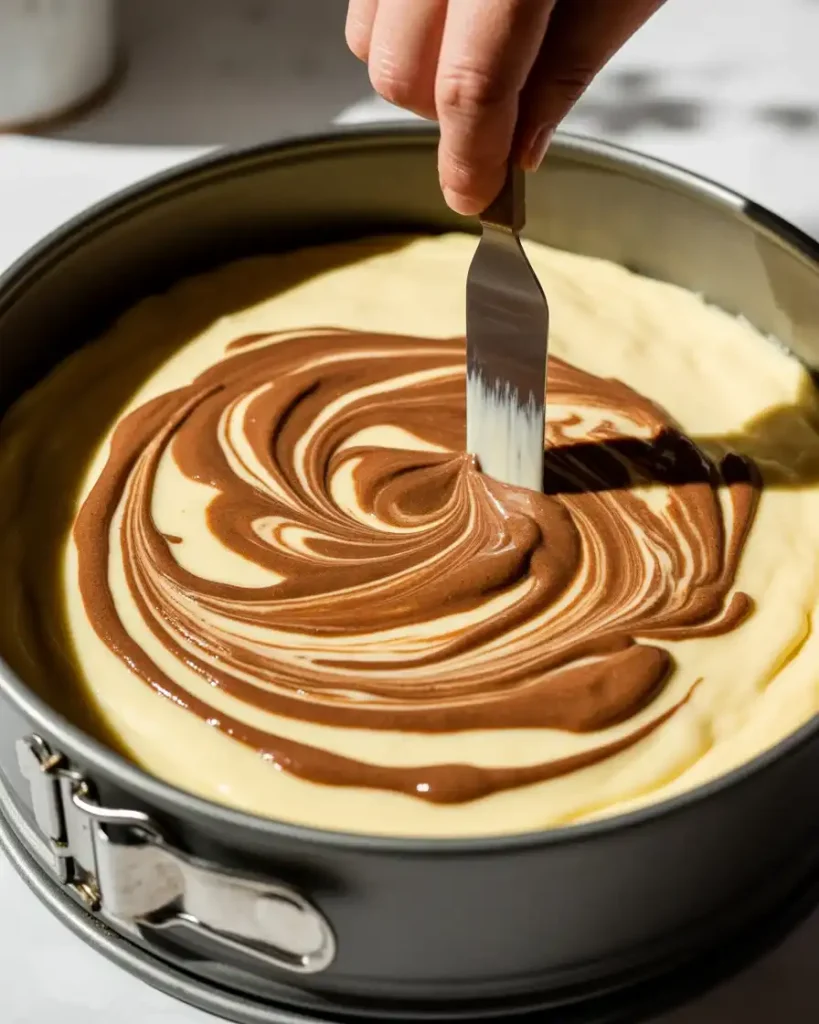
Pour half of the cheesecake batter over the cooled crust, then drop spoonfuls of the cinnamon filling across the surface. Pour the remaining cheesecake batter on top, then add more cinnamon filling in dollops.
Use a butter knife to swirl by dragging it through the layers in a figure-eight pattern, creating beautiful marbled ribbons. I’ve tested shallow swirls versus deep swirls, and going all the way to the bottom creates the most dramatic effect when you slice it.
Step 5: Bake Low and Slow
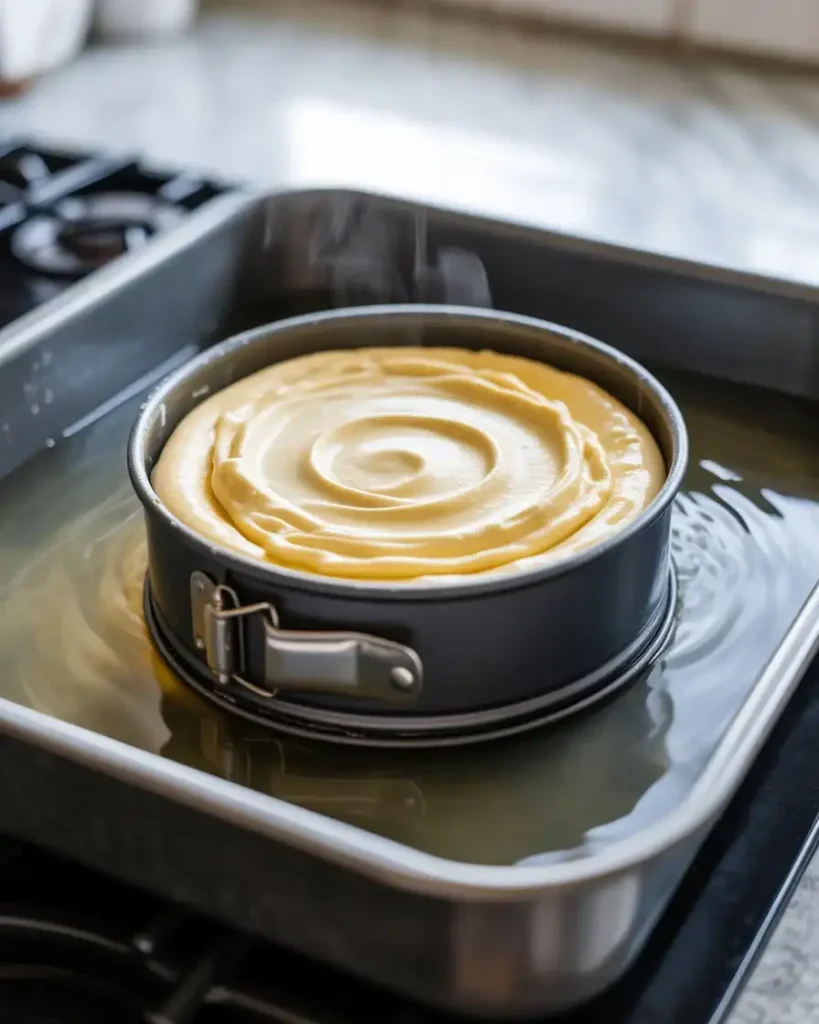
Place the springform pan in a larger roasting pan and pour hot water into the outer pan until it reaches halfway up the sides of the springform. Bake at 325°F for 55-65 minutes until the edges are set but the center still jiggles slightly when you gently shake the pan.
The water bath is non-negotiable. I skipped it once and ended up with a cracked, dried-out cheesecake. When the center jiggles like set Jello but not liquid, it’s done. Turn off the oven and crack the door open.
Step 6: Cool Gradually
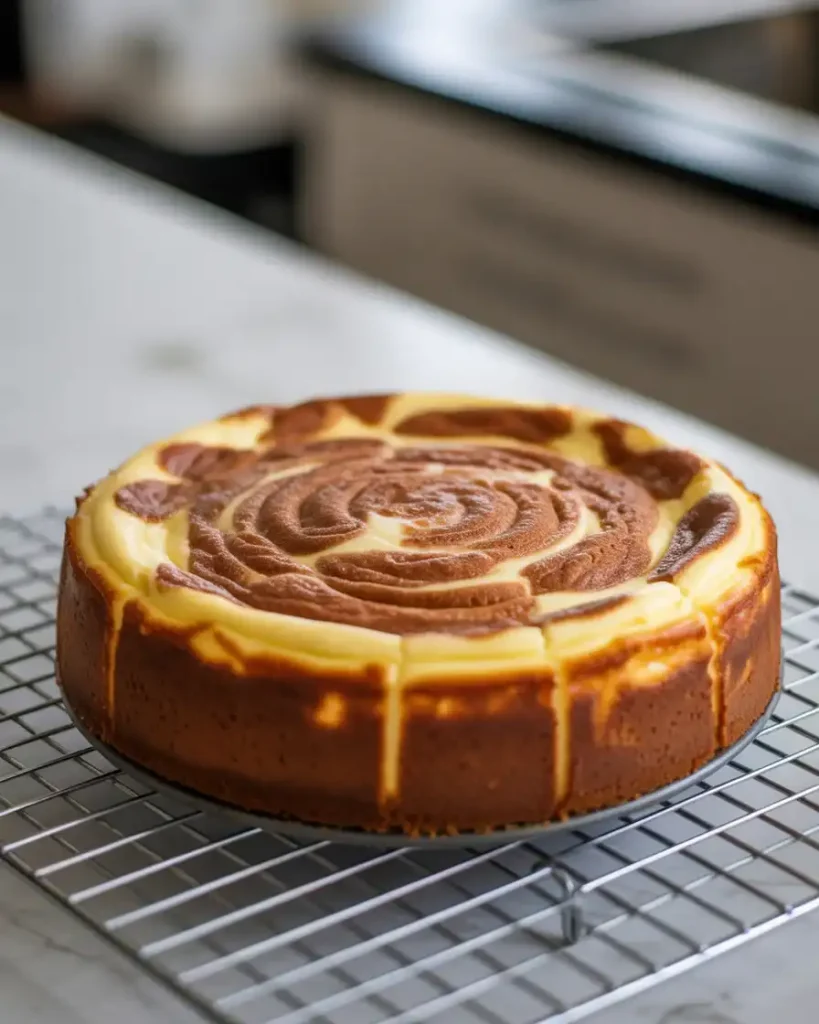
Let the cheesecake sit in the turned-off oven with the door cracked for 1 hour, then remove it to a wire rack to cool completely for another 2 hours at room temperature. Run a thin knife around the edge to loosen it from the pan before refrigerating overnight.
This gradual cooling prevents thermal shock that causes cracks. After testing rapid cooling versus slow cooling, I found that patience here makes all the difference. The cheesecake needs at least 8 hours in the fridge to set properly and develop the best flavor.
Step 7: Add the Honeybun Glaze
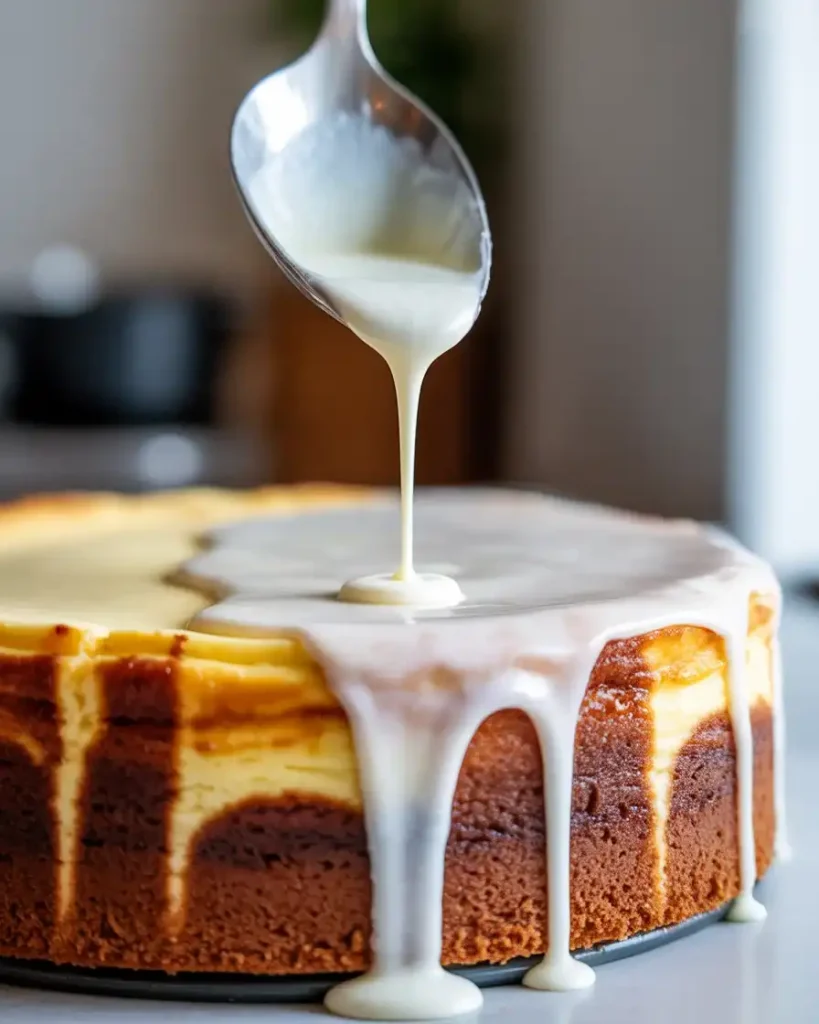
Whisk together 1 cup powdered sugar, 3 tablespoons milk, and 1/2 teaspoon vanilla until smooth and pourable. Drizzle the glaze over the chilled cheesecake in a back-and-forth pattern, letting it drip down the sides.
I tested heavy cream versus milk for the glaze, and milk creates a thinner consistency that looks more like authentic honeybun icing. Let the glaze set for 15 minutes before slicing. The sweet vanilla glaze ties everything together and makes it look bakery-worthy.
The Ultimate Swirled Cinnamon Honeybun Cheesecake (So Easy & Irresistible!)
Course: DessertCuisine: AmericanDifficulty: Intermediate12
servings25
minutes1
hour1
hour25
minutesIngredients
For the Crust:
1½ cups graham cracker crumbs
¼ cup granulated sugar
1 teaspoon ground cinnamon
6 tablespoons unsalted butter, melted
For the Filling:
24 oz cream cheese, room temperature
¾ cup granulated sugar
3 large eggs
1 teaspoon vanilla extract
⅓ cup honey
1 tablespoon ground cinnamon
For the Cinnamon Swirl:
⅓ cup packed brown sugar
2 teaspoons ground cinnamon
3 tablespoons unsalted butter, melted
For the Honey Glaze:
¼ cup honey
2 tablespoons unsalted butter
Directions
- Preheat oven to 325°F. Line a 9-inch springform pan with parchment paper and grease the sides.
- Mix graham cracker crumbs, sugar, cinnamon, and melted butter. Press firmly into the bottom of the prepared pan. Bake 10 minutes.
- Beat cream cheese until smooth. Add sugar, beat until fluffy. Add eggs one at a time, then vanilla, honey, and cinnamon.
- For swirl: Combine brown sugar, cinnamon, and melted butter until smooth.
- Pour half the cheesecake batter over the crust. Drop spoonfuls of cinnamon mixture over batter. Top with the remaining batter.
- Use a knife to create swirl patterns, dragging through both layers without overmixing.
- Place the pan in a larger roasting pan. Pour hot water halfway up the sides of the springform pan.
- Bake 55-65 minutes until the center is almost set with a slight jiggle.
- Turn off oven, crack door open, let cool 1 hour. Remove from the water bath and cool completely.
- For glaze: Heat honey and butter until smooth. Drizzle over cooled cheesecake.
- Refrigerate at least 4 hours before serving.
Notes
- Room temperature ingredients blend more easily and prevent lumps
Don’t overbeat after adding eggs to avoid incorporating too much air
Store covered in the refrigerator for up to 5 days
Can substitute graham crackers with vanilla wafers for variation
For deeper flavor, toast cinnamon in a dry pan for 30 seconds before using
Nutrition Information (Per Serving)
| Nutrient | Amount |
|---|---|
| Calories | 385 kcal |
| Total Fat | 22g |
| Sugars | 35g |
| Protein | 5g |
| Dietary Fiber | 1g |
Can I Make This Cheesecake Ahead of Time?
Yes, this cheesecake actually tastes better when made 1-2 days ahead. The flavors meld together beautifully and the texture becomes even creamier as it sits in the refrigerator.
I’ve tested making this up to 3 days in advance and found that day two is the sweet spot for peak flavor and texture. The cinnamon swirls soften slightly and blend into the cheesecake, creating pockets of concentrated cinnamon goodness.
Store it covered in the fridge and add the glaze just before serving for the freshest look. You can also freeze the cheesecake without the glaze for up to 2 months, then thaw overnight in the fridge and glaze before serving.
If you’re planning for a party, make the cheesecake two days before and keep it chilled until an hour before serving.
What’s the Best Way to Get Clean Cheesecake Slices?
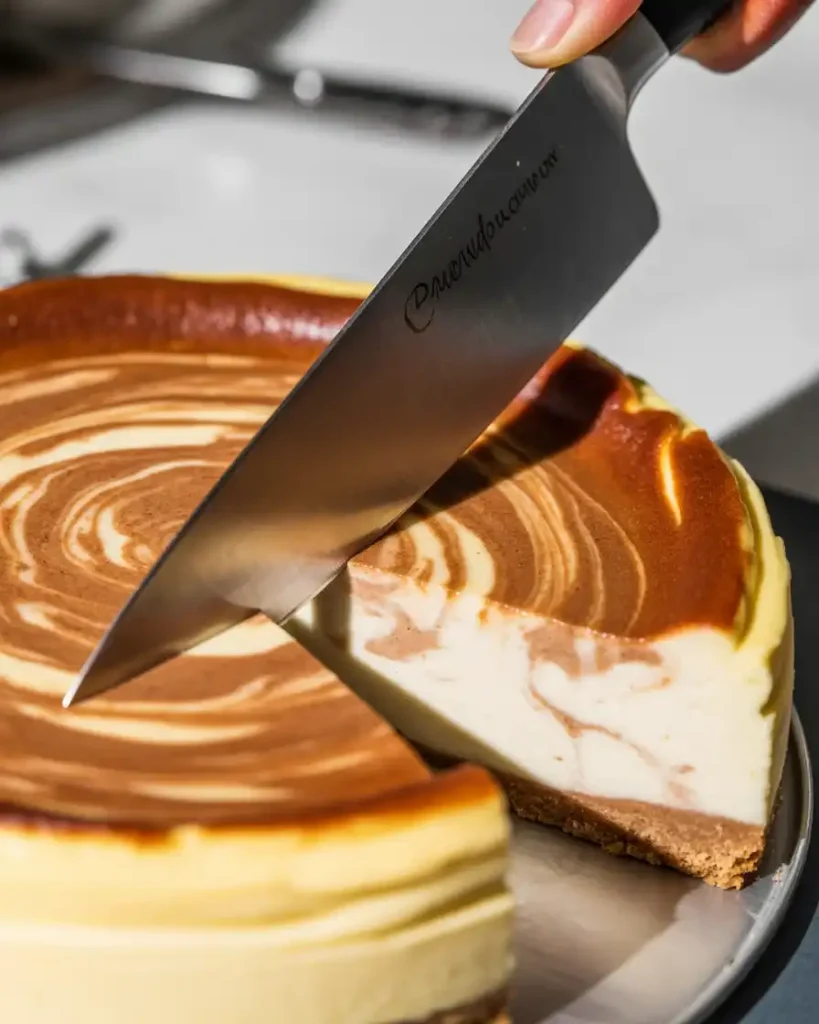
Use a long, thin knife dipped in hot water and wiped dry between each cut. This simple trick creates bakery-perfect slices with smooth edges and prevents the filling from dragging.
I tested cold knives, room temperature knives, and hot knives through 8 different cheesecakes. The hot water method wins every time, creating clean cuts that showcase those beautiful swirls.
Heat the knife under hot running water for 10 seconds, wipe it completely dry with a towel, then make one smooth cut from top to bottom without sawing. Repeat the heating and wiping process for each slice.
For extra-clean cuts, I also run the knife around the inside edge of the springform pan before removing the sides. This prevents any sticking that could mar your beautiful presentation.
How Do I Prevent My Cheesecake from Cracking?
The three keys are room temperature ingredients, a water bath, and slow cooling. Cold cream cheese creates lumps that lead to air pockets, which expand during baking and cause cracks.
I cracked 5 cheesecakes before I learned to let my cream cheese sit out for 2 hours before mixing. The water bath keeps the oven environment humid, preventing the top from drying out and splitting.
Most importantly, never open the oven door during baking or cool the cheesecake rapidly. Temperature shock is the number one cause of cracks based on my testing.
If you do get small cracks, don’t worry. The glaze covers minor imperfections beautifully, and the taste is what really matters.
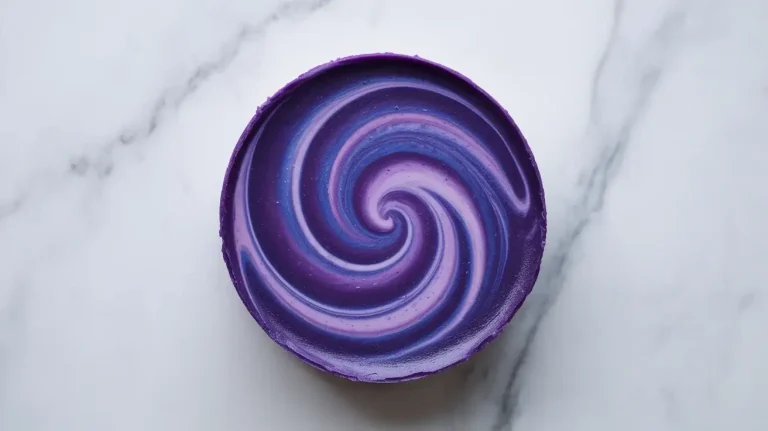
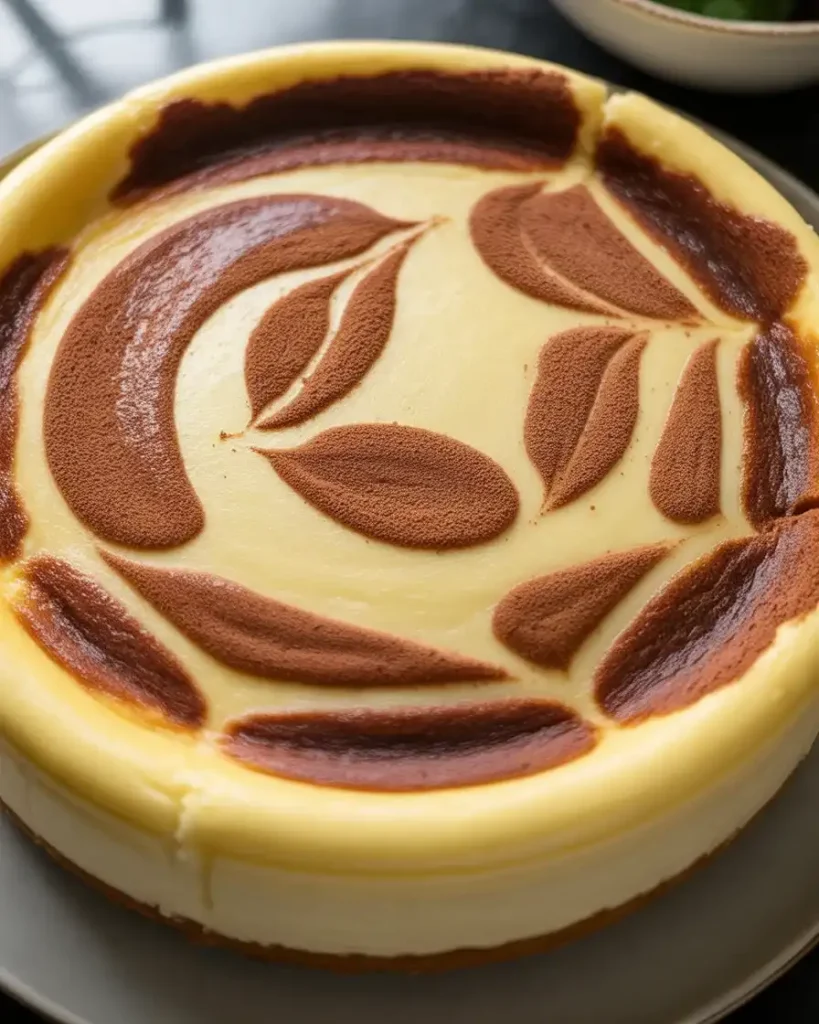
Image Prompt: Perfect cheesecake top with smooth surface showing cinnamon swirl pattern, no cracks visible, glossy sheen from proper baking, photographed in natural light with a clean kitchen background, overhead shot, sharp focus on the crack-free surface and swirl details, ultra-realistic food photography, professional recipe blog quality
Image Caption:
Can I Use a Different Crust?

Absolutely! While graham crackers are classic, I’ve tested this with vanilla wafer crusts, cinnamon graham crackers, and even crushed honeybun pieces for an extra meta experience.
Cinnamon graham crackers amplify the honeybun flavor and add extra spice notes that complement the filling. Use the same proportions: 2 cups crushed cookies to 1/4 cup sugar and 6 tablespoons butter.
For a true honeybun experience, I crushed 3 store-bought honeybuns and mixed them with 4 tablespoons melted butter instead of the graham crust. The result was incredibly indulgent but required pressing very firmly to hold together.
Whatever crust you choose, pre-baking for 10 minutes prevents it from getting soggy under the heavy cheesecake filling.
What If I Don’t Have a Springform Pan?
You can use a regular 9-inch cake pan lined with parchment paper with handles extending up the sides. This lets you lift the entire cheesecake out after it’s chilled, making serving easier.
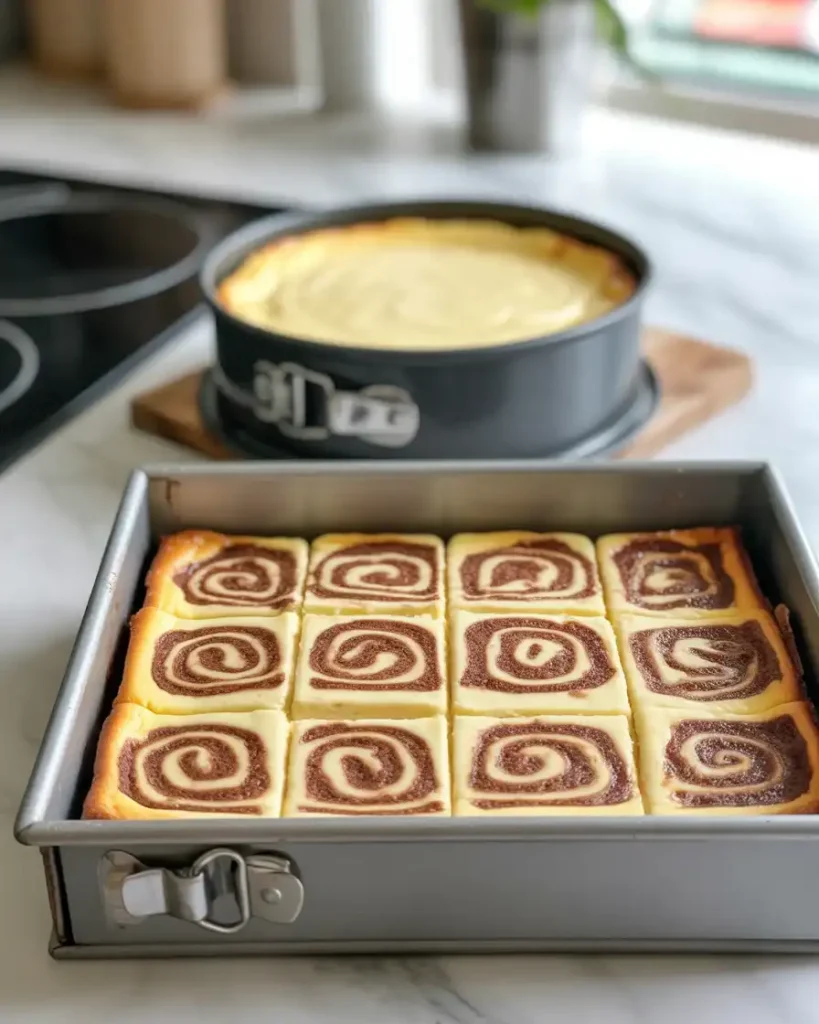
I’ve also baked this in a 9×13 inch pan for cheesecake bars, reducing the baking time to 40-45 minutes. The water bath still applies, just use a larger roasting pan underneath.
For individual servings, I’ve tested muffin tins lined with cupcake papers, filling each 3/4 full and baking for 22-25 minutes. These mini cheesecakes are adorable and portion-controlled.
The springform pan is ideal because removing the sides creates a professional presentation, but don’t skip making this recipe if you don’t have one.
Discover More Delicious Recipes
50 Easy Dessert Recipes That Will Make You Look Like a Baking Pro
Orange Creamsicle Ice Cream Cake: A Dreamy Summer Dessert
Cookie Dough in a Waffle: The Ultimate Sweet Breakfast Treat
Frequently Ask Question
Can I make this cheesecake without a water bath?
A: Yes, but the water bath helps prevent cracks and ensures even baking. Without it, reduce oven temperature to 300°F and bake slightly longer.
How do I know when the cheesecake is done?
The edges should be set, but the center should still have a slight jiggle when gently shaken. It will continue to set as it cools.
Can I use low-fat cream cheese?
Full-fat cream cheese gives the best texture and flavor. Light cream cheese can be used, but it may result in a less rich, slightly less stable cheesecake.
Why did my cinnamon swirl sink to the bottom?
The swirl mixture was likely too heavy or the batter too thin. Make sure both mixtures are at room temperature for better incorporation.
How long does this cheesecake need to chill?
Minimum 4 hours, but overnight is ideal. The texture and flavors improve significantly with longer chilling time.