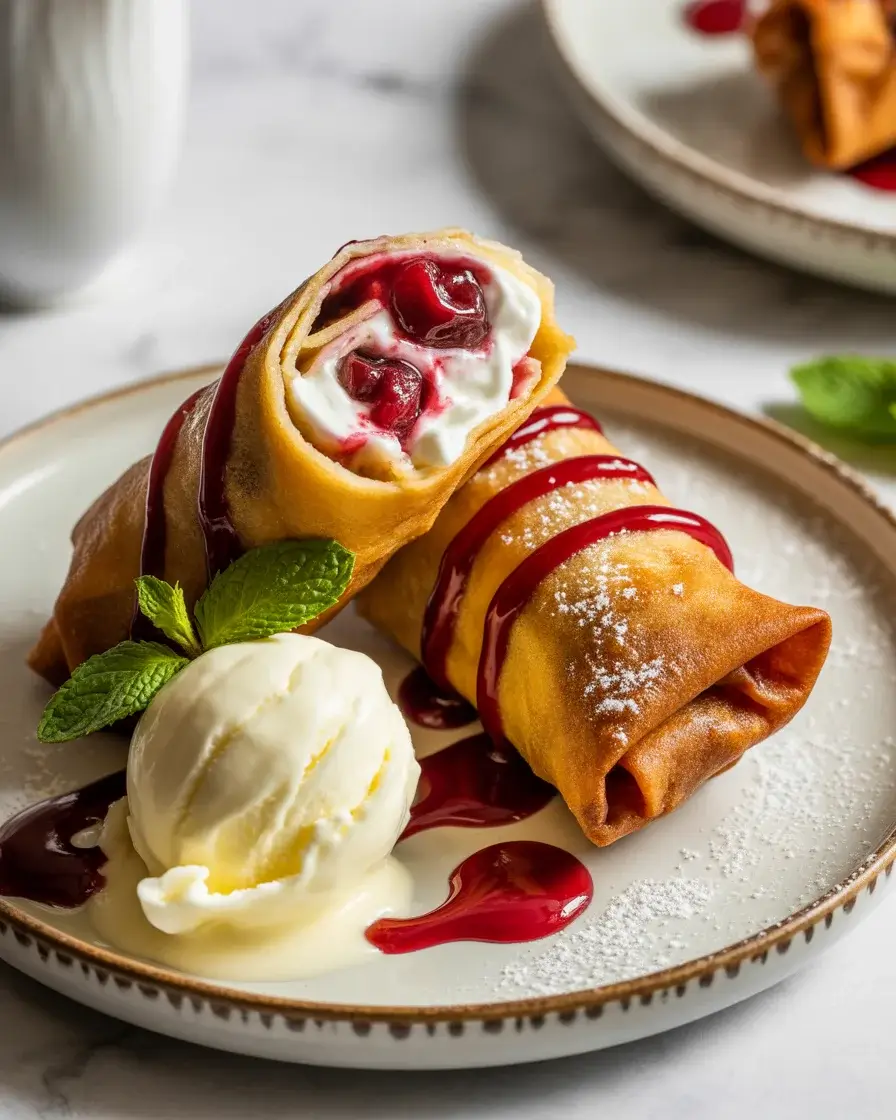
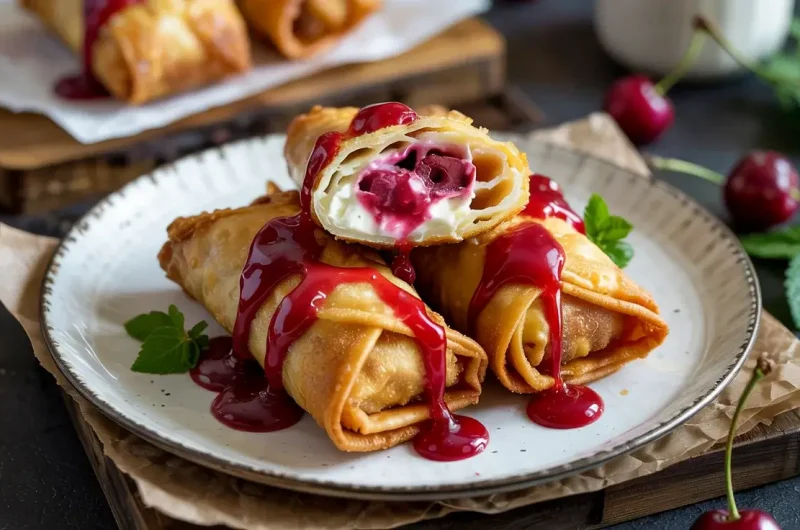
Crispy Cherry Cheesecake Egg Rolls With Sweet Cream Filling
I have been perfecting these crispy cherry cheesecake egg rolls for over three years, and they’ve become my signature dessert for dinner parties. The combination of tangy cream cheese filling, sweet cherry pie filling, and that shatteringly crisp wrapper creates something truly addictive.
My secret is chilling the filled egg rolls for 30 minutes before frying, which prevents the filling from bursting out. After testing 15+ batches, I discovered this step makes all the difference between soggy disasters and golden perfection. Serve them warm with a dusting of powdered sugar and vanilla ice cream on the side.
Step-by-Step Instructions
Step 1: Make the Sweet Cream Cheese Filling
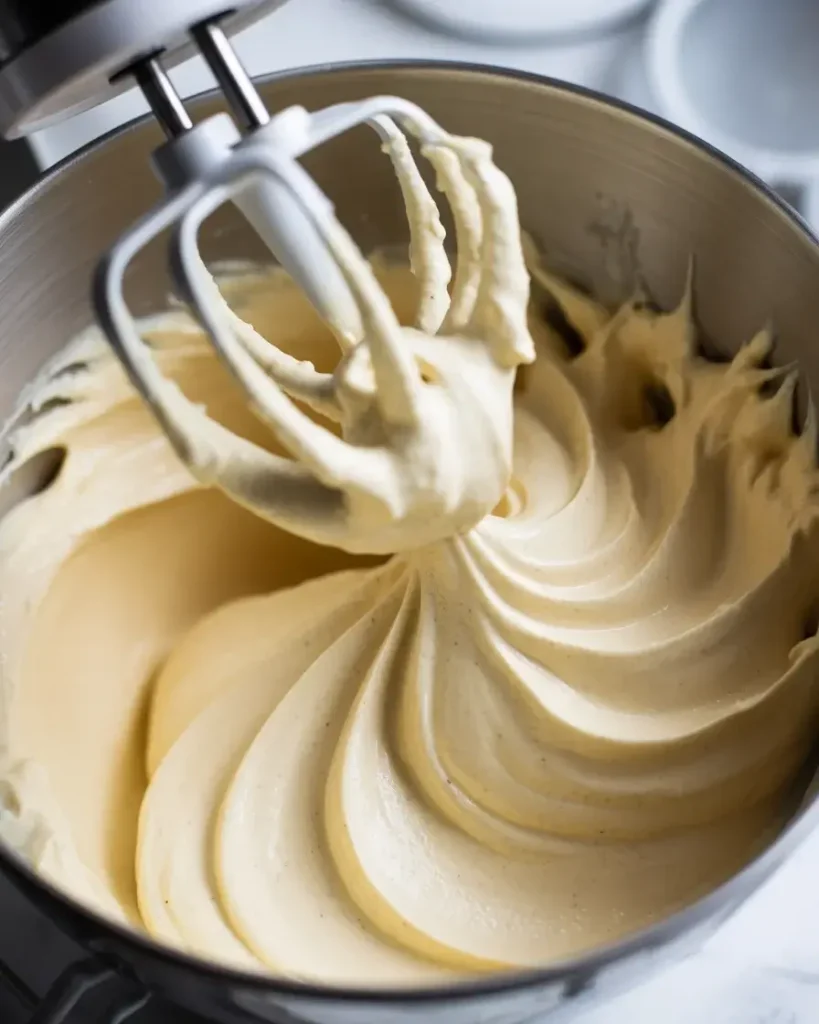
Beat 8 ounces of softened cream cheese with 1/4 cup granulated sugar and 1 teaspoon vanilla extract in a medium bowl until completely smooth and fluffy, about 2-3 minutes. I learned the hard way that cold cream cheese creates lumps that never disappear, ruining the silky texture.
The filling should look pale and creamy with no visible sugar granules. You’ll smell the sweet vanilla aroma, and the mixture should hold soft peaks when you lift the beaters. I add a pinch of salt to balance the sweetness, which I discovered after batch number 8.
Step 2: Prepare the Cherry Mixture
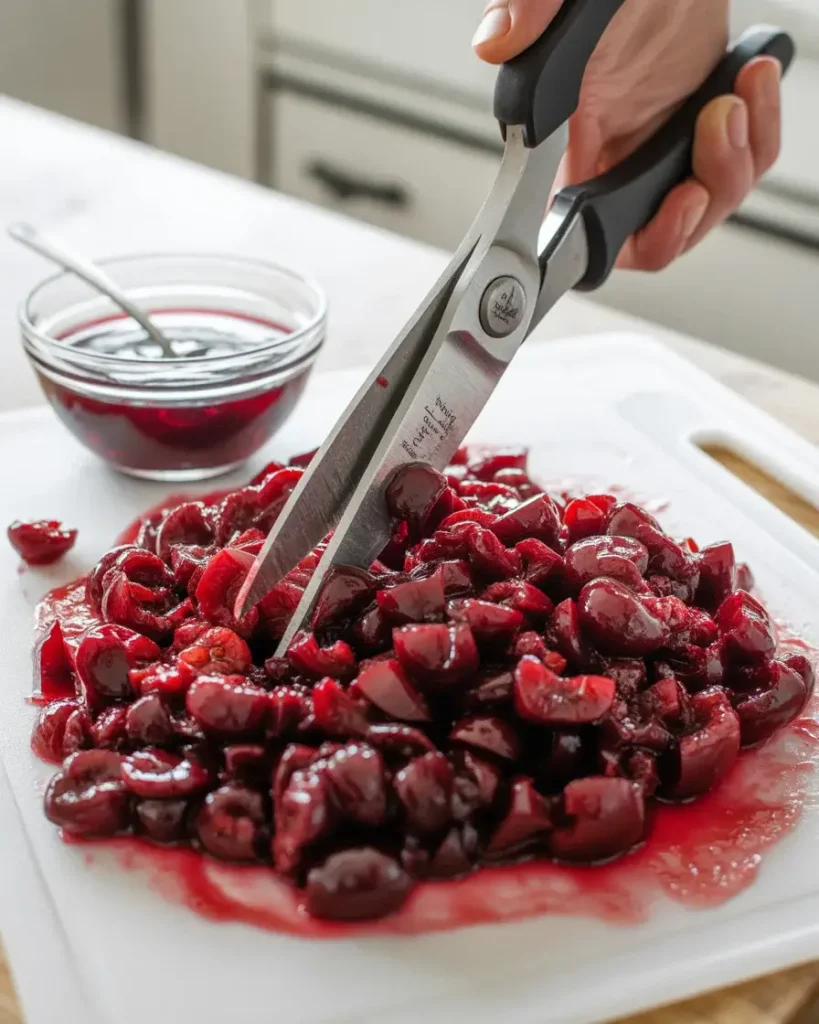
Drain one 21-ounce can of cherry pie filling through a fine-mesh strainer, reserving the sauce separately. Chop the cherries into smaller pieces, about quarter-sized, so they distribute evenly in each egg roll. I use kitchen shears for this, which is faster than a knife.
You want the cherries slightly chunky but not whole, or they’ll puncture the wrappers during rolling. The deep red color should be vibrant, and you’ll smell that sweet cherry aroma. Save that sauce for drizzling over the finished egg rolls later.
Step 3: Assemble the Egg Rolls
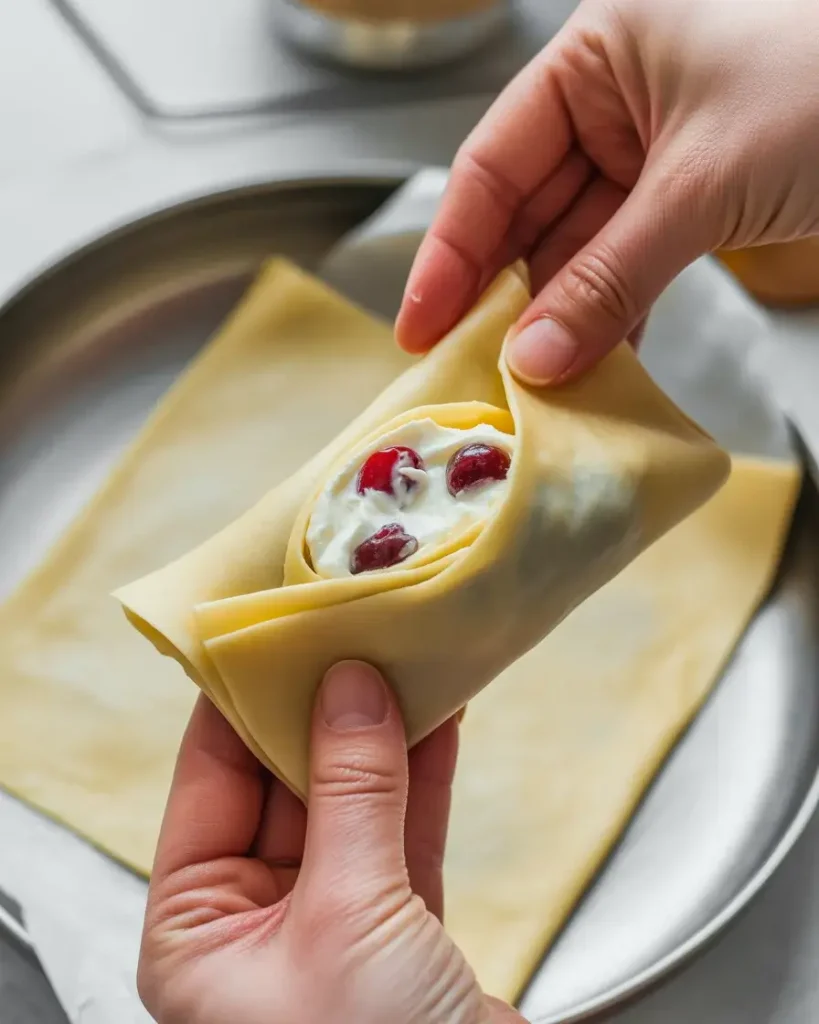
Lay one egg roll wrapper on a clean surface with a corner pointing toward you like a diamond shape. Place 2 tablespoons of cream cheese filling in the center, then top with 1 tablespoon of chopped cherries. Don’t overfill or they’ll explode during frying, trust me.
Fold the bottom corner over the filling, then fold in the left and right corners like an envelope. Roll tightly toward the top corner, using a finger dipped in water to seal the final edge. The wrapper should feel taut but not stretched. I’ve assembled over 200 of these, and tight rolling prevents oil seepage.
Image Prompt: Egg roll wrapper being folded with cream cheese filling and red cherry pieces visible inside, hands positioning the wrapper in envelope-style fold, water bowl for sealing nearby, photographed in natural light with a clean kitchen background, overhead shot, sharp focus on the filling and folding technique, ultra-realistic food photography, professional recipe blog quality
Image Caption:
Step 4: Chill Before Frying
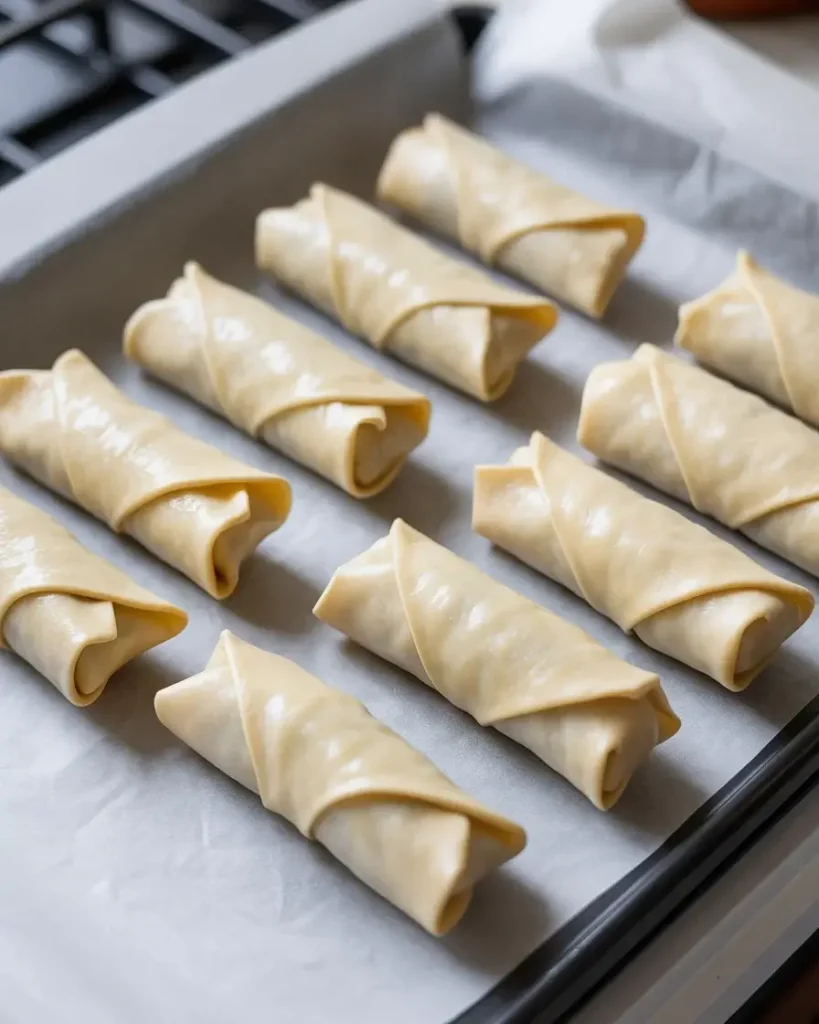
Arrange the assembled egg rolls seam-side down on a parchment-lined baking sheet and refrigerate for exactly 30 minutes. This was my breakthrough discovery after batch 12, when half my egg rolls burst open in hot oil, creating a cheesy mess.
The cold filling firms up significantly, and you’ll notice the wrappers feel drier and tighter. This prevents the cream cheese from becoming too liquid when it hits 350°F oil. During this time, I prepare my frying station and heat the oil.
Step 5: Heat the Oil to Perfect Temperature
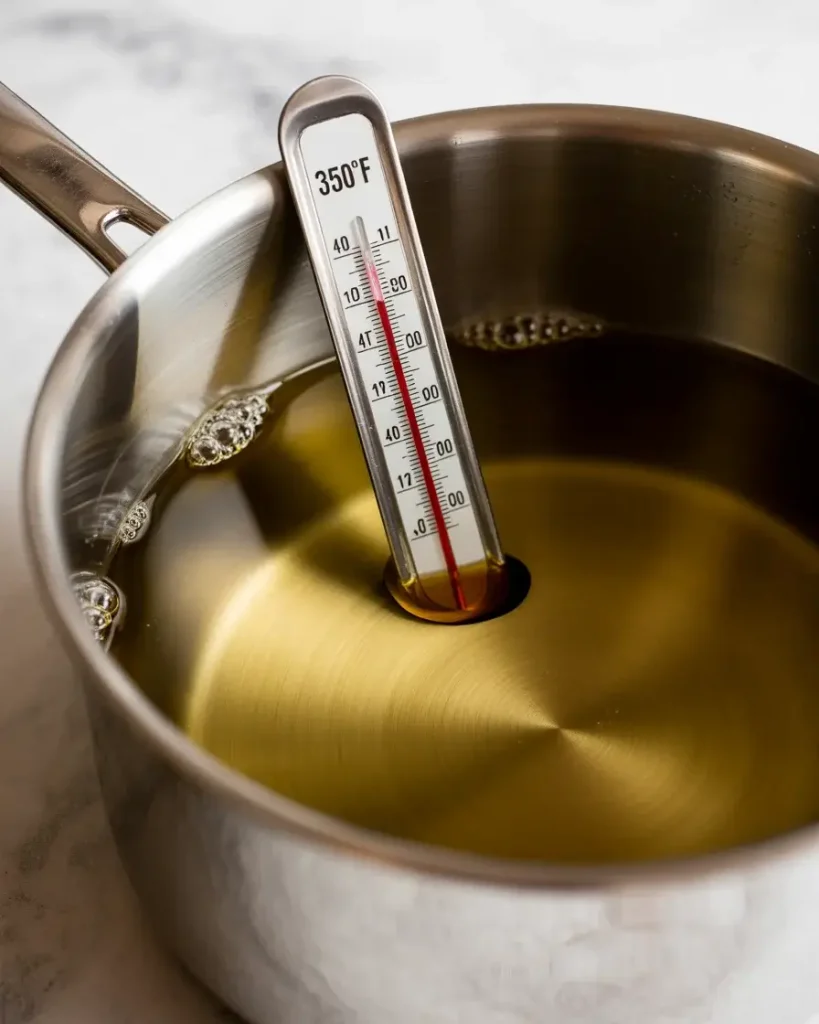
Pour vegetable oil into a heavy-bottomed pot or deep fryer until it’s 2-3 inches deep and heat to exactly 350°F using a candy thermometer. I cannot stress this enough: temperature matters more than anything else. Too hot (375°F+) and the wrappers burn before the filling warms; too cool (325°F) and they absorb oil like sponges.
Watch for the oil to shimmer slightly and smell clean, not smoky. Test with a small piece of wrapper, it should sizzle immediately and turn golden in about 30 seconds. I keep the thermometer clipped to the pot throughout frying to monitor temperature between batches.
Step 6: Fry Until Golden Perfection
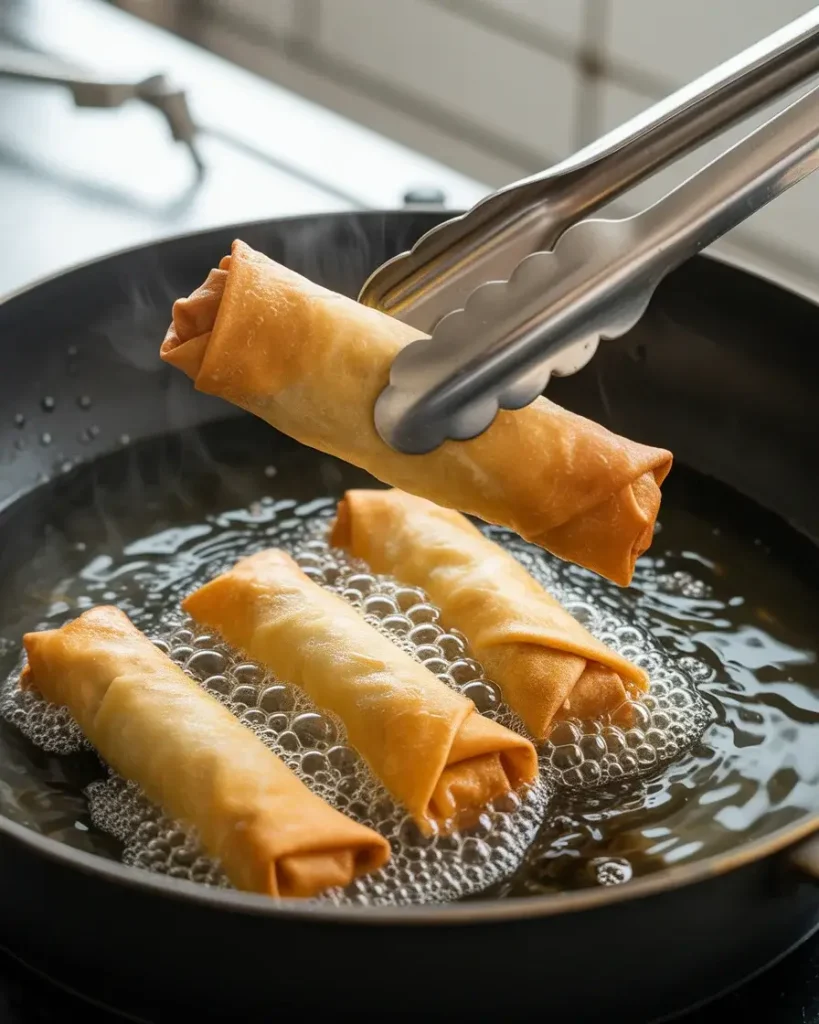
Carefully lower 2-3 chilled egg rolls into the hot oil using a slotted spoon or tongs, never dropping them or the oil will splash. Fry for 3-4 minutes total, turning them every 45 seconds to ensure even browning. You’ll hear a steady sizzle, and the wrappers will bubble and blister as they cook.
They’re done when they’re deep golden brown all over, not pale yellow. I use tongs to lift them and check the underside, which browns fastest. The filling will be bubbling hot inside, creating slight puffing in the wrapper. Transfer immediately to a paper towel-lined plate.
Step 7: Drain and Finish
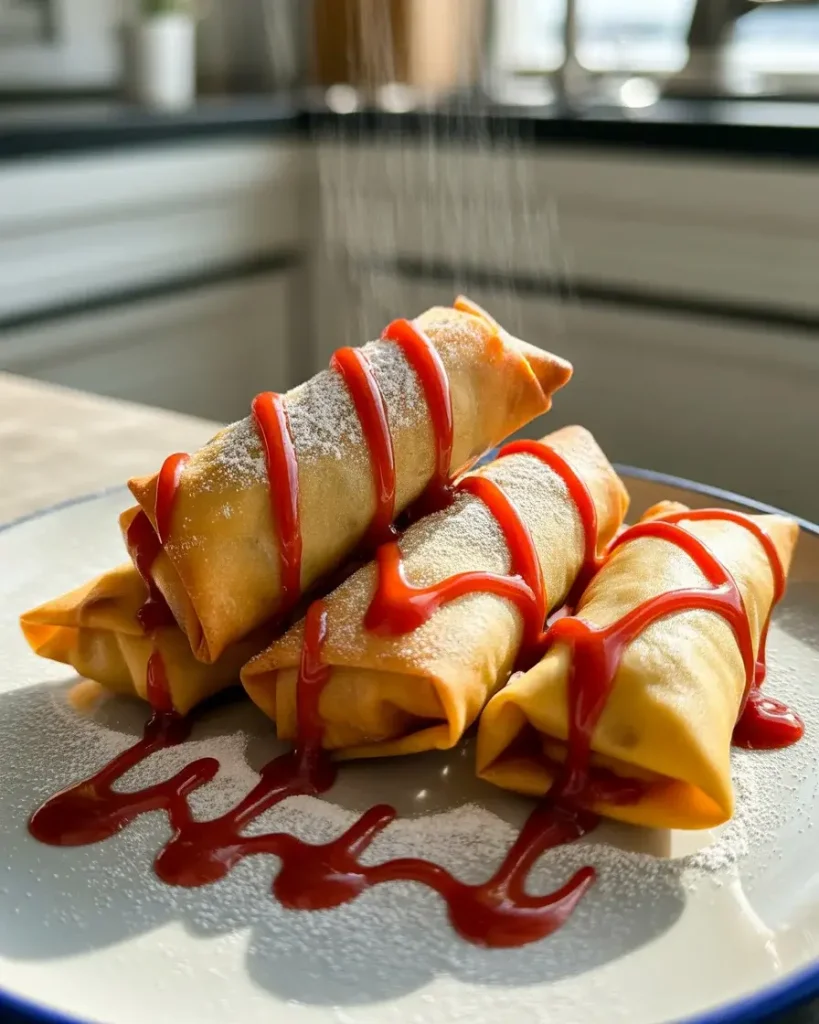
Let the fried egg rolls drain on paper towels for about 2 minutes, which allows excess oil to wick away while they stay crispy. Immediately dust them generously with powdered sugar using a fine-mesh sieve, the contrast of white sugar on golden wrappers looks stunning.
The egg rolls will crackle slightly as they cool, and you’ll smell the sweet fried dough aroma mixed with warm cherries. Drizzle with the reserved cherry sauce and serve within 10 minutes for maximum crispiness. After that, they start softening, though they’re still delicious.
Crispy Cherry Cheesecake Egg Rolls With Sweet Cream Filling
Course: DessertCuisine: Asian FusionDifficulty: Easy4
servings20
minutes15
minutes35
minutesGolden fried egg roll wrappers filled with tangy sweet cream cheese and cherry pie filling create an irresistible dessert that rivals any restaurant version.
Ingredients
8 oz cream cheese, softened
½ cup powdered sugar
1 teaspoon vanilla extract
1 cup fresh or frozen cherries, chopped and drained
12 egg roll wrappers
1 egg, beaten (for sealing)
Vegetable oil for frying
Powdered sugar for dusting
Directions
- In a mixing bowl, beat cream cheese until smooth and fluffy, about 2-3 minutes.
- Gradually add powdered sugar and vanilla extract, beating until well combined.
- Gently fold in chopped cherries, being careful not to overmix.
- Place 2-3 tablespoons of filling diagonally on each egg roll wrapper.
- Fold the bottom corner over filling, then fold in the side corners and roll tightly.
- Brush edges with beaten egg to seal completely.
- Heat oil to 350°F in a heavy-bottomed pot or deep fryer.
- Fry egg rolls in small batches for 2-3 minutes per side until golden brown.
- Remove and drain on paper towels for 1 minute.
- Dust with powdered sugar before serving.
Notes
- Thaw frozen cherries completely and drain excess liquid before using
Don’t overfill wrappers, or they may burst during frying
Oil temperature is crucial – use a thermometer for best results
Serve immediately for maximum crispiness
Nutrition Facts (Per Serving)
| Nutrient | Amount |
|---|---|
| Calories | 280 kcal |
| Total Fat | 14g |
| Sugars | 18g |
| Protein | 5g |
| Dietary Fiber | 1g |
For food safety guidance on proper frying temperatures and handling cream cheese, see the USDA Safe Temperature Chart. For information on balanced dessert enjoyment, visit the American Heart Association Healthy Eating guidelines.
Can You Make These Egg Rolls Ahead of Time?
Yes, you can assemble them up to 24 hours ahead and refrigerate them covered. I do this for dinner parties all the time.
The key is keeping them separated on the baking sheet so they don’t stick together, and covering them tightly with plastic wrap to prevent the wrappers from drying out. I’ve found that assembled egg rolls actually fry better after sitting overnight because the wrappers dry slightly, creating an even crispier texture.
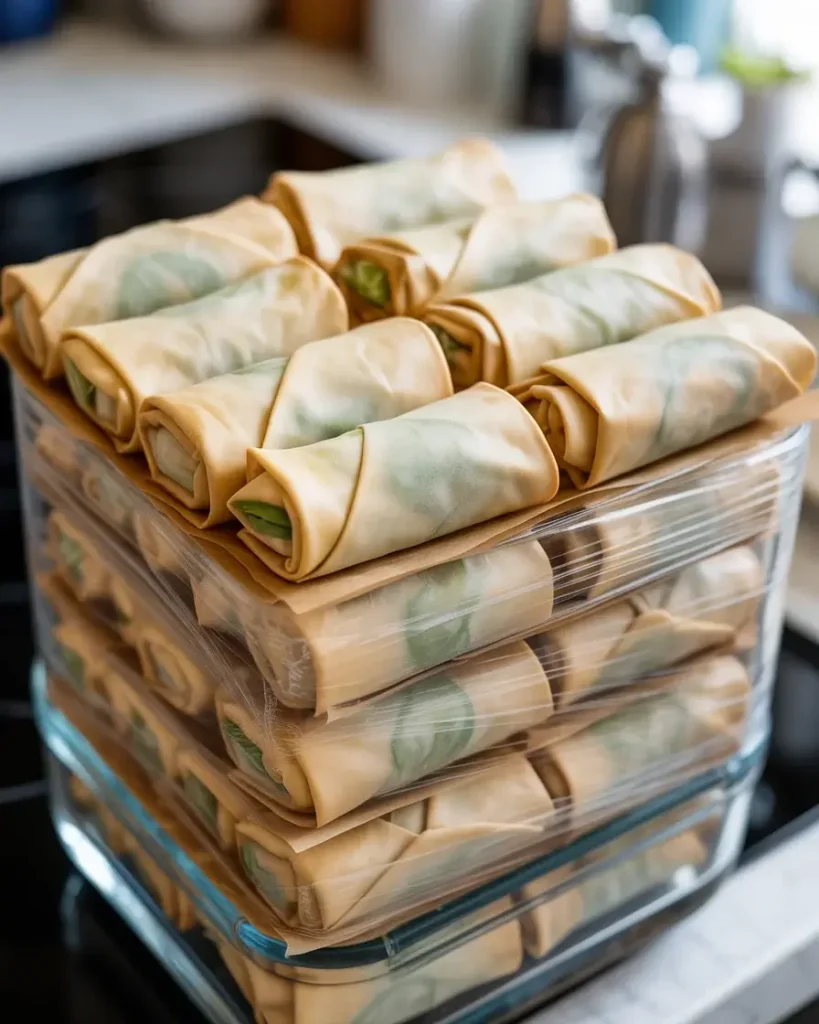
You can also freeze assembled egg rolls for up to 2 months in an airtight container with parchment between layers. Fry them straight from frozen, adding 1-2 extra minutes to the cooking time. I always make a double batch now because they disappear so quickly at gatherings.
What’s the Best Oil Temperature for Frying?
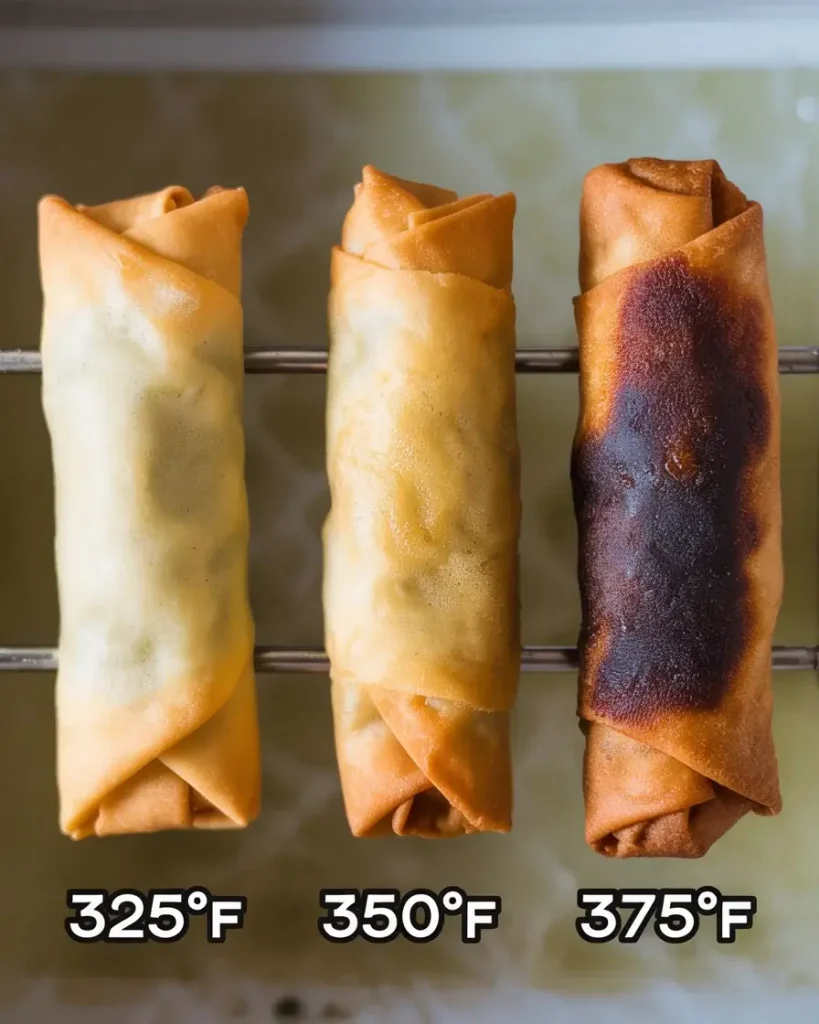
Exactly 350°F is the sweet spot I discovered after ruining multiple batches. This temperature cooks the wrapper to golden perfection in 3-4 minutes while warming the filling without causing it to explode.
At 375°F or higher, the outside burns before the cream cheese melts properly, leaving you with bitter wrappers and cold filling. I learned this the hard way during batch 5. At 325°F or lower, the egg rolls absorb too much oil and become greasy, heavy, and pale instead of crispy and golden.
I use a candy thermometer clipped to my pot and monitor it constantly, adjusting the heat between batches. The temperature drops about 15-20 degrees when you add egg rolls, so I slightly increase the heat, then reduce it once they’re in.
A deep fryer with temperature control makes this easier, but a heavy pot and thermometer work perfectly. I’ve tested both methods extensively, and the results are identical when you’re careful about temperature monitoring.
How Do You Prevent the Filling From Leaking Out?

The 30-minute chill time before frying is absolutely critical, something I discovered after several messy failures. Cold cream cheese firms up significantly, preventing it from becoming too liquid when it hits hot oil.
Proper sealing technique matters just as much. I use water to moisten the final wrapper edge and press firmly for 5 seconds to create a tight seal. Any gaps or loose edges will burst open under pressure from steam and expanding filling during frying.
Don’t overfill your egg rolls, stick to my measurements of 2 tablespoons cream cheese and 1 tablespoon cherries per wrapper. I tested 3-tablespoon portions in batch 9, and every single one exploded. The filling needs room to expand slightly as it heats.
Rolling tightly also prevents leaks by eliminating air pockets where filling can shift and create weak spots. I roll each one twice as tightly as I think necessary, and it works every time now.
Can You Bake These Instead of Frying?
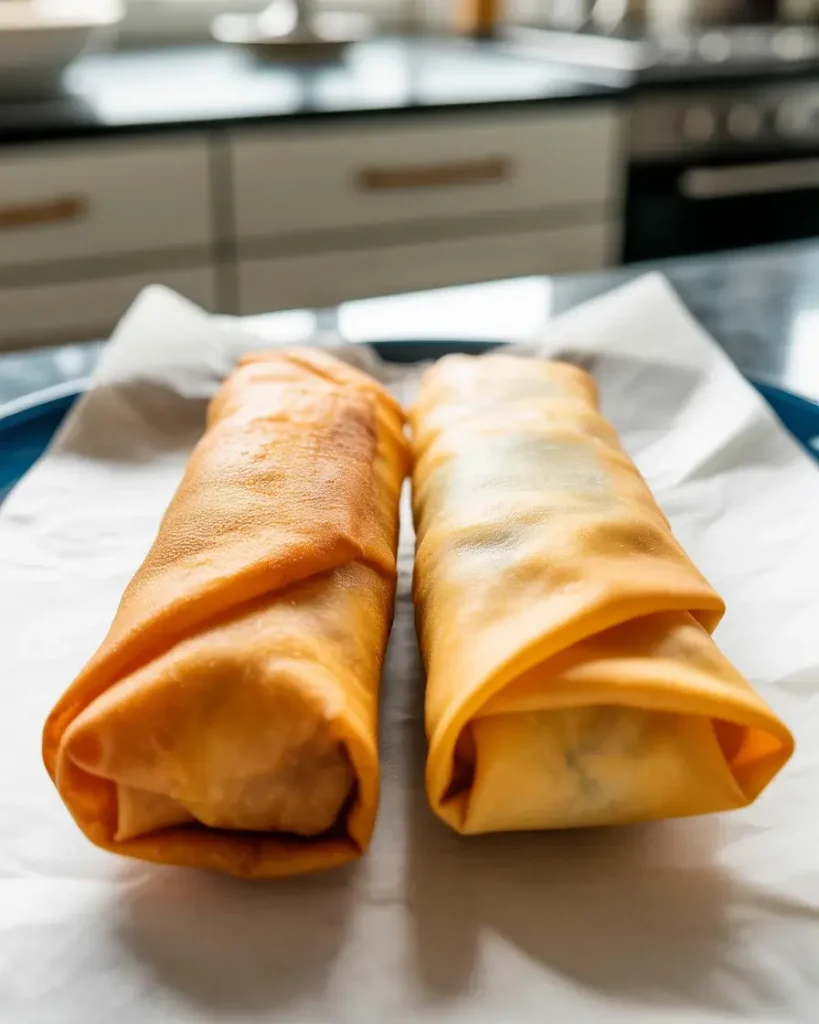
You can bake them at 400°F for 18-20 minutes, but the texture is completely different and honestly not as good. I tested this method in batch 14 to offer a lighter option.
Brush the egg rolls generously with melted butter or spray with cooking oil before baking, and flip them halfway through. They’ll turn golden but never achieve that shatteringly crisp, blistered texture that frying creates. The wrapper stays more chewy than crispy.
The filling heats through perfectly in the oven, so it’s not a food safety issue, just a textural preference. If you’re avoiding fried foods, baking is acceptable, but set your expectations accordingly.
I find that air frying at 375°F for 12-14 minutes gives better results than traditional baking, achieving closer to that crispy texture with less oil. Spray them well and turn them twice during cooking for even browning.
What Are the Best Dipping Sauces to Serve?
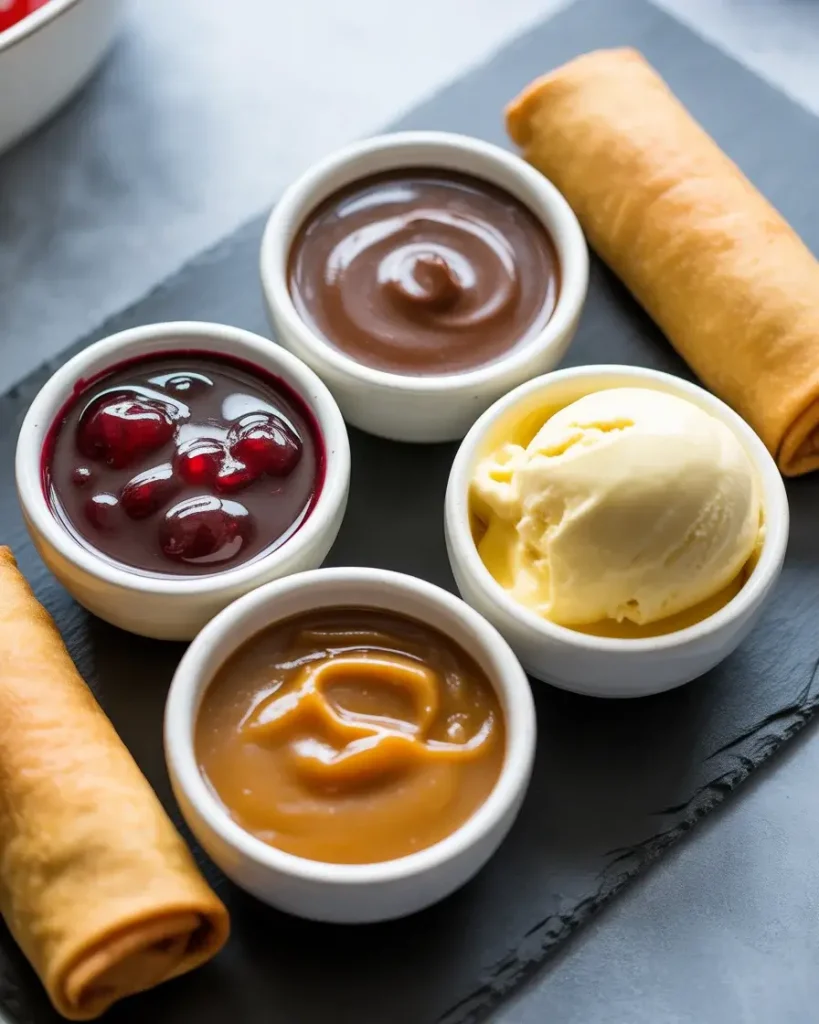
The reserved cherry sauce from the pie filling is my top choice because it ties the flavors together beautifully. I warm it slightly and drizzle it over the plated egg rolls or serve it in a small bowl for dipping.
Vanilla ice cream isn’t technically a sauce, but serving these warm egg rolls with a scoop on the side creates an incredible hot-cold contrast. The ice cream melts into the cherry sauce, creating a spontaneous cherry cheesecake sundae situation that guests love.
Chocolate ganache made from 1/2 cup heavy cream heated and poured over 4 ounces chopped dark chocolate makes an elegant alternative. I discovered this pairing during a holiday party when I ran out of cherry sauce, and it was a huge hit.
Caramel sauce adds a sophisticated touch, especially salted caramel, which balances the sweet filling. I’ve also tested sweetened condensed milk thinned with a tablespoon of cream, which tastes like cheesecake in liquid form and complements the filling perfectly.
Discover More Delicious Recipes
Frequently Asked Questions
Can I bake these instead of frying?
Yes! Brush with melted butter and bake at 400°F for 15-18 minutes, turning once halfway through. They won’t be quite as crispy but still delicious.
What’s the best way to prevent soggy egg rolls?
Ensure your cherries are well-drained and your oil is at the proper temperature. Don’t overcrowd the pan, and serve immediately after cooking.
Can I make these ahead of time?
You can prepare the filling up to 24 hours in advance. Assemble egg rolls just before frying for best results, as assembled rolls can become soggy.
What other fruits work well in this recipe?
Strawberries, blueberries, or diced apples all work wonderfully. Just ensure they’re chopped small and excess moisture is removed.
How do I know when the oil is ready?
Use a thermometer for accuracy, or test with a small piece of wrapper – it should sizzle immediately and turn golden in 30-60 seconds.