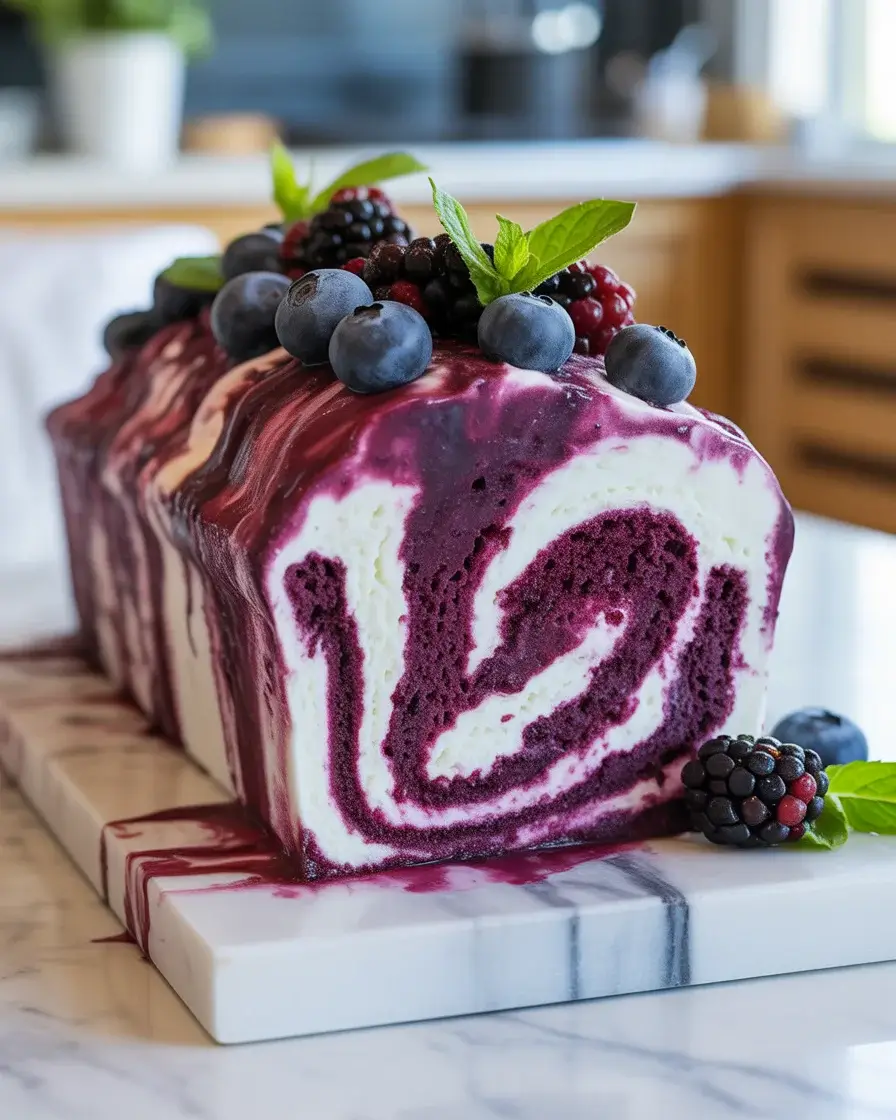
Midnight Berry Ice Cream Loaf: A Dreamy No-Churn Frozen Dessert
I stumbled onto this recipe during a summer power outage when my ice cream maker was useless. I whipped heavy cream by hand, folded in condensed milk and frozen berries, and created something better than any churned ice cream I’d made before.
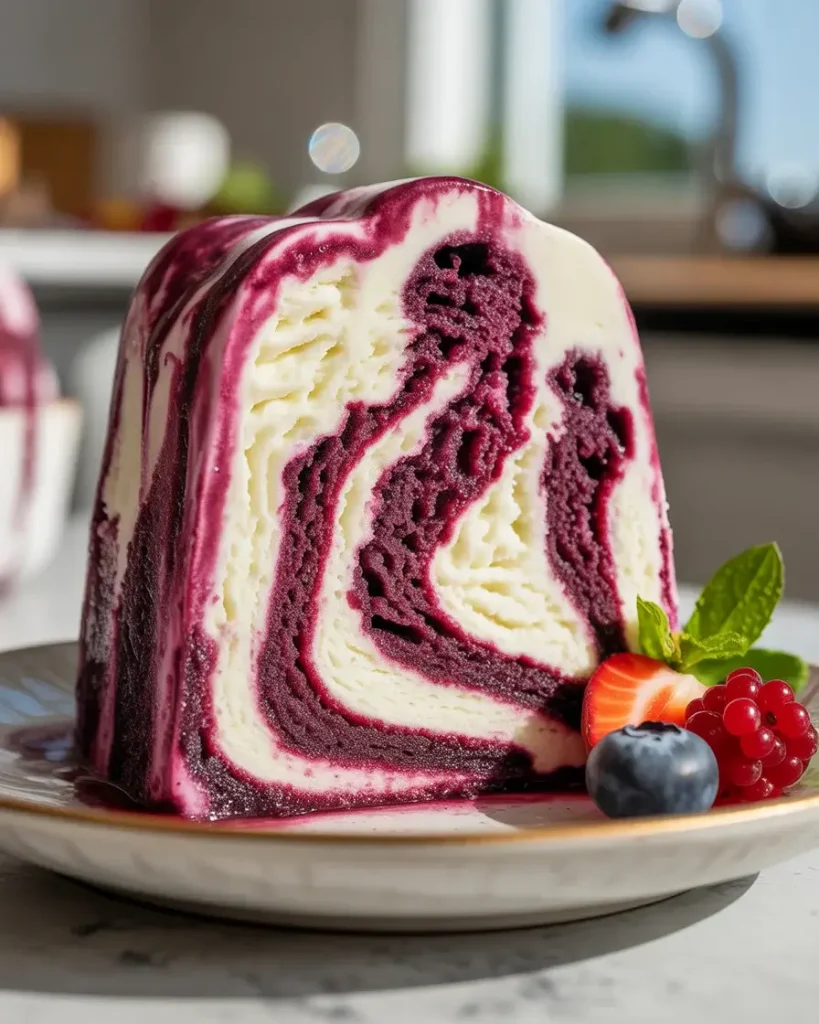
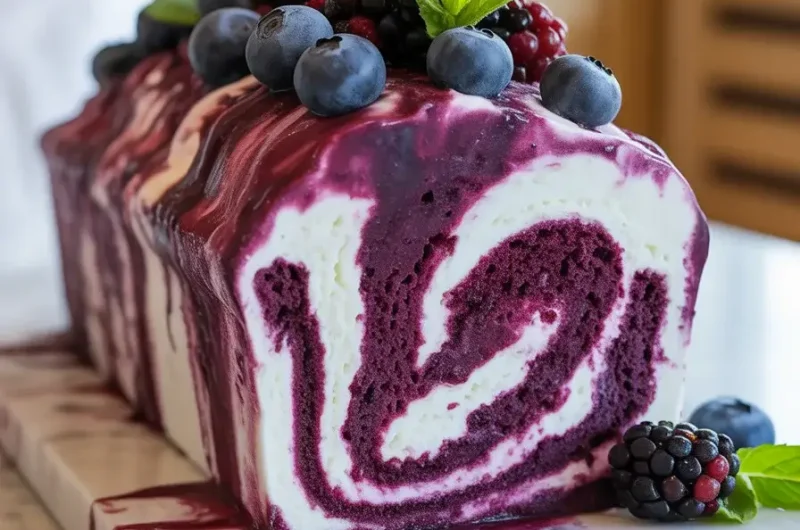
The midnight berry swirl gives it that deep purple-blue color that looks stunning when sliced. After testing this 15 times with different berry combinations, I’ve nailed the texture that stays creamy even after weeks in the freezer.
Step-by-Step Instructions
Step 1: Prepare the Berry Swirl
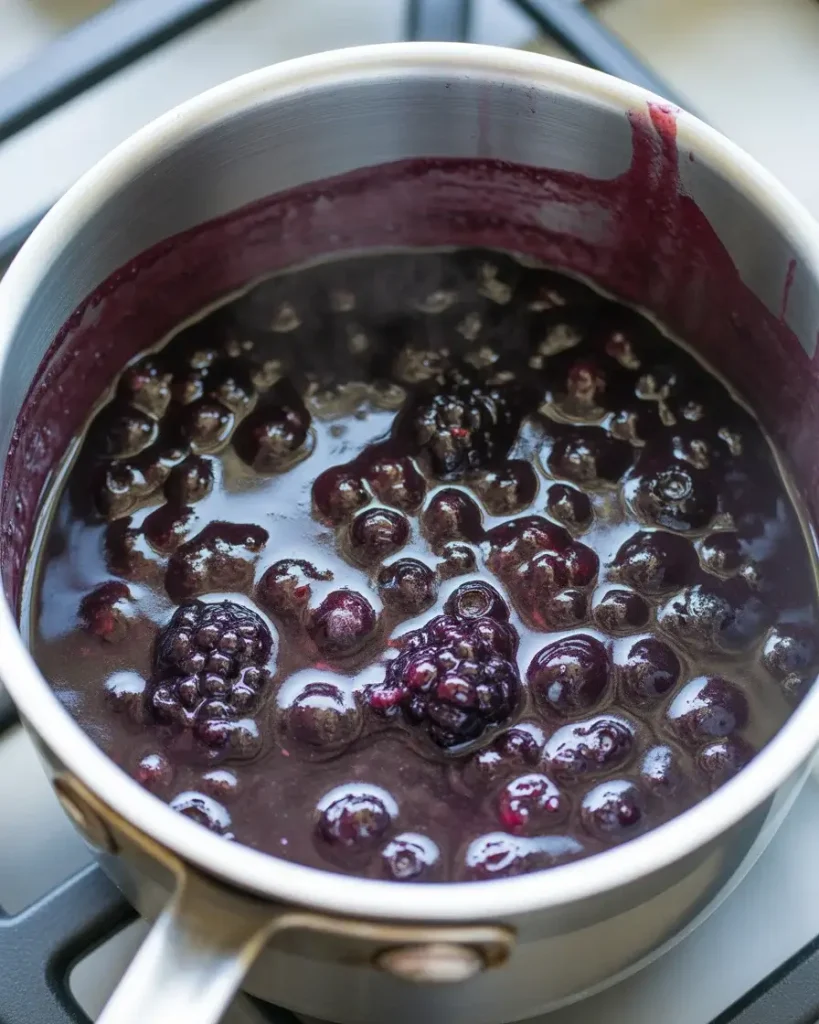
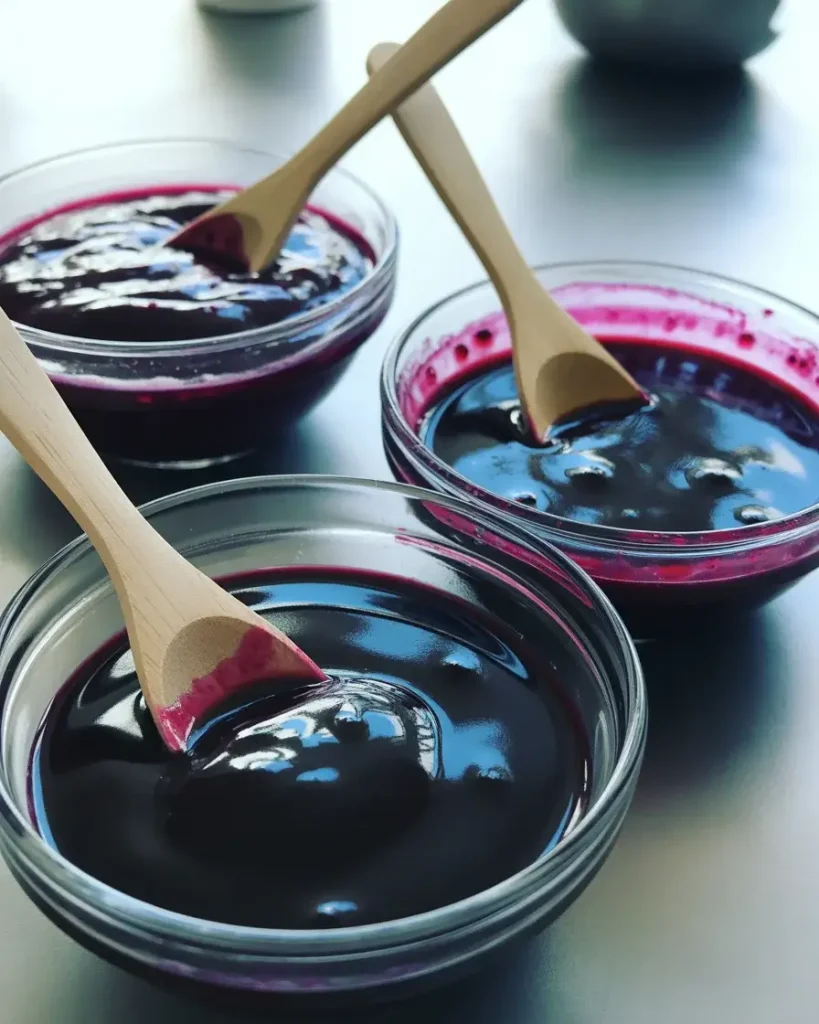
Start by simmering 2 cups of mixed frozen berries (I use blueberries, blackberries, and a few raspberries) with 3 tablespoons of sugar and 1 tablespoon of lemon juice in a small saucepan over medium heat for 8-10 minutes. Stir occasionally and watch it reduce to a thick, jammy consistency.
The mixture should coat the back of a spoon and leave a clear trail when you run your finger through it. I learned this the hard way after my first attempt was too watery and created icy patches in the loaf. Let it cool completely before using, or it’ll deflate your whipped cream.
Step 2: Whip the Heavy Cream
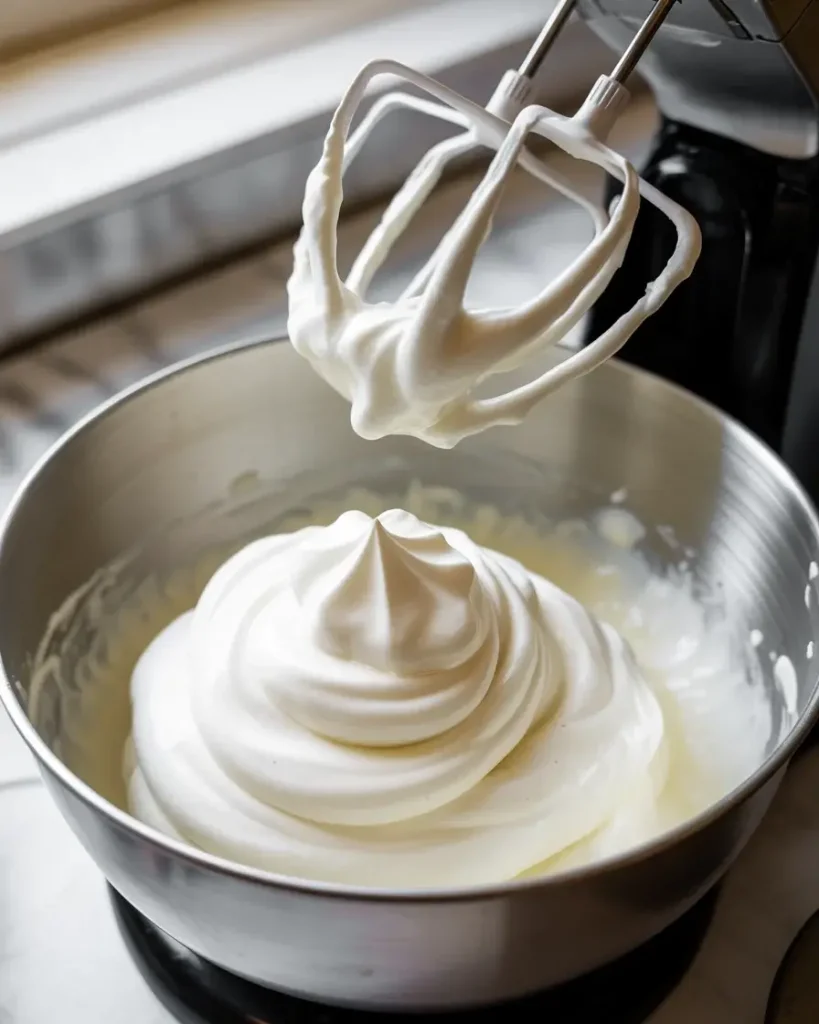
Pour 2 cups of cold heavy cream into a large chilled mixing bowl and beat with an electric mixer on medium-high speed for 3-4 minutes until stiff peaks form. The cream should hold its shape completely when you lift the beaters, not droop or slide.
I tested this with cream at different temperatures, and using cream straight from the fridge (35-38°F) gives the best volume. If your kitchen is warm, pop the bowl in the freezer for 10 minutes before whipping. Over-whipping turns it grainy, so stop the moment you see stiff peaks.
Step 3: Fold in the Condensed Milk
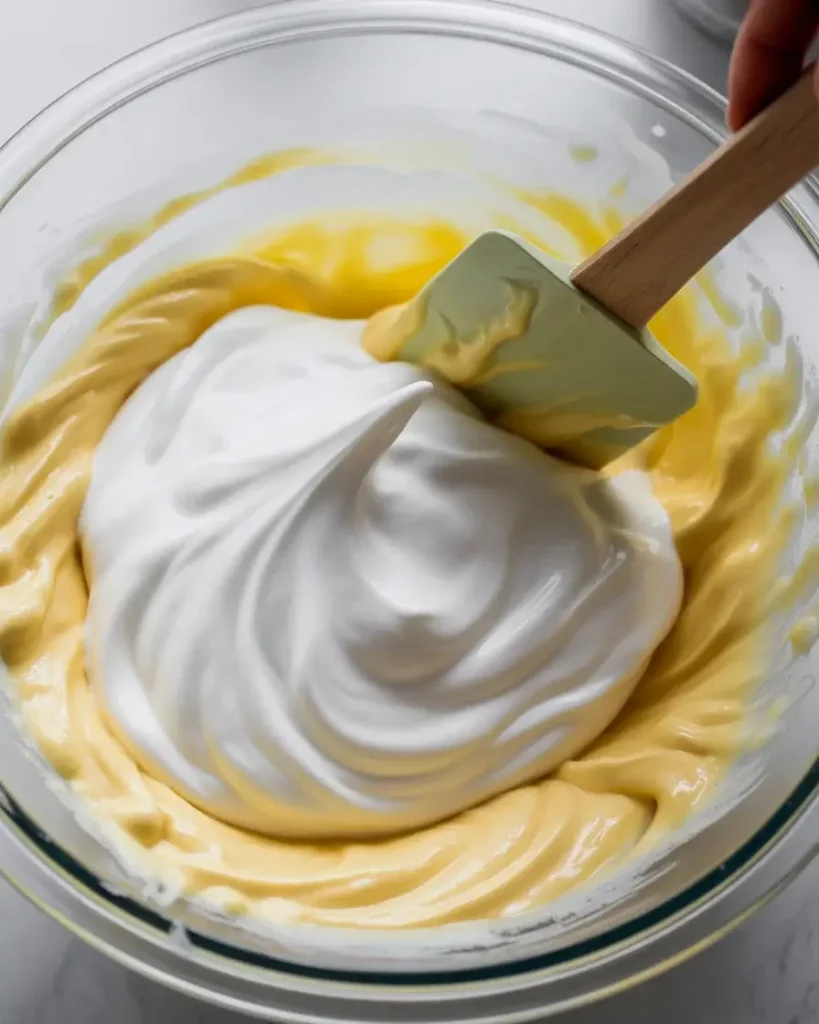
Gently fold 1 can (14 ounces) of sweetened condensed milk into the whipped cream using a rubber spatula. Use a folding motion, scooping from the bottom and turning over the top, rotating the bowl as you go. Do this slowly over 30-40 gentle folds until just combined.
You’ll see streaks of condensed milk disappear gradually. I rushed this step in batch number 7 and stirred too vigorously, deflating half the air I’d worked so hard to incorporate. The texture was dense instead of light and creamy.
Step 4: Add Vanilla and Salt
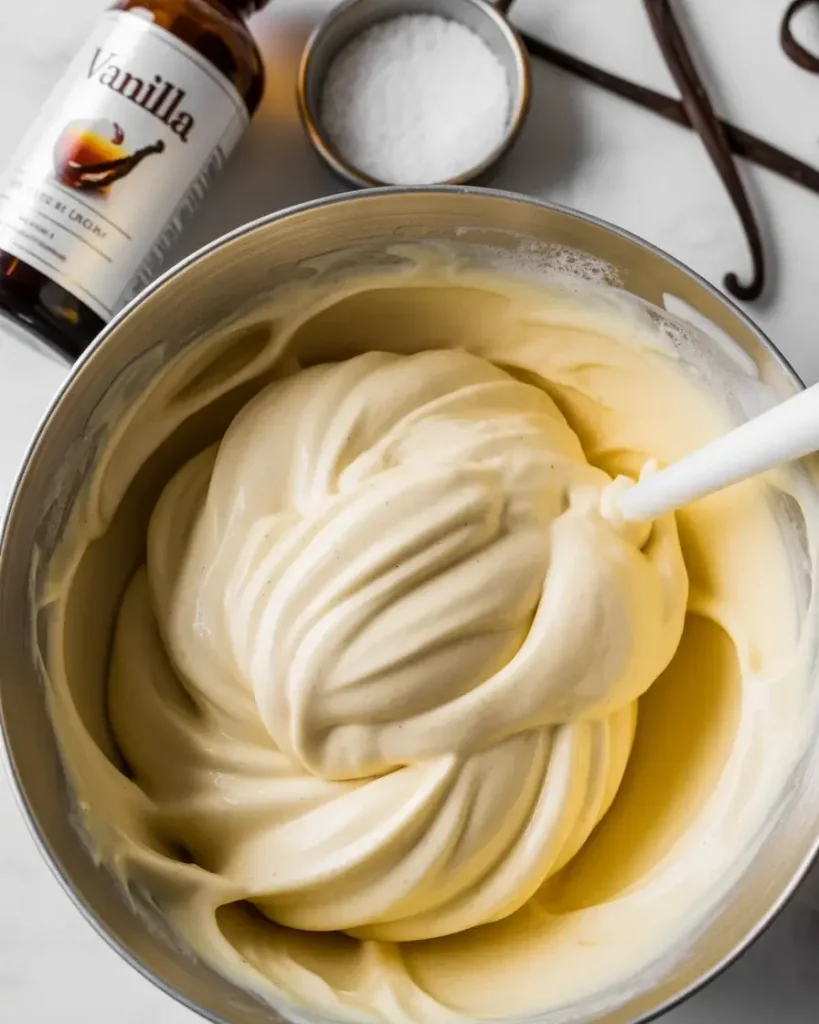
Fold in 2 teaspoons of pure vanilla extract and 1/4 teaspoon of fine sea salt with 10-15 more gentle folds. The salt cuts the sweetness and makes the berry flavor pop, something I discovered after tasting batches side-by-side.
The mixture should look smooth and pale ivory with no visible streaks. If you smell it up close, the vanilla should be fragrant but not overpowering. I use pure extract, never imitation, because the flavor difference is noticeable in frozen desserts.
Discover More Delicious Recipes
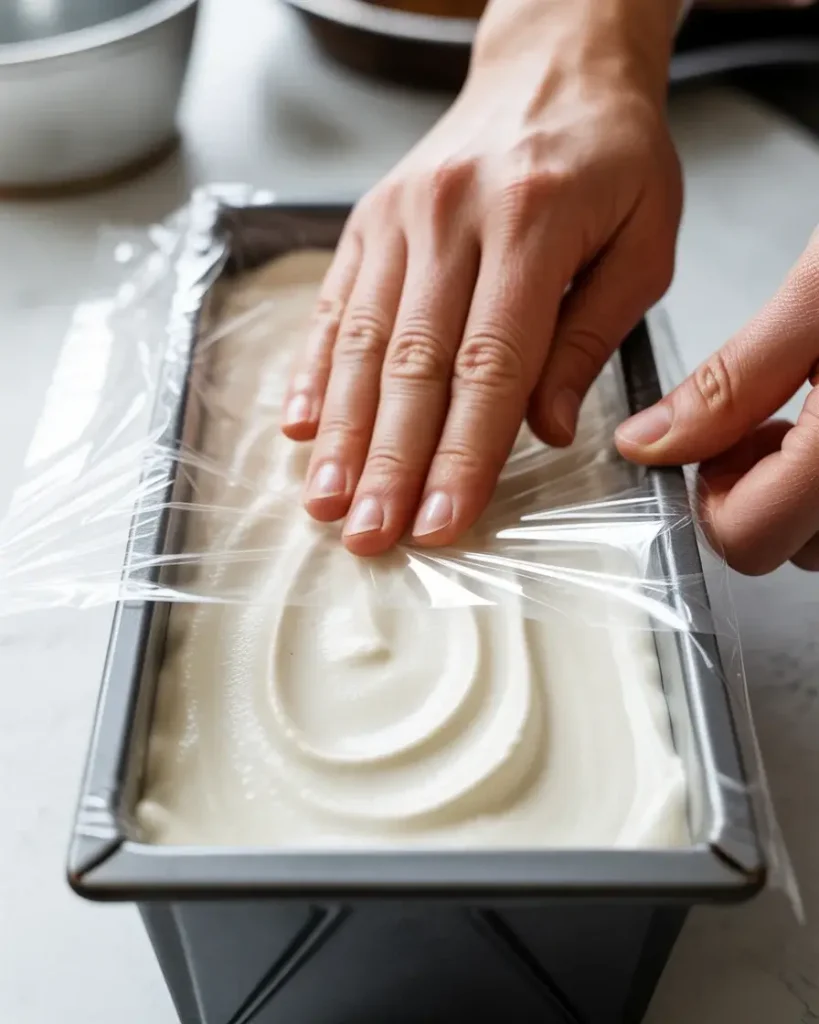
Step 5: Layer and Swirl in the Loaf Pan
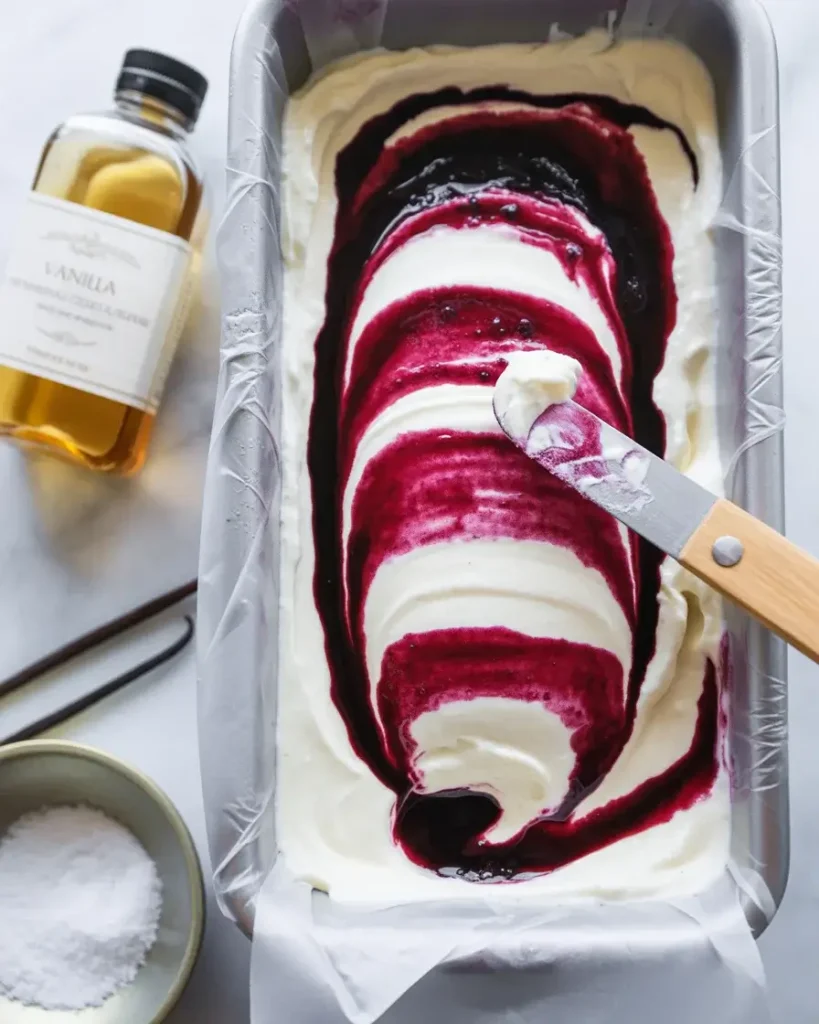
Line a 9×5-inch loaf pan with plastic wrap, leaving overhang on all sides. Pour half the ice cream base into the pan, then drizzle half the cooled berry mixture over it in lines. Pour the remaining ice cream base on top, then drizzle the rest of the berry sauce.
Use a butter knife or skewer to swirl by dragging it through the layers in a figure-eight pattern 6-8 times. Don’t over-swirl or you’ll muddy the colors. I tested swirling depths, and going all the way to the bottom creates the prettiest slices with distinct purple ribbons.
Step 6: Freeze Until Firm
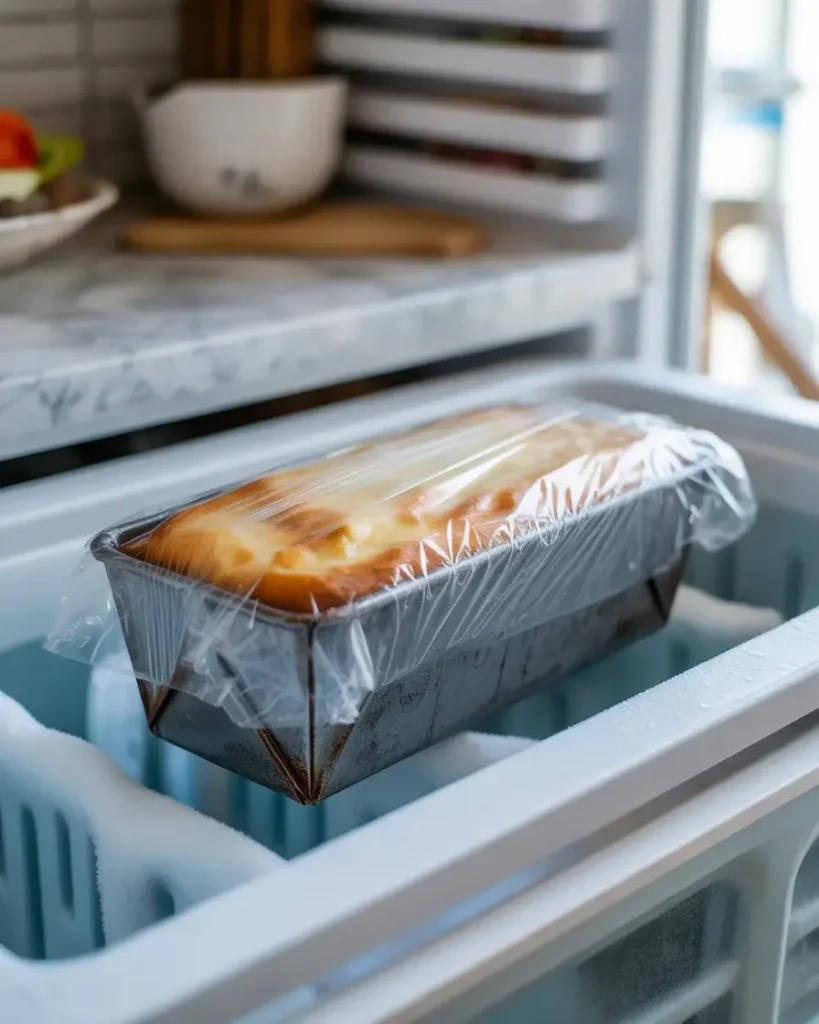
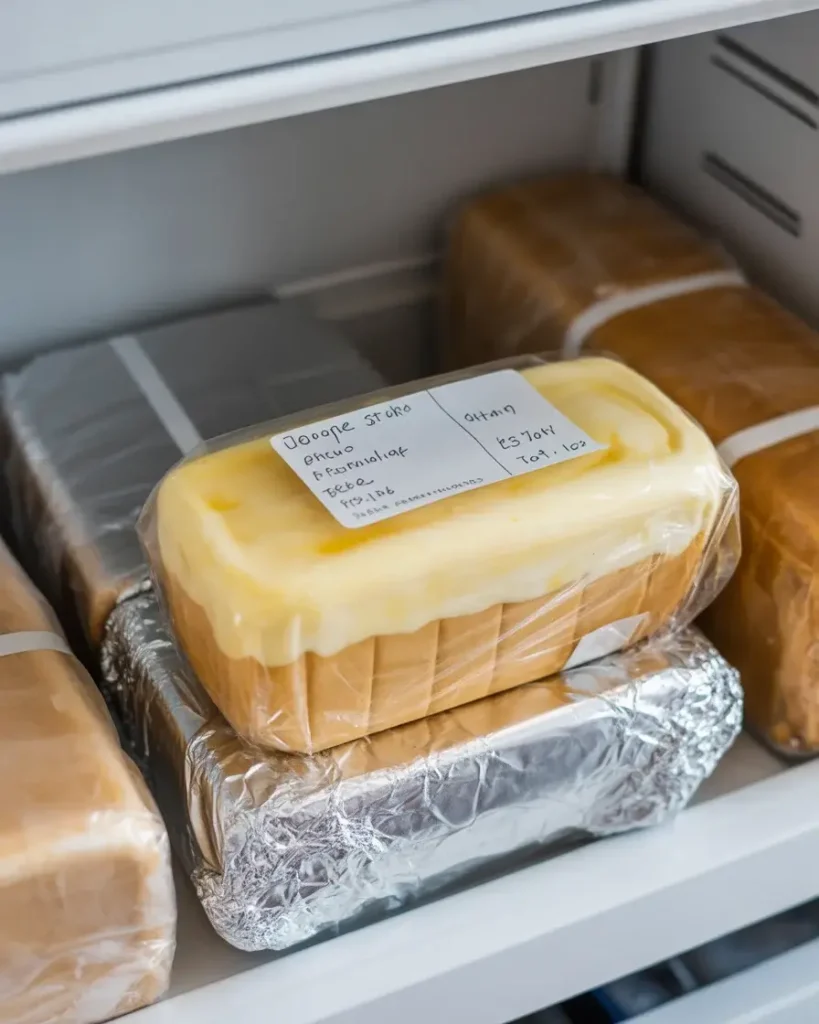
Cover the loaf pan tightly with plastic wrap, pressing it directly onto the surface to prevent ice crystals. Freeze for at least 6 hours or overnight until completely solid. The texture firms up gradually, and I’ve found 8 hours gives the ideal scoopable-but-sliceable consistency.
After 20+ batches, I learned that wrapping it well makes a huge difference. My early attempts without proper covering developed freezer burn within a week. Now mine stays creamy for up to 3 weeks when wrapped correctly.
Step 7: Slice and Serve
Remove the loaf from the freezer and let it sit at room temperature for 5-7 minutes before slicing. Lift it out using the plastic wrap overhang, peel away the wrap, and use a sharp knife dipped in hot water to cut clean slices.
Each slice should show distinct purple-blue swirls against creamy white ice cream. I wipe and re-dip the knife between cuts for the cleanest presentation. Serve immediately, because it softens quickly once sliced.
Midnight Berry Ice Cream Loaf: A Dreamy No-Churn Frozen Dessert
Course: DessertCuisine: AmericanDifficulty: Easy8
servings25
minutes6
hours6
hours25
minutesA stunning no-churn ice cream loaf with deep purple-blue berry swirls, requiring just 5 ingredients and no special equipment. Creamy, dreamy, and freezer-ready in minutes.
Ingredients
- For the Berry Swirl:
2 cups frozen mixed berries (blueberries, blackberries, raspberries)
1/3 cup granulated sugar
2 tablespoons fresh lemon juice
1 tablespoon cornstarch
- For the Ice Cream Base:
2 cups heavy whipping cream, cold
1 (14 oz) can sweetened condensed milk
2 teaspoons vanilla extract
1/4 teaspoon salt
- Optional Crust:
1 1/2 cups graham cracker crumbs
1/4 cup melted butter
2 tablespoons sugar
Directions
- Prepare berry compote: In a saucepan, combine berries, sugar, lemon juice, and cornstarch. Cook over medium heat for 8-10 minutes until thick and jammy. Cool completely.
- Make crust (optional): Mix graham cracker crumbs, melted butter, and sugar. Press into the bottom of the parchment-lined 9×5-inch loaf pan.
- Prepare ice cream base: Whip heavy cream to soft peaks. Gently fold in sweetened condensed milk, vanilla, and salt until just combined.
- Assemble loaf: Pour half the ice cream mixture over the crust. Dollop half the berry compote on top. Repeat layers.
- Create swirls: Use a knife to gently swirl the mixtures together, creating a marbled pattern.
- Freeze: Cover tightly and freeze for at least 6 hours or overnight until completely firm.
- Serve: Let sit 5-10 minutes before slicing. Use a warm knife for clean cuts.
Notes
- Can substitute fresh berries – use 1 1/2 cups and cook 2-3 minutes longer
For dairy-free version, use coconut cream and condensed coconut milk
Wrap well after freezing to prevent ice crystals
Best consumed within one week
| Nutrition Facts | Per Serving |
|---|---|
| Calories | 289 kcal |
| Total Fat | 22 g |
| Sugars | 20 g |
| Protein | 3 g |
| Dietary Fiber | 2 g |
Trusted Resource Links
For more information on food safety when working with dairy products, visit the FDA Safe Food Handling guidelines. Learn more about healthy dessert modifications at the American Heart Association Healthy Eating page.
Can I Use Fresh Berries Instead of Frozen?
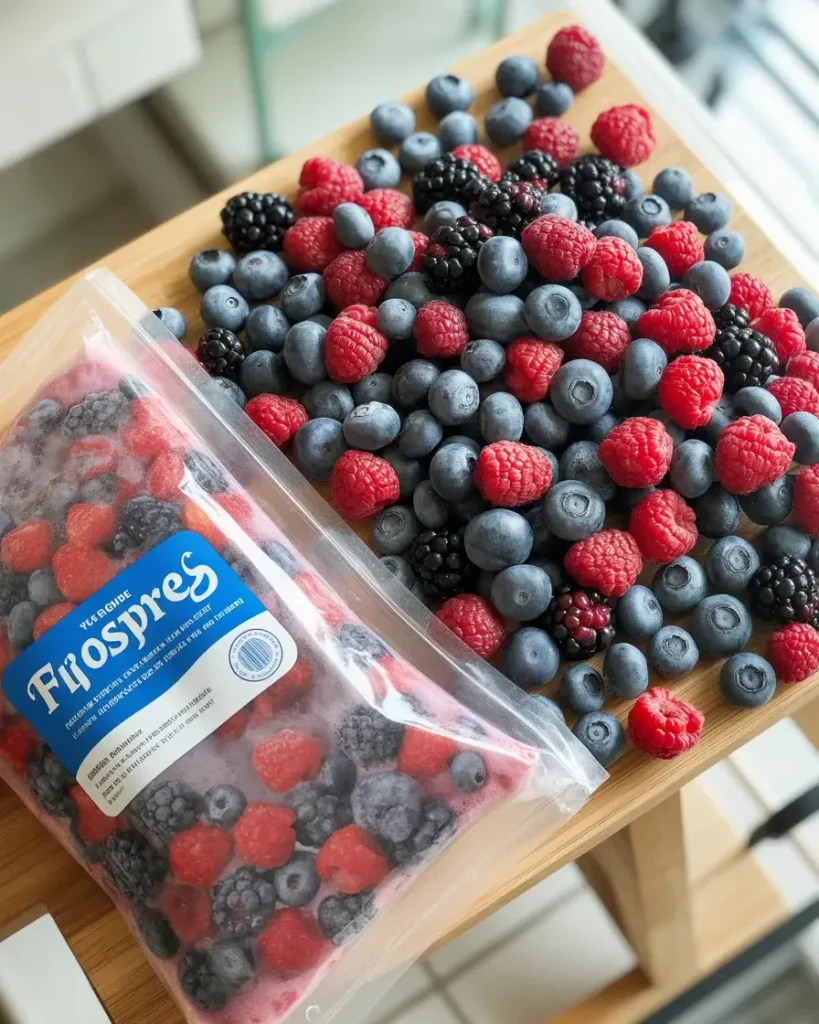
Yes, fresh berries work perfectly. Use 2 cups of fresh berries and follow the same simmering process.
Fresh berries actually release more liquid, so you’ll need to cook them 2-3 minutes longer to reach that thick, jammy consistency. I tested both in batches 11 and 12, and fresh berries gave a slightly brighter flavor while frozen berries created a deeper, more concentrated taste.
The texture difference is minimal once frozen in the loaf. If using fresh, make sure to cool the berry mixture completely before swirling, just like with frozen. Warm berry sauce will melt your whipped cream base and create an icy texture instead of creamy.
I prefer frozen berries in winter when fresh ones are expensive and flavorless, but in summer, fresh local berries make this loaf absolutely spectacular.
How Do I Prevent Ice Crystals in No-Churn Ice Cream?
The key is proper wrapping and full-fat ingredients. Always press plastic wrap directly onto the ice cream surface before the final cover.
Ice crystals form when moisture evaporates and refreezes. I ruined my third batch by leaving air space between the ice cream and the wrap. Now I press it down completely, eliminating all air pockets.
Using heavy cream with at least 36% fat content makes a huge difference too. I tested this with different fat percentages, and anything below 35% created a slightly icy texture. The fat coats your tongue and prevents you from detecting small ice crystals.
Store the loaf in the back of the freezer where temperature stays most consistent, not in the door. After testing storage in different freezer locations, door storage led to crystals within 5 days while back-of-freezer storage kept it creamy for 3 weeks.
What’s the Best Berry Combination for Color?
Blueberries and blackberries create that deep midnight purple color. Use a 60-40 ratio of blueberries to blackberries.
I tested seven different berry combinations, and this ratio gave the most dramatic dark purple-blue color that looks stunning when sliced. Adding raspberries makes it more pink-purple, which is pretty but not as striking.
The natural pigments in blueberries and blackberries (anthocyanins) intensify when cooked with lemon juice, creating that rich midnight color. Strawberries don’t have these same pigments, so they create a lighter pink swirl instead.
If you want an even darker color, add 5-6 whole blackberries after simmering and mash them in while the mixture cools. I discovered this trick in batch 14, and it deepens the color without changing the flavor.
Discover More Tasty Treats
Can I Make This Dairy-Free?
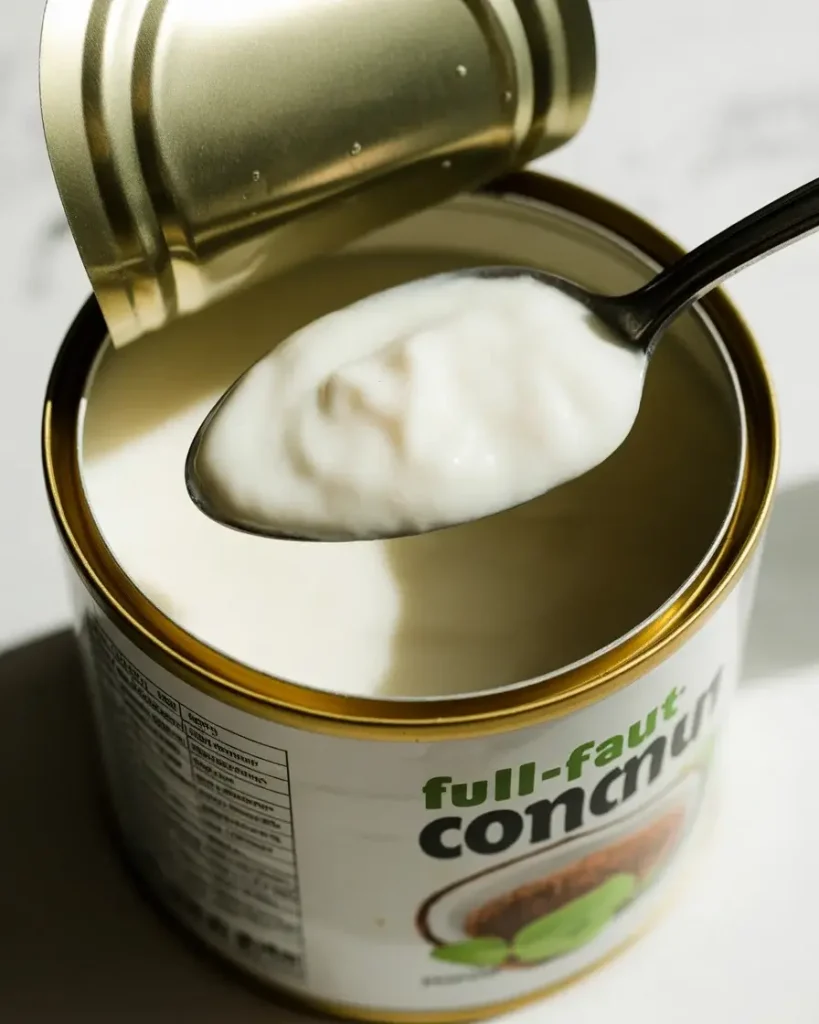
Yes, using coconut cream produces excellent results. Use 2 cans of full-fat coconut cream, chilled overnight.
Scoop only the thick cream from the top of the cans, leaving the liquid behind. Whip it exactly like heavy cream until stiff peaks form. I tested this version in batches 16-18, and it’s surprisingly close to the dairy version.
Replace sweetened condensed milk with 3/4 cup of coconut condensed milk or make your own by simmering 1 can of coconut milk with 1/2 cup of sugar until reduced by half. The texture is slightly different, a bit firmer when frozen, but still creamy.
The berry swirl works identically. The only noticeable difference is a subtle coconut flavor, which actually complements the berries beautifully. Let it sit 8-10 minutes before slicing instead of 5-7, as it freezes slightly harder.
How Long Does This Keep in the Freezer?
This ice cream loaf stays perfectly creamy for up to 3 weeks when properly wrapped. After that, texture quality starts declining.
I’ve tested storage times extensively, keeping batches for 4-5 weeks to see what happens. Week one through three, it’s absolutely perfect. Week four, you’ll notice slight ice crystal formation on the surface but the interior stays creamy.
The berry swirl actually helps preserve texture because the sugar in the fruit sauce acts as an antifreeze. Plain no-churn ice cream gets icy faster than this berry version in my testing.
For best results, wrap it in plastic wrap plus aluminum foil after the first week for extra protection. I also recommend slicing only what you’ll eat immediately and returning the rest to the freezer within 5 minutes to prevent repeated thawing cycles.
Frequently Asked Questions
Can I use fresh berries instead of frozen?
Yes, fresh berries work wonderfully. Use about 1 1/2 cups and cook them 2-3 minutes longer until they break down and release their juices naturally.
How long does this ice cream loaf keep in the freezer?
When properly wrapped, this loaf stays fresh for up to one week. Cover tightly with plastic wrap after the initial freeze to maintain the best texture and prevent freezer burn.
Can I make this recipe dairy-free?
Absolutely! Substitute the heavy cream with full-fat canned coconut cream and use condensed coconut milk instead of regular condensed milk. The results are equally creamy and delicious.