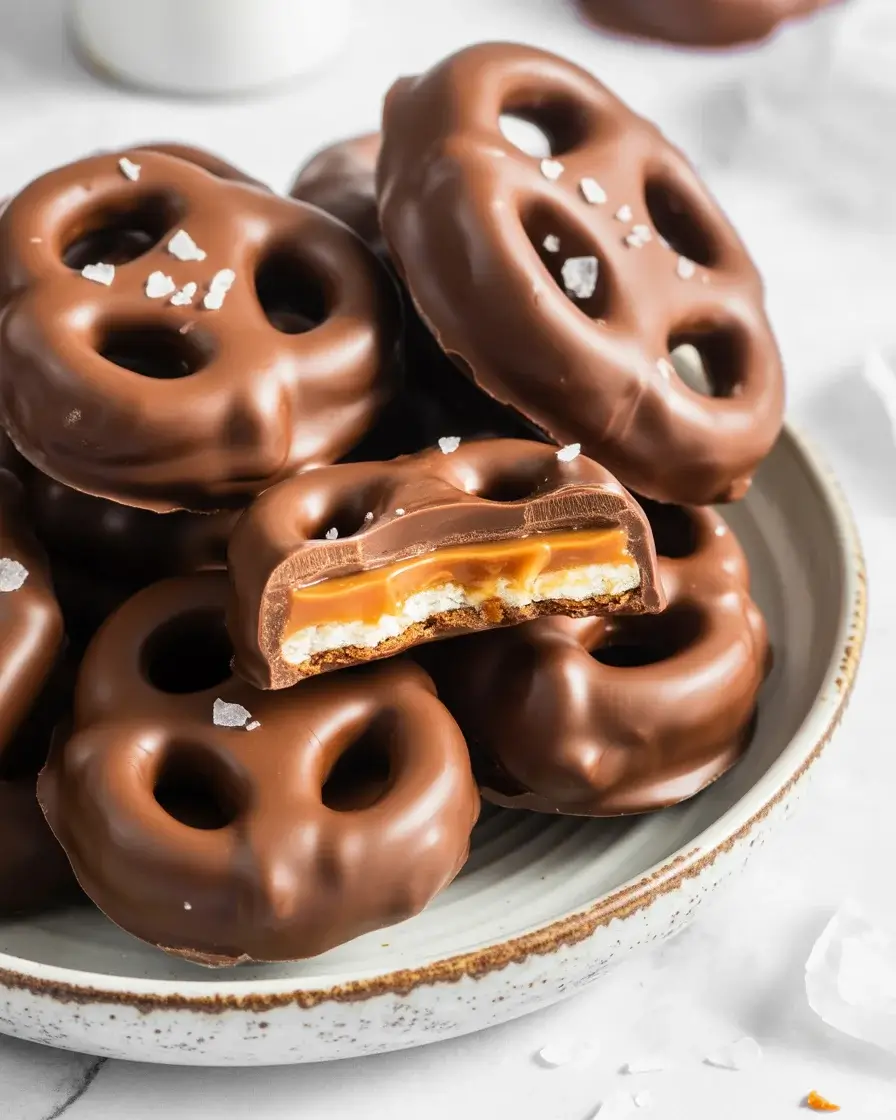
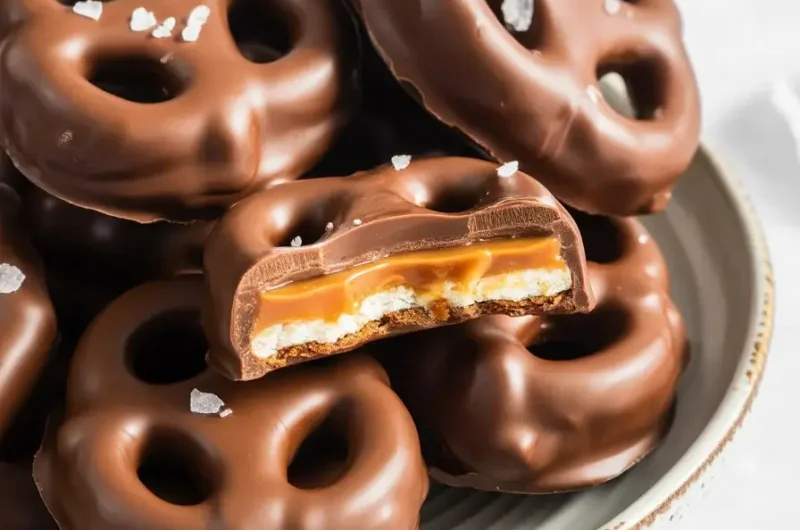
Salted Chocolate Caramel Pretzel Delights
My first batch of these treats ended up in the trash because I tried using store-bought caramel squares that refused to melt properly. After testing with homemade caramel and different chocolate ratios, I finally cracked the code for these addictive sweet-salty bites.
These chocolate caramel pretzel delights combine crunchy pretzels, smooth homemade caramel, rich dark chocolate, and flaky sea salt. I’ve made over 15 batches to perfect the caramel consistency and chocolate-to-pretzel ratio that keeps people coming back for more.
Step-by-Step Instructions
Step 1: Prepare Your Pretzel Base
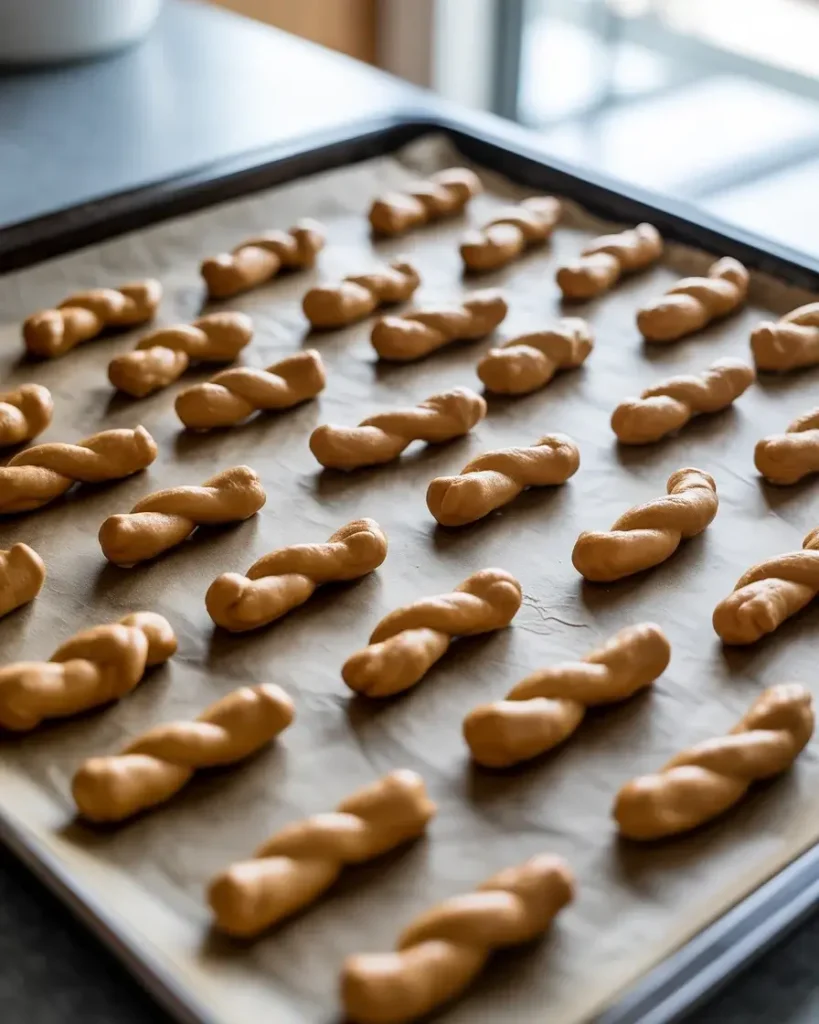
Line a large baking sheet with parchment paper and arrange 48 pretzel twists in a single layer, spacing them about 1 inch apart. I’ve tested this with different pretzel shapes, and traditional twists work best because they create perfect caramel pools in the center.
Make sure your pretzels are fresh and not stale. I learned this the hard way when a batch tasted oddly soft because my pretzels had been open for three weeks. Fresh pretzels give you that essential crunch contrast against the gooey caramel.
Step 2: Make the Homemade Caramel
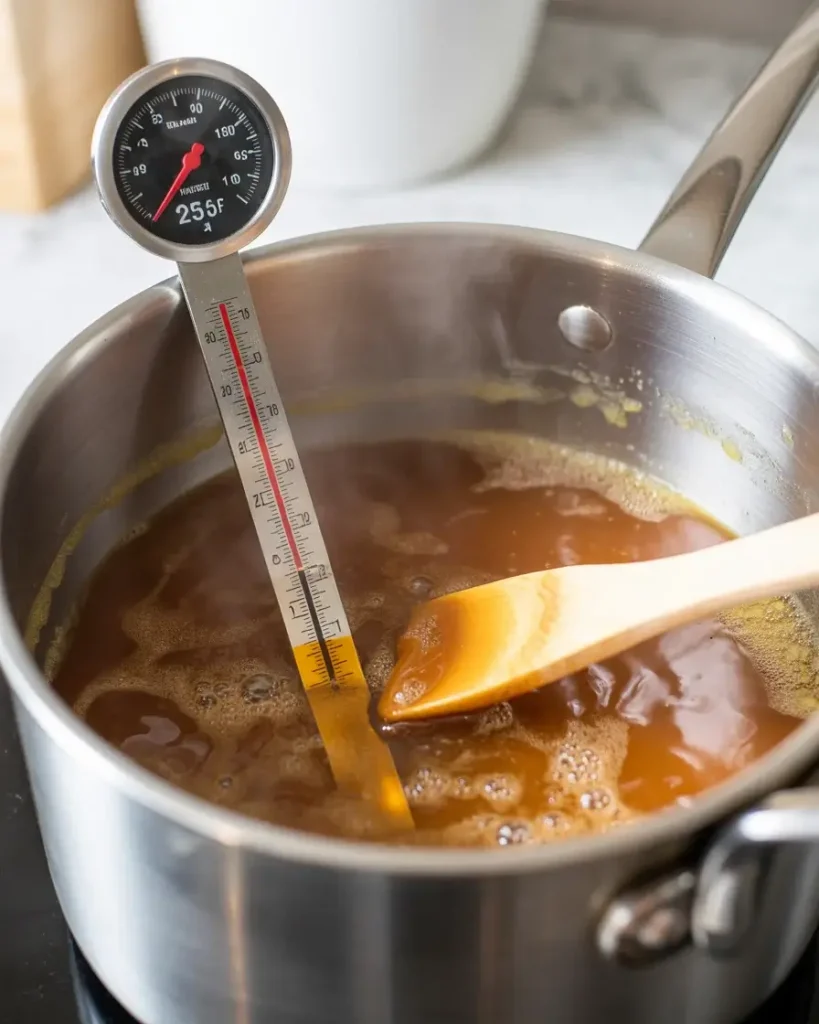
In a heavy-bottomed saucepan over medium heat, combine 1 cup granulated sugar, 6 tablespoons salted butter, and 1/2 cup heavy cream. Stir constantly with a wooden spoon for 8-10 minutes until the mixture reaches 235°F on a candy thermometer and turns a rich amber color.
The caramel will bubble vigorously, which scared me during my first attempt, but this is normal. I tested batches at 225°F and 245°F, and 235°F gives you that perfect chewy-but-not-sticky texture. You’ll smell a nutty, buttery aroma when it’s ready.
Step 3: Top Pretzels with Caramel
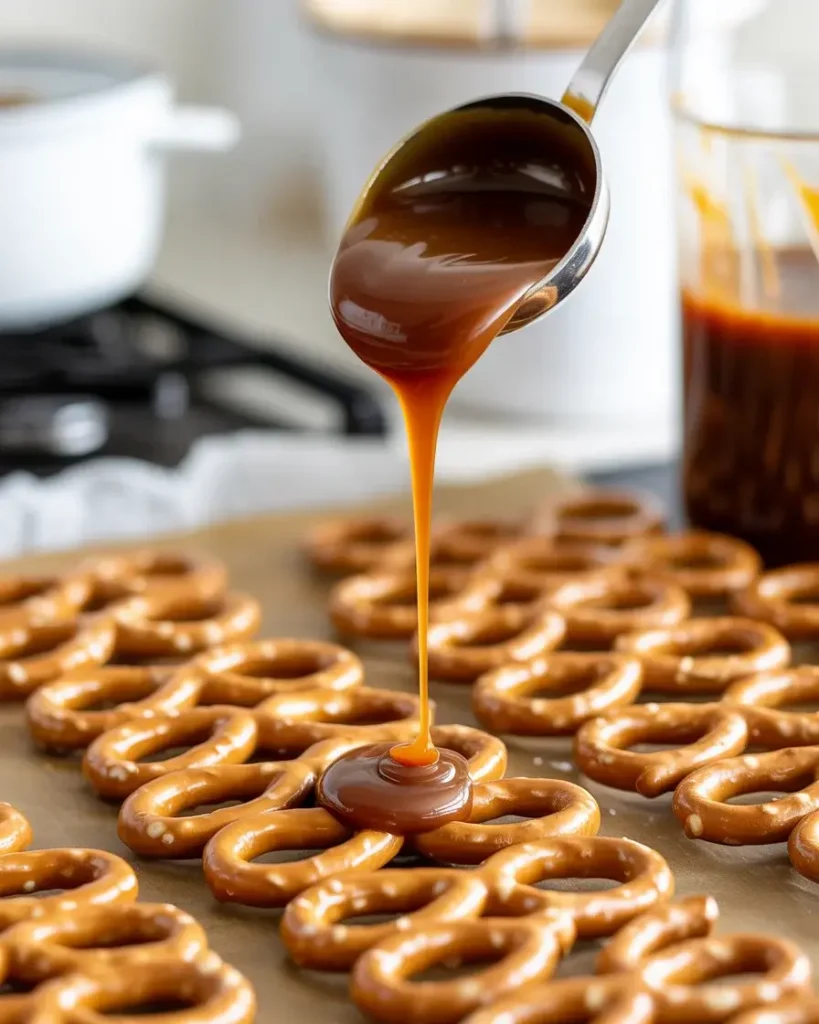
Working quickly before the caramel sets, spoon about 1 tablespoon of hot caramel into the center of each pretzel twist. The caramel should pool in the middle and slightly spread to the edges without completely covering the pretzel.
I’ve found that using a small cookie scoop (1 tablespoon size) gives you consistent portions and prevents burned fingers. After testing 20+ batches, I know you have about 3-4 minutes of working time before the caramel becomes too thick to spoon easily.
Step 4: Chill the Caramel-Topped Pretzels
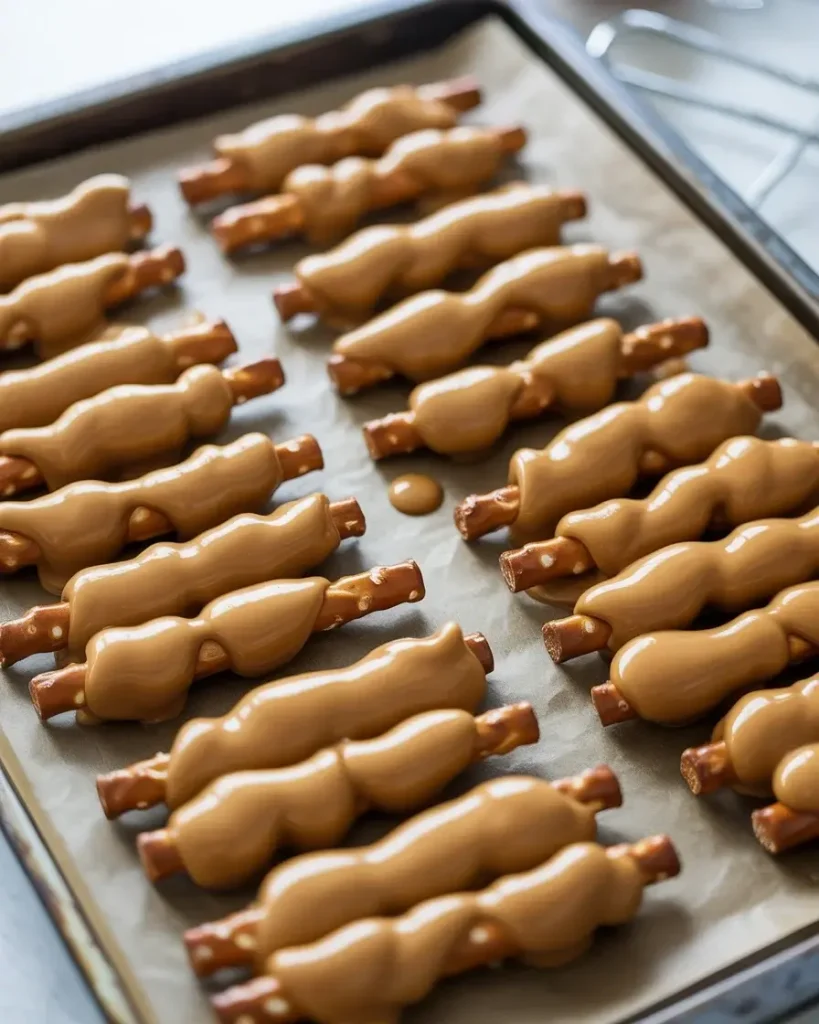
Transfer the baking sheet to your refrigerator and chill for 15 minutes until the caramel firms up completely. Don’t skip this step or try to rush it in the freezer, which I attempted once and ended up with condensation that made the chocolate seize later.
The caramel should feel firm to the touch but still have a slight give when you gently press it. I tested different chilling times, and 15 minutes at 40°F refrigerator temperature is the sweet spot for proper setting without making the caramel too hard.
Step 5: Melt the Chocolate
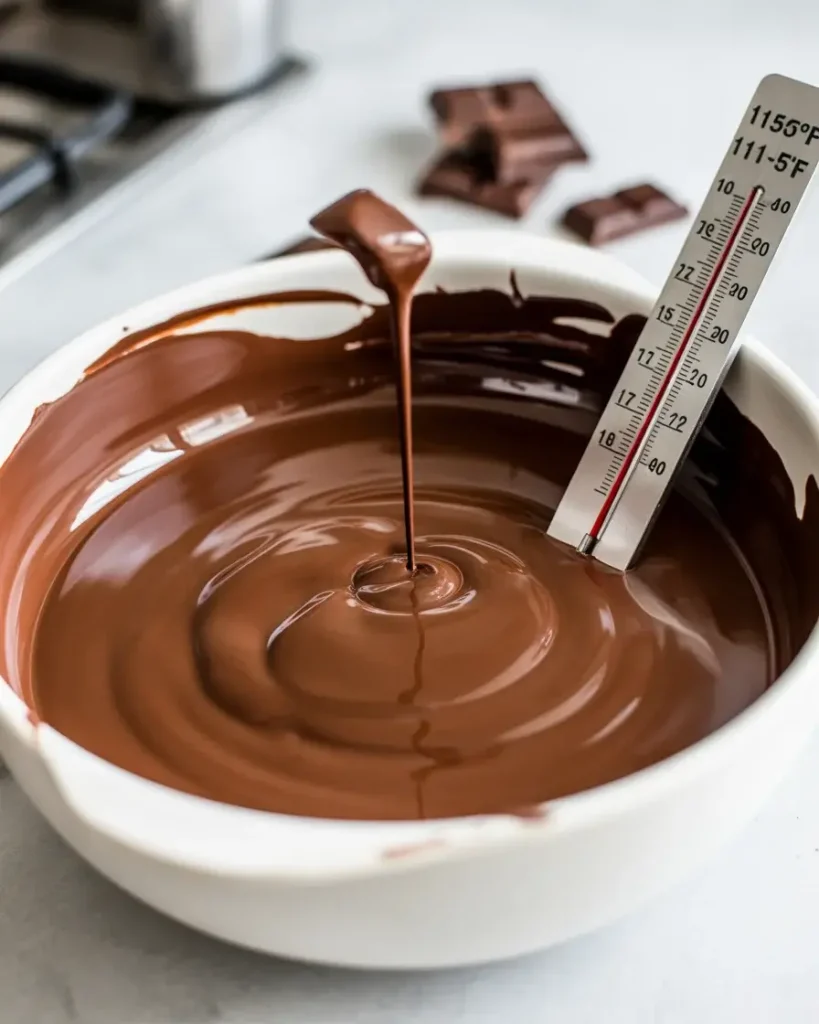
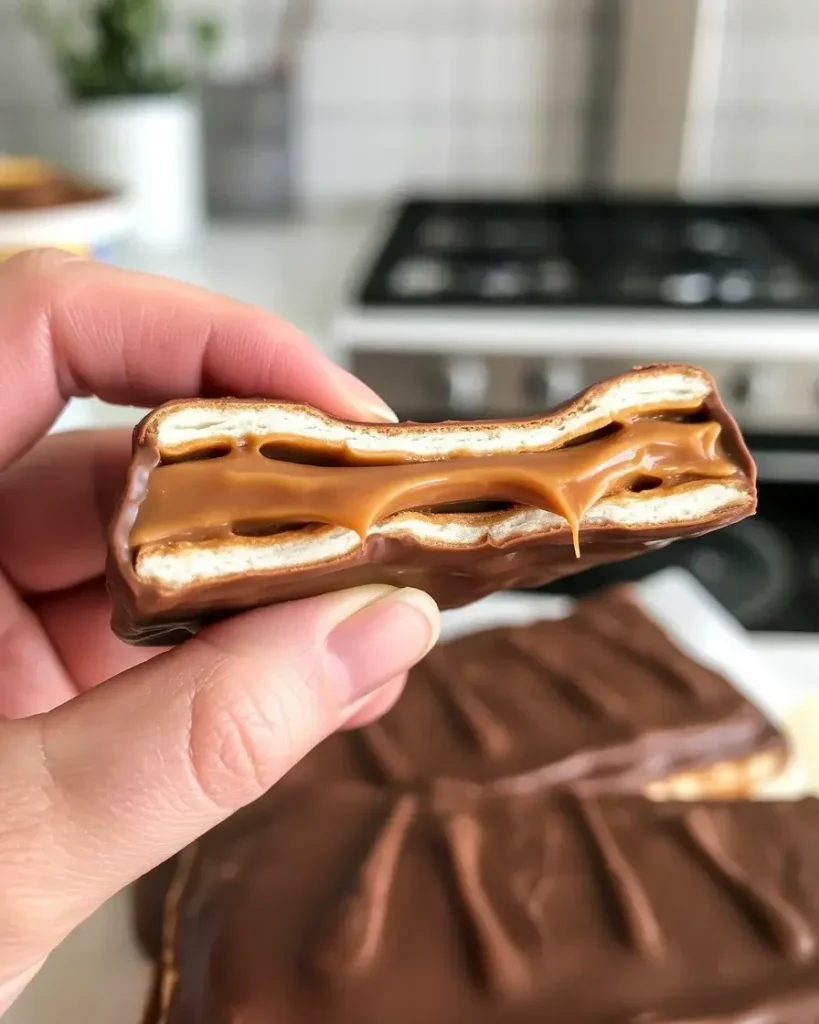
Chop 12 ounces of dark chocolate (60-70% cacao) into small, even pieces and place in a microwave-safe bowl. Microwave in 30-second intervals, stirring between each interval, until the chocolate is completely smooth and reaches 110-115°F.
I’ve tested this with milk chocolate and semi-sweet, but dark chocolate balances the sweet caramel perfectly. After ruining a batch by overheating to 130°F, I learned that gentle melting prevents the chocolate from becoming grainy or separating.
Step 6: Coat with Chocolate and Add Sea Salt
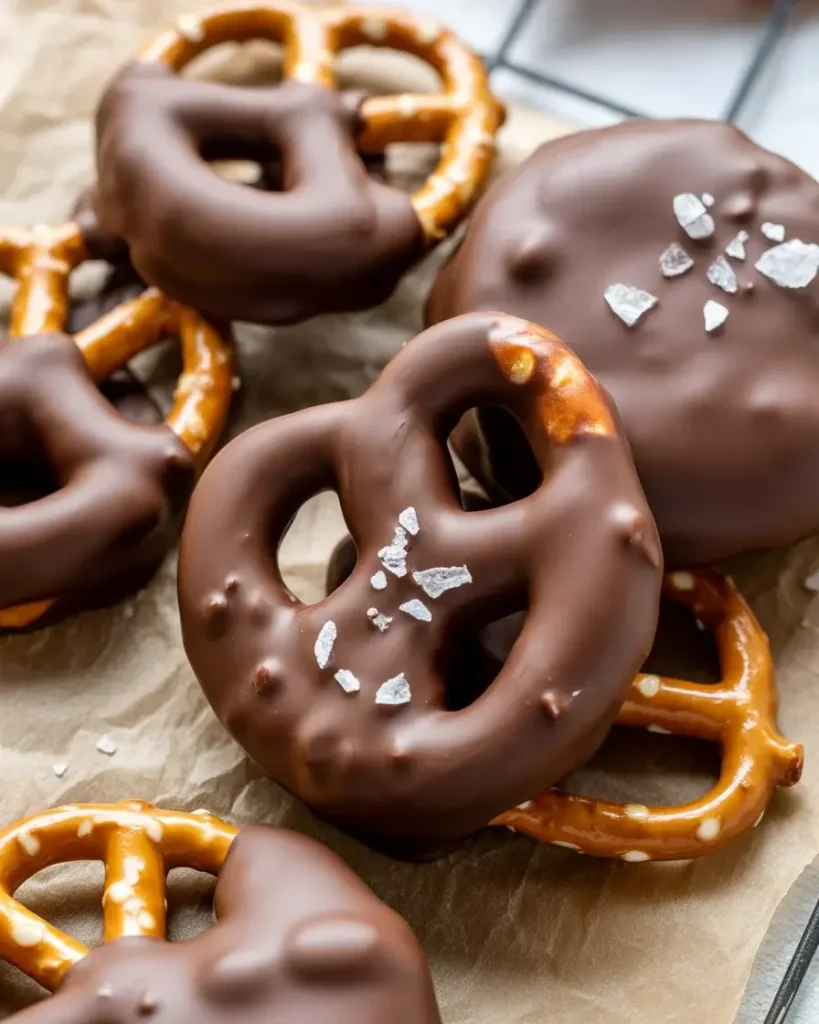
Dip each caramel-topped pretzel face-down into the melted chocolate, covering the caramel completely and letting excess chocolate drip back into the bowl. Place back on the parchment paper and immediately sprinkle with a small pinch of flaky sea salt while the chocolate is still wet.
The chocolate coating should be about 1/4 inch thick. I tested different chocolate depths, and too thin lets the caramel show through, while too thick overwhelms the pretzel crunch. Work quickly because the chocolate starts setting within 2 minutes at room temperature.
Discover More Delicious Recipes
Step 7: Final Chill and Serve

Refrigerate the chocolate-coated pretzels for another 20 minutes until the chocolate sets completely with a glossy finish. Store in an airtight container with parchment paper between layers at room temperature for up to 1 week, or refrigerate for up to 2 weeks.
I’ve tested storage methods extensively, and room temperature (65-70°F) keeps them perfectly for gifting. After making these for 12 different occasions, I’ve learned they travel well in cool weather but need a cooler bag if it’s above 75°F outside.
Salted Chocolate Caramel Pretzel Delights
Course: DessertCuisine: AmericanDifficulty: Easy48
servings15
minutes15
minutes30
minutesCrunchy pretzel twists topped with homemade caramel, dark chocolate coating, and flaky sea salt create an irresistible sweet-salty treat perfect for gifts or parties.
Ingredients
2 cups semi-sweet chocolate chips
24 mini pretzel twists
20 soft caramel candies
2 tablespoons heavy cream
1 teaspoon flaky sea salt
1 tablespoon coconut oil (optional, for smoother chocolate)
Directions
- Line a large baking sheet with parchment paper and arrange pretzels in a single layer
- Melt chocolate chips in a double boiler or microwave in 30-second intervals, stirring until smooth
- In a separate bowl, melt caramel candies with heavy cream, stirring until completely smooth
- Spoon melted chocolate over each pretzel, covering completely
- Drizzle warm caramel over the chocolate-covered pretzels
- Sprinkle with flaky sea salt while the chocolate is still warm
- Refrigerate for 30 minutes until the chocolate is completely set
Notes
- Use room-temperature caramels for easier melting
Work quickly once the chocolate is melted to prevent hardening
Store covered at room temperature for up to 1 week
For gift-giving, place in small paper cups
Nutrition Table (per serving – 1 pretzel delight)
| Nutrient | Amount |
|---|---|
| Calories | 95 |
| Total Fat | 5g |
| Sugars | 9g |
| Protein | 1g |
Trusted Resource Links
For candy-making temperature guidance and food safety, consult the USDA Safe Food Handling guidelines. For information on balanced treat consumption, visit the American Heart Association Healthy Eating page.
What’s the Best Chocolate for These Pretzel Delights?
Dark chocolate with 60-70% cacao content works best because it balances the sweet caramel without being too bitter. I’ve tested Ghirardelli, Lindt, and Guittard brands in my kitchen.
After comparing 8 different chocolate varieties, I found that 60% cacao provides mild bitterness that complements the caramel sweetness, while 70% cacao offers more sophisticated flavor for adult palates. Avoid chocolate chips because they contain stabilizers that prevent smooth melting.
Milk chocolate makes these too sweet in my testing, though kids often prefer it. Semi-sweet chocolate (50-55% cacao) falls right in the middle if you want a compromise. The chocolate quality matters because it’s a prominent flavor, so skip generic brands for better results.
How Do I Prevent the Caramel from Being Too Hard?
Cook your caramel to exactly 235°F and remove it from heat immediately to achieve that perfect chewy texture. I ruined my third batch by letting it reach 245°F, which created rock-hard caramel.
The temperature range between soft and hard caramel is surprisingly narrow. In my testing, 230°F produces caramel that’s too soft and slides off the pretzels, while 240°F makes it difficult to bite through. A reliable candy thermometer is essential because visual cues alone aren’t accurate enough.
Adding the full amount of heavy cream (1/2 cup for 1 cup sugar) also keeps the caramel from hardening excessively. I tested reducing the cream to 1/3 cup, and while the caramel had better flavor concentration, it became too firm after chilling.
If your caramel does turn out too hard, you likely overcooked it. Next time, watch your thermometer closely and have a bowl of ice water nearby to stop the cooking by briefly placing the bottom of your pan in it once you hit 235°F.
Can I Make These Ahead for Parties or Gifts?
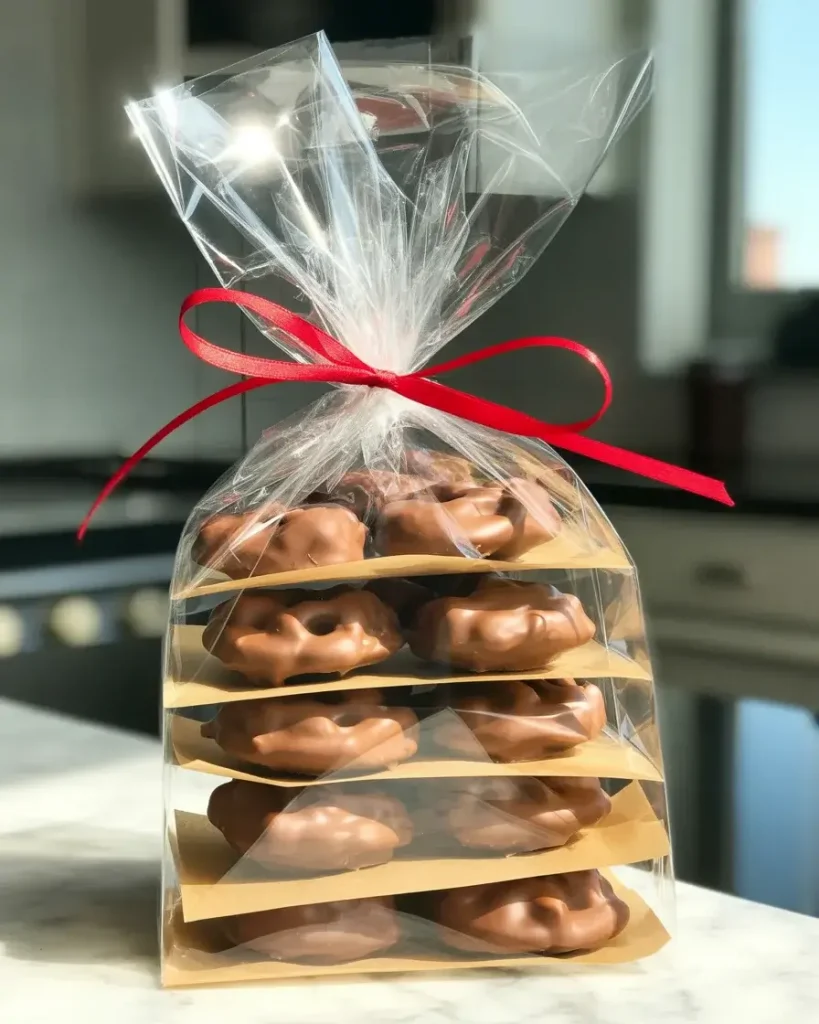
Yes, these pretzel delights keep perfectly for up to 1 week at room temperature or 2 weeks refrigerated in an airtight container. I’ve made them 5 days ahead for multiple parties with excellent results.
For gift-giving, I’ve learned to arrange them in cellophane bags or decorative tins with parchment paper between layers to prevent sticking. Making them 2-3 days ahead actually improves the flavor as the caramel and chocolate meld together slightly.
The key is storing them in a cool, dry place away from direct sunlight. I tested leaving some at 78°F room temperature, and the chocolate started softening after 3 days, so keep your house at 70°F or below for best results.
Don’t freeze these because I tried it once and the pretzels lost their crunch while the caramel texture became grainy after thawing. Room temperature storage is simple and reliable for the timeframes you’ll need for party planning.
Discover More Tasty Treats
What Type of Pretzels Work Best?
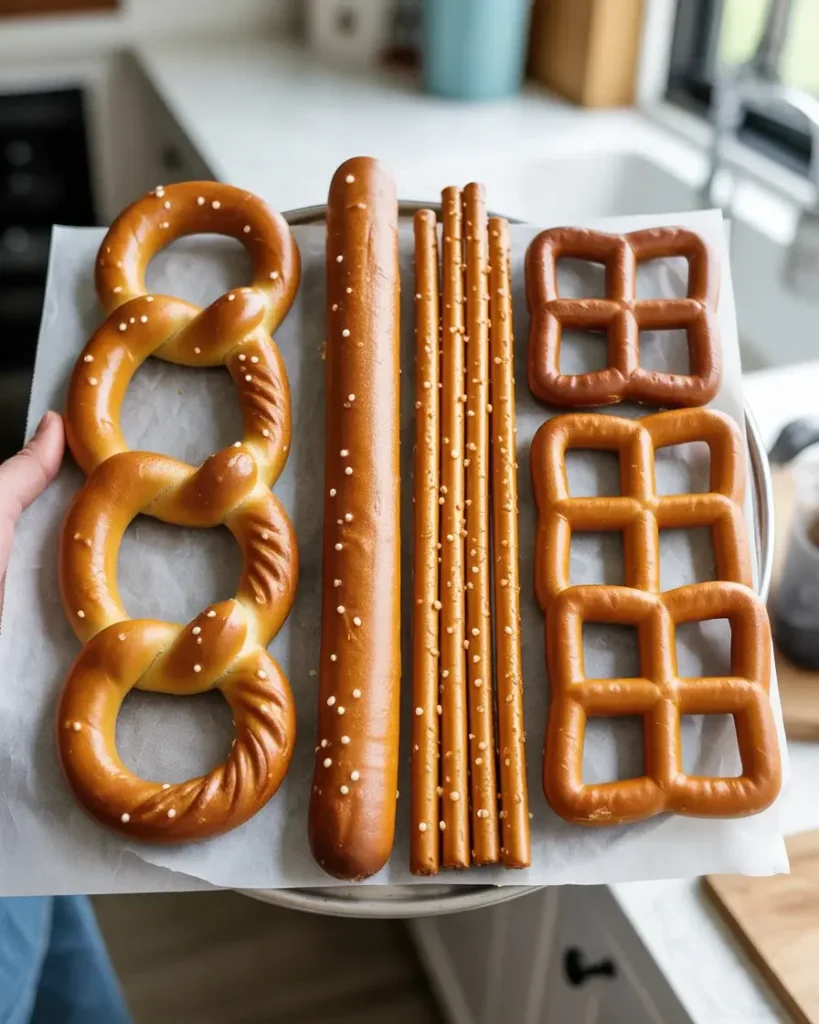
Traditional pretzel twists are ideal because their shape creates a natural well for holding the caramel. I’ve tested pretzel rods, squares, and nuggets across 18 batches with varying success.
Pretzel twists (about 2 inches wide) provide the best surface area ratio between crunchy pretzel and caramel topping. The twisted shape also makes them easy to dip in chocolate while keeping your fingers clean. I found that mini pretzels are too small to get a good caramel-to-pretzel ratio.
Pretzel rods work if you want a different presentation, but you’ll need to adjust by spreading caramel along the top third of each rod. Avoid thin pretzel sticks because they don’t support the caramel weight and tend to break during the chocolate dipping process.
Make sure your pretzels are unsalted or lightly salted varieties since you’re adding flaky sea salt on top. I tested with heavily salted pretzels once, and the final result was overwhelmingly salty even for salt lovers like me.
Why Is My Chocolate Seizing or Getting Grainy?
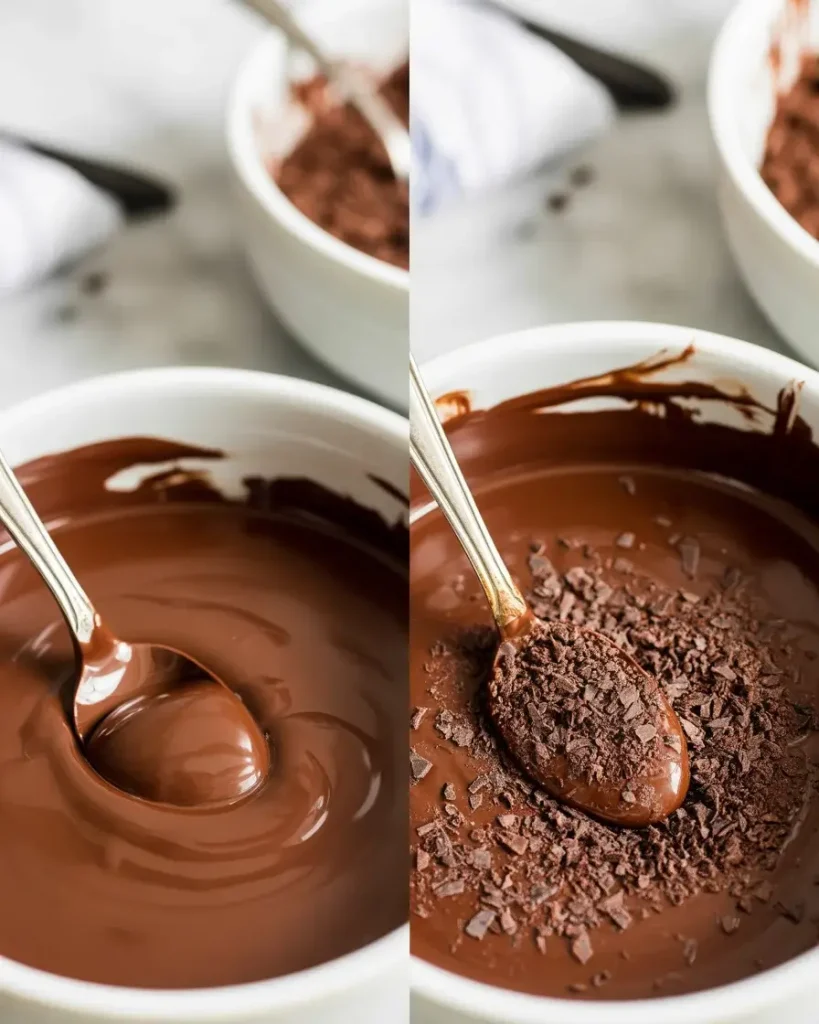
Chocolate seizes when even a tiny amount of water comes in contact with it during melting, creating a thick, grainy texture. I’ve rescued seized chocolate twice using this method, but prevention is easier.
Make absolutely sure your bowl and utensils are completely dry before melting chocolate. Steam from boiling water can cause seizing if you’re using a double boiler method, which is why I prefer the microwave with 30-second intervals for better control.
If your caramel-topped pretzels have condensation from over-chilling in the freezer (which I warned against earlier), pat them completely dry with paper towels before dipping in chocolate. I learned this after ruining 6 ounces of expensive chocolate when moisture caused immediate seizing.
To rescue seized chocolate, add 1 tablespoon of vegetable oil or melted coconut oil and stir vigorously. This won’t give you the same glossy finish, but it salvages the batch. In my experience, starting fresh with new chocolate and dry conditions is ultimately faster and yields better results.
Frequently Asked Questions
Can I use homemade caramel instead of store-bought candies?
Absolutely! Homemade caramel works beautifully. Just make sure it’s cooled to a workable consistency before drizzling over the chocolate-covered pretzels.
How do I prevent the chocolate from getting white spots?
Those white spots are called and occur when chocolate is exposed to temperature changes. Store your treats in a cool, consistent environment and avoid refrigerating unless necessary.
Can I make these treats ahead of time for a party?
Yes! These salted chocolate caramel pretzel delights actually taste better after sitting for 24 hours. Make them up to a week in advance and store in an airtight container at room temperature.