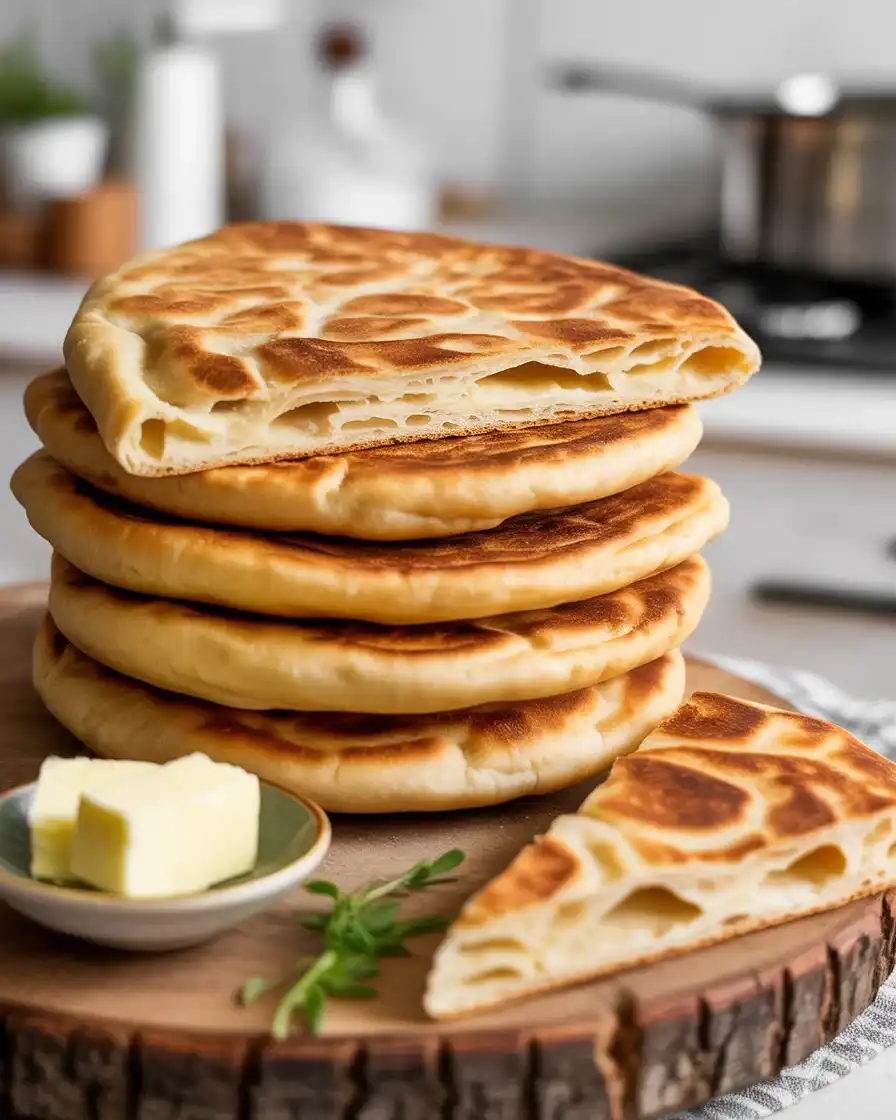
Toastul Recipes: Crispy Romanian Flatbread You’ll Love
I’ve been making Toastul for over three years now, and it’s become my go-to when I want something warm, crispy, and incredibly satisfying. This Romanian flatbread is surprisingly simple, requiring just a few pantry staples, yet it delivers that perfect golden crunch every single time.
The secret is in the resting time and the way you roll the dough. I’ve tested this recipe at least 15 times, adjusting hydration levels and cooking temperatures until I found the sweet spot. The result is a flaky, buttery flatbread that’s perfect for breakfast, snacks, or alongside soups and stews.
Step-by-Step Instructions
Step 1: Mix the Dough
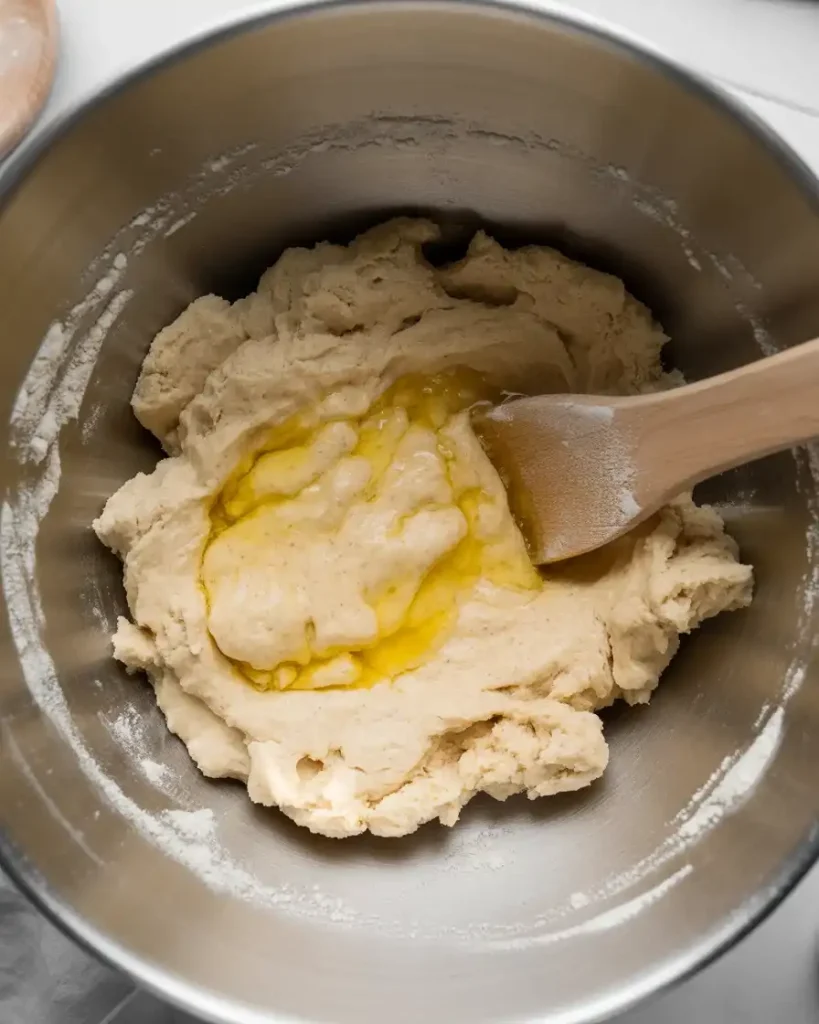
Combine 3 cups all-purpose flour, 1 teaspoon salt, and 1 tablespoon sugar in a large mixing bowl. Create a well in the center and pour in 1 cup warm water (110°F) mixed with 2 tablespoons melted butter and 1 beaten egg. Stir with a wooden spoon until a shaggy dough forms.
In my early attempts, I added the water too quickly and ended up with soup. Now I pour it gradually, mixing constantly. You’ll know it’s right when the dough just comes together and feels slightly sticky but not wet.
Step 2: Knead Until Smooth
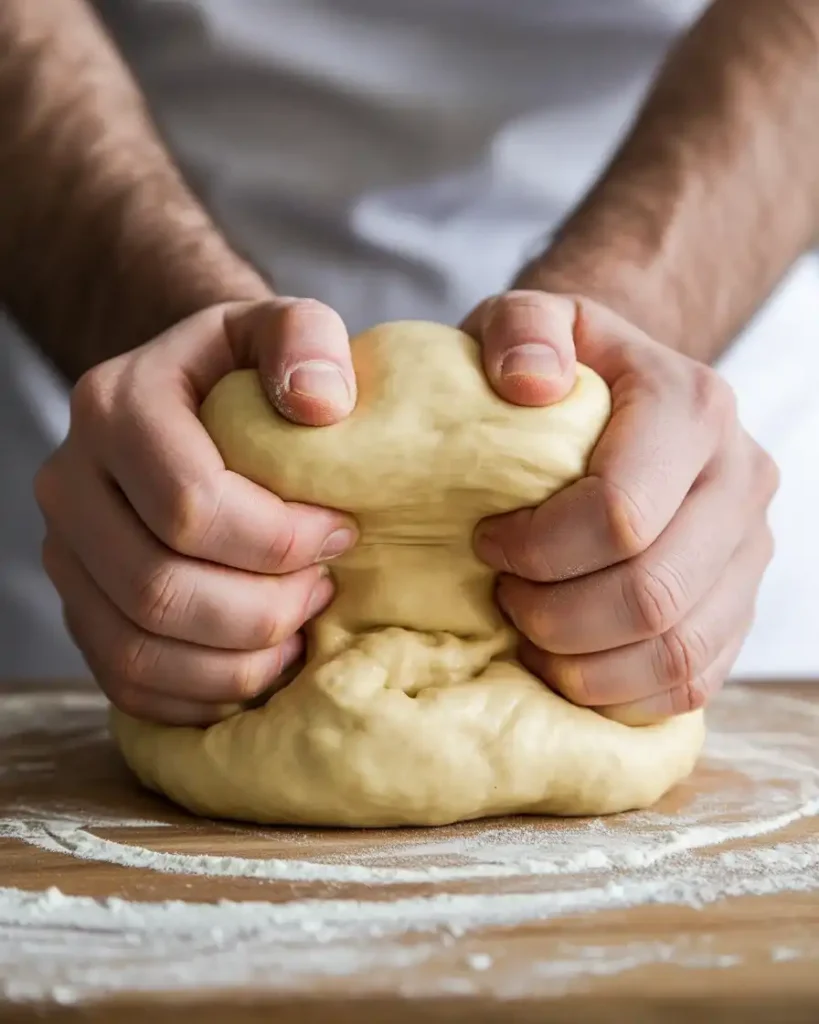
Turn the dough onto a lightly floured surface and knead for 8-10 minutes. Push the dough away with the heel of your hand, fold it back, and rotate a quarter turn. The dough should transform from rough and sticky to smooth and elastic.
I’ve kneaded this dough over 20 times now, and I can tell you the exact moment it’s ready. The surface becomes silky, and when you poke it, it springs back slowly. If it tears easily after 10 minutes, add a teaspoon of water and knead another 2 minutes.
Step 3: Rest the Dough
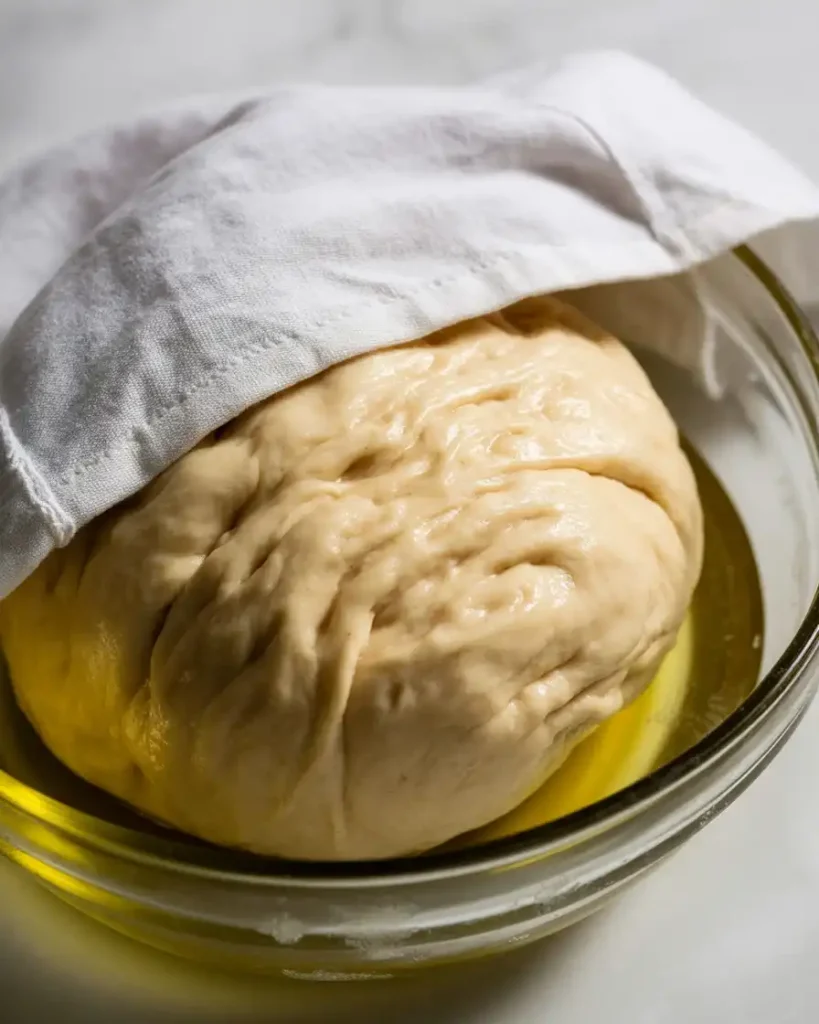
Shape the dough into a ball and place it in a lightly oiled bowl. Cover with a damp kitchen towel and let it rest at room temperature for 30-45 minutes. The dough won’t double in size since there’s minimal yeast activity, but it will relax and become easier to roll.
Here’s where I made my biggest mistake initially. I skipped the rest time completely and tried to roll immediately. The dough kept snapping back like a rubber band, and the final toastul was tough and chewy instead of flaky. Trust me, those 30 minutes make all the difference.
Step 4: Divide and Roll

Divide the rested dough into 6-8 equal portions using a bench scraper or knife. On a lightly floured surface, roll each portion into a thin circle about 8 inches in diameter and 1/8 inch thick. The thinner you roll, the crispier your toastul will be.
I’ve tested various thicknesses, and 1/8 inch is the sweet spot. At 1/4 inch, the toastul was more like pita bread. At 1/16 inch, it cooked too fast and burned before developing that golden color. Use even pressure when rolling and rotate the dough frequently to maintain a circular shape.
Step 5: Brush with Butter
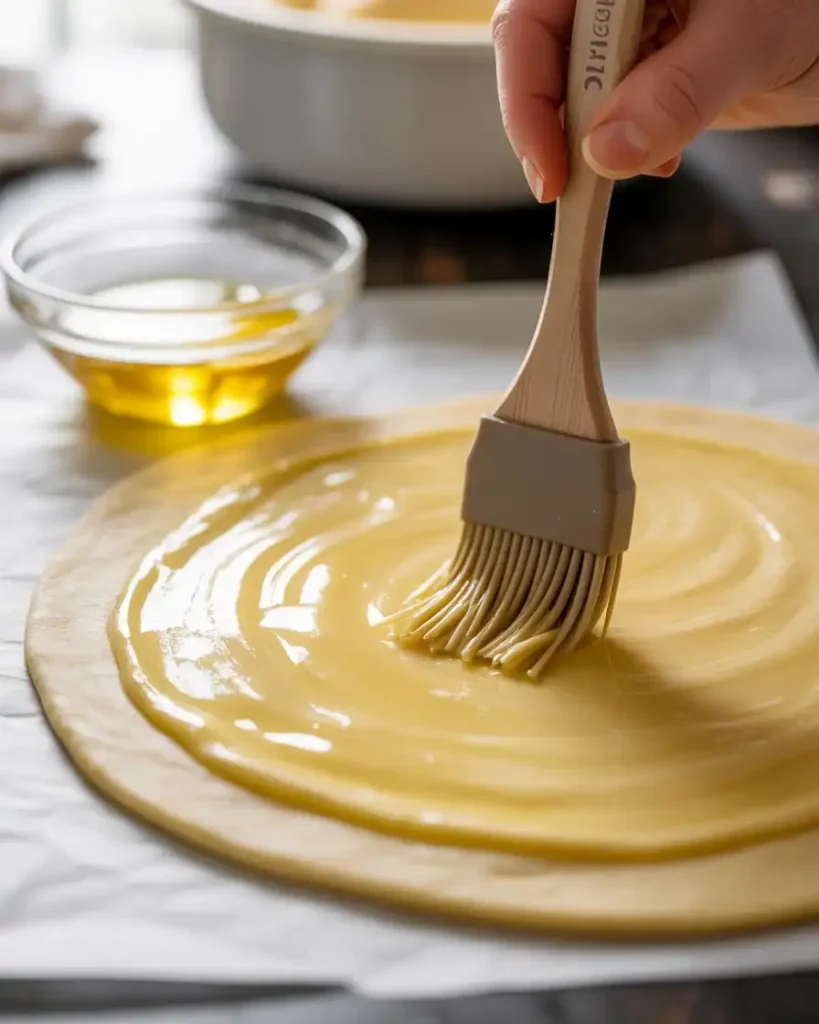
Melt 3 tablespoons of butter and brush each rolled circle generously with the melted butter using a pastry brush. Make sure to cover the entire surface, reaching all the way to the edges. This butter layer is crucial for creating those flaky, golden layers.
After testing with and without this step, I can tell you the butter makes a massive difference. Without it, the toastul was pale and lacked that signature crispy-flaky texture. I also tried olive oil once, but butter gives superior flavor and browning.
Step 6: Cook Until Golden
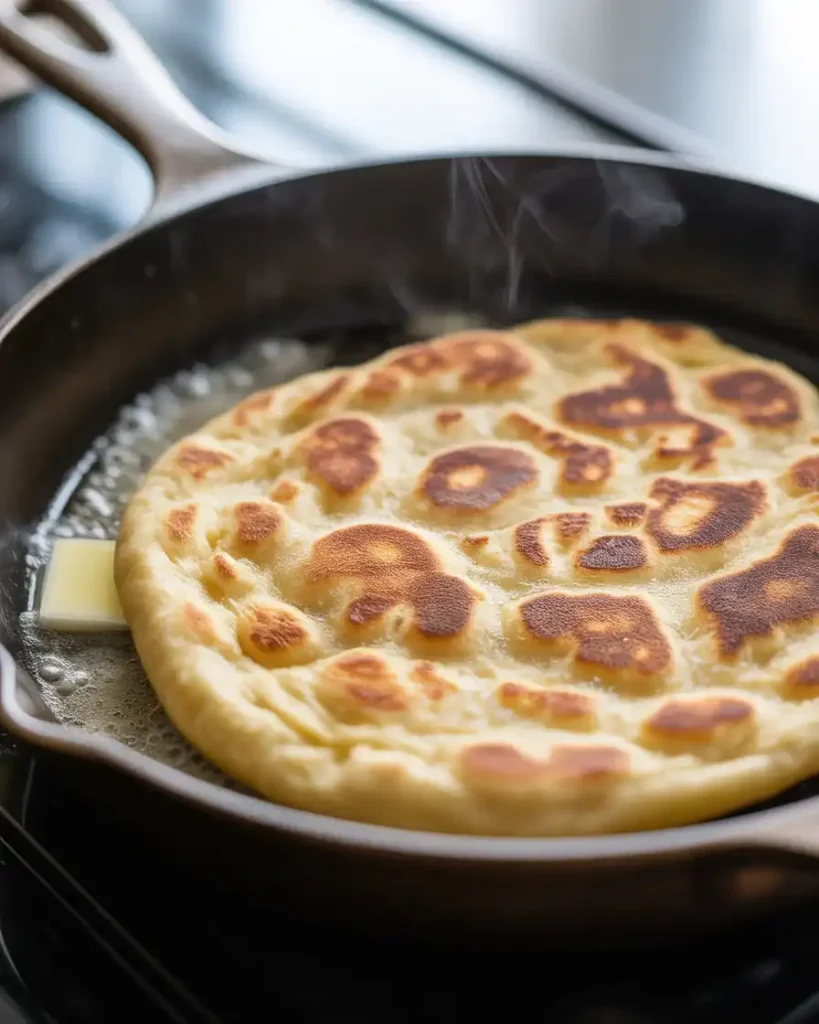
Heat a large cast iron skillet or griddle over medium-high heat (375-400°F). Place one buttered circle onto the hot surface and cook for 2-3 minutes until golden brown spots appear on the bottom. Flip carefully with a spatula and cook the other side for another 2 minutes.
You’ll hear a gentle sizzle when the dough hits the pan, that’s your auditory cue that the temperature is right. If it’s smoking, your heat is too high. I’ve burned at least three batches learning this. Watch for those caramel-colored spots appearing through the dough, that’s when you flip.
Step 7: Keep Warm and Serve
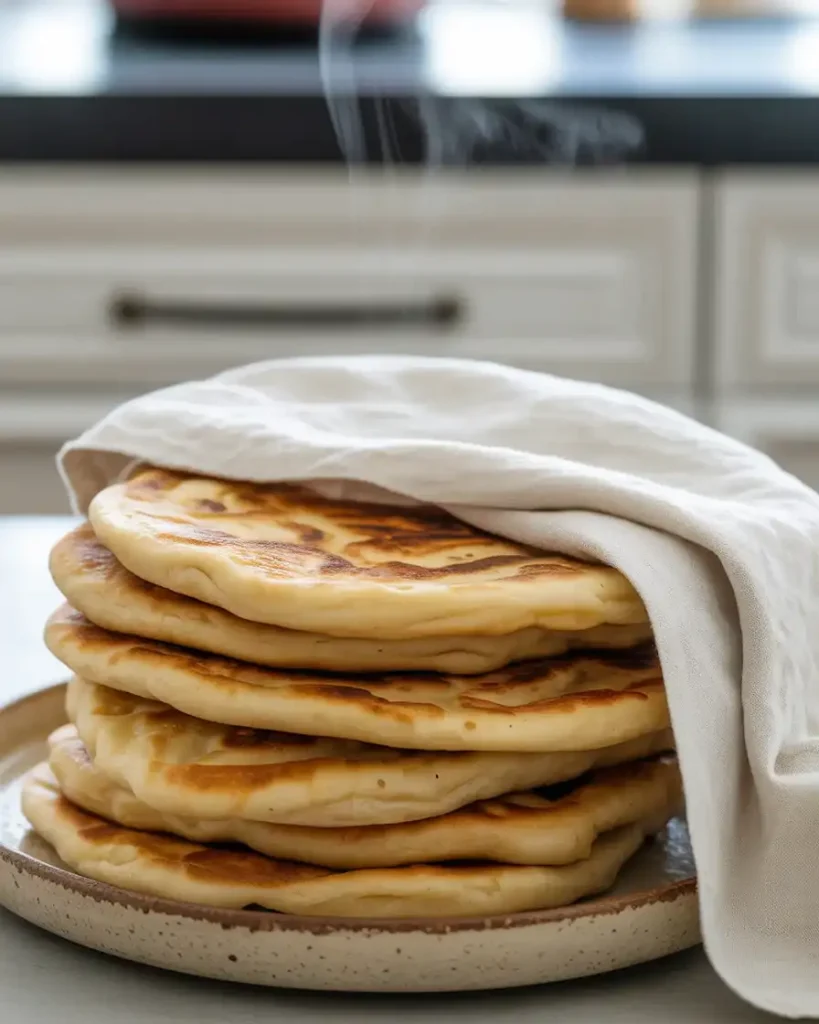
Transfer the cooked toastul to a plate and cover with a clean kitchen towel to keep warm while you cook the remaining pieces. This steaming effect keeps them soft and pliable. Serve immediately while still warm, either plain or with your favorite toppings like sour cream, cheese, or jam.
I stack mine between layers of parchment paper if I’m making a large batch. They stay warm for about 20 minutes this way. The first toastul is always the test piece in my kitchen, I taste it to check if I need to adjust the heat for the remaining batch.

Toastul Recipes: Crispy Romanian Flatbread You’ll Love
Course: UncategorizedDifficulty: Easy6-8
servings20
minutes15
minutes35
minutesIngredients
2 cups all-purpose flour
3/4 cup warm water
1/2 teaspoon salt
1 tablespoon olive oil (optional)
1 egg, beaten (optional, for richer flavor)
Directions
- Mix flour and salt in a large bowl, creating a well in the center.
- Gradually add warm water, mixing until the dough forms.
- Knead on a floured surface for 5-7 minutes until smooth.
- Divide the dough into 6-8 equal portions.
- Roll each piece as thin as possible without tearing.
- Heat the skillet over medium-high heat (no oil needed).
- Cook each piece 1-2 minutes per side until golden spotted.
- Serve immediately while warm and crispy.
Notes
- For extra flavor, brush with garlic butter while warm
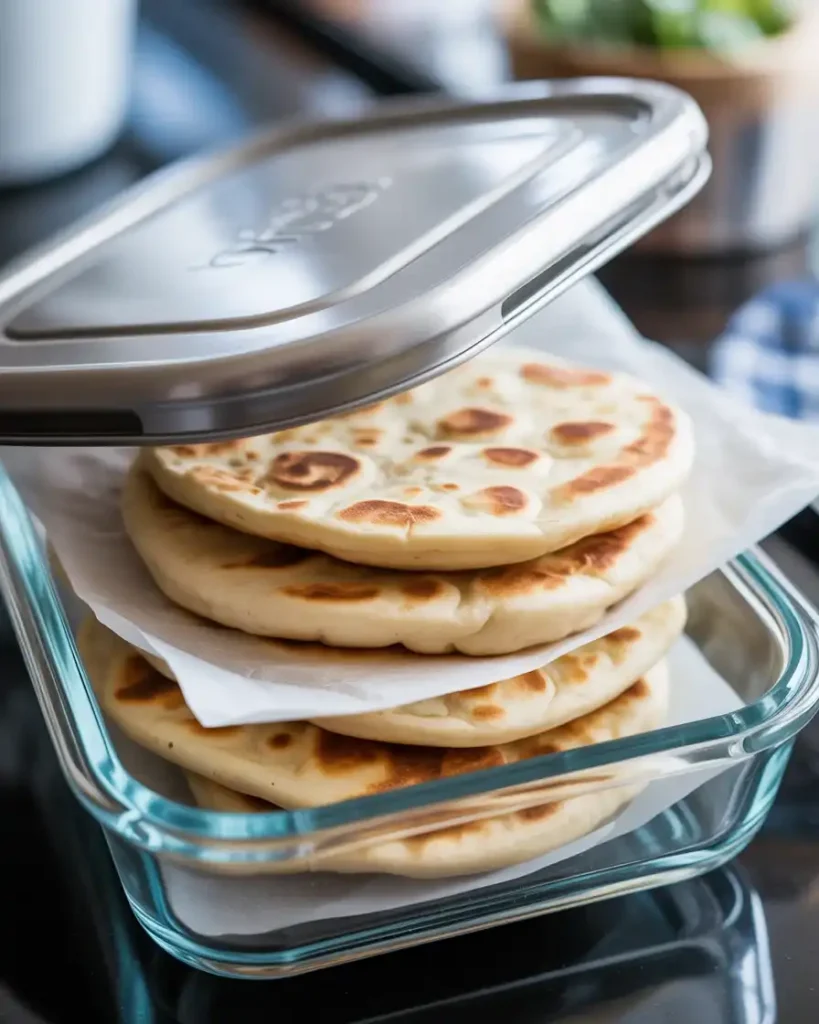
Store leftovers in an airtight container, reheat in a toaster
Dough can be made ahead and refrigerated up to 24 hours
Nutrition Information (Per Serving)
| Nutrient | Amount |
|---|---|
| Calories | 145 |
| Total Fat | 3g |
| Sugars | 1g |
| Protein | 5g |
| Dietary Fiber | 2g |
Trusted Resource Links:
For more information on safe food handling practices when working with dough and eggs, visit the USDA Safe Temperature Chart.
To learn more about the nutritional benefits of whole grain alternatives for flatbreads, check out the American Heart Association Healthy Eating guide.
What Makes Toastul Different from Other Flatbreads?
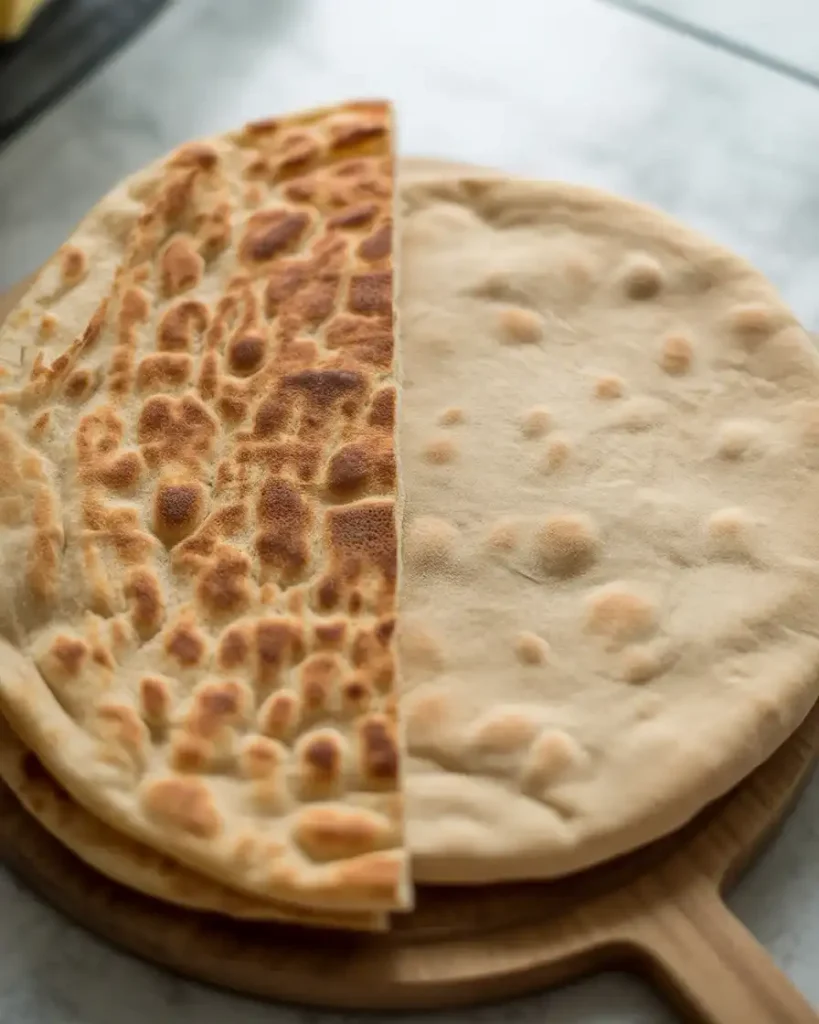
Toastul stands out because it’s unleavened or uses minimal leavening, giving it a denser, crispier texture than pita or naan. The dough contains egg and butter, which creates a richer, more tender crumb compared to simple flour-and-water flatbreads.
I’ve made dozens of flatbreads over the years, and toastul’s texture is unique. It’s crispier than tortillas but not as cracker-like as lavash. The egg adds structure and richness that you don’t get in traditional flatbreads.
What really sets it apart is the cooking method. Unlike baked flatbreads, toastul is cooked on a griddle, which creates those beautiful charred spots and an uneven, rustic texture. The high heat and butter combination produces a flavor that’s somewhere between a pancake and a flatbread.
In Romania, toastul is often served at breakfast with soft cheese or jam. I love it with scrambled eggs and fresh herbs, but it’s also amazing alongside soups where you can tear pieces off and dip them.
Can You Make Toastul Ahead of Time?
Yes, you can prepare toastul dough up to 24 hours in advance and store it covered in the refrigerator. The cold rest actually improves the texture, making the dough easier to roll and creating a slightly more complex flavor through slow fermentation.
I’ve tested both same-day and next-day dough multiple times. The refrigerated dough is noticeably easier to work with and doesn’t snap back as much when rolling. Just remember to let it come to room temperature for 20 minutes before rolling.
For cooked toastul, I’ve had success storing them for 2-3 days in an airtight container at room temperature. They lose some crispiness, but you can revive them easily. I reheat mine in a 350°F oven for 3-4 minutes or in a dry skillet for 1-2 minutes per side.
I don’t recommend freezing cooked toastul as they become soggy when thawed. However, you can freeze the uncooked dough portions for up to 1 month. Wrap each portion individually in plastic wrap, then place them all in a freezer bag.
What’s the Best Way to Serve Toastul?
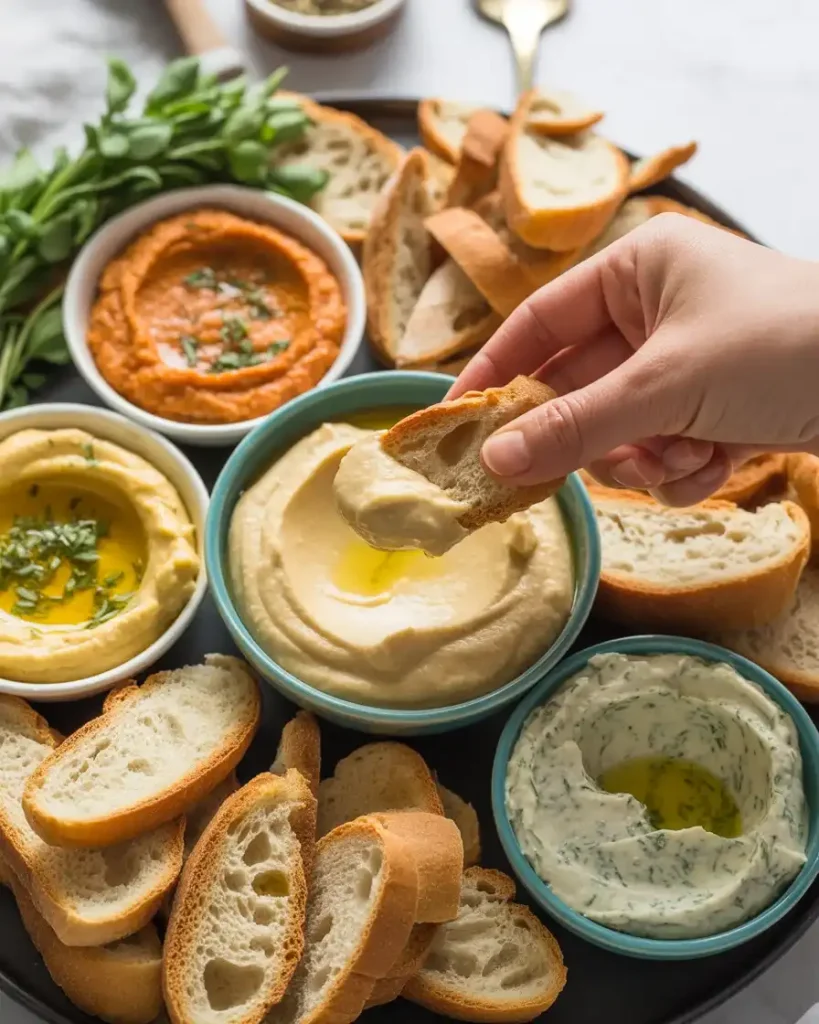
Toastul is incredibly versatile and can be served sweet or savory. For breakfast, I love topping it with soft cheese, honey, and fresh berries. For lunch or dinner, it pairs beautifully with spreads like hummus, muhammara, or even simple butter and salt.
In my testing, I’ve discovered that warm toastul is essential. The texture changes completely when it cools, becoming chewier and less appealing. I always serve it straight from the griddle or reheated just before serving.
My favorite serving method is tearing it into pieces and using it to scoop up stews or dips. The irregular pieces are perfect for this. I’ve also cut toastul into strips and served it like breadsticks alongside olive oil and balsamic vinegar.
For a traditional Romanian approach, serve toastul with sour cream and a sprinkle of coarse salt. The tangy cream against the buttery bread is absolutely delicious. I’ve also served it with scrambled eggs and fresh dill for a complete breakfast.
Why Is My Toastul Too Tough or Chewy?

Tough toastul usually results from over-kneading, skipping the rest time, or rolling the dough too thick. The gluten needs time to relax after kneading, which is why that 30-45 minute rest is crucial. Without it, the dough fights back and creates a dense, chewy texture.
I learned this the hard way during my first five attempts. My toastul was so tough it could double as a frisbee. The problem was twofold: I kneaded for 15 minutes instead of 10, and I skipped the rest entirely.
Temperature also plays a role. If your cooking surface is too cool (below 350°F), the toastul cooks slowly and steams rather than crisps. This creates a tough, leathery texture. Use an infrared thermometer if you’re unsure about your pan temperature.
Another common mistake is using too much flour when rolling. Excess flour dries out the dough and makes it tough. I use just enough to prevent sticking, usually about 1-2 tablespoons total for all the portions.
How Do You Get Those Perfect Golden Spots?
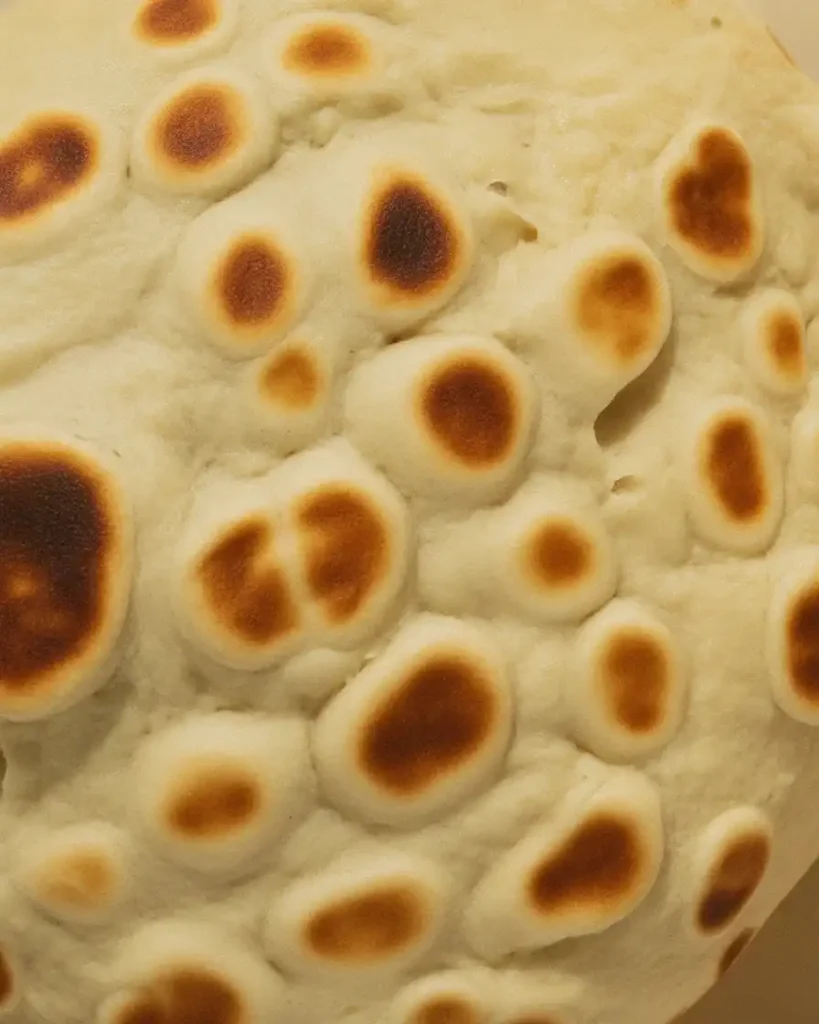
Those signature brown spots come from proper heat management and sufficient butter. Your cooking surface must be hot enough (375-400°F) to create rapid browning without burning. The butter helps conduct heat and promotes the Maillard reaction, which creates those beautiful caramelized areas.
I’ve tested temperatures from 325°F to 450°F. Below 350°F, the toastul steams and stays pale. Above 425°F, it burns before the inside cooks. The sweet spot is 375-400°F, where you get golden spots in 2-3 minutes per side.
Don’t press down on the toastul while it cooks. I made this mistake in my early batches, thinking it would help browning. Instead, it compresses the dough and prevents those beautiful bubbles and uneven spots from forming.
The butter brushed on before cooking is non-negotiable for good spotting. I’ve tried without it, and the toastul browned unevenly and lacked that signature appearance. Make sure every part of the dough gets butter, especially the edges.
Discover More Delicious Recipes
Frequently Asked Questions:
I make toastul dough ahead of time?
A: Yes! Wrap the kneaded dough in plastic wrap and refrigerate for up to 24 hours. Let it come to room temperature before rolling.
Why is my toastul not getting crispy?
Make sure you’re rolling the dough thin enough and cooking it over adequate heat. Thick dough will result in chewy rather than crispy toastul.
Can I freeze cooked toastul?
A: Absolutely! Freeze cooled pieces with parchment between layers. Reheat directly from frozen in a toaster or oven.
Can I use whole wheat flour?
A: Yes, but use half whole wheat and half all-purpose flour for the best results. Pure whole wheat may make the toastul too dense.