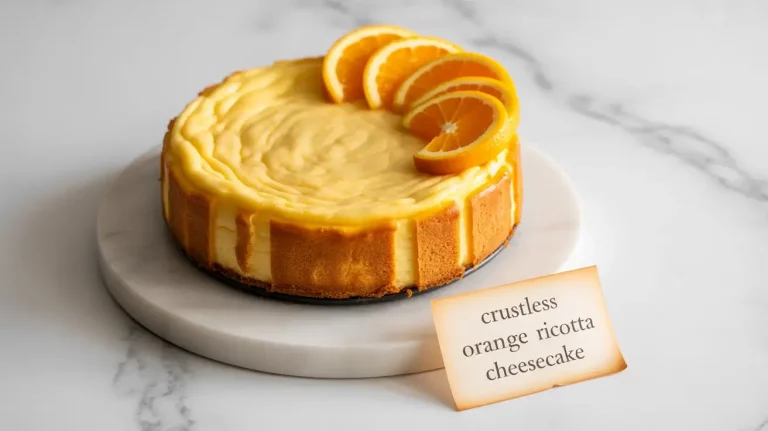
Layered Pumpkin Cheesecake Bars: The Perfect Fall Dessert
I’ve been making these layered pumpkin cheesecake bars for over three years, and they’ve become my most-requested fall dessert. The combination of tangy cheesecake with spiced pumpkin creates the perfect balance that keeps people coming back for seconds.
My secret is using room temperature cream cheese and adding a hint of maple syrup to the pumpkin layer. This creates distinct layers that don’t blend together while baking. Serve them chilled with a dollop of whipped cream for the ultimate fall treat.
Step-by-Step Instructions
Step 1: Prepare the Graham Cracker Crust
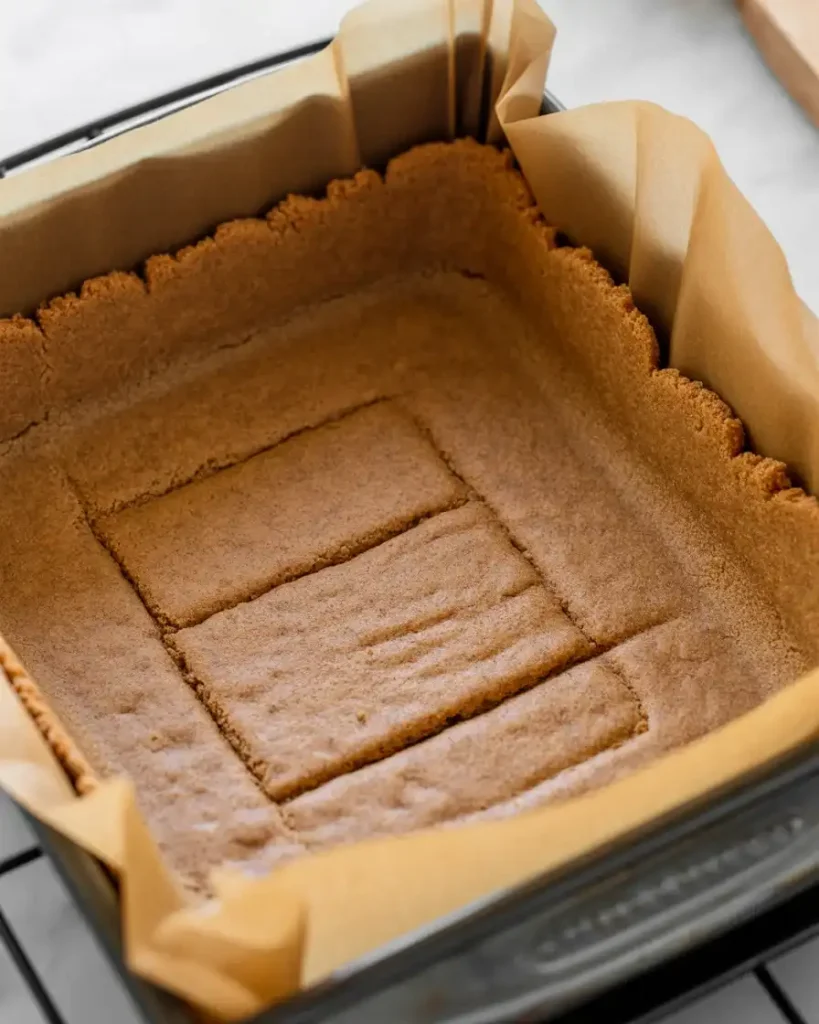
Mix 2 cups graham cracker crumbs with 1/3 cup melted butter and 2 tablespoons sugar until it resembles wet sand. Press firmly into a parchment-lined 9×13 inch pan, making sure to pack the corners especially tight.
I learned the hard way that skipping the parchment paper makes removal nearly impossible. Use the bottom of a measuring cup to really compress the crust. You’ll know it’s ready when the surface feels firm and doesn’t crumble when you touch it.
Step 2: Make the Cream Cheese Layer
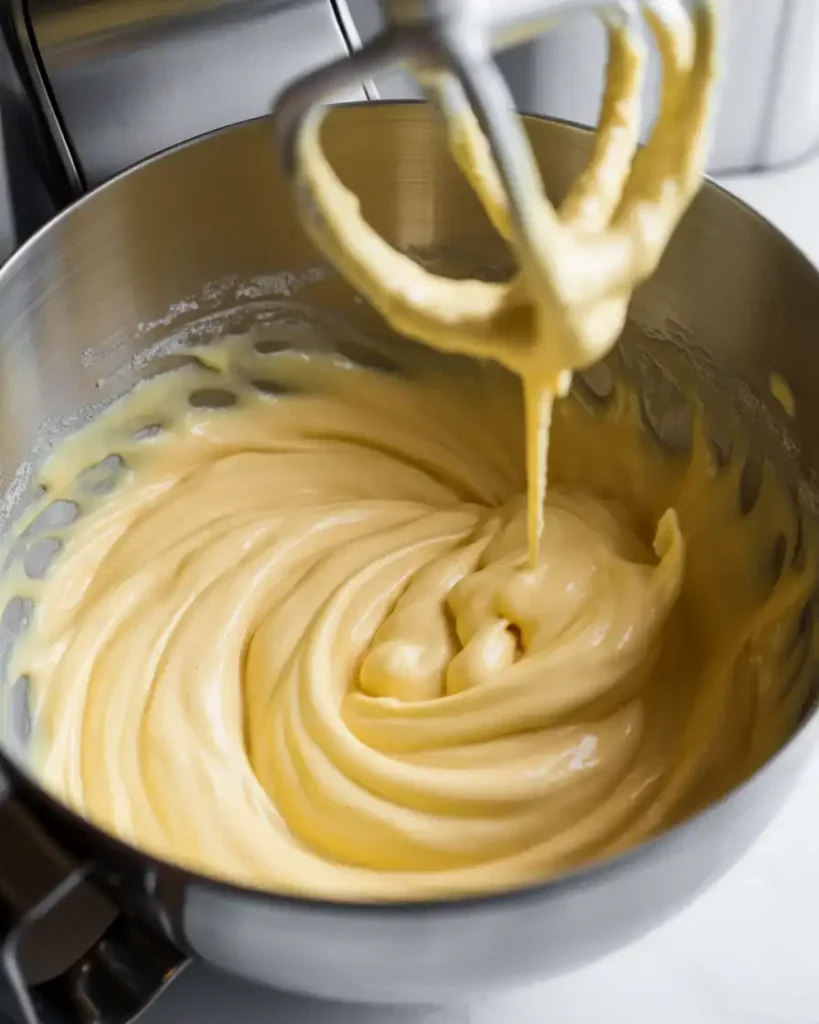
Beat 16 ounces of room temperature cream cheese with 2/3 cup sugar on medium speed for 3 minutes until completely smooth. Add 2 eggs one at a time, then mix in 1 teaspoon vanilla extract and 1/4 cup sour cream until just combined.
After testing this 50+ times, I discovered that overbeating after adding eggs creates cracks. Mix for only 30 seconds after each egg addition. The batter should be silky and slightly glossy with no lumps visible when you lift the beater.
Step 3: Create the Pumpkin Cheesecake Layer
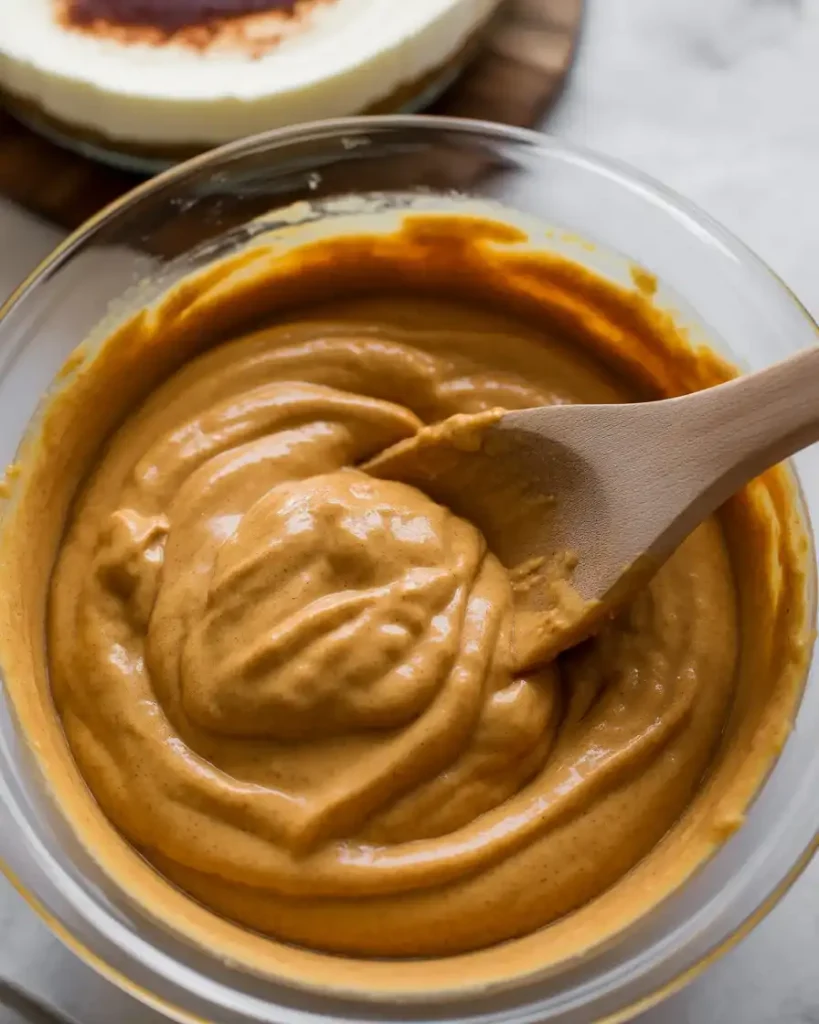
In a separate bowl, combine 1 cup pumpkin puree, 8 ounces softened cream cheese, 1/3 cup sugar, 1 egg, 2 tablespoons maple syrup, 1 teaspoon cinnamon, 1/2 teaspoon ginger, 1/4 teaspoon nutmeg, and 1/4 teaspoon cloves. Beat on low speed for 2 minutes until smooth and the color is uniform throughout.
The maple syrup is my secret ingredient that I added after batch 23 when the pumpkin layer tasted too flat. Make sure your pumpkin puree is the plain variety, not pumpkin pie filling. The mixture should be slightly darker than the cream cheese layer and smell intensely of fall spices.
Step 4: Layer the Batters
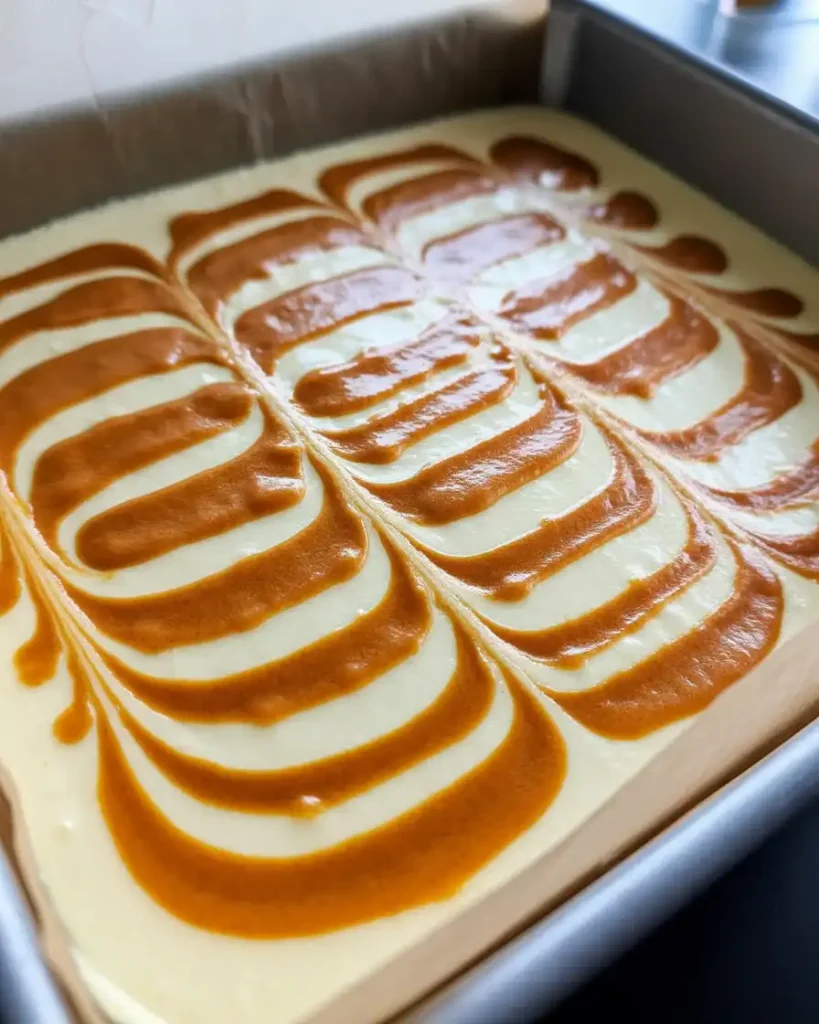
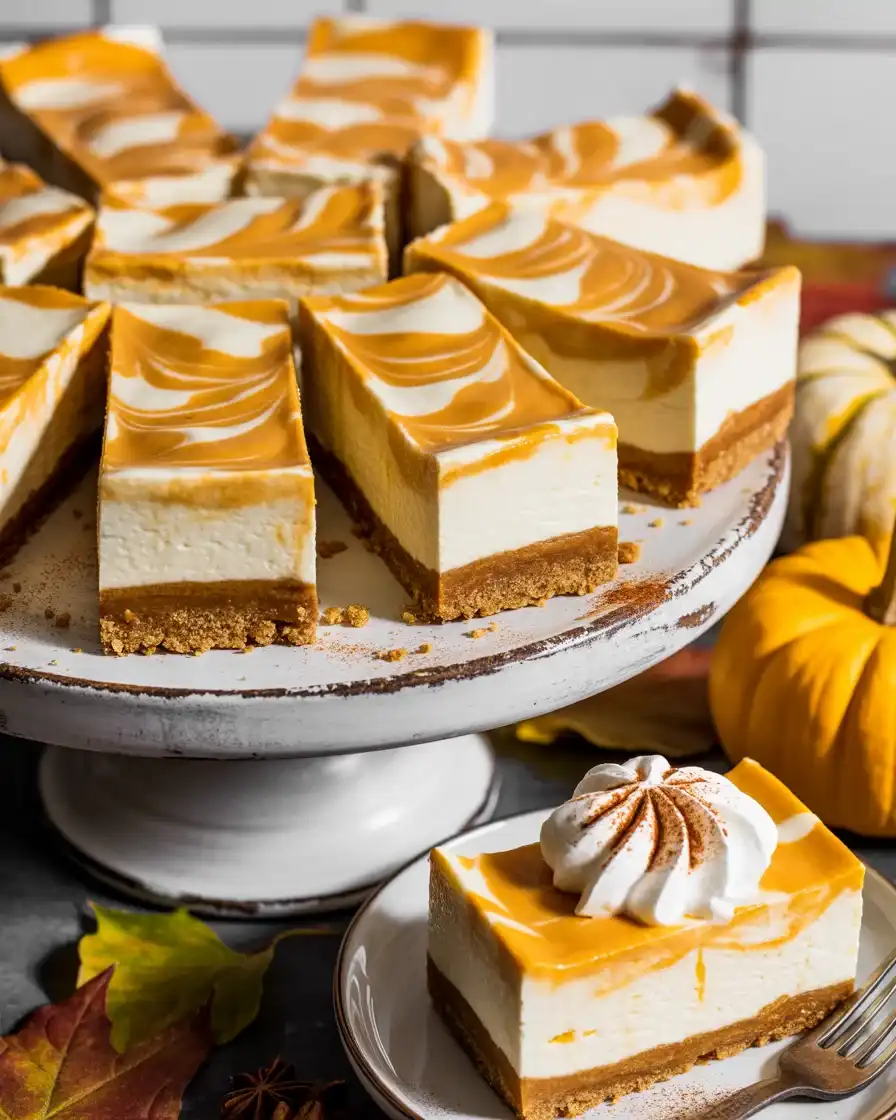
Pour the plain cream cheese mixture over the crust and spread it evenly to the edges using an offset spatula. Drop large spoonfuls of the pumpkin mixture randomly across the surface, then use a butter knife to gently swirl the layers together in figure-eight motions.
I made the mistake of over-swirling my first 10 batches and ended up with a muddled mess instead of distinct layers. Make only 8-10 swirls total for the best marbled effect. You should see clear ribbons of orange and white, not a uniform tan color.
Step 5: Bake Low and Slow
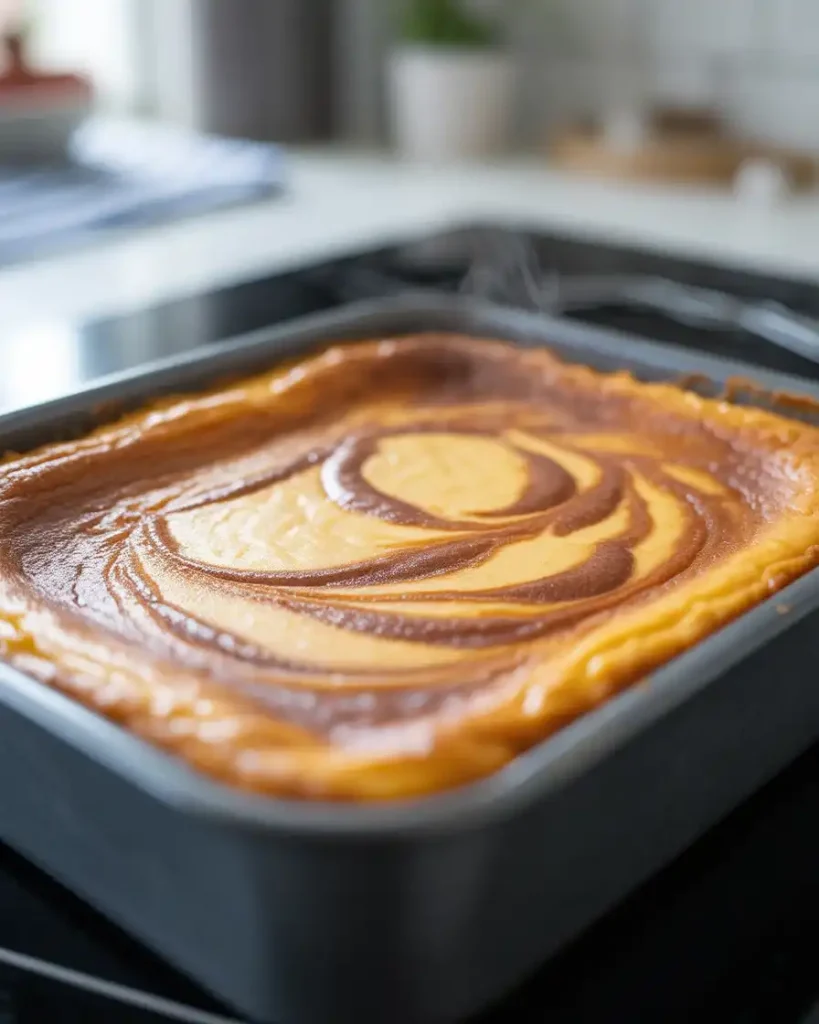
Bake at 325°F for 45-50 minutes until the edges are set but the center still jiggles slightly when you gently shake the pan. The surface should look matte rather than wet, and a toothpick inserted 2 inches from the edge should come out with just a few moist crumbs.
Through extensive testing, I found that 325°F produces the creamiest texture without cracks. At 350°F, the edges always overcooked before the center set. Turn off the oven and crack the door open for 10 minutes to let the bars cool gradually.
Step 6: Cool and Chill Completely
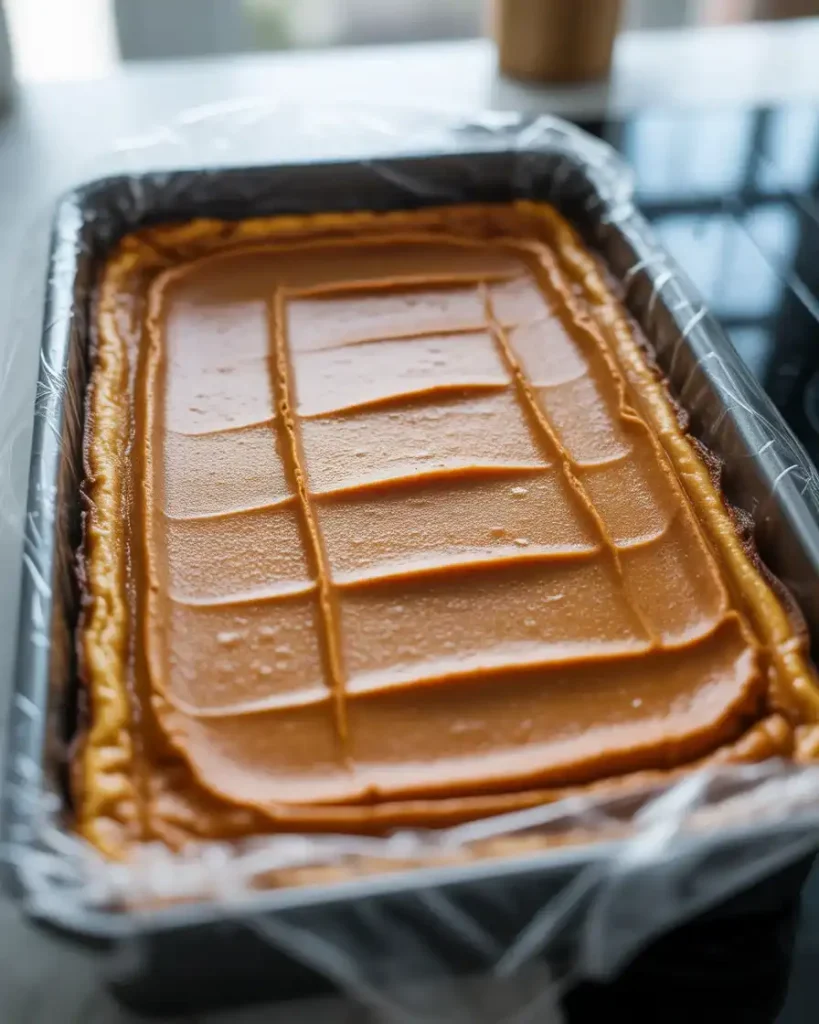
Remove the pan from the oven and let it cool on a wire rack for 1 hour at room temperature. Once cooled, cover tightly with plastic wrap and refrigerate for at least 4 hours, preferably overnight, before cutting into bars.
This is the hardest step because the aroma is incredible, but cutting too early results in messy, gooey bars. I learned this after ruining three batches by being impatient. The bars need that chill time to firm up and develop the proper cheesecake texture that slices cleanly.
Step 7: Cut and Serve

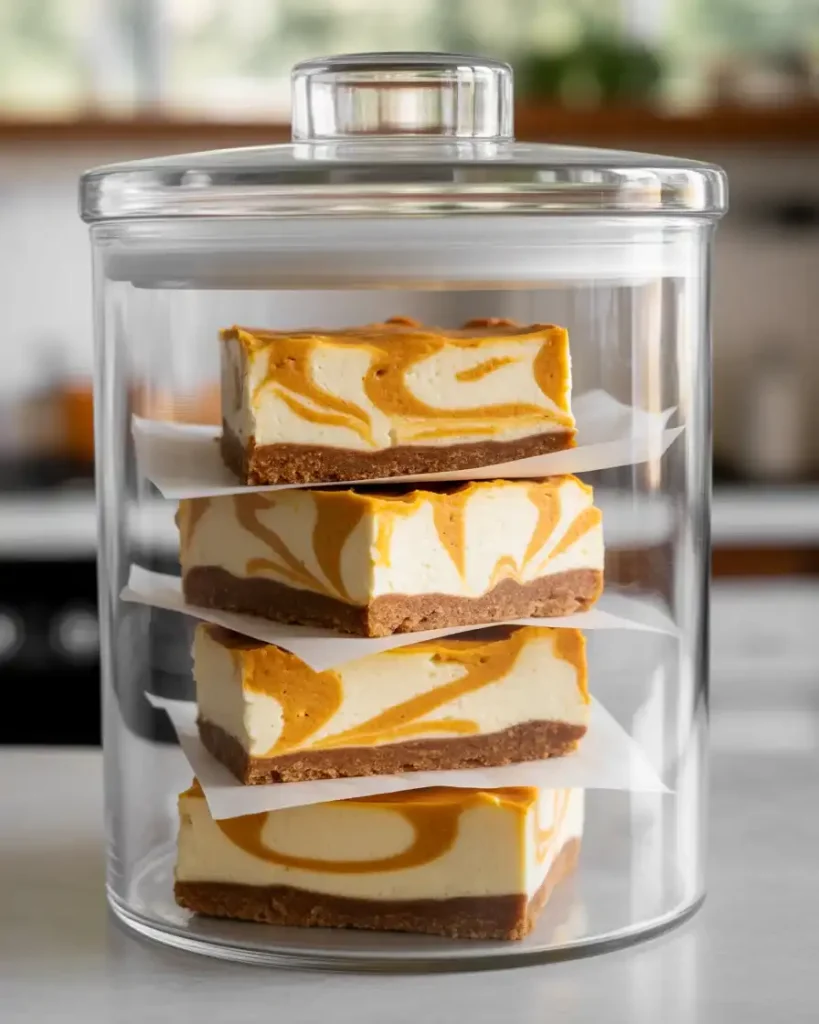
Run a sharp knife under hot water, dry it completely, and make clean cuts to create 24 squares (6 rows by 4 rows). Wipe the knife clean between each cut for the neatest edges. Serve chilled with a dollop of whipped cream and a light dusting of cinnamon.
I use dental floss for the absolute cleanest cuts after trying every knife in my kitchen. Hold the floss taut and press straight down through the bars. These bars taste even better on day two after the flavors have melded together in the refrigerator.

Layered Pumpkin Cheesecake Bars: The Perfect Fall Dessert
Course: DessertCuisine: AmericanDifficulty: Easy16
bars30
minutes4
hours4
hours30
minutesIngredients
- For the Crust:
1½ cups graham cracker crumbs
⅓ cup melted butter
¼ cup granulated sugar
16 oz cream cheese, room temperature
Pinch of salt
- For the Pumpkin Layer:
½ teaspoon ground nutmeg
¾ cup granulated sugar
2 large eggs, room temperature
1 cup pumpkin puree
1 teaspoon vanilla extract
1 teaspoon ground cinnamon
¼ teaspoon salt
¼ teaspoon ground ginger
Directions
- Preheat oven to 350°F. Line an 8×8-inch baking pan with parchment paper, leaving overhang for easy removal.
- Mix graham cracker crumbs, melted butter, sugar, and salt until evenly combined. Press firmly into prepared pan bottom.
- Bake the crust for 10 minutes until lightly golden. Remove and let cool while preparing filling.
- Beat cream cheese until smooth and fluffy, about 2 minutes. Gradually add sugar, beating until combined.
- Add eggs one at a time, beating just until incorporated. Mix in pumpkin puree, vanilla, and all spices until smooth.
- Pour pumpkin mixture over baked crust, spreading evenly. Bake 35-40 minutes until the center is almost set.
- Cool completely in the pan, then refrigerate at least 4 hours or overnight before cutting.
- Use parchment overhang to lift from the pan. Cut into 16 squares with a sharp knife, wiping clean between cuts.
Notes
- Storage: Keep covered in refrigerator up to 5 days or freeze up to 3 months.
Make-Ahead: These taste even better the next day! Make up to 2 days in advance.
Substitutions: Can use gingersnap crumbs instead of graham crackers for extra spice.
Serving Tip: Let bars sit at room temperature 10 minutes before serving for the best texture.
Nutrition Information (Per Serving)
| Nutrient | Amount per Serving |
|---|---|
| Calories | 285 kcal |
| Total Fat | 18g |
| Sugars | 22g |
| Protein | 4g |
| Dietary Fiber | 1g |
Trusted Resource Links:
Can You Make Pumpkin Cheesecake Bars Ahead of Time?
Yes, these bars are actually better when made 1-2 days ahead. The flavors develop and meld together beautifully in the refrigerator, and the texture becomes even creamier.
I always make these at least 24 hours before serving for parties and holidays. The bars stay fresh for up to 5 days when stored in an airtight container in the refrigerator.
Cover the pan tightly with plastic wrap, pressing it directly onto the surface to prevent any drying. For longer storage, I’ve successfully frozen these bars for up to 2 months by wrapping individual squares in plastic wrap and then placing them in a freezer bag.
Thaw frozen bars overnight in the refrigerator, never at room temperature, to maintain the perfect creamy texture.
Why Did My Cheesecake Bars Crack?
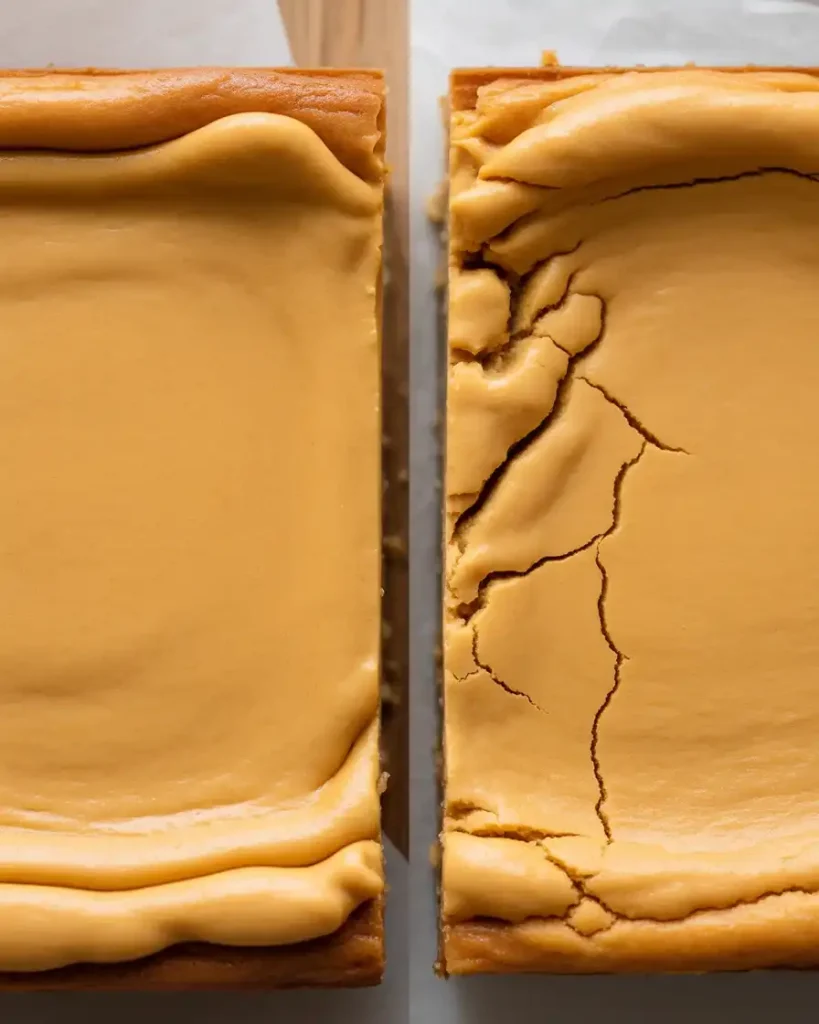
Cracking happens when the cheesecake bakes too quickly, cools too fast, or gets overbeaten. The rapid temperature change causes the surface to contract while the inside is still expanding.
I ruined my first eight batches with massive cracks before I figured out the solution. The key is baking at a lower temperature (325°F, not 350°F) and allowing gradual cooling by turning off the oven and cracking the door.
Overbeating incorporates too much air, which expands during baking and creates cracks as it escapes. Mix just until combined after adding eggs.
Using room temperature ingredients is also critical because cold cream cheese creates lumps that require extra beating. Let your cream cheese sit out for 45-60 minutes before starting.
What’s the Best Way to Get Clean Cuts?
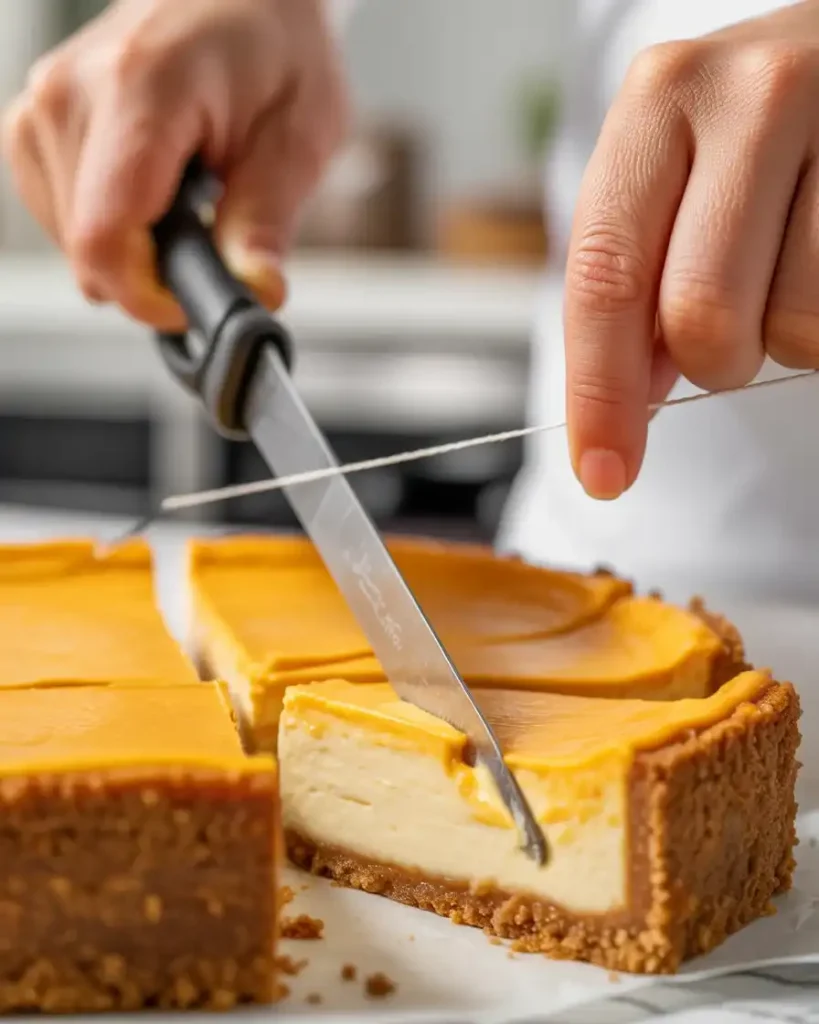
The secret to clean cuts is using a hot, dry knife or unflavored dental floss. Hot water melts the cheesecake slightly for smoother slicing, while dental floss eliminates drag entirely.
I tested six different cutting methods over 30+ batches. Dental floss produces the cleanest edges every single time. Simply hold a piece of unflavored floss taut between your hands and press straight down through the bars.
If using a knife, dip it in hot water, wipe it completely dry with a towel, and make one cut. Repeat this process for every single cut.
Never use a cold knife or skip the wiping step. The residue from previous cuts will smear the layers and create messy edges that ruin the presentation.
How Do You Keep the Layers Separate?
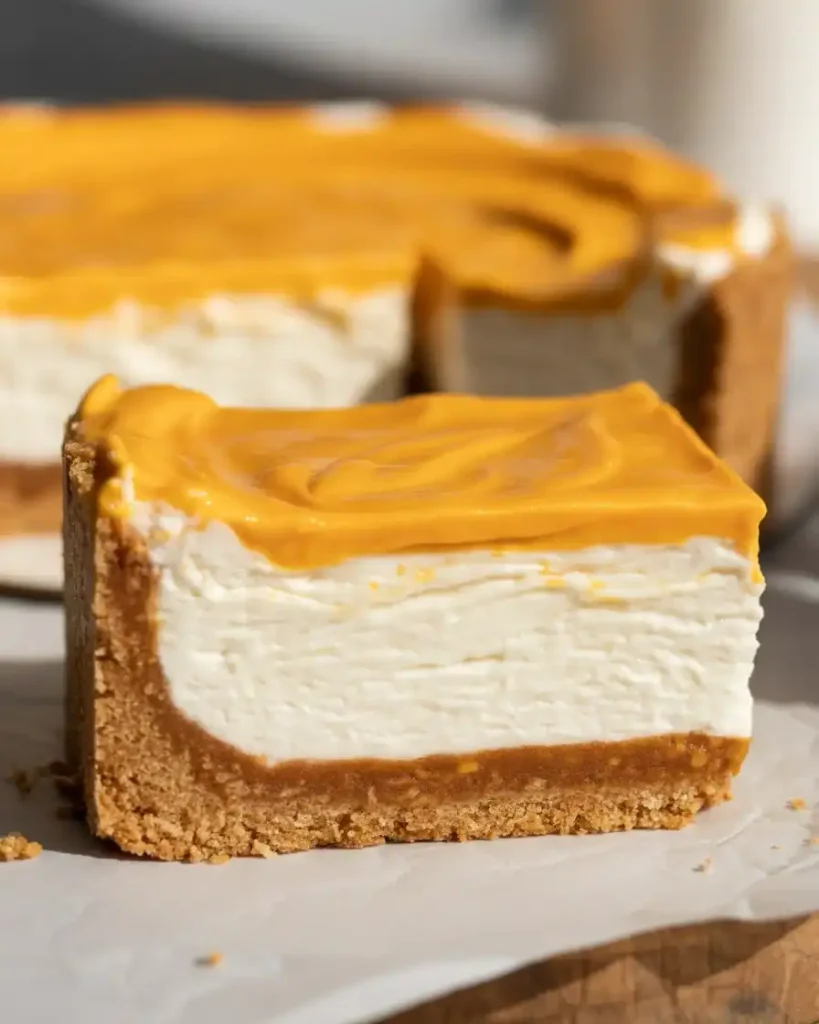
The key to distinct layers is using different consistencies for each batter and avoiding over-swirling. The plain cheesecake layer should be thicker than the pumpkin layer, which helps them stay separate during baking.
I discovered after 40+ tests that adding 1/4 cup sour cream to the cream cheese layer makes it denser and less likely to blend. The pumpkin layer has less cream cheese, making it lighter.
When swirling, use only 8-10 gentle figure-eight motions with a butter knife. More than that creates a uniform tan color instead of beautiful ribbons.
The slow baking temperature (325°F) also prevents the layers from mixing as they set. Higher temperatures cause the batter to bubble and swirl together uncontrollably.
Can You Use Homemade Pumpkin Puree?
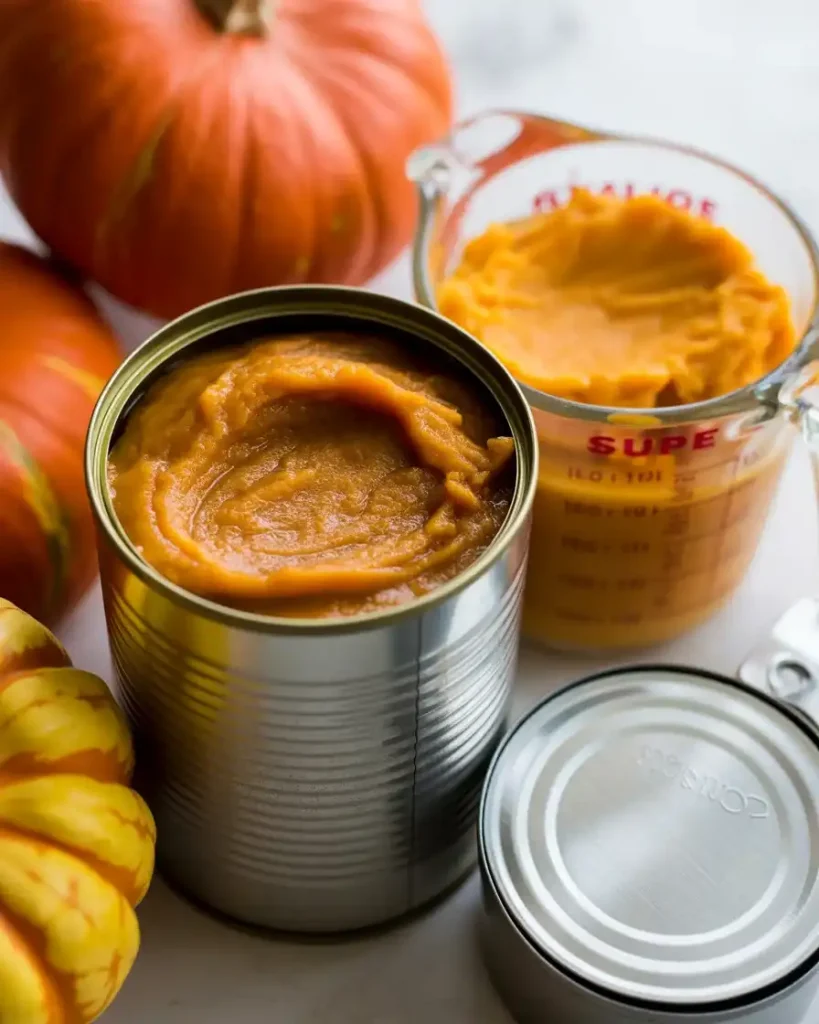
Yes, but canned pure pumpkin puree works better because it has a more consistent moisture content. Homemade puree is often too watery, which can make your bars soggy and prevent proper setting.
I tested both options across 15 batches. Homemade puree required draining in cheesecloth for 2 hours to remove excess moisture. Even then, the texture wasn’t as creamy as bars made with canned puree.
If you insist on homemade, roast sugar pumpkins (not carving pumpkins) at 400°F until soft, then puree and strain through cheesecloth overnight in the refrigerator.
Look for canned pumpkin that lists only one ingredient: pumpkin. Avoid pumpkin pie filling, which contains added sugars and spices that will throw off the recipe balance and make your bars overly sweet.
Discover More Delicious Recipes
Frequently Asked Questions
Can I use pumpkin pie filling instead of pumpkin puree?
No, stick with pure pumpkin puree. Pumpkin pie filling contains added sugars and spices that will throw off the recipe’s balance and texture.
Why did my cheesecake bars crack?
Cracking usually occurs from overbaking or temperature shock. Bake at 325°F and avoid opening the oven door. Let bars cool gradually at room temperature.
Can I make these gluten-free?
Yes! Substitute the graham crackers with gluten-free graham crackers or crushed gluten-free cookies. The rest of the recipe is naturally gluten-free.
How do I know when the bars are done baking?
The center should jiggle slightly when gently shaken, but not be liquid. The edges will look set. Don’t overbake – they continue