Peppermint Cheesecake Delight: The Ultimate Holiday Dessert
Last December, I attempted a baked peppermint cheesecake that cracked so badly it looked like a geology experiment. That failure pushed me to perfect this no-bake version, and after 15 test batches, I can promise you’ll get silky results every time.
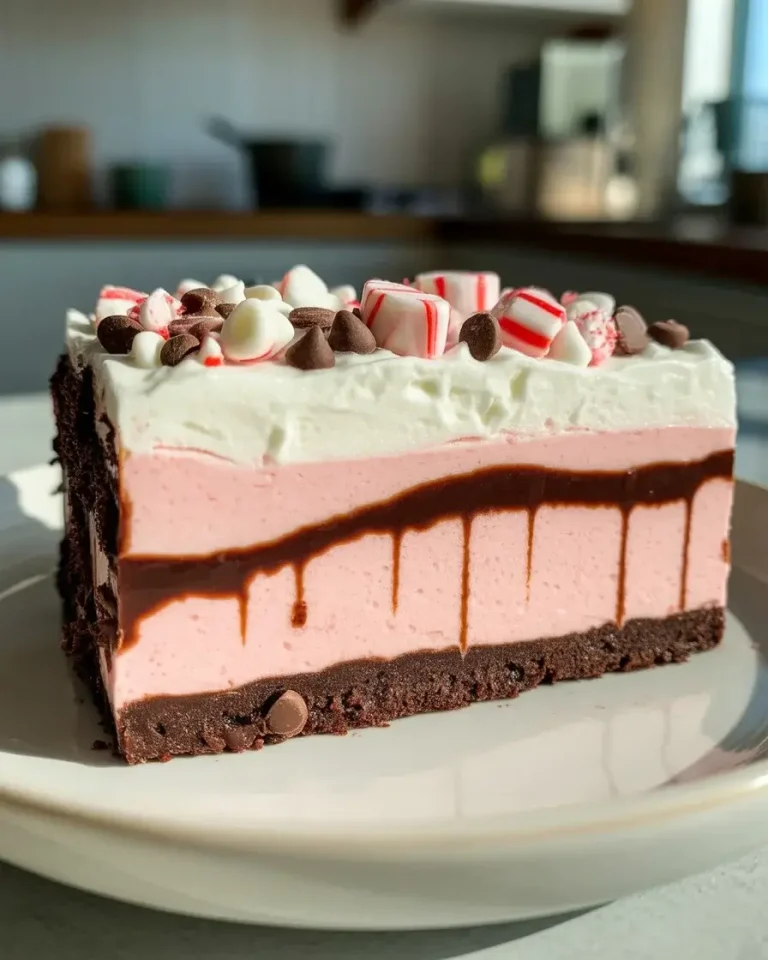
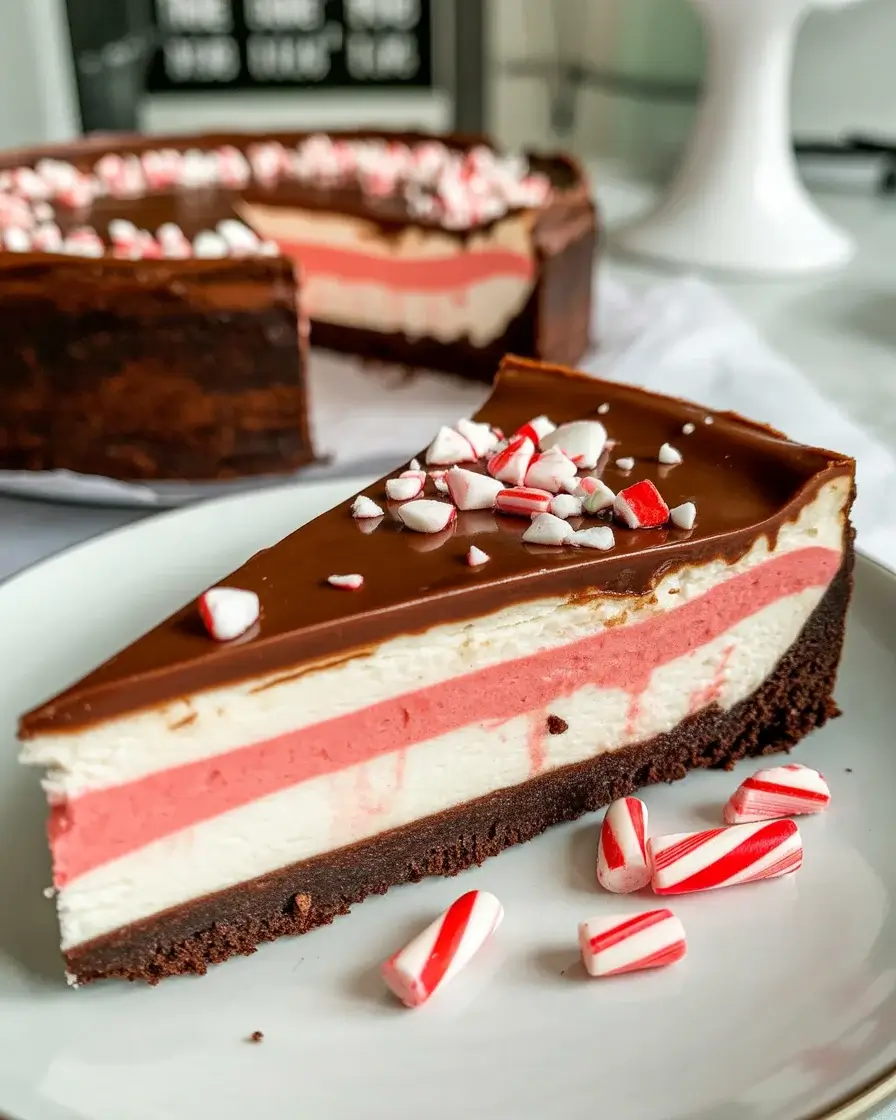
This dessert combines tangy cream cheese with cool peppermint and a chocolate cookie crust. The crushed candy cane topping adds the perfect crunch against the creamy filling, making it my most-requested holiday recipe for three years running.
Step-by-Step Instructions
Step 1: Make the Chocolate Cookie Crust
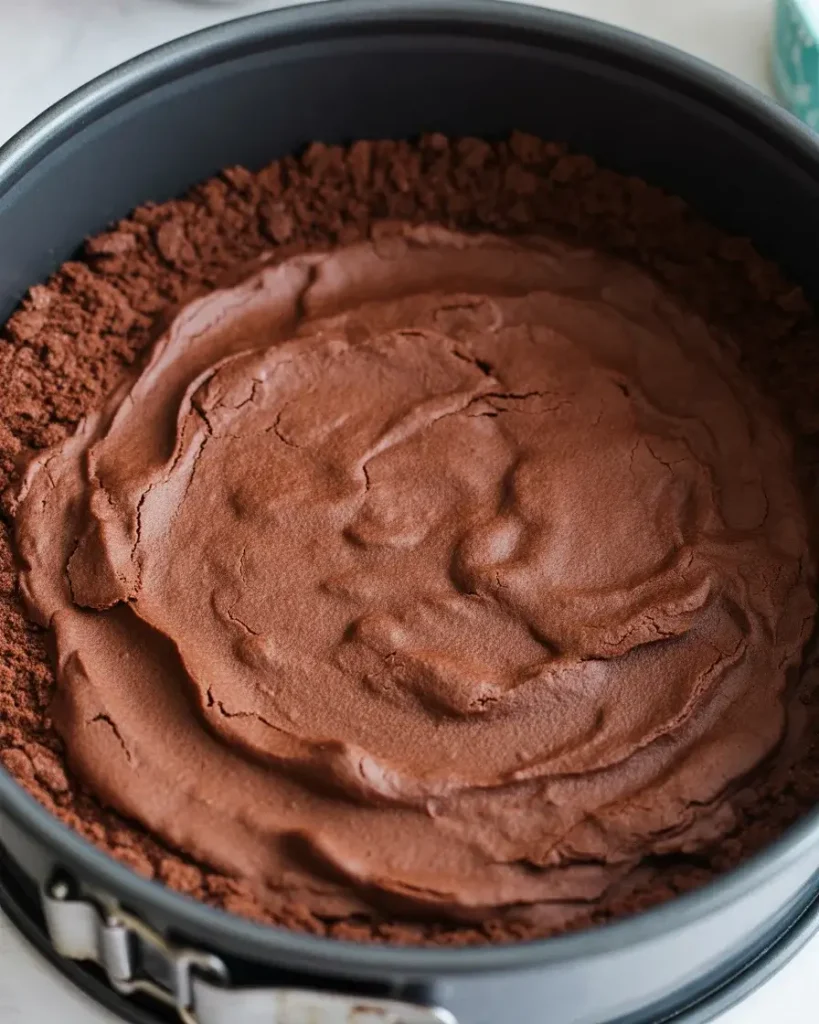
Pulse 24 chocolate sandwich cookies (cream filling included) in a food processor until you get fine crumbs. Mix with 5 tablespoons melted butter until the texture resembles wet sand. Press firmly into the bottom of a 9-inch springform pan, using the bottom of a measuring cup to pack it down.
I tested this with and without removing the cream filling, and keeping it in makes the crust bind better. You’ll know it’s pressed enough when you can’t see any loose crumbs and the surface looks smooth.
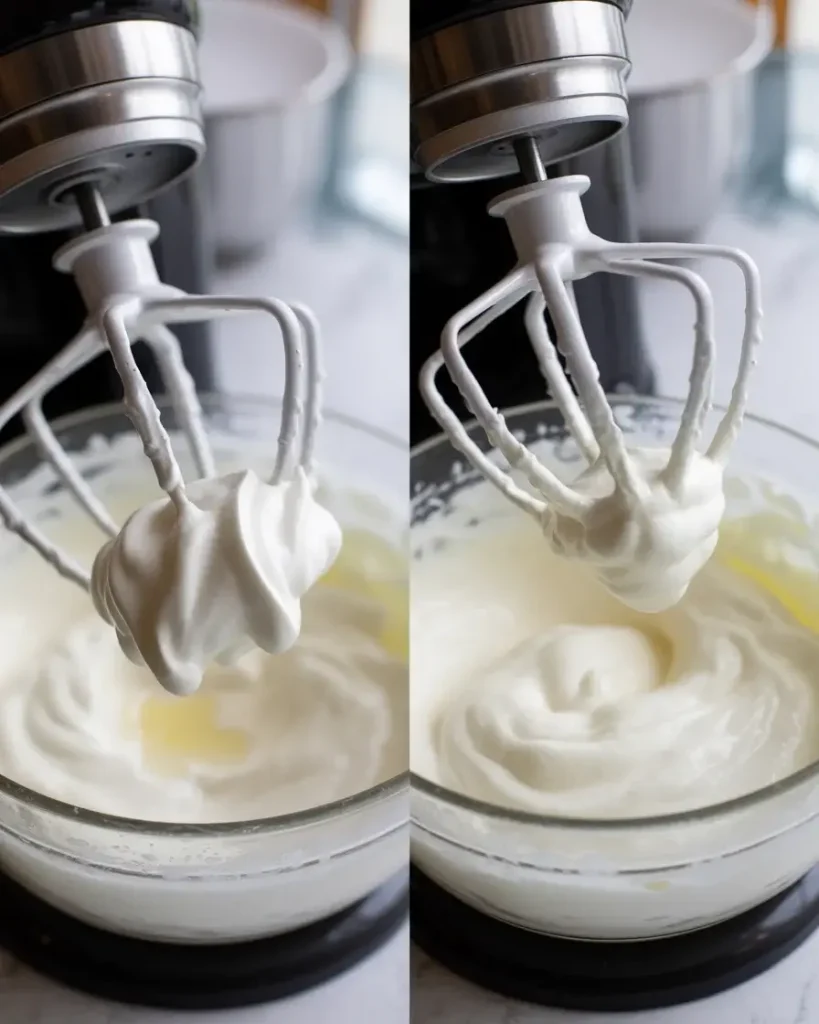
Step 2: Beat the Cream Cheese Base
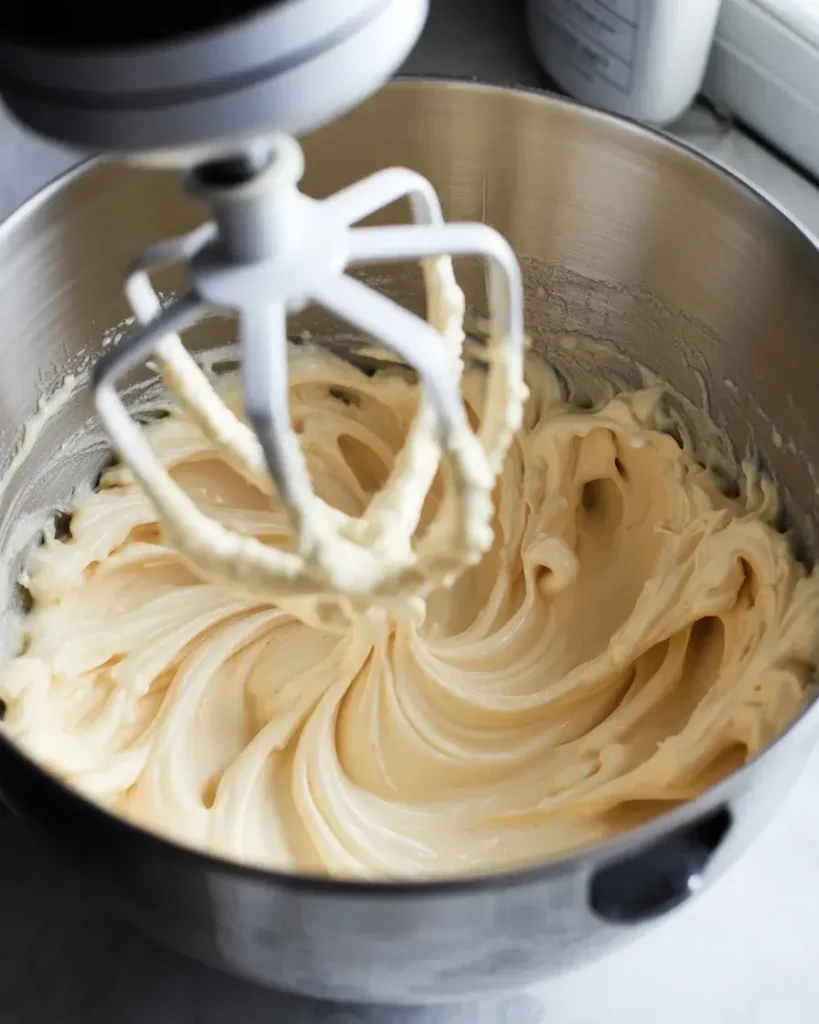
Beat 24 ounces of softened cream cheese (three 8-ounce blocks) with an electric mixer on medium speed for 3 minutes until completely smooth with no lumps visible. Add 3/4 cup granulated sugar and beat for another 2 minutes until fluffy. The mixture should look pale and hold soft peaks when you lift the beater.
Room temperature cream cheese is critical here. I once tried this with cold cream cheese straight from the fridge and ended up with lumps that never disappeared. Let your cream cheese sit out for 45 minutes before starting.
Step 3: Add Peppermint and Fold in Whipped Cream
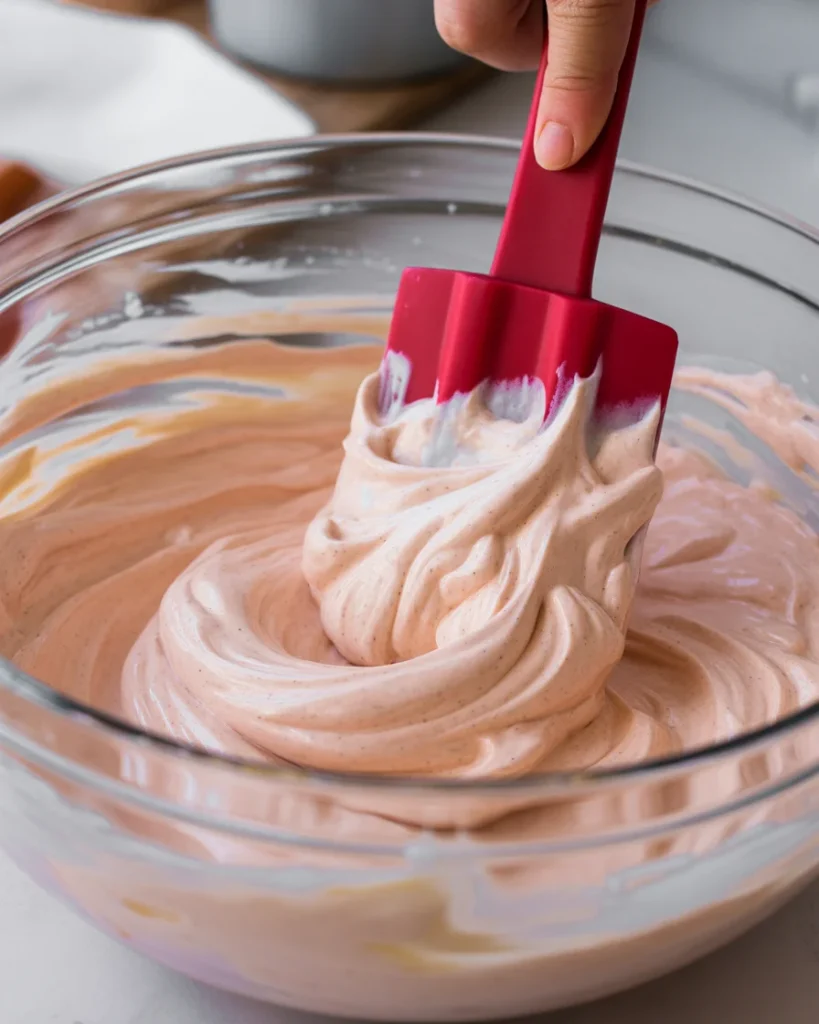
Mix in 1 teaspoon peppermint extract and 3 drops of red food coloring until evenly distributed. In a separate bowl, whip 1 cup of heavy cream to stiff peaks (about 3 minutes with an electric mixer). Gently fold the whipped cream into the cream cheese mixture using a rubber spatula, cutting through the center and folding over until just combined.
The folding motion took me five batches to master. If you stir instead of fold, you’ll deflate the whipped cream and lose that airy texture. I aim for about 15-20 gentle folds until I see only a few white streaks remaining.
Discover More Delicious Recipes
Step 4: Pour and Smooth the Filling

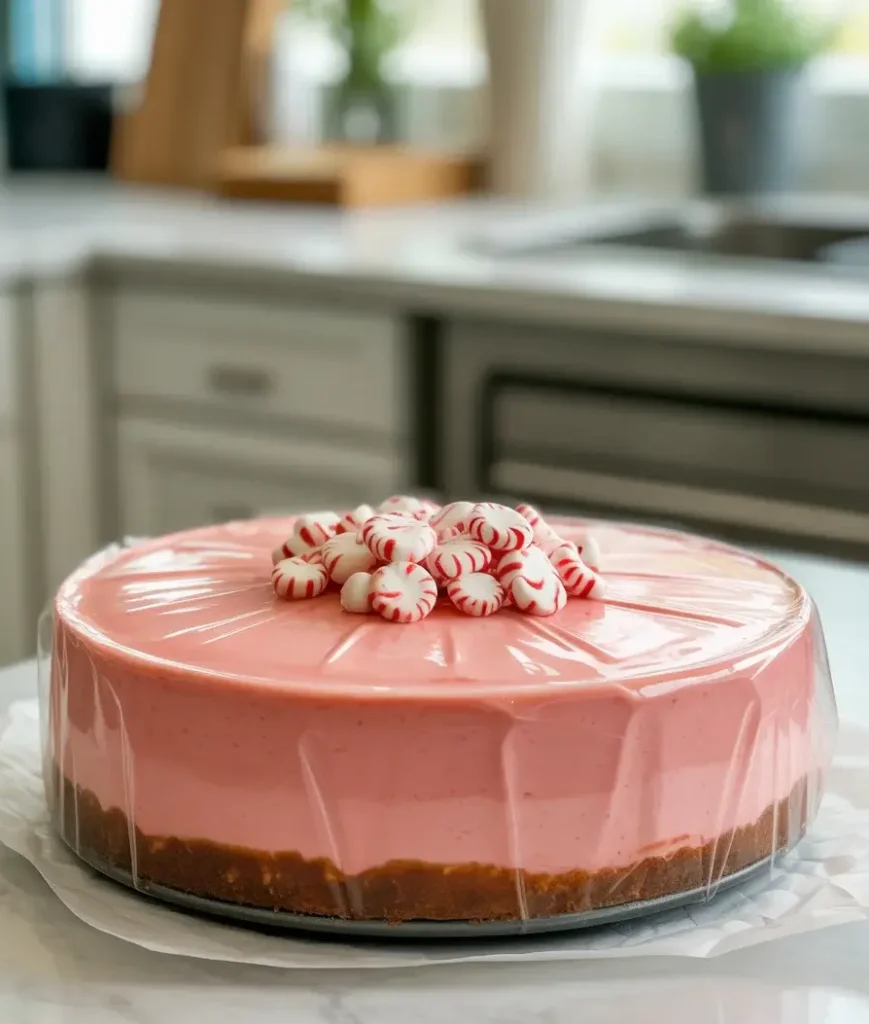
Pour the peppermint cheesecake filling over the chocolate crust, using a spatula to spread it evenly to the edges. Tap the pan gently on the counter 5-6 times to release any air bubbles trapped in the filling. Use an offset spatula to smooth the top in a circular motion, creating a perfectly flat surface.
Those air bubbles will create weird pockets if you skip the tapping step. I learned this when my first attempt had a crater in the center after chilling. The tapping makes a surprising difference in the final appearance.
Step 5: Chill Until Firm
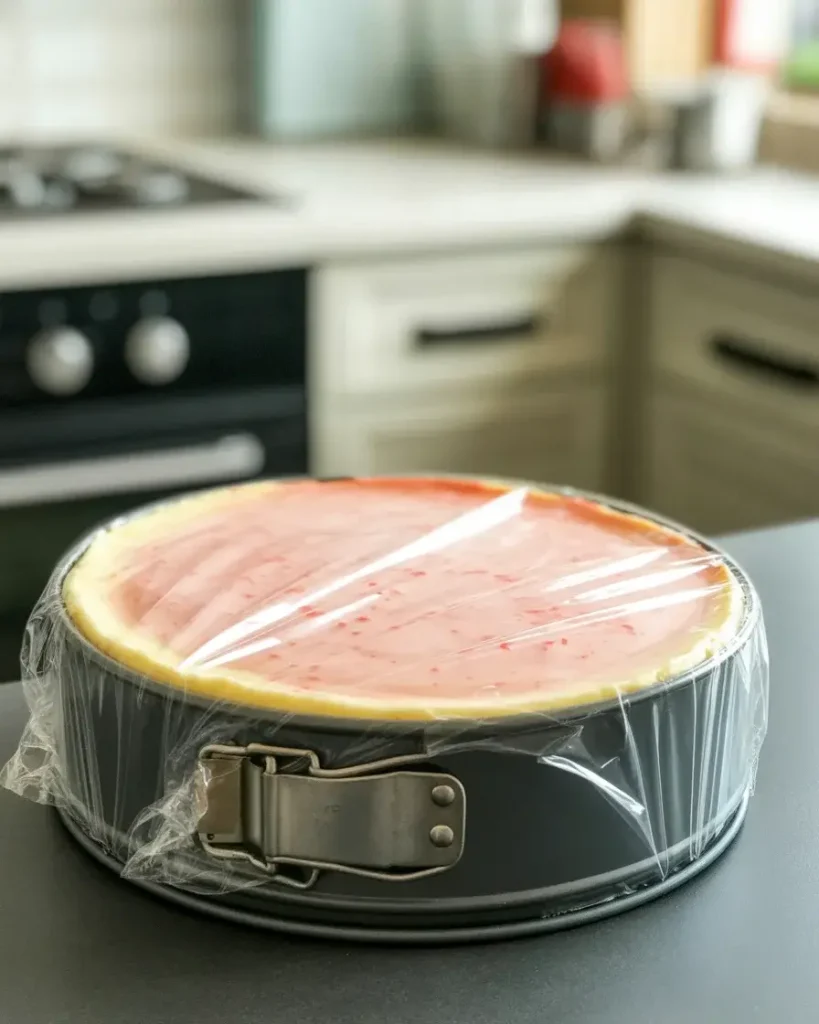
Cover the cheesecake with plastic wrap (press it gently against the surface to prevent condensation) and refrigerate for at least 6 hours or overnight. The cheesecake is ready when the center doesn’t jiggle when you gently shake the pan and the edges pull away slightly from the pan sides.
I’ve tested chill times from 4 to 12 hours. Four hours left the center too soft to slice cleanly, while 8-10 hours gave me the perfect firm yet creamy texture. Overnight chilling (12 hours) works great if you’re making this ahead.
Step 6: Make the Chocolate Ganache Topping

Heat 1/2 cup heavy cream in a small saucepan over medium heat until it just begins to simmer (small bubbles around the edges). Remove from heat and pour over 4 ounces of chopped semi-sweet chocolate in a bowl. Let sit for 2 minutes undisturbed, then whisk until completely smooth and glossy.
The 2-minute waiting period is essential. I used to stir immediately and ended up with grainy ganache because the chocolate seized. Patience creates that mirror-like finish you want for the topping.
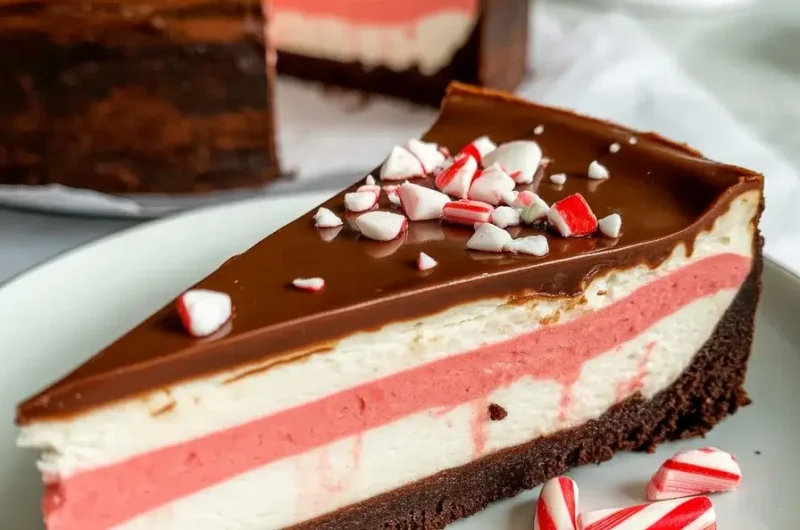
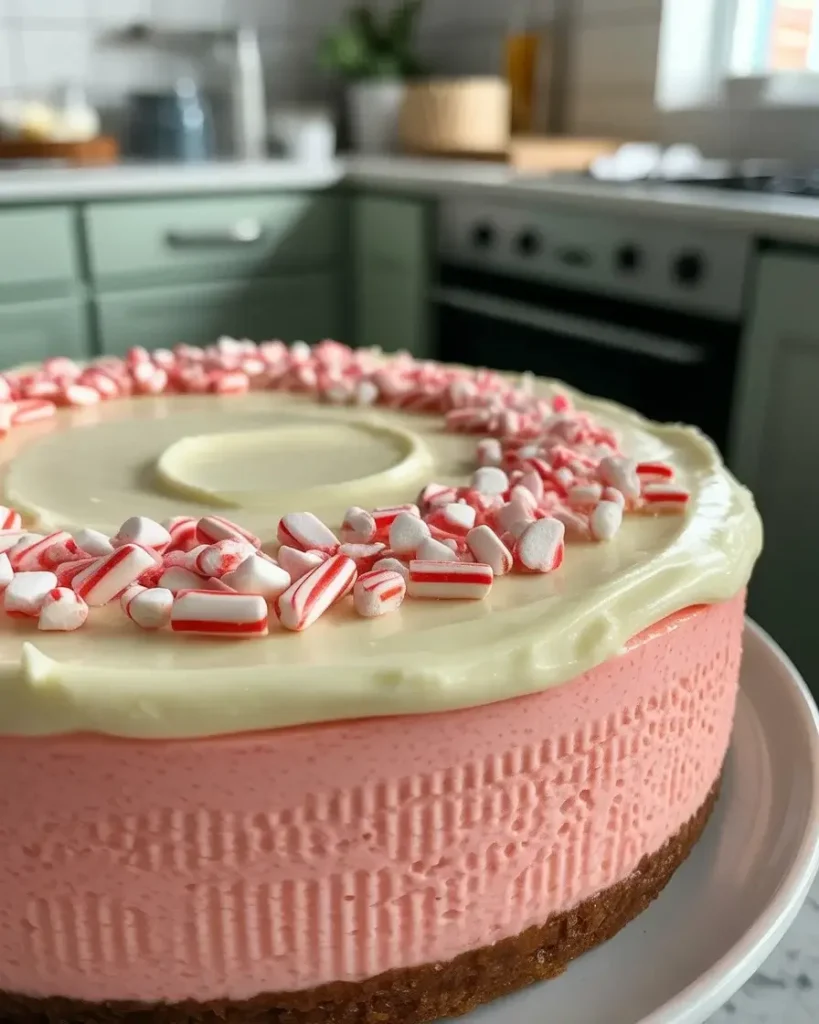
Step 7: Add Ganache and Candy Cane Topping
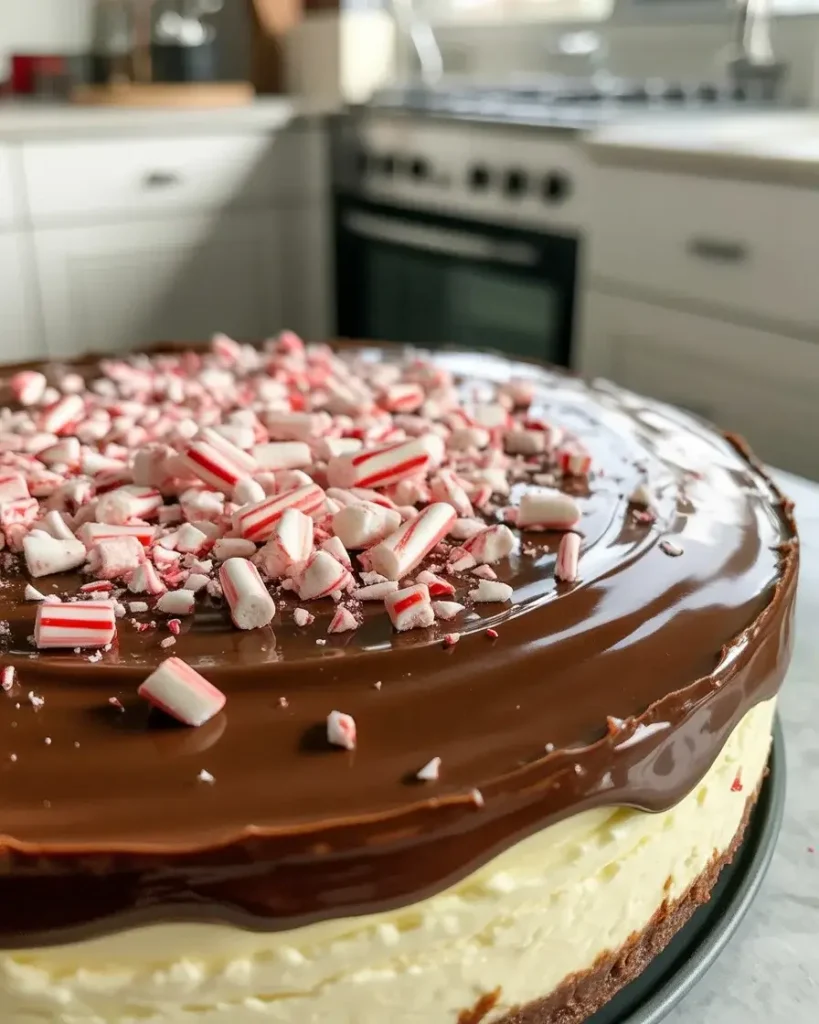
Pour the slightly cooled ganache (wait 5 minutes after making it) over the chilled cheesecake, starting in the center and using a spatula to gently spread it to the edges. Immediately sprinkle 1/3 cup crushed candy canes over the wet ganache before it sets. Let the ganache firm up for 30 minutes at room temperature.
The timing here matters more than I expected. If the ganache is too hot, it’ll melt into the cheesecake filling. Too cool, and it won’t spread smoothly. I shoot for lukewarm, around 90-95°F if you want to use a thermometer.
Step 8: Release and Slice for Perfect Pieces
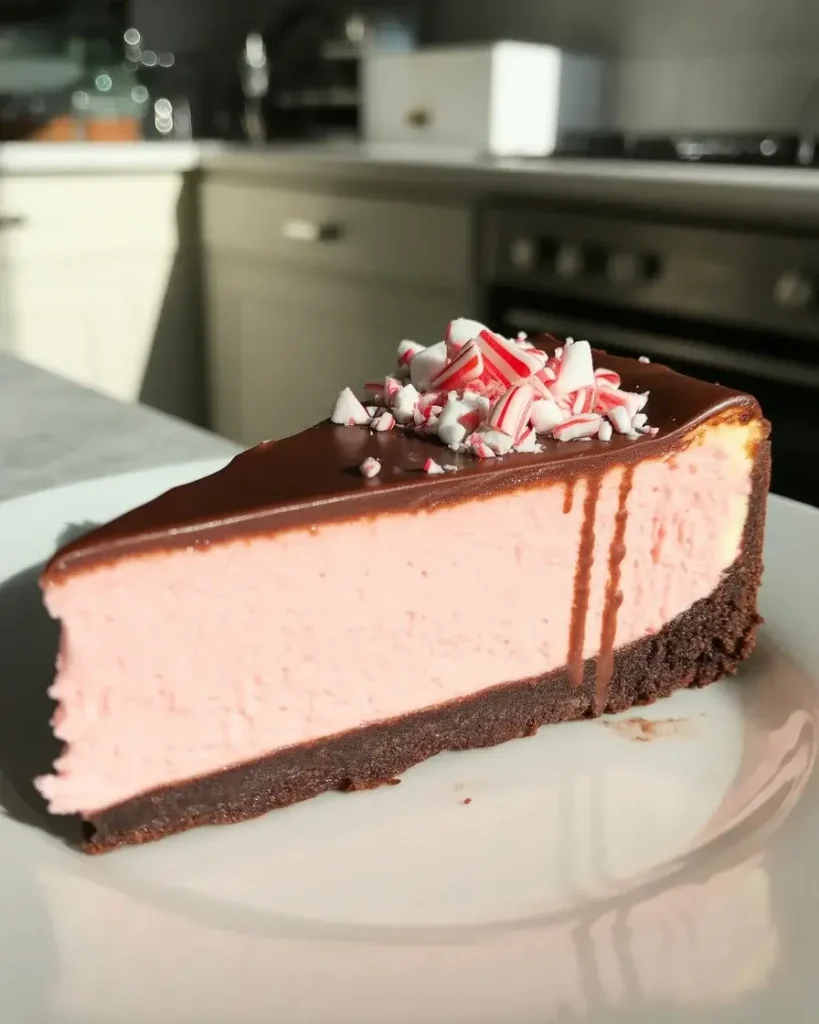
Run a thin knife under hot water, dry it completely, then slide it around the inside edge of the springform pan. Release the springform clasp and lift off the outer ring. For clean slices, heat your knife under hot water and wipe it dry between each cut.
This hot knife trick changed everything for me. My early attempts had ragged edges where the filling stuck to the blade. Now I get those Instagram-worthy slices with sharp edges every single time. It adds 2 minutes to serving but makes a huge visual difference.
Peppermint Cheesecake Delight: The Ultimate Holiday Dessert
Course: DessertCuisine: AmericanDifficulty: Easy12
servings20
minutes4
hours4
hours20
minutesA no-bake peppermint cheesecake with chocolate cookie crust, creamy pink filling, chocolate ganache, and crushed candy canes. Perfect for Christmas and holiday gatherings.
Ingredients
For the Crust:
24 chocolate sandwich cookies (like Oreos)
4 tablespoons unsalted butter, melted
For the Filling:
24 oz cream cheese, room temperature
1 cup powdered sugar
1 teaspoon peppermint extract
1½ cups heavy whipping cream
½ cup crushed peppermint candies, divided
Red food coloring (optional)
For Garnish:
Additional crushed peppermint candies
Chocolate shavings
Whipped cream
Directions
- Line a 9-inch springform pan with parchment paper. Crush cookies in food processor until fine crumbs form.
- Mix cookie crumbs with melted butter until evenly moistened. Press firmly into bottom of prepared pan.
- Beat cream cheese with electric mixer until smooth and fluffy, about 3 minutes. Gradually add powdered sugar and peppermint extract.
- In separate bowl, whip heavy cream to soft peaks. Gently fold whipped cream into cream cheese mixture until combined.
- Fold in ¼ cup crushed peppermint candies and a few drops of food coloring if desired.
- Pour filling over crust and smooth top. Refrigerate 4 hours or overnight until completely set.
- Before serving, garnish with remaining crushed candies, chocolate shavings, and dollops of whipped cream.
- Run knife around edges before removing springform ring. Slice with warm knife for clean cuts.
Notes
- Make sure cream cheese is completely room temperature for smoothest texture
Can be made up to 3 days ahead and stored covered in refrigerator
Freezes well for up to 1 month; thaw 30 minutes before serving
For stronger mint flavor, add an additional ½ teaspoon peppermint extract
| Nutrient | Per Serving |
|---|---|
| Calories | 385 kcal |
| Total Fat | 26g |
| Sugars | 28g |
| Protein | 7g |
| Dietary Fiber | 1g |
Trusted Resource Links
For food safety guidelines when working with dairy products, visit the FDA Safe Food Handling resource. For more information about heart-healthy dessert modifications, check the American Heart Association Healthy Eating guide.
How Long Does Peppermint Cheesecake Need to Set?
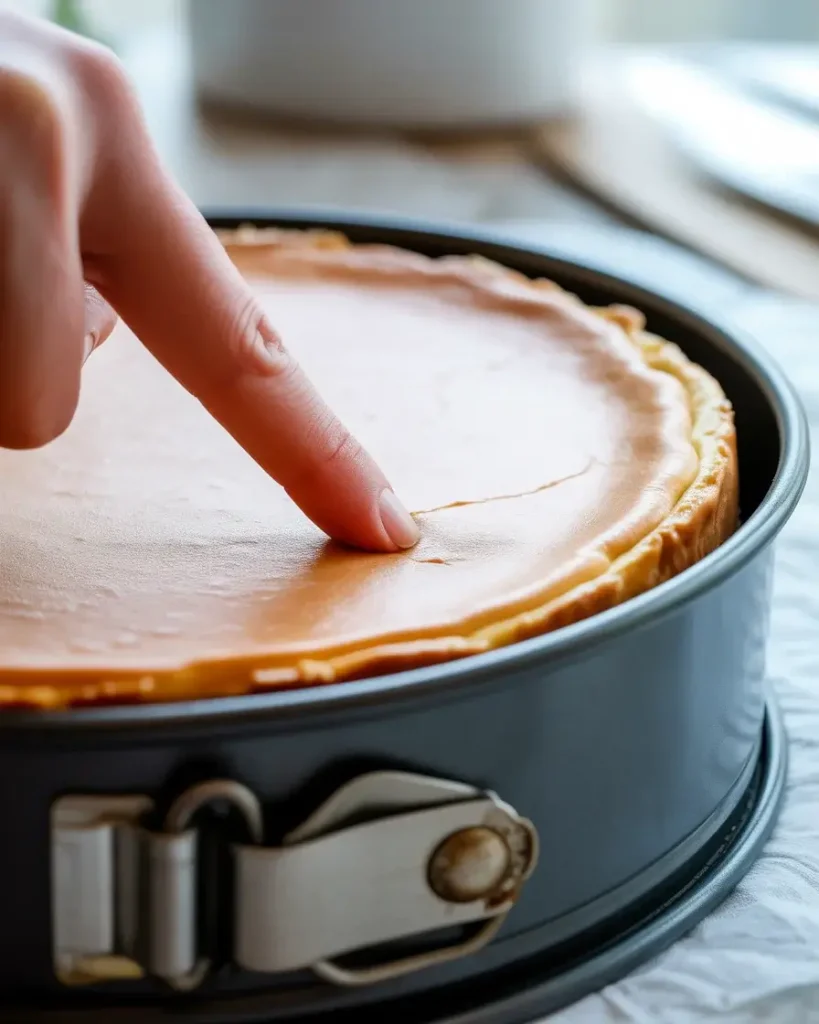
This no-bake cheesecake requires a minimum of 6 hours in the refrigerator to set properly. The center should feel firm when gently pressed and not jiggle when you shake the pan.
I’ve tested this extensively because I’m always impatient with desserts. At 4 hours, the filling was still too soft and slices fell apart. At 6 hours, I could slice cleanly but the texture was just barely firm enough.
The sweet spot is 8-10 hours, which gives you that perfect creamy-yet-sliceable consistency. Overnight chilling works beautifully if you’re planning ahead for a party. The cheesecake actually improves after 12-24 hours as the flavors meld together.
In one test, I even left it for 36 hours and it was still perfect. The whipped cream stays stable thanks to the cream cheese, so you don’t have to worry about it deflating.
Can I Make This Cheesecake Ahead of Time?
Yes, this peppermint cheesecake actually tastes better when made 1-2 days ahead. Store it covered in the refrigerator for up to 5 days before serving.
I always make mine two days before Christmas dinner now. The peppermint flavor intensifies as it sits, and the texture becomes even creamier. Plus, it’s one less thing to stress about on the actual holiday.
Wait to add the crushed candy cane topping until 2-3 hours before serving. I learned this the hard way when my candy canes dissolved into sticky puddles after sitting on the ganache overnight. The moisture from the refrigerator softens them.
For longer storage, you can freeze the cheesecake (without candy cane topping) for up to 1 month. Wrap it tightly in plastic wrap and aluminum foil. Thaw overnight in the refrigerator and add fresh candy canes before serving.
What If My Cheesecake Filling Is Too Runny?
If your filling seems too soft after mixing, you likely over-whipped the cream or didn’t beat the cream cheese long enough. The good news is it will still firm up during the 6-8 hour chill time.
I’ve had this happen twice. Once, I under-beat the cream cheese and it had tiny lumps that prevented proper setting. The other time, I whipped the heavy cream to soft peaks instead of stiff peaks, adding too much liquid.
For stiff peaks, the cream should stand straight up when you lift the beater. Soft peaks will curl over, and that’s not firm enough for this recipe. The difference in whipping time is only about 60-90 seconds but it matters.
If you’re really concerned, you can add 1 teaspoon of unflavored gelatin dissolved in 2 tablespoons of warm water to the cream cheese mixture. This guarantees a firm set, though I haven’t needed it in my last 10 batches.
Discover More Tasty Treats
Can I Use White Chocolate Instead of Dark Chocolate?
Absolutely, white chocolate ganache creates a beautiful contrast with the pink filling. Use 5 ounces of white chocolate with 1/3 cup heavy cream since white chocolate is sweeter and richer.
I tested this variation for a friend who doesn’t like dark chocolate. The white chocolate version is sweeter overall, so I reduced the sugar in the filling to 2/3 cup to balance it out. The visual effect is stunning with white-on-pink.
Heat the cream the same way but be extra careful with white chocolate. It scorches more easily than dark chocolate, so keep your heat at medium-low. The melting time is also shorter, about 90 seconds instead of 2 minutes.
White chocolate ganache sets firmer than dark chocolate ganache at room temperature. I let mine sit for only 3-4 minutes before pouring it, compared to 5 minutes for dark chocolate.
How Do I Prevent Cracks in the Ganache Layer?
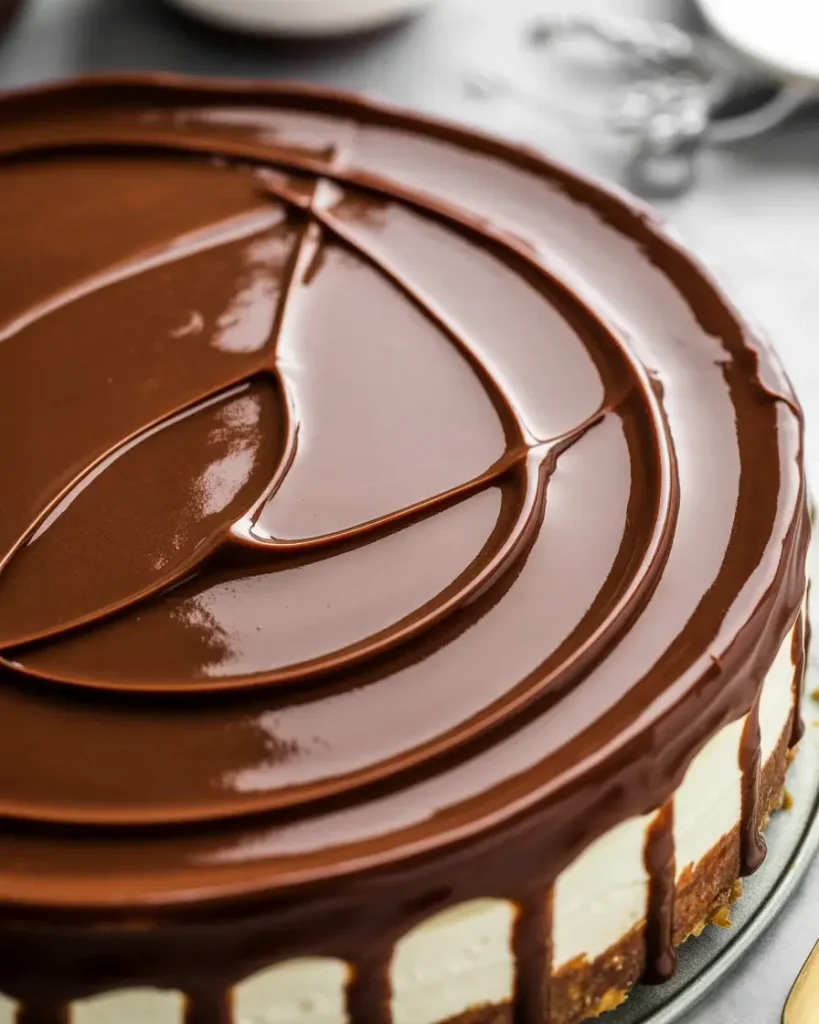
Let both the cheesecake and ganache come closer to room temperature before adding the topping. A 10-15°F temperature difference prevents thermal shock that causes cracks.
This was my biggest frustration in early tests. I’d pull the cheesecake straight from the fridge and pour hot ganache on top. Within minutes, I’d see hairline cracks forming as the ganache contracted while cooling.
Now I let the chilled cheesecake sit at room temperature for 15-20 minutes before adding ganache. The surface should feel cool but not ice-cold when you touch it. The ganache should be warm but not steaming hot.
Pour the ganache slowly in a circular pattern starting from the center. This distributes the temperature more evenly than dumping it all in one spot. I also avoid spreading it too aggressively, which can pull the layer apart as it sets.
Frequently Asked Questions
Can I make this peppermint cheesecake without peppermint extract?
Yes, you can substitute vanilla extract or almond extract for a different flavor profile. You can also omit the extract entirely and fold in melted chocolate for a chocolate cheesecake variation.
How long does peppermint cheesecake delight need to set?
The cheesecake needs at least 4 hours to set properly, but overnight chilling produces the best texture. For firmer slices, chill for 6-8 hours before serving.
Can I use a different type of crust?
Absolutely! Graham cracker, vanilla wafer, or gingersnap crusts work beautifully. Use the same ratio of 1½ cups crumbs to 4 tablespoons melted butter for any crust variation.