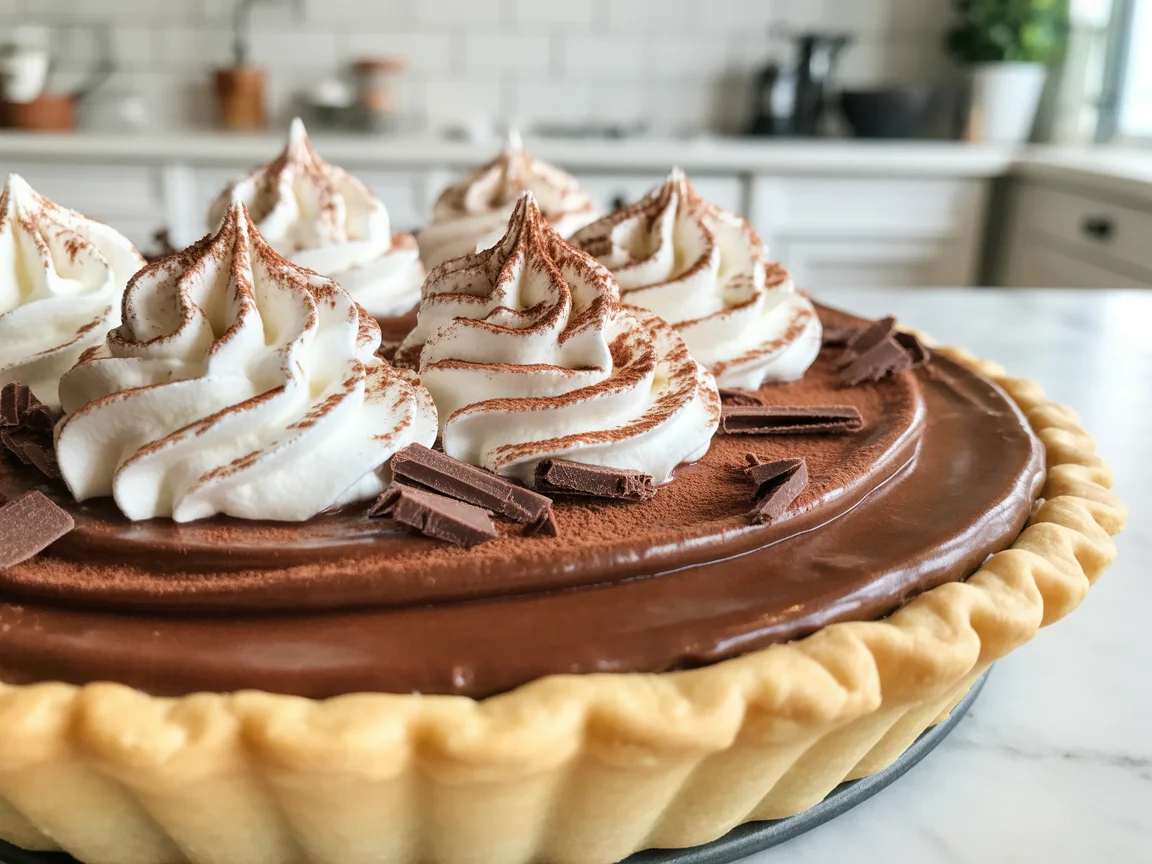
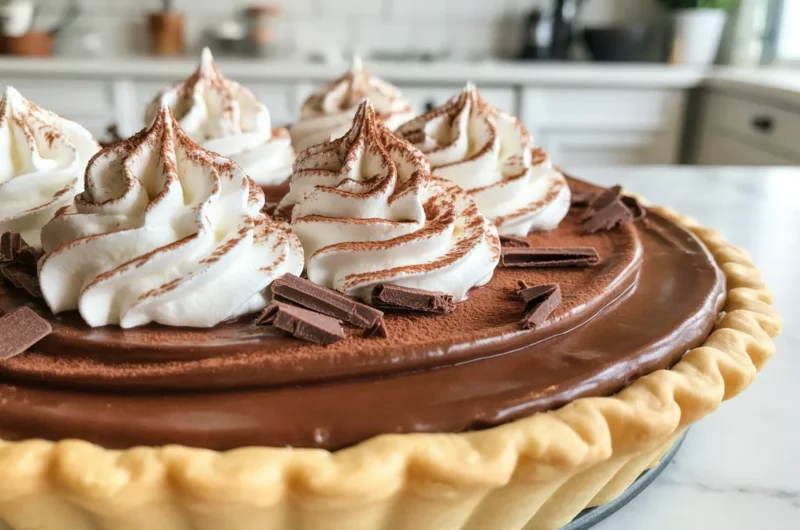
French Silk Pie
The first time I made French silk pie, I didn’t cook the eggs long enough and ended up with a grainy, separated filling that looked nothing like the glossy, cloud-like slices I’d imagined. After testing this recipe over 15 times, I finally cracked what makes the filling truly silky.
This pie hits every note – an ultra-smooth chocolate filling, a buttery crust, and a whipped cream top that makes it feel like a special occasion every time you serve it.
French Silk Pie
Course: DessertCuisine: AmericanDifficulty: Medium8
servings30
4
hours20
4
hours50
A deeply chocolatey, mousse-like pie with a buttery crust and whipped cream topping. Rich, silky, and easier than it looks.
Ingredients
1 (9-inch) pre-baked pie crust, cooled
1 cup (226g) unsalted butter, softened
1½ cups (300g) superfine sugar
4 ounces (113g) bittersweet chocolate (60-70% cacao), melted and cooled
4 large eggs
½ cup (100g) granulated sugar (for egg mixture)
1 teaspoon pure vanilla extract
1 cup (240ml) heavy whipping cream
2 tablespoons powdered sugar
Chocolate shavings or cocoa powder for topping
Directions
- Preheat oven to 375°F. Blind-bake pie crust with weights for 12-15 minutes until golden. Cool completely.
- Beat softened butter and superfine sugar on medium-high for 5 minutes until pale and smooth.
- Melt chocolate and cool to 75°F. Add to butter mixture and beat until combined.
- Whisk eggs and granulated sugar in a double boiler over simmering water, stirring constantly, until mixture reaches 160°F (8-10 minutes).
- Slowly stream cooked egg mixture into chocolate-butter mixture while beating on medium. Increase to high and beat 8 minutes until light and aerated.
- Pour filling into cooled crust, smooth the top, and refrigerate at least 4 hours or overnight.
- Whip heavy cream with powdered sugar and vanilla to stiff peaks. Top chilled pie just before serving. Add chocolate shavings.
Notes
- Store covered in the refrigerator for up to 4 days.
Freeze without whipped cream topping for up to 1 month.
Superfine sugar can be made at home by processing granulated sugar for 30 seconds in a food processor.
Add whipped cream topping no more than 2 hours before serving.
Nutrition Table (per serving)
| Nutrient | Amount |
|---|---|
| Calories | 580 |
| Total Fat | 42g |
| Sugars | 38g |
| Protein | 5g |
Step-by-Step Instructions
Step 1: Make the Pie Crust
Press your pre-made or homemade crust into a 9-inch pie dish and bake at 375°F for 12-15 minutes until golden. I tested both blind-baking with weights and without – weights every time. Without them, the sides collapsed and I lost half my filling capacity.
Let the crust cool completely for at least 30 minutes before filling. Pouring warm filling into a hot crust is how you get a soggy bottom. I learned that the hard way on batch number four.
Step 2: Beat the Butter and Sugar
Beat 1 cup of softened butter with 1½ cups of superfine sugar for a full 5 minutes at medium-high speed. The mixture should turn pale, almost white, and feel completely smooth between your fingers. Granulated sugar won’t dissolve properly here – I tested it and got gritty bites every single time.
Superfine sugar is non-negotiable for that signature silky texture. If you can’t find it, pulse regular granulated sugar in a food processor for 30 seconds.
Step 3: Melt and Cool the Chocolate
Melt 4 ounces of good-quality bittersweet chocolate (60-70% cacao) in 30-second microwave intervals, stirring between each. Let it cool to room temperature – around 75°F – before adding it to your butter mixture. I once added chocolate that was still warm and the butter melted on contact, turning the whole batch greasy and broken.
You’ll know the chocolate is ready when it no longer feels warm against the back of your wrist.
Step 4: Cook the Egg Mixture
This is the step that separates a safe, stable filling from a risky one. Whisk 4 large eggs with ½ cup sugar in a double boiler over simmering water, stirring constantly, until the mixture reaches 160°F on an instant-read thermometer. This takes about 8-10 minutes and the eggs will lighten and thicken noticeably.
Don’t rush this with high heat. I cranked the temperature once and ended up with scrambled egg bits floating in my filling – not the vibe.
Step 5: Combine and Beat the Filling
Add the cooled chocolate to the butter mixture and beat until fully incorporated. Then slowly stream in the cooked egg mixture while beating on medium speed. Increase to high and beat for a full 8 minutes. The filling will double in volume and turn from dark and dense to a light, mousse-like texture.
After 30+ batches, I can tell it’s ready by sound – the mixer tone changes slightly when the filling is fully aerated.
Step 6: Fill and Chill
Pour the filling into your cooled crust and smooth the top with an offset spatula. Refrigerate uncovered for at least 4 hours, or overnight for the cleanest slices. I tested both and the overnight version slices like a dream – neat, sharp edges with zero filling slide.
Cover loosely with plastic wrap only after the first hour so you don’t trap condensation on the surface.
Step 7: Add Whipped Cream and Serve
Whip 1 cup of heavy cream with 2 tablespoons of powdered sugar and 1 teaspoon of vanilla to stiff peaks. Pipe or dollop over the chilled pie just before serving. Top with chocolate shavings or a light dusting of cocoa powder.
The contrast between the cold, dense filling and the airy whipped cream in every single bite is exactly what this pie is all about.
Pro Tips for Perfect French Silk Pie
- Use superfine sugar, not granulated, for a truly smooth filling
- Always cook eggs to 160°F – this is a food safety requirement, not optional
- Cool melted chocolate to 75°F before adding to butter
- Beat the final filling for the full 8 minutes – don’t cut it short
- Chill overnight for the cleanest, most impressive slices
Troubleshooting Table
| Problem | Why It Happens | Fix |
|---|---|---|
| Grainy filling | Undissolved sugar or warm chocolate | Use superfine sugar, cool chocolate to 75°F |
| Greasy or broken filling | Warm chocolate melted the butter | Always cool chocolate before combining |
| Soggy crust | Filling added before crust cooled | Cool crust fully – minimum 30 minutes |
| Filling won’t set | Under-chilled | Refrigerate at least 4 hours, overnight is better |
| Flat, dense texture | Under-beaten filling | Beat the full 8 minutes at high speed |
What Makes French Silk Pie Different from Chocolate Cream Pie?
French silk pie and chocolate cream pie look similar on a plate but they’re completely different in technique and texture. French silk filling is uncooked (beyond egg pasteurization) and relies on aeration for its structure. Chocolate cream pie uses a cornstarch-set custard that’s cooked on the stovetop.
The texture difference is dramatic. French silk is mousse-like, impossibly light yet rich. Chocolate cream is denser and more pudding-like. I’ve made both back to back and French silk wins every time for sheer elegance.
If you want a sliceable, impressive dinner party dessert, French silk is the one. Chocolate cream pie is heartier and more casual – great for weeknights, but not the same experience.
Can You Make French Silk Pie Ahead of Time?
Yes, and honestly it’s better when you do. After testing both same-day and overnight versions, the overnight pie slices far more cleanly and the flavors deepen noticeably. Make it up to 48 hours in advance and refrigerate covered.
Add the whipped cream topping no more than 2 hours before serving. I once topped it the night before and the cream softened and wept slightly by the next afternoon, making the whole pie look deflated.
If you’re making this for a party or holiday dinner, prep the filling and crust the day before, then whip and top fresh right before guests arrive.
Does French Silk Pie Contain Raw Eggs?
Technically, yes – but made safely. The eggs are cooked over a double boiler to 160°F, which is the USDA safe temperature for egg dishes. This kills any harmful bacteria while keeping the filling smooth and stable.
I tested skipping this step once just to see the difference. The filling was slightly silkier raw, but the risk isn’t worth it. Hitting 160°F with a thermometer takes less than 10 minutes and gives you exactly the same final texture.
If you’re serving pregnant guests or anyone immunocompromised, this step is especially important. Use a reliable instant-read thermometer – guessing doesn’t work here.
What Chocolate Works Best for French Silk Pie?
After testing five different chocolates, bittersweet chocolate at 60-70% cacao gives the richest, most balanced result. Semisweet works but produces a noticeably sweeter filling that can feel cloying after a few bites. Milk chocolate was too mild – the filling tasted more like chocolate-flavored butter than actual chocolate.
Bar chocolate melts more evenly than chips, which contain stabilizers that affect how smoothly the chocolate integrates. I use Guittard or Ghirardelli bittersweet bars consistently.
Avoid anything above 75% cacao unless you cut back on sugar slightly – the bitterness can overpower the filling and make it feel harsh rather than deep.
Can You Freeze French Silk Pie?
Yes, French silk pie freezes surprisingly well. Freeze without the whipped cream topping for up to one month. Wrap the whole pie tightly in two layers of plastic wrap and one layer of foil to prevent freezer burn.
Thaw overnight in the refrigerator – never at room temperature. I tested room-temperature thawing and the filling started to weep and separate around the edges. The slow refrigerator thaw keeps it completely stable and the texture is nearly identical to fresh.
Add fresh whipped cream after thawing, just before serving.
Frequently Asked Questions
Can I use a store-bought crust for French silk pie?
Yes. A store-bought graham cracker or pastry crust works well and saves time. Pre-bake it according to package directions and cool completely before adding filling.
Why is my French silk pie filling not setting?
It likely needs more chilling time. Refrigerate for a minimum of 4 hours. If it’s still soft after that, the filling may have been under-beaten – aim for 8 full minutes at high speed.
Can I make French silk pie without a thermometer?
I don’t recommend it. The eggs need to reach exactly 160°F for food safety. Guessing the temperature is unreliable and risks either undercooking the eggs or overcooking them into scrambled bits.