Peanut Butter Chocolate Lava Cakes
These Peanut Butter Chocolate Lava Cakes are pure indulgence in every bite. Rich chocolate meets creamy peanut butter in a dessert that’s surprisingly simple to make at home.
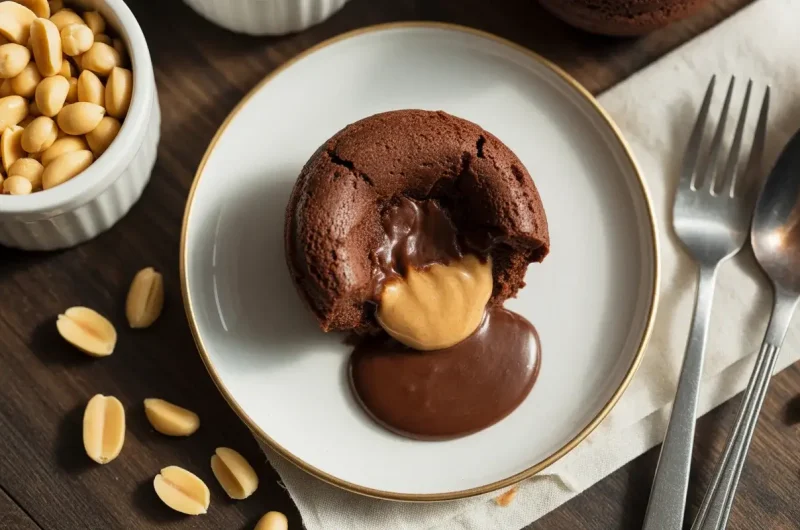
With a molten center that oozes out when you cut into them, these individual cakes are perfect for date night or when you want to impress guests. The combination of warm chocolate cake with a gooey peanut butter filling is absolutely irresistible.
Ready in just 25 minutes, this recipe proves that restaurant-quality desserts can be made in your own kitchen with basic ingredients.
Why You’ll Love This Recipe
This dessert combines two classic flavors in the most decadent way possible. The rich chocolate cake exterior gives way to a warm, melty peanut butter center that’s pure heaven.
These individual cakes bake up quickly and look impressively elegant. They’re perfect for special occasions but easy enough for a weeknight treat when you need something truly satisfying.
The recipe is also easily customizable—swap in almond butter, add a pinch of sea salt, or serve with vanilla ice cream for extra indulgence.
Read More: White Chocolate Raspberry Poke Cake
Ingredients You’ll Need
The beauty of this recipe is that it uses simple pantry staples you likely already have on hand. Here’s what makes these lava cakes so special:
For the chocolate cake:
For the peanut butter filling:
Use high-quality chocolate for the best flavor—it really makes a difference in the final result. The peanut butter filling gets frozen before baking, which creates that perfect molten center.
How to Make the Peanut Butter Filling
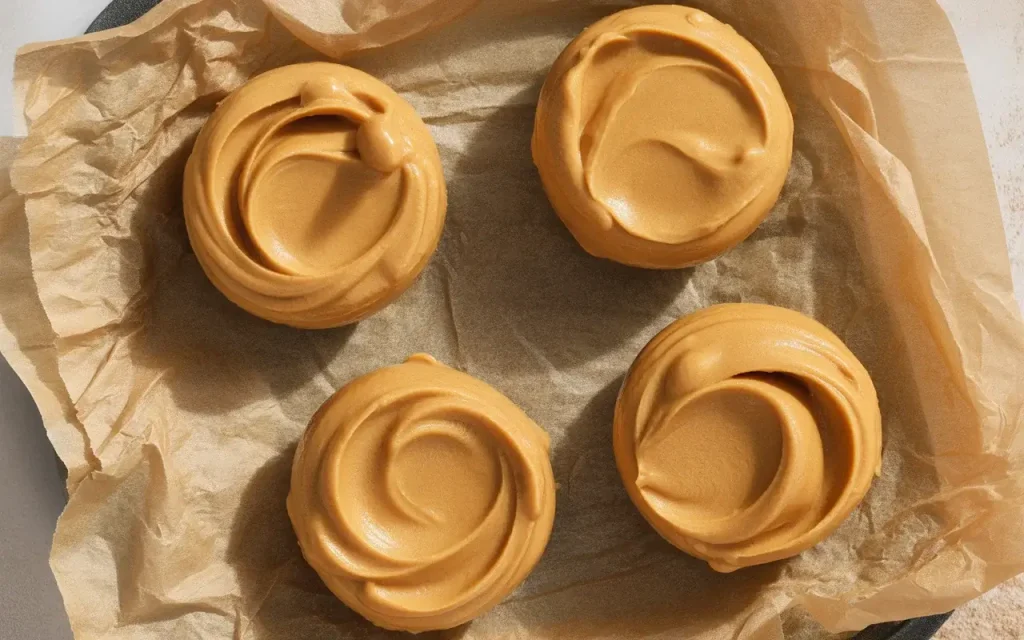
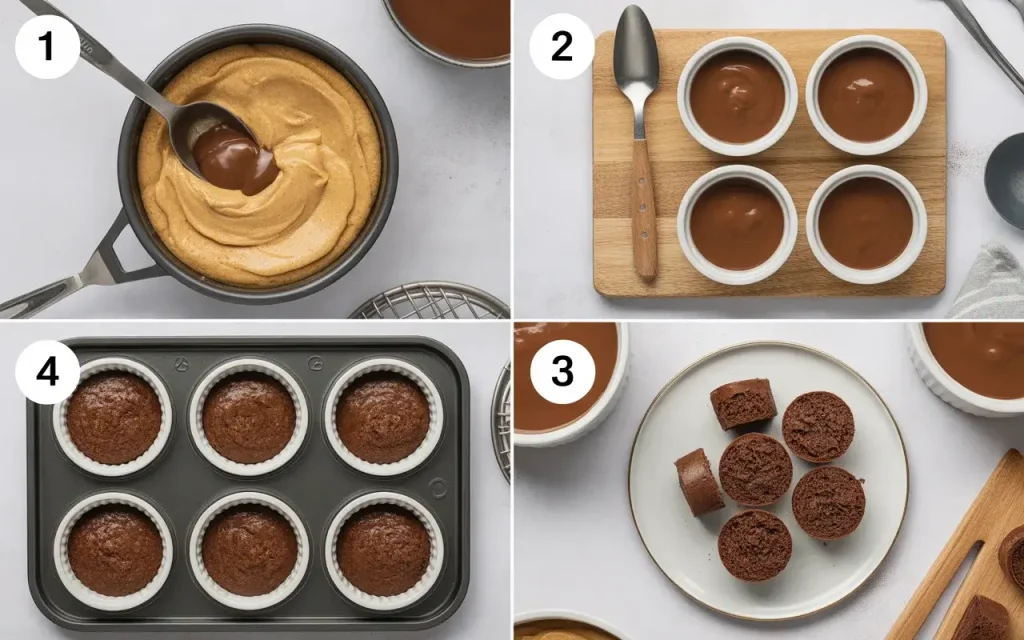
Start by mixing creamy peanut butter with powdered sugar until well combined. The sugar helps thicken the mixture so it holds its shape when frozen.
Scoop the mixture into 4 equal portions on a parchment-lined plate or baking sheet. Flatten each portion slightly into a thick disk shape.
Freeze for at least 30 minutes until completely solid. This step is crucial—the frozen filling melts slowly as the cake bakes, creating that signature lava effect.
Peanut Butter Chocolate Lava Cakes
Course: DessertCuisine: AmericanDifficulty: Intermediate4
servings15
44
minutes59
minutesDecadent individual chocolate cakes with a molten peanut butter center that oozes out when you break them open. Perfect for date night or special occasions.
Ingredients
- Peanut Butter Filling
1/2 cup creamy peanut butter
3 tablespoons powdered sugar
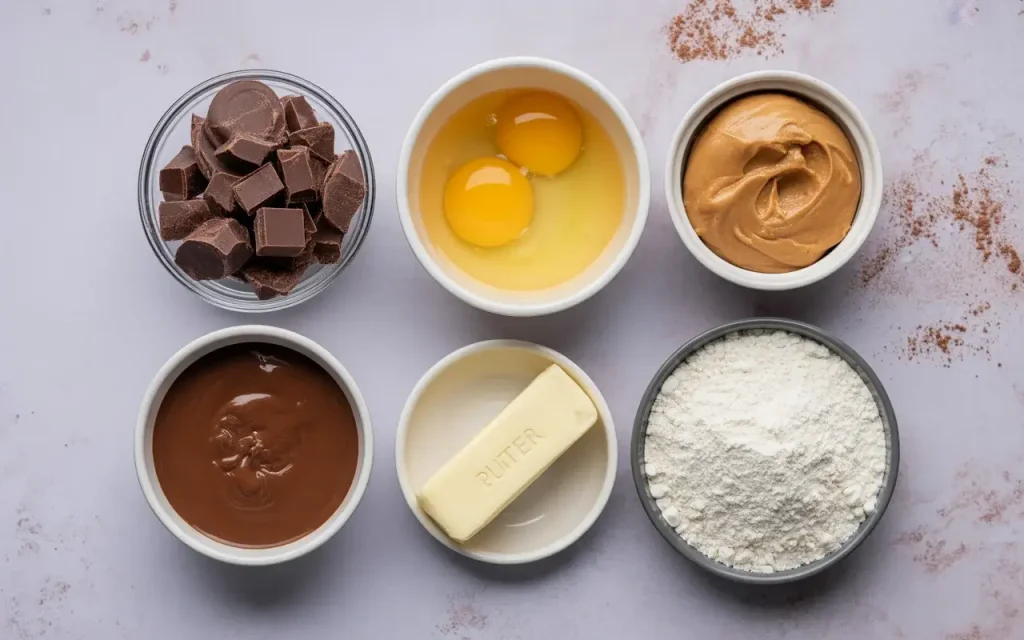
- Chocolate Cake
6 oz semi-sweet chocolate chips or chopped chocolate
1/2 cup (1 stick) unsalted butter
2 large eggs
2 large egg yolks
1/4 cup granulated sugar
2 tablespoons all-purpose flour
1 teaspoon vanilla extract
Pinch of salt
Butter and cocoa powder for ramekins
Directions
- Mix peanut butter and powdered sugar until smooth. Divide into 4 portions and shape into thick disks on parchment paper. Freeze for 30 minutes.
- Preheat oven to 425°F. Generously butter four 6-ounce ramekins and dust with cocoa powder.
- Melt chocolate and butter in microwave-safe bowl in 30-second intervals, stirring until smooth. Let cool slightly.
- In separate bowl, whisk eggs, egg yolks, and sugar for 2 minutes until pale and thickened.
- Fold melted chocolate mixture into egg mixture until combined.
- Gently fold in flour, vanilla, and salt until just mixed.
- Fill each ramekin halfway with batter. Place one frozen peanut butter disk in center of each, then cover with remaining batter.
- Place ramekins on baking sheet. Bake 12-14 minutes until edges are set but centers still jiggle slightly.
- Let cool 1 minute, then run a knife around edges and carefully invert onto serving plates. Serve immediately.
Notes
- Chocolate choice: Use good-quality chocolate for best flavor. Milk chocolate works too for a sweeter version.
Natural peanut butter: Not recommended as it’s too oily and won’t hold shape when frozen.
Ramekin prep: Don’t skip buttering and dusting—it ensures clean release.
Baking time: Ovens vary. Check at 12 minutes—edges should be firm, centers soft.
Make-ahead: Assemble and refrigerate filled ramekins up to 24 hours ahead. Add 1-2 minutes baking time.
Substitutions: Try almond butter or Nutella filling for variation.
Serving tip: Top with vanilla ice cream, whipped cream, or sea salt flakes.
Nutrition Information (Per Serving)
| Nutrient | Amount |
|---|---|
| Calories | 625 |
| Total Fat | 45g |
| Saturated Fat | 22g |
| Cholesterol | 235mg |
| Sodium | 220mg |
| Total Carbohydrates | 48g |
| Dietary Fiber | 4g |
| Sugars | 38g |
| Protein | 13g |
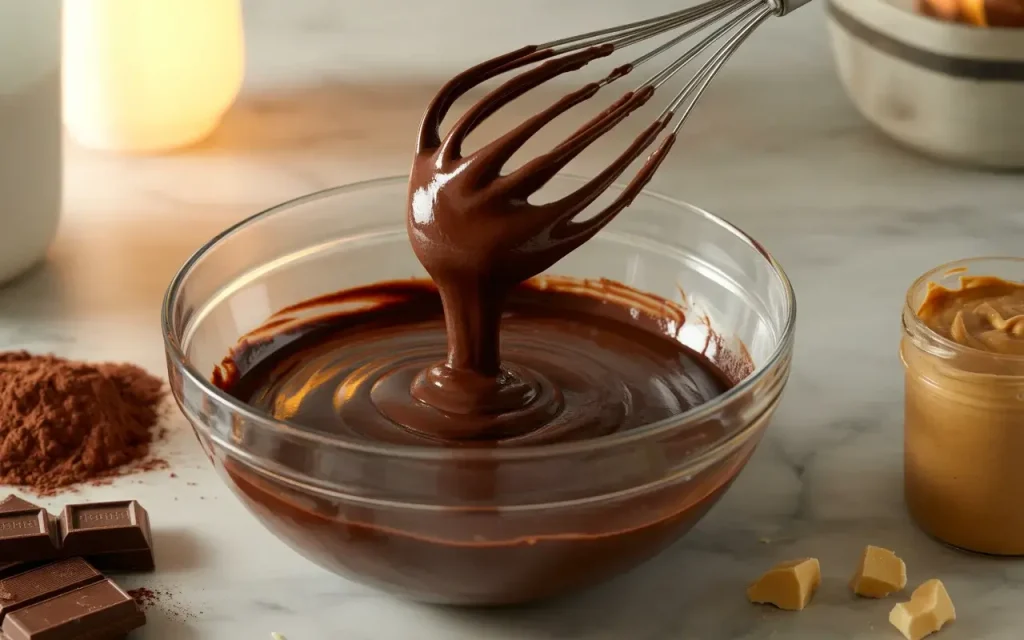
Preparing the Chocolate Batter
Melt the chocolate and butter together in a microwave-safe bowl in 30-second intervals, stirring between each, until smooth. Let it cool slightly so it doesn’t cook the eggs.
Whisk the eggs, egg yolks, and sugar together until pale and slightly thickened—about 2 minutes. This adds air and helps create the perfect cake texture.
Fold in the melted chocolate mixture, then gently add the flour, vanilla, and salt. Mix just until combined—overmixing can make the cakes tough.
Assembling and Baking
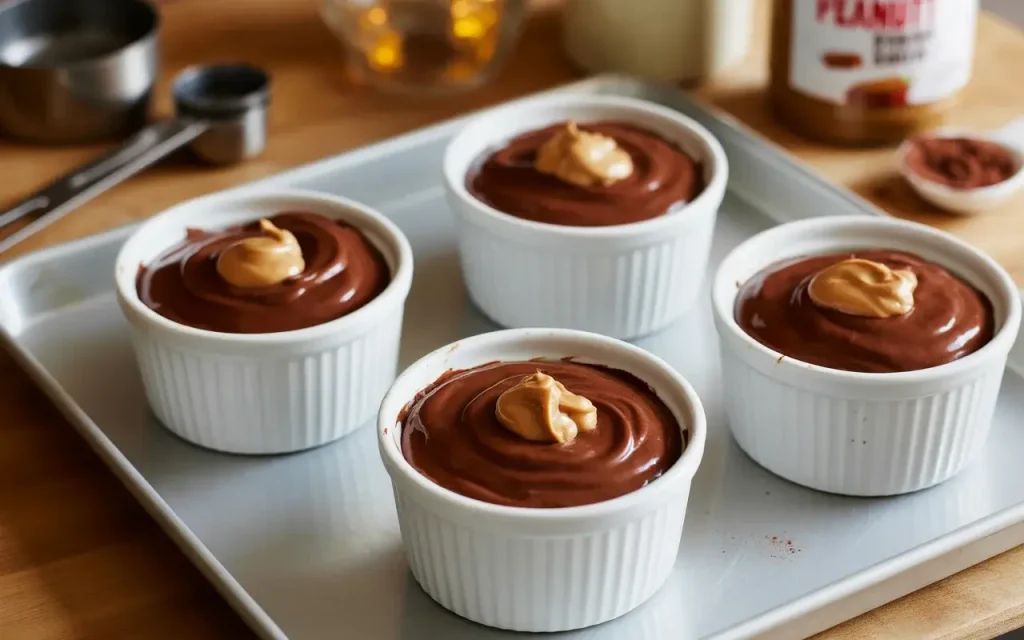
Generously butter and cocoa-dust four 6-ounce ramekins to prevent sticking. This step ensures your cakes release perfectly after baking.
Fill each ramekin halfway with chocolate batter, place a frozen peanut butter disk in the center, then cover with remaining batter. The filling should be completely covered.
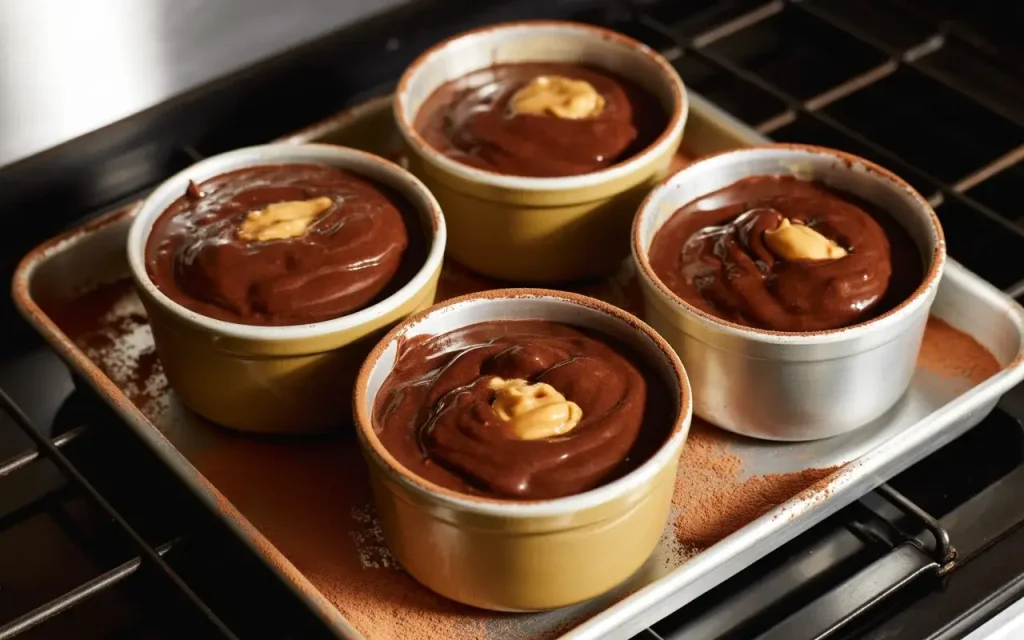
Bake at 425°F for 12-14 minutes until the edges are set but the center still jiggles slightly. Don’t overbake—you want that molten center!
Step-by-Step Instructions
Follow these detailed steps for perfect lava cakes every time:
- Make the filling: Mix 1/2 cup creamy peanut butter with 3 tablespoons powdered sugar until smooth
- Freeze the filling: Divide into 4 portions, shape into disks, and freeze for 30 minutes
- Preheat oven: Set to 425°F and prepare ramekins with butter and cocoa powder
- Melt chocolate: Combine 6 oz semi-sweet chocolate and 1/2 cup butter in microwave-safe bowl, heat in 30-second intervals until smooth
- Mix wet ingredients: Whisk 2 whole eggs, 2 egg yolks, and 1/4 cup sugar for 2 minutes until pale
- Combine batters: Fold melted chocolate into egg mixture, then add 2 tablespoons flour, 1 teaspoon vanilla, and pinch of salt
- Assemble: Fill ramekins halfway, add frozen peanut butter disk, cover with remaining batter
- Bake: Place ramekins on baking sheet and bake 12-14 minutes until edges are firm
- Rest and serve: Let cool 1 minute, run knife around edges, invert onto plates, and serve immediately
Serving Suggestions
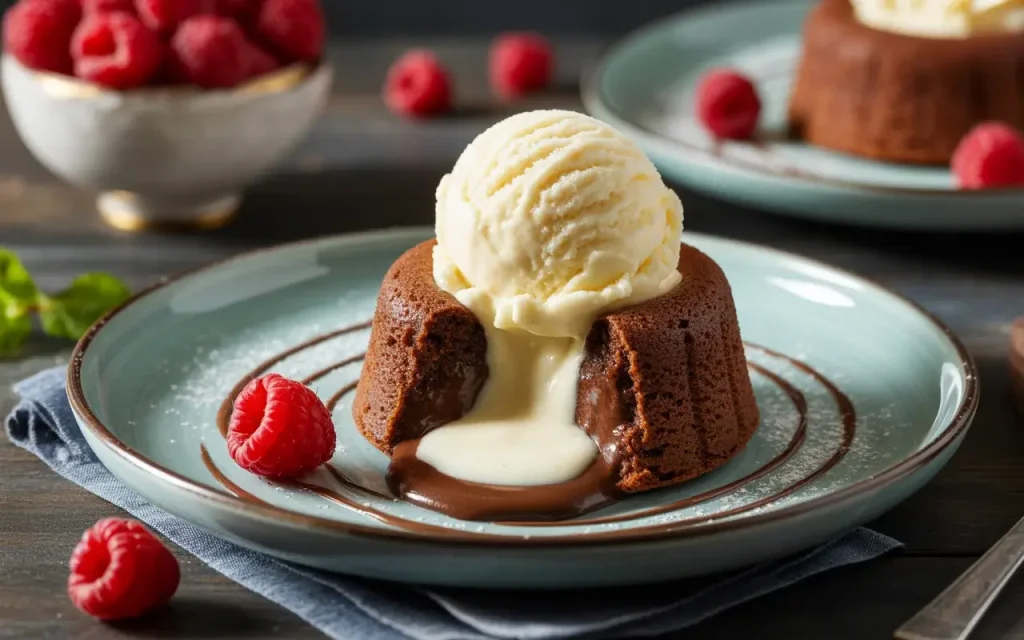
These lava cakes are best served immediately while the center is still warm and gooey. Run a knife around the edges and carefully invert onto dessert plates.
Top with a scoop of vanilla ice cream for the ultimate hot-and-cold contrast. A dusting of powdered sugar or drizzle of extra melted peanut butter makes them even more special.
Fresh berries or a dollop of whipped cream also complement the rich chocolate beautifully. Serve with coffee or dessert wine for an elegant finish to any meal.
Storage and Make-Ahead Tips
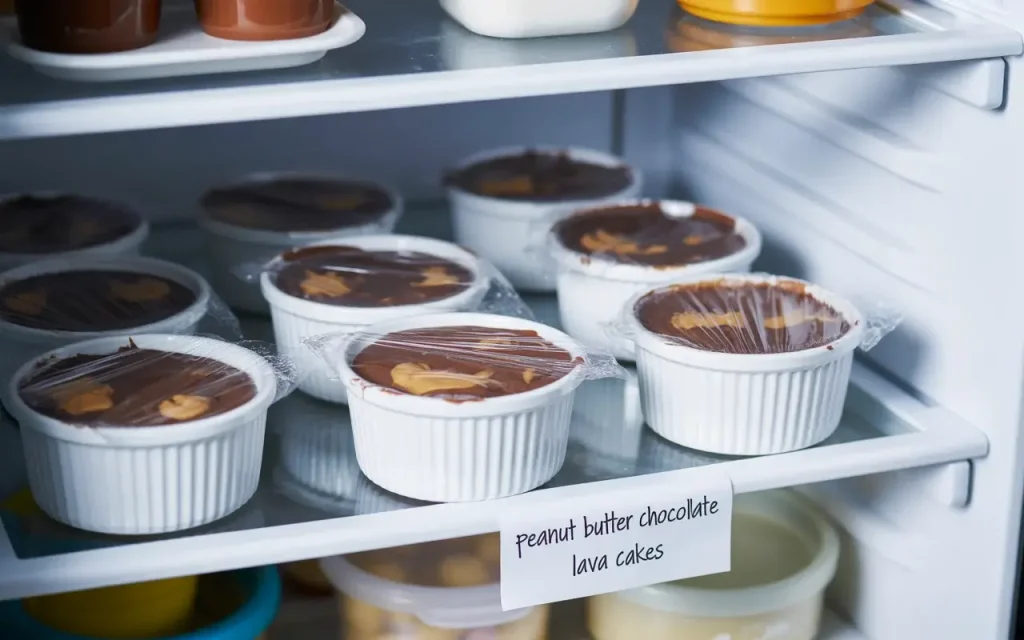
These cakes are definitely best fresh from the oven, but you can prep ahead to save time. Assemble the filled ramekins, cover tightly with plastic wrap, and refrigerate for up to 24 hours before baking.
If baking from cold, add 1-2 extra minutes to the baking time. The frozen peanut butter disks can be made up to a week ahead and stored in a freezer bag.
Leftover baked cakes can be refrigerated for up to 2 days and reheated in the microwave for 20-30 seconds, though they won’t have quite the same molten center effect.
Frequently Asked Questions
Can I use natural peanut butter for the filling?
Natural peanut butter isn’t recommended because it’s too oily and won’t hold its shape when frozen. The filling may leak out during baking. Stick with conventional creamy peanut butter like Jif or Skippy for best results.
How do I know when the lava cakes are done?
The edges should be firm and pulling away slightly from the sides of the ramekin, while the center should still look soft and jiggle when gently shaken. This usually takes 12-14 minutes at 425°F. Underbaking slightly is better than overbaking for that perfect molten center.
Can I make these without ramekins?
Yes! You can use a muffin tin, though the cakes will be smaller and may need 1-2 minutes less baking time. Generously butter and flour each cup. You can also use other oven-safe dishes like small ceramic bowls or custard cups as long as they’re about 6 ounces in capacity.