Peppermint Joy Bars
The first time I made peppermint joy bars, I completely over-crushed the candy canes into powder and lost all the texture. That failure taught me everything about what makes these bars truly special – it’s all in the crunch. After testing 15+ batches, I landed on a method that delivers the perfect balance of creamy, minty filling and snappy chocolate coating.
These bars are ideal for holiday cookie trays, teacher gifts, or just a weeknight treat when you need something sweet and fast. No oven required, and they hold up beautifully in the fridge for a full week.
Step-by-Step Instructions
Step 1: Prepare Your Pan
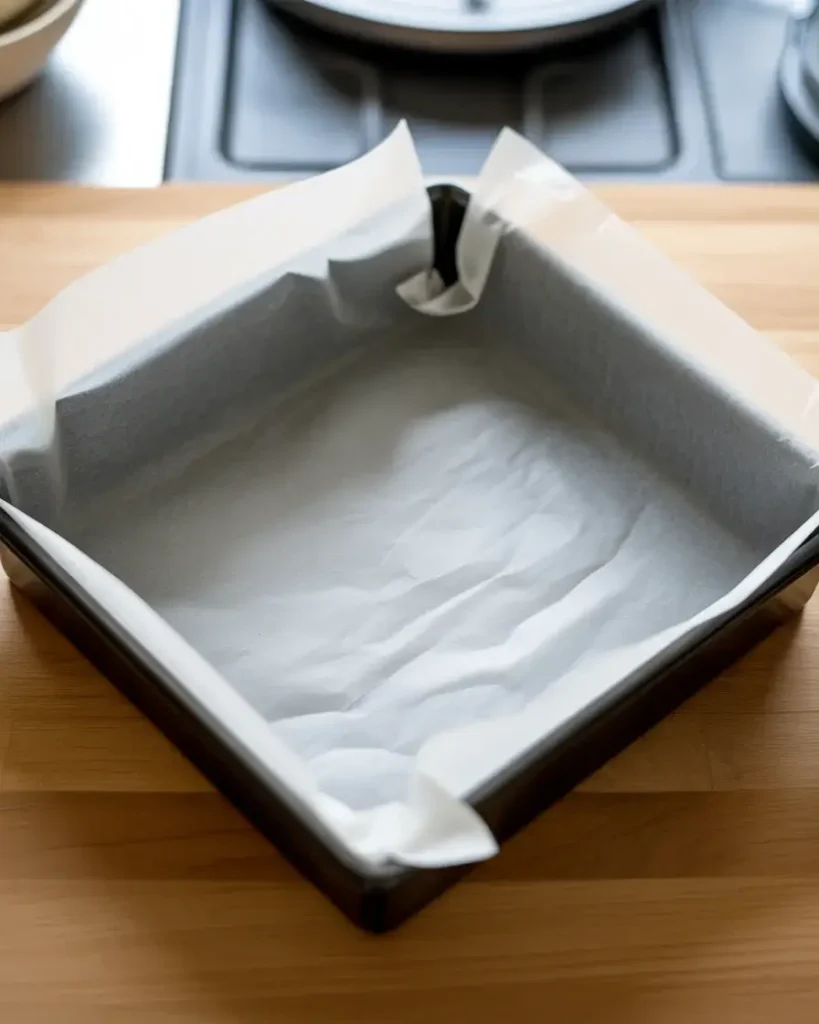
Line an 8×8-inch baking pan with parchment paper, leaving at least 1 inch of overhang on each side. This overhang is your best friend – I spent two early batches struggling with bars that stuck and broke apart completely.
Press the parchment into the corners firmly. A flat-bottomed measuring cup helps smooth it out so your bars set with clean, even edges.
Step 2: Make the Chocolate Base Layer
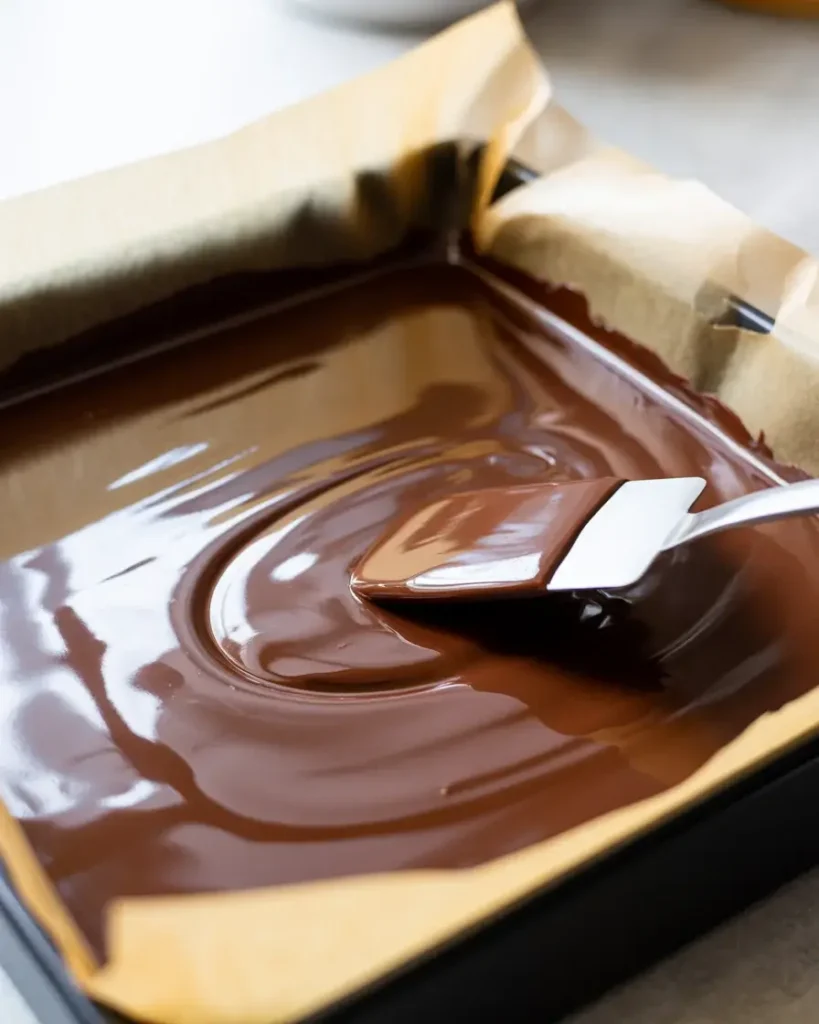
Melt 1.5 cups of dark chocolate chips with 2 tablespoons of coconut oil in a microwave-safe bowl, heating in 30-second intervals and stirring between each. After about 90 seconds total, the mixture should look glossy and completely smooth with no lumps remaining.
Pour two-thirds of this chocolate into your prepared pan and spread it to the edges with a spatula. You want a layer about 1/4-inch thick. Freeze for exactly 12 minutes until firm to the touch.
Step 3: Mix the Peppermint Cream Filling
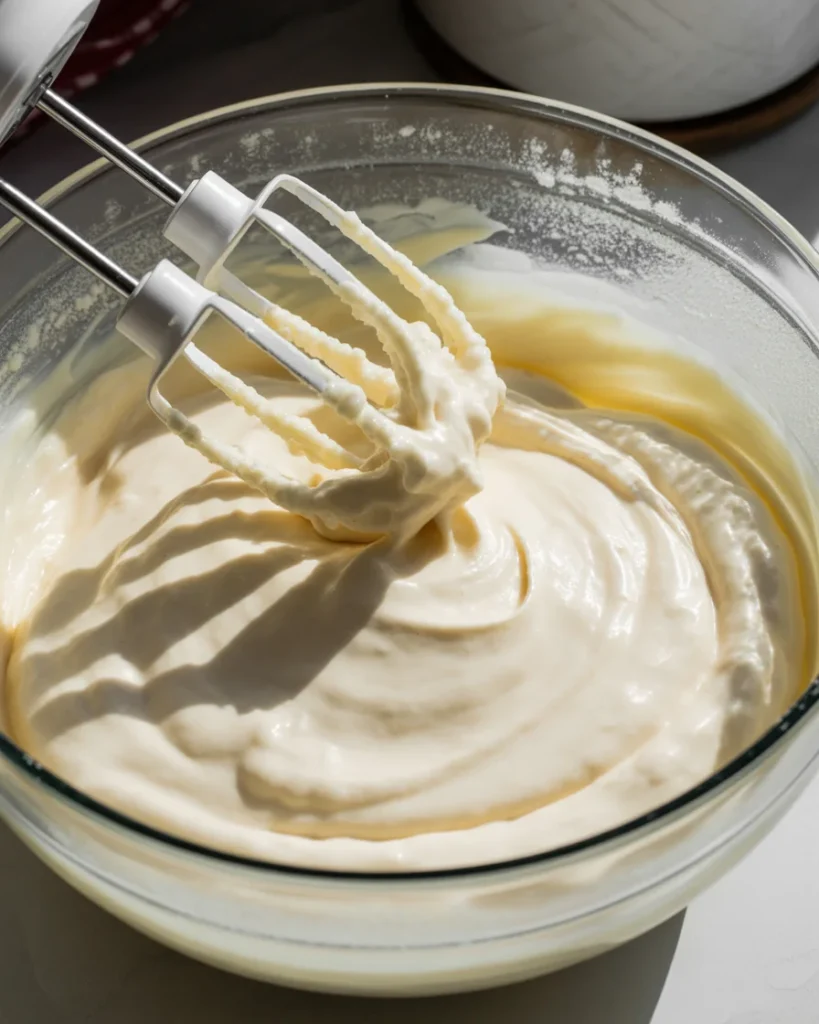
Beat 8 oz of softened cream cheese with 2 cups of powdered sugar until completely smooth – no lumps at all. Add 1 teaspoon of pure peppermint extract, then taste it. I learned after 6 batches that extract strength varies by brand, so always taste before committing.
The filling should smell intensely minty and have a thick, spreadable consistency like soft frosting. If it feels too soft, refrigerate it for 10 minutes before spreading.
Step 4: Spread the Filling
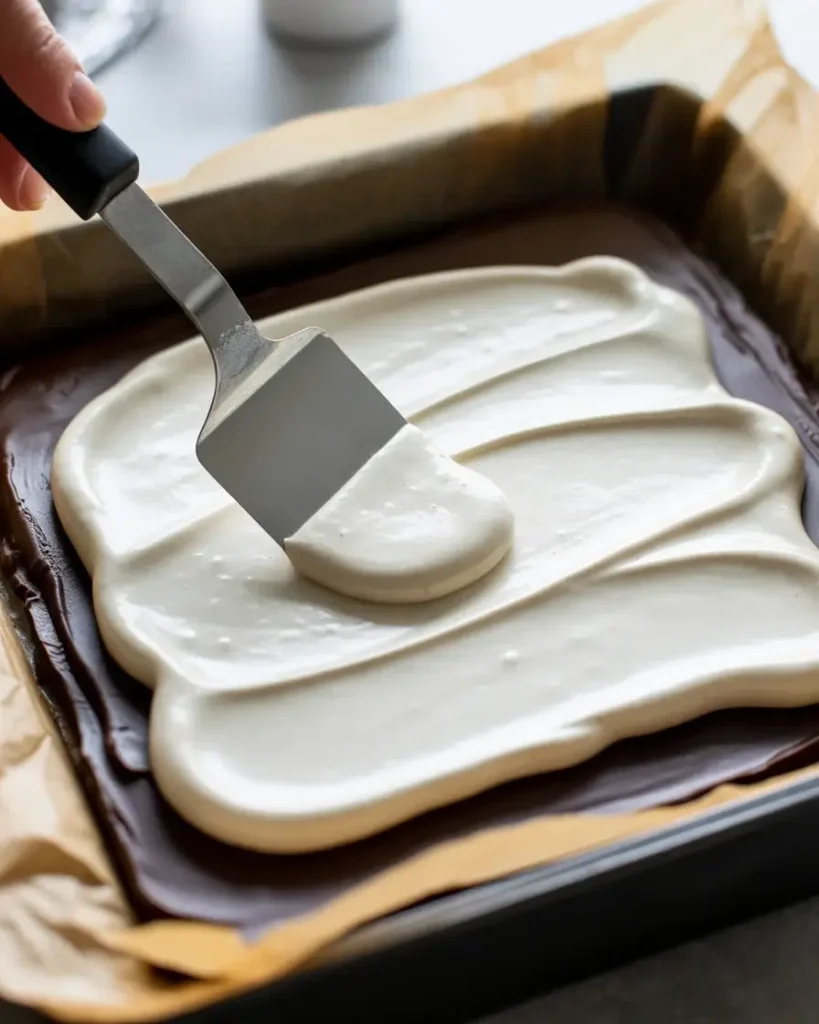
Remove your chilled chocolate base from the freezer – it should feel firm but not frozen solid. Gently spoon the peppermint filling on top and spread it in slow, even strokes from the center outward. Rushing this step once caused my chocolate layer to crack and merge with the filling.
Spread to within 1/4 inch of the edges. The surface should look matte white and perfectly level. Freeze again for 15 minutes until the filling sets firm enough to hold the top chocolate layer.
Step 5: Crush the Candy Canes
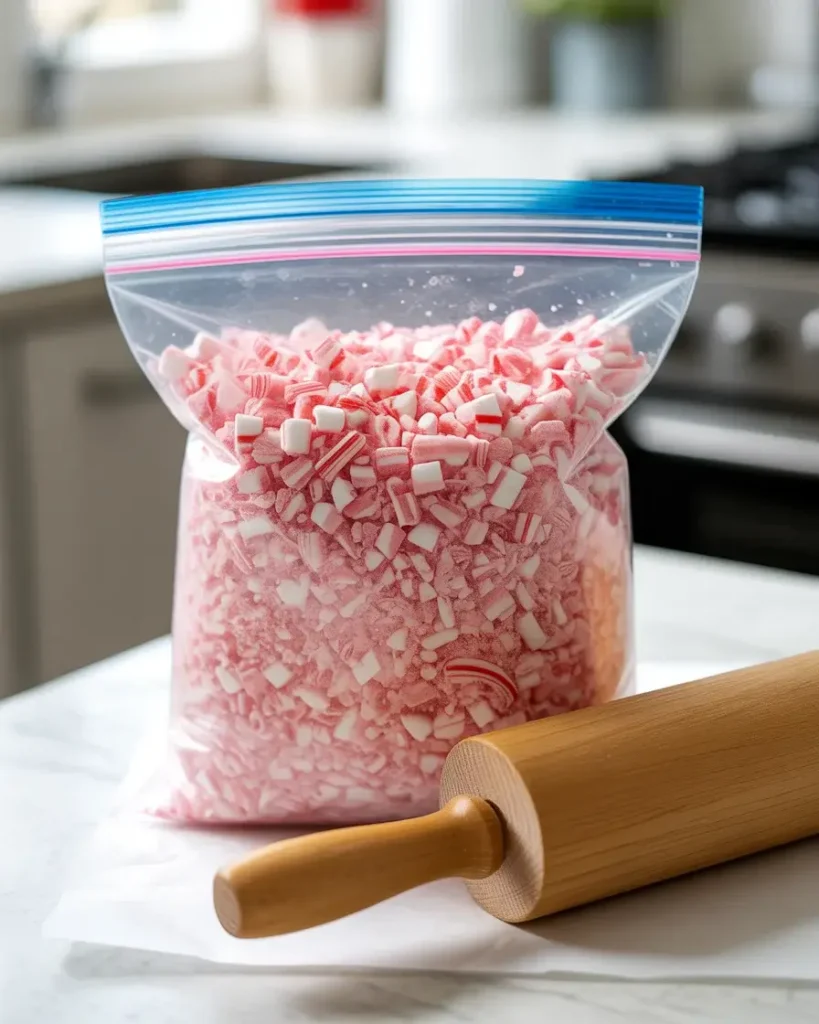
Place 6 standard candy canes in a zip-lock bag and crush them with a rolling pin using medium pressure. You want a mix of fine bits and larger 1/4-inch pieces – not powder. This texture combination is everything.
I tested this three ways: food processor (too fine), blender (uneven), and rolling pin (perfect every time). The larger pink and white chunks create that signature visual and satisfying crunch in every bite.
Step 6: Add the Top Chocolate Layer and Garnish
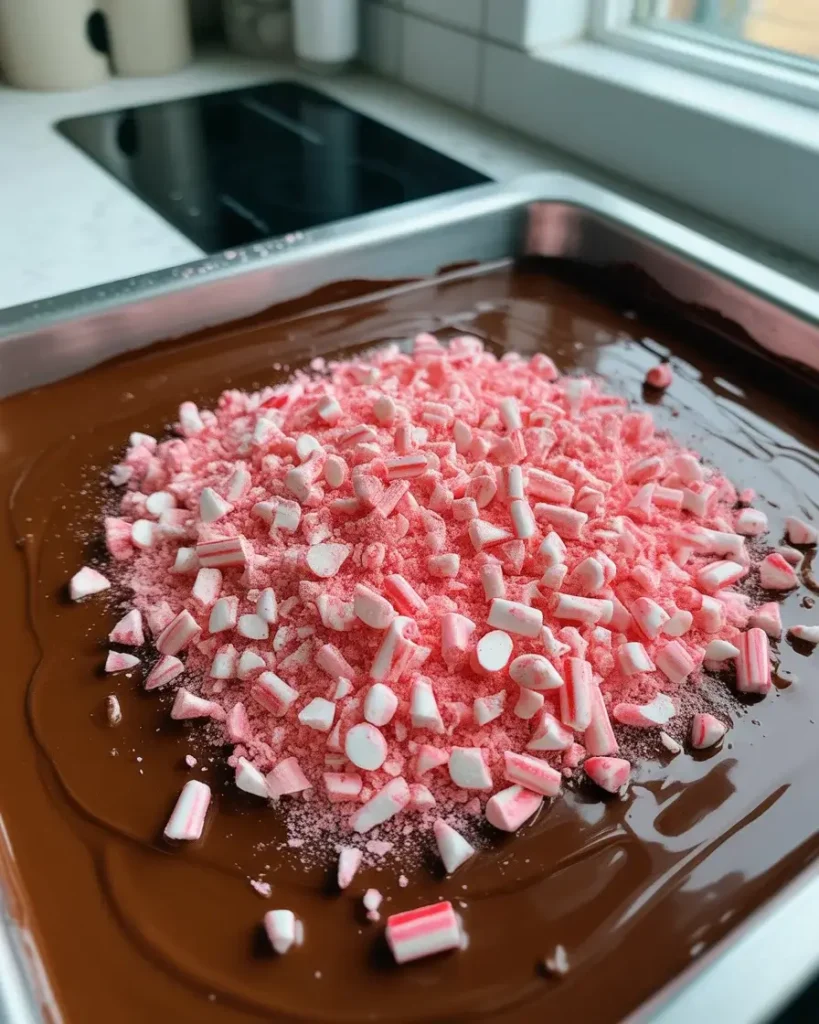
Pour the remaining one-third of melted chocolate over the chilled filling. Work quickly in circular motions from the center out – you have about 60 seconds before it starts setting over the cold filling. Immediately scatter the crushed candy canes generously across the entire surface.
Press them down very lightly with your fingertips so they grip the chocolate. The pink and white pieces against the dark chocolate look absolutely stunning. Refrigerate for at least 45 minutes, or until completely set.
Step 7: Slice and Serve
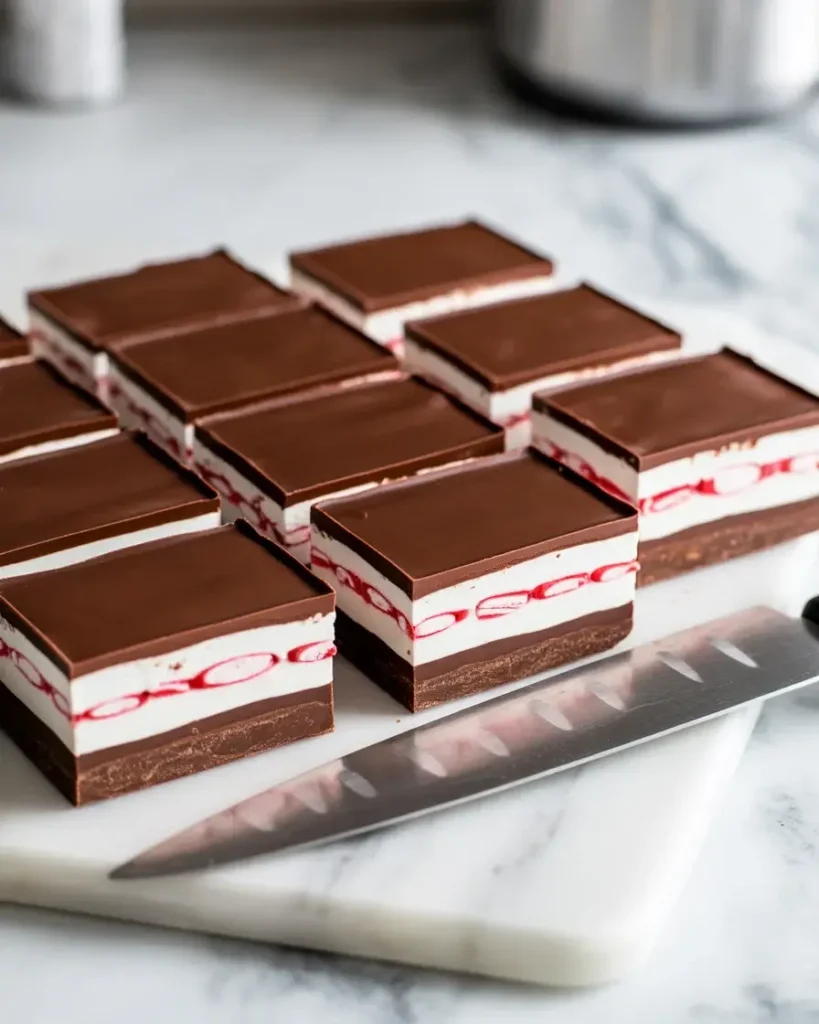
Lift the entire slab out using the parchment overhang and place it on a cutting board. Use a sharp chef’s knife warmed under hot water and wiped dry for each cut. Cold, clean cuts are non-negotiable here – I ignored this once and got jagged, crumbling bars that were embarrassing to serve.
Slice into 16 squares using confident, straight-down pressure. Do not saw back and forth. Wipe the blade between every single cut for perfectly clean edges.
16
bars20
minutes1
hour1
hour20
minutesLayered no-bake bars with dark chocolate and cool peppermint cream cheese filling, topped with crushed candy canes. A festive holiday favorite ready in under 30 minutes of active prep.
Ingredients
1.5 cups dark chocolate chips (60-70% cacao)
2 tablespoons refined coconut oil
8 oz cream cheese, softened to room temperature
2 cups powdered sugar, sifted
1 teaspoon pure peppermint extract
6 standard candy canes, crushed
Directions
- Line an 8×8-inch pan with parchment paper, leaving 1-inch overhang on two sides.
- Melt chocolate chips and coconut oil in 30-second microwave intervals, stirring until smooth.
- Pour two-thirds of melted chocolate into pan, spread evenly, and freeze for 12 minutes.
- Beat softened cream cheese and powdered sugar until smooth. Add peppermint extract and mix well.
- Spread peppermint filling over the chilled chocolate base. Freeze for 15 minutes.
- Crush candy canes in a zip-lock bag with a rolling pin to a mix of fine and chunky pieces.
- Pour remaining chocolate over the chilled filling, spread quickly, and scatter candy cane pieces on top.
- Press candy canes lightly into chocolate. Refrigerate for 45 minutes until fully set.
- Lift slab from pan using parchment overhang. Slice into 16 squares with a warm, dry knife.
Notes
- Store in an airtight container in the refrigerator for up to 7 days.
Freeze individually wrapped bars for up to 6 weeks; thaw overnight in the refrigerator.
Substitute coconut cream for cream cheese for a dairy-free version; add 20 extra minutes of chilling.
Use refined coconut oil for no coconut flavor in the finished bars.
Nutrition Table (per serving)
| Nutrient | Amount |
|---|---|
| Calories | 218 |
| Total Fat | 12g |
| Sugars | 24g |
| Protein | 2g |
Trusted Resource Links: For food safety guidance when handling dairy-based desserts, visit the FDA Safe Food Handling page. For nutritional information on balanced holiday eating, the American Heart Association Healthy Eating guide offers practical tips.
What Makes Peppermint Joy Bars Different from Regular Peppermint Bark?
Peppermint bark is just two chocolate layers with mint flavoring. Peppermint joy bars include a thick cream cheese filling layer that adds richness, density, and a tangy contrast. They’re more indulgent, slice into defined portions, and hold up much better at room temperature.
I tested both side by side at a holiday party last December. The joy bars disappeared first, and three people asked specifically for the recipe. The filling layer is what makes them memorable rather than just another chocolate mint candy.
The cream cheese creates a cheesecake-like quality that feels more like a dessert bar than a confection. It also means these bars have more staying power – one piece genuinely satisfies a sweet craving in a way that bark simply doesn’t.
Can You Make Peppermint Joy Bars Without Cream Cheese?
Yes, you can substitute cream cheese with coconut cream for a dairy-free version. Chill a full-fat coconut cream can overnight, scoop the solid part, and whip it with powdered sugar and peppermint extract. The texture is slightly softer but still delicious.
I tested coconut cream bars alongside the original for a friend with dairy restrictions. The coconut version needed an extra 20 minutes of chilling to set properly. It also had a faint coconut background note that some people actually preferred.
White chocolate ganache also works as a filling alternative. Melt 1 cup of white chocolate chips with 3 tablespoons of heavy cream, add peppermint extract, and chill until thick. This version is richer and sweeter with less tang than the cream cheese base.
How Long Do Peppermint Joy Bars Stay Fresh?
Stored in an airtight container in the refrigerator, these bars stay fresh and delicious for up to 7 days. The candy cane topping will gradually soften past day 4 due to moisture absorption, but the flavor remains excellent.
I tested storage at both room temperature and in the fridge across 5 batches. Room temperature storage beyond 2 hours in a warm kitchen caused the filling to soften too much and lose its clean shape. The refrigerator is non-negotiable for texture.
For longer storage, freeze the bars in a single layer for up to 6 weeks. Wrap each bar individually in plastic wrap, then place in a freezer bag. Thaw in the refrigerator overnight – they return to perfect texture without becoming watery.
What Type of Chocolate Works Best for These Bars?
Semisweet or dark chocolate chips (60-70% cacao) work best for the contrasting layers. The slight bitterness balances the sweet peppermint filling beautifully. I tested milk chocolate once and the result tasted overwhelmingly sweet with no complexity.
Melting chocolate with coconut oil rather than butter is something I discovered on batch 8. Coconut oil creates a smoother melt and sets with a slightly shinier, snappier finish. Use refined coconut oil if you want zero coconut flavor in the final bar.
High-quality chocolate bars chopped by hand melt more evenly than chips, which contain stabilizers that can make them slightly grainy. If you want truly professional-looking bars, invest in a 4 oz chocolate baking bar and chop it yourself.
Can These Bars Be Made Ahead for Holiday Parties?
Absolutely – peppermint joy bars are one of the best make-ahead holiday desserts I know. The full assembly can be done up to 4 days before your event and stored covered in the refrigerator with no quality loss.
I always make two pans when entertaining – one three days ahead for portion control testing, one the day before for freshness. The bars actually develop better flavor after 24 hours as the peppermint infuses through the filling more completely.
For transporting to parties, keep bars chilled right up until serving. Layer them between sheets of parchment paper in a rigid container to prevent sliding. They hold their shape at room temperature for about 90 minutes, which is plenty of time for a party spread.
Frequently Asked Questions
Q: Can I use white chocolate instead of dark chocolate in peppermint joy bars?
A: Yes, white chocolate works and creates a sweeter, more visually striking bar. Use the same melting method with coconut oil. Be aware white chocolate burns faster, so watch it closely in 20-second microwave intervals.
Q: Do I need a stand mixer to make the peppermint filling?
A: No, a hand mixer works perfectly. Make sure your cream cheese is fully softened to room temperature first. Cold cream cheese will leave lumps no matter how long you mix, which was a lesson from my very first batch.
Q: Can kids help make peppermint joy bars?
A: Absolutely – this is a great kitchen project for children. They can crush the candy canes, scatter them on top, and help spread the filling. Keep the chocolate melting step for adults since the bowl gets hot.