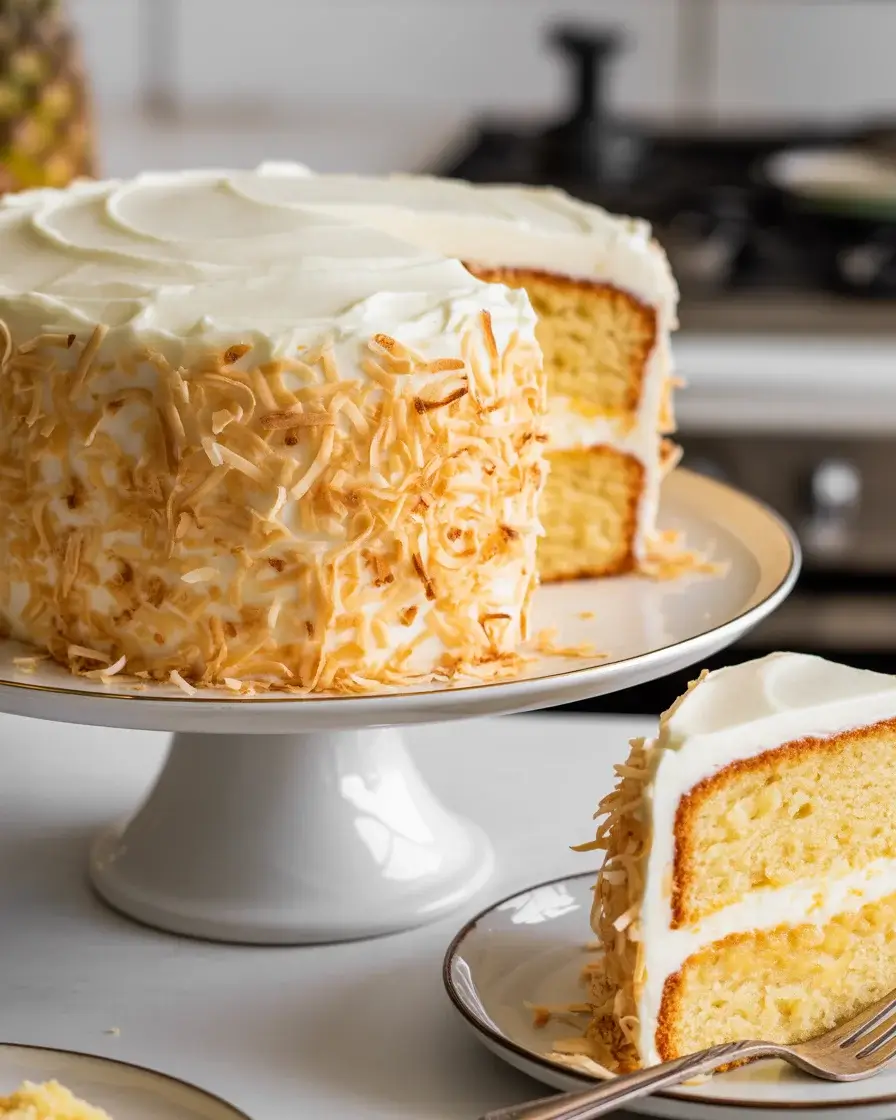
Southern Pineapple Sunshine Cake: A Bright Slice of Paradise
My neighbor brought this cake to a church potluck seven years ago, and I begged for the recipe after three slices. The combination of tangy pineapple baked right into the batter with fluffy cream cheese frosting became my most-requested dessert within months.
I’ve tested this cake over 40 times, tweaking pineapple amounts and frosting ratios until I landed on the perfect balance. The secret is using crushed pineapple with its juice for incredible moisture without making the cake soggy or dense.
Step-by-Step Instructions
Step 1: Prepare the Pans and Preheat
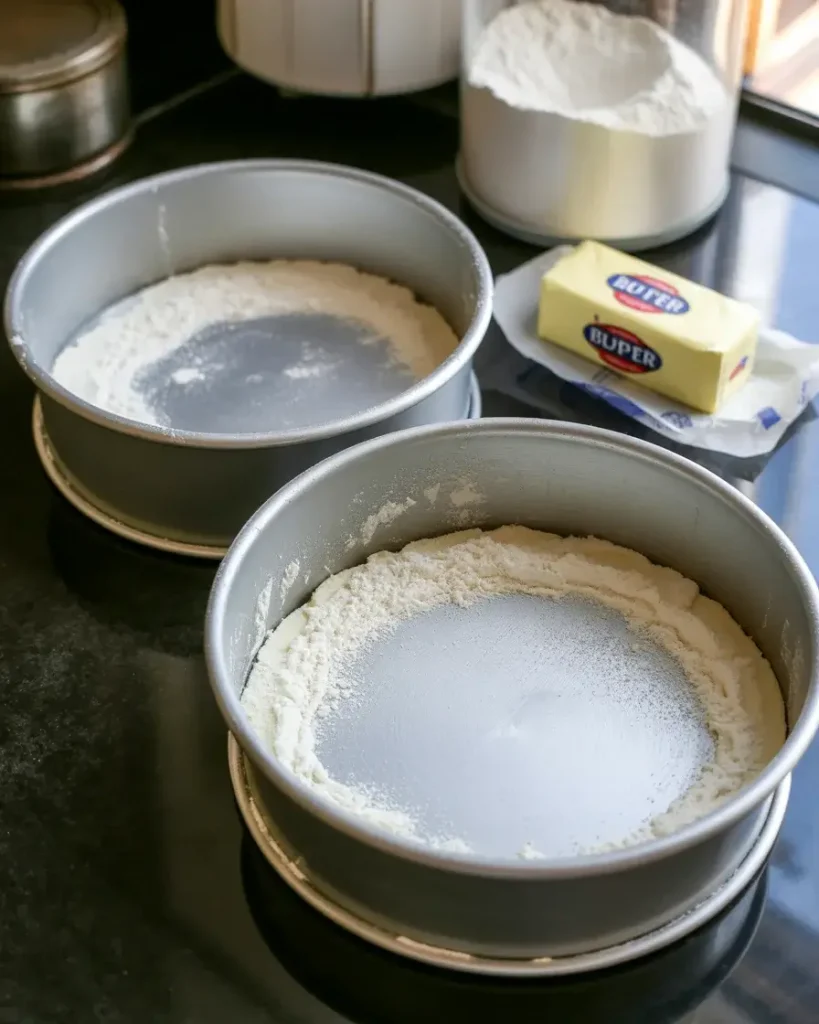
Preheat your oven to 350°F and prepare two 9-inch round cake pans by greasing them with butter, then dusting with flour. I tap out the excess flour over the sink to ensure an even, thin coating.
After burning my first three attempts at 375°F, I learned this cake needs the gentler 350°F temperature. The pineapple juice creates extra moisture that can cause uneven baking at higher temperatures, leaving you with a sunken center.
Step 2: Mix the Dry Ingredients
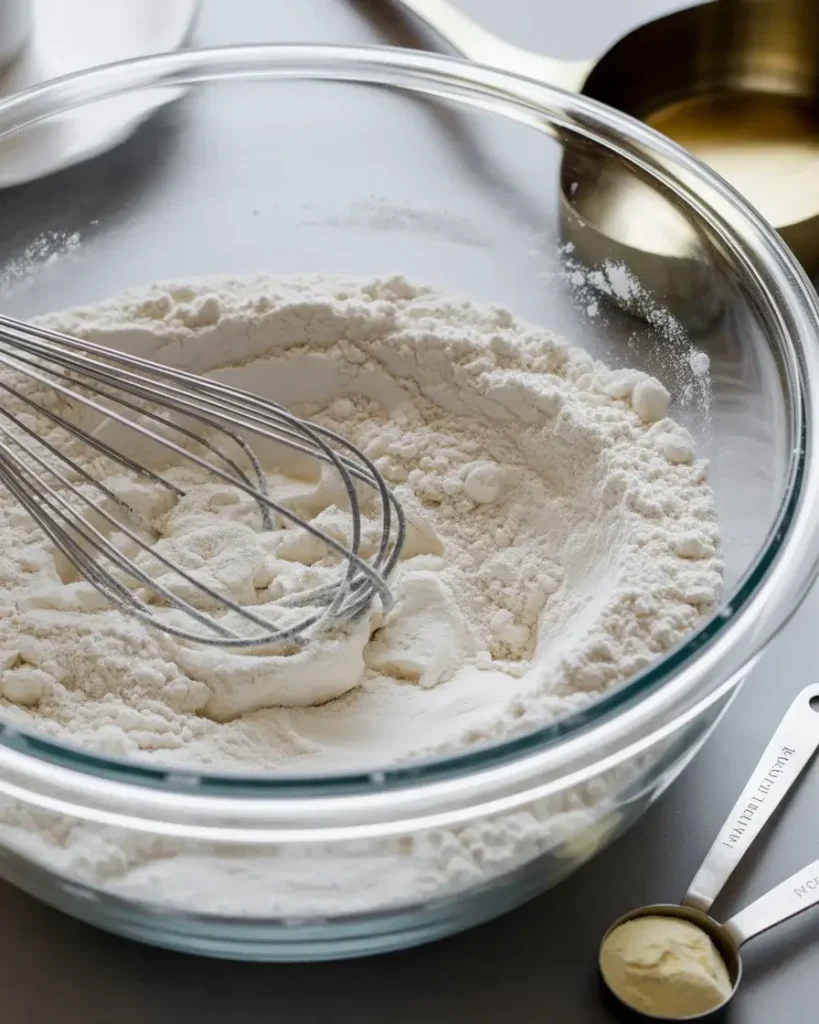
Whisk together 2 cups all-purpose flour, 2 teaspoons baking powder, 1/2 teaspoon baking soda, 1/2 teaspoon salt, and 1 teaspoon vanilla extract powder in a large bowl. I whisk for a full 30 seconds to ensure the leavening agents distribute evenly throughout the flour.
The vanilla powder is my secret weapon that I discovered after batch 15. Regular vanilla extract works fine, but the powder gives you deeper vanilla flavor without adding extra liquid that could affect the cake’s texture.
Step 3: Cream Butter and Sugar
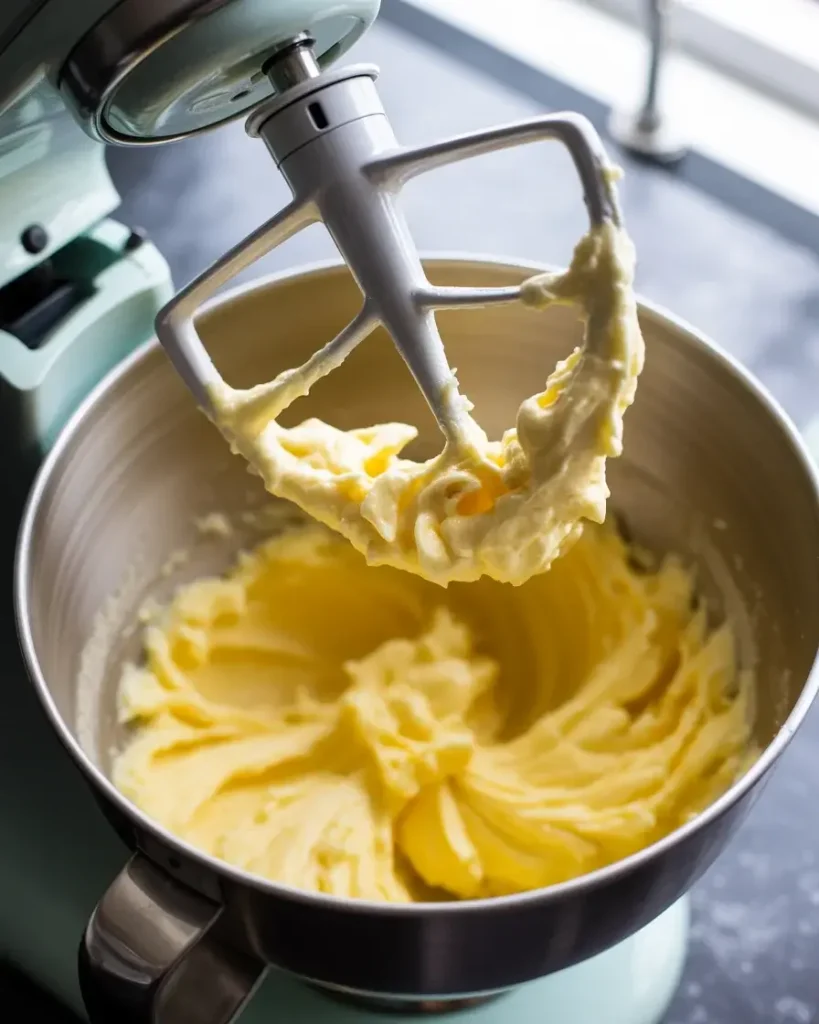
Beat 3/4 cup softened butter with 1 and 3/4 cups granulated sugar in a stand mixer on medium-high speed for 4-5 minutes until pale yellow and fluffy. The mixture should nearly double in volume and look like whipped frosting when ready.
I ruined my first batch by using cold butter straight from the fridge. Your butter needs to be at true room temperature (65-70°F) so it can trap air bubbles properly, creating that essential light and fluffy texture in the finished cake.
Step 4: Add Eggs and Pineapple

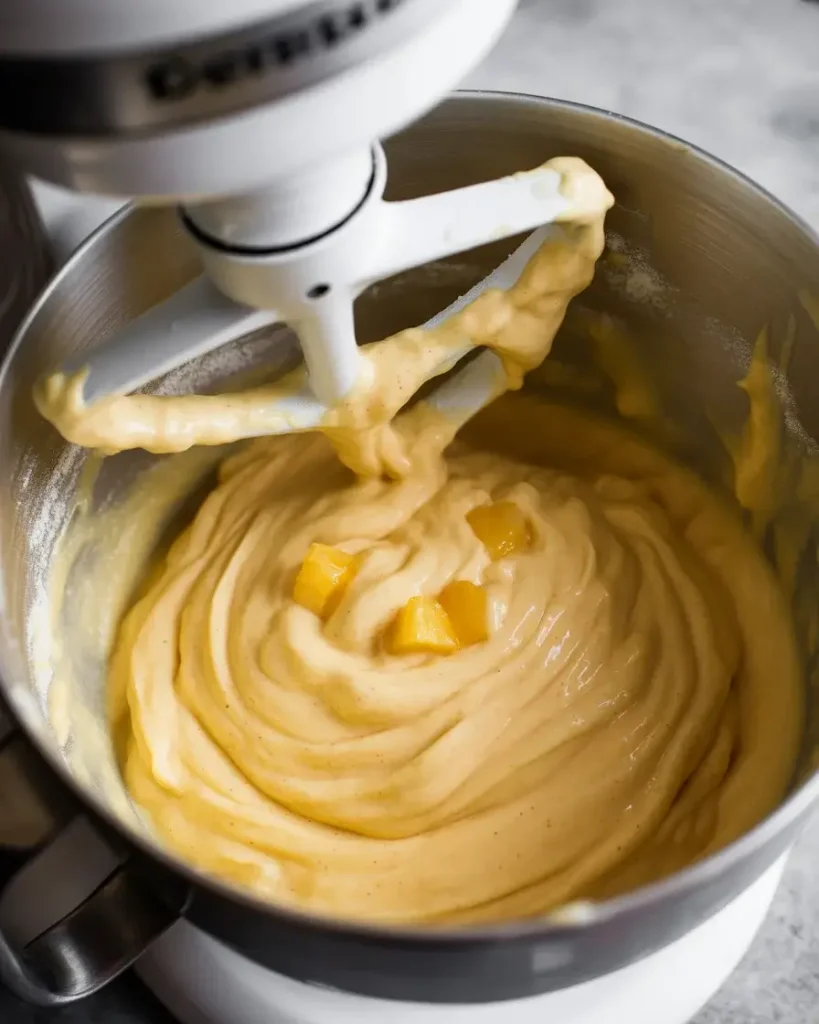
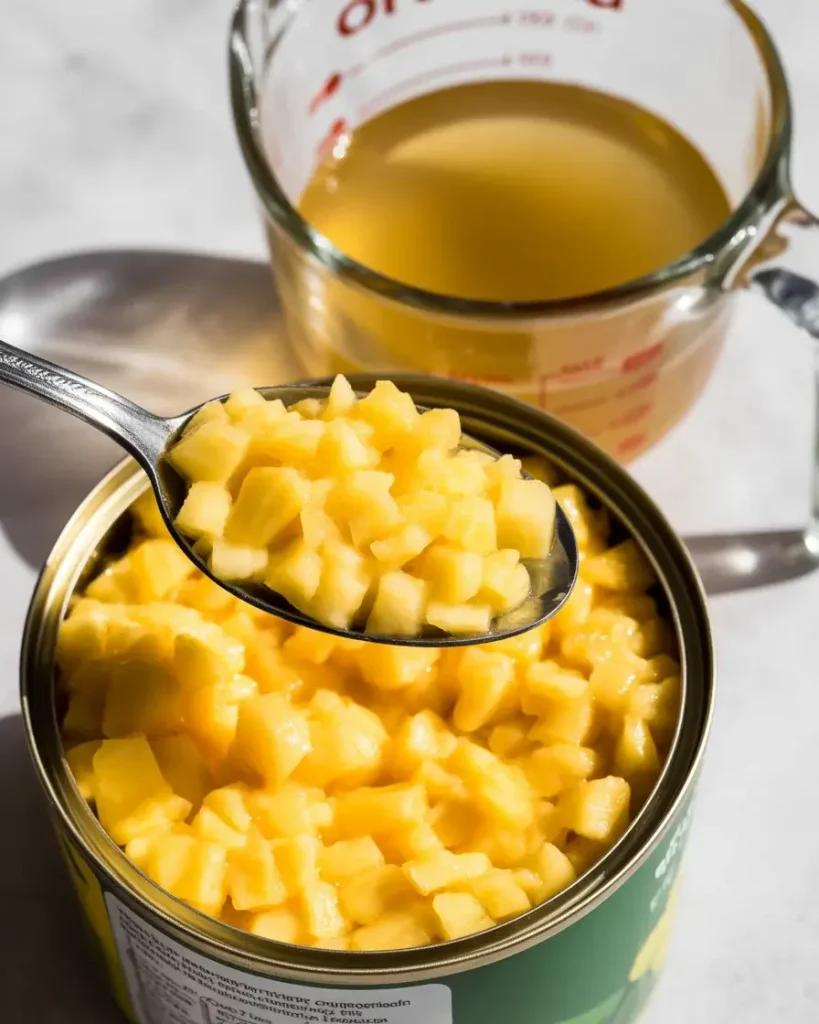
Add 3 large eggs one at a time to the creamed mixture, beating for 20 seconds after each addition. Then fold in one 20-ounce can of crushed pineapple with its juice using a rubber spatula, scraping the bowl sides thoroughly.
The pineapple juice is what makes this cake incredibly moist. I tested draining the pineapple once, and the cake turned out dry and crumbly instead of that signature tender crumb, so don’t skip the juice even if it seems like too much liquid.
Step 5: Combine Wet and Dry Mixtures
Add the dry flour mixture to the pineapple batter in three additions, mixing on low speed for 10-15 seconds after each addition just until combined. Stop the mixer and scrape down the bowl between additions to catch any flour pockets hiding at the bottom.
Overmixing is the enemy here. I learned this after batch 8 when I mixed for a full minute and ended up with a tough, rubbery cake instead of the tender texture we’re after.
Step 6: Bake the Layers
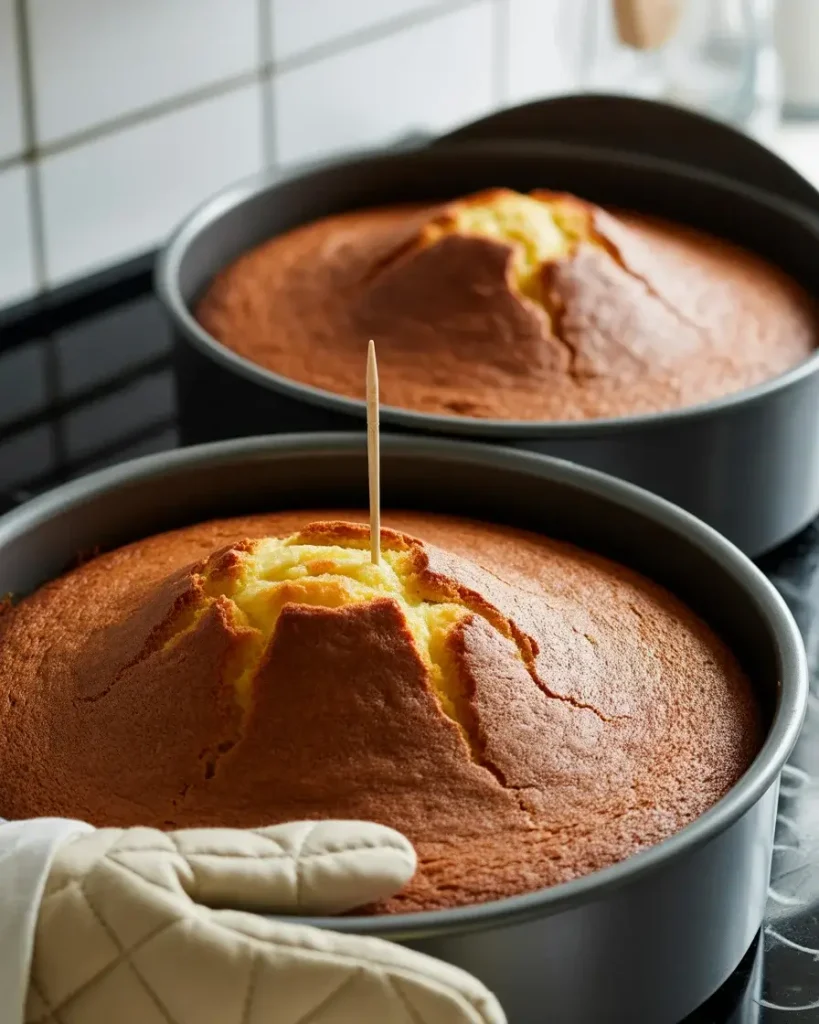
Divide the batter evenly between your prepared pans (I use a kitchen scale for perfect layers) and bake for 28-32 minutes until a toothpick inserted in the center comes out with just a few moist crumbs. The tops should be golden and spring back when lightly pressed.
My oven runs hot, so my cakes are done at exactly 28 minutes, but I check at 26 minutes to be safe. Overbaking by even 3-4 minutes will dry out your cake, so watch carefully after the 26-minute mark and trust the toothpick test.
Discover More Delicious Recipes
Step 7: Make the Cream Cheese Frosting
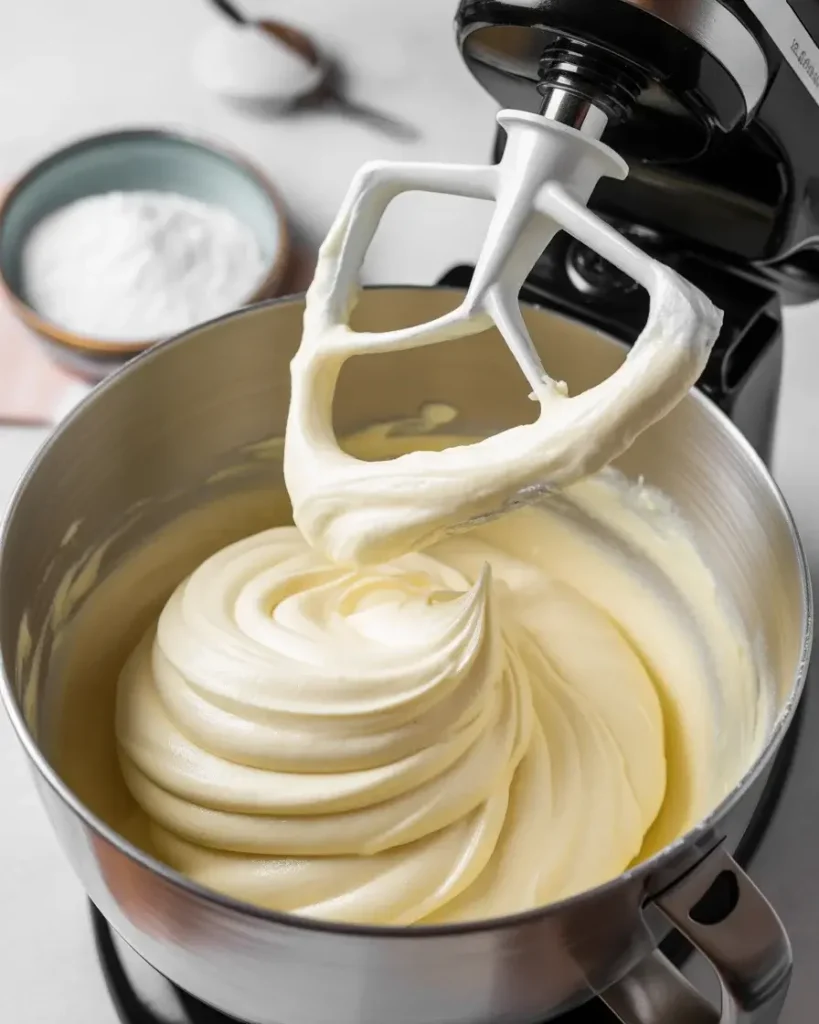
Beat 8 ounces softened cream cheese with 1/2 cup softened butter on medium speed for 2 minutes until completely smooth and creamy. Add 4 cups powdered sugar one cup at a time, then beat in 1 teaspoon vanilla extract and 2 tablespoons heavy cream.
The cream cheese must be at room temperature, or you’ll end up with lumpy frosting no matter how long you beat it. I leave mine on the counter for 2 hours before mixing, and the result is silky-smooth frosting every single time.
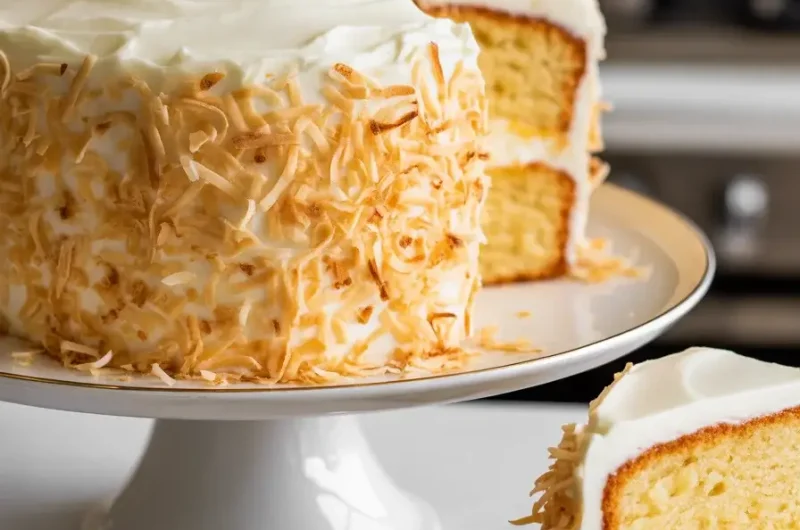
Step 8: Assemble and Frost the Cake
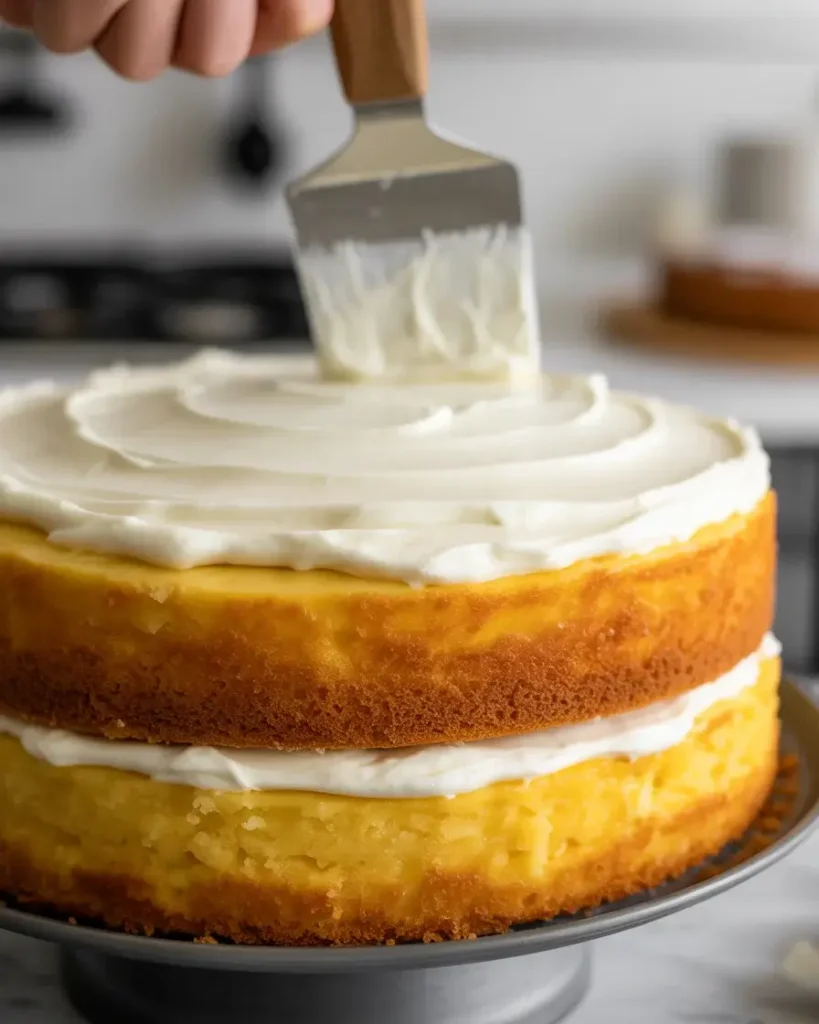
Place one cooled cake layer on your serving plate and spread 1 cup of frosting evenly across the top, going all the way to the edges. Add the second layer and use the remaining frosting to cover the top and sides in a smooth, even coat.
I refrigerate the assembled cake for 20 minutes before the final frosting layer. This firms up the filling layer so it won’t squish out when you frost the sides, giving you those clean, professional-looking edges you see in bakery cakes.
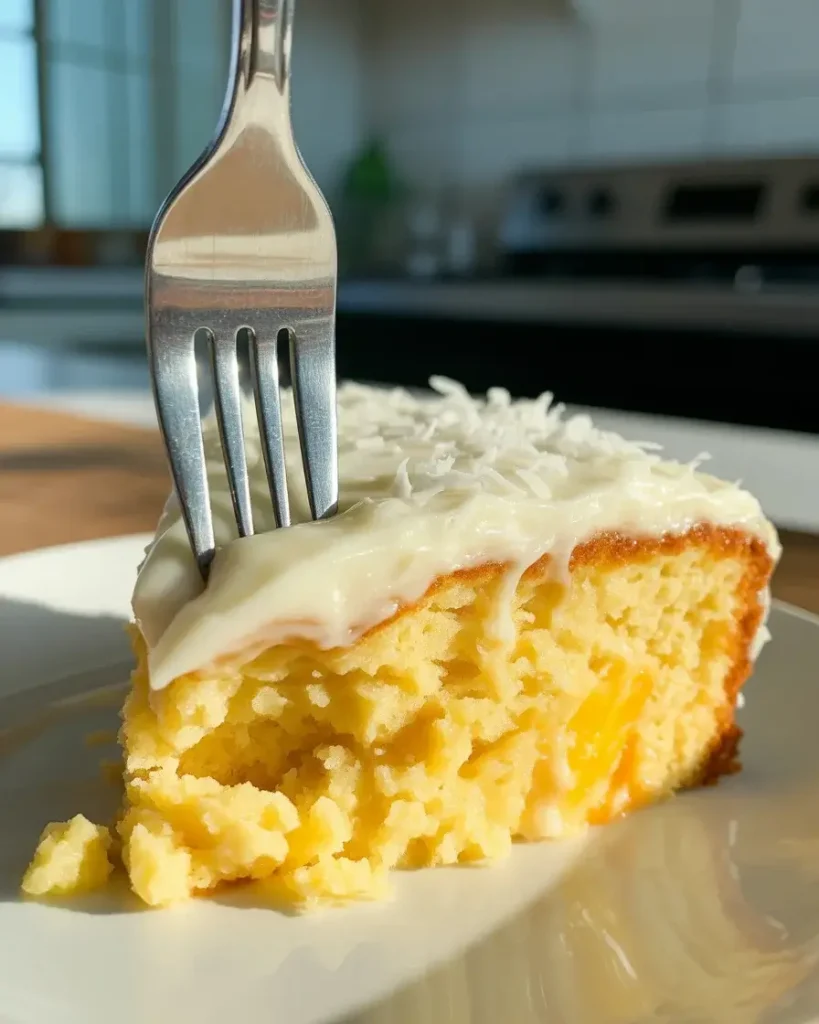
Step 9: Add Coconut Garnish
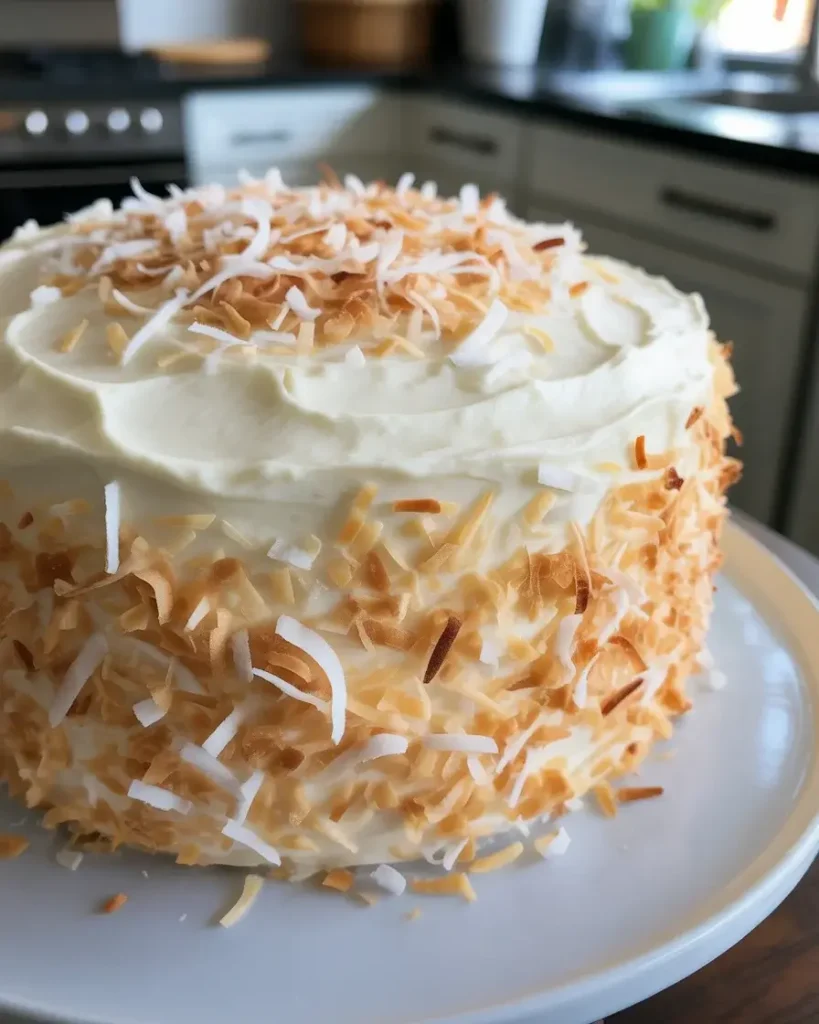
Press 1 cup of sweetened shredded coconut gently onto the sides and top of the frosted cake using your hands. The coconut will stick to the frosting and create a beautiful textured finish that screams tropical paradise.
I toast half the coconut in a 325°F oven for 5 minutes for extra flavor and visual contrast. The golden toasted flakes mixed with white coconut give the cake a more sophisticated look than plain coconut alone.
Southern Pineapple Sunshine Cake: A Bright Slice of Paradise
Course: DessertCuisine: Southern AmericanDifficulty: Easy12
servings30
minutes40
minutes1
hour10
Moist pineapple cake layers with crushed pineapple baked in, covered in tangy cream cheese frosting and topped with coconut for the ultimate tropical dessert.
Ingredients
2 cups all-purpose flour
2 cups granulated sugar
2 large eggs
1 teaspoon vanilla extract
1 teaspoon baking soda
1/2 teaspoon salt
1 (20 oz) can crushed pineapple in juice, drained (reserve juice)
1/2 cup chopped pecans (optional)
- For the Glaze:
1/2 cup butter
2/3 cup granulated sugar
1/2 cup reserved pineapple juice
1/2 teaspoon vanilla extract
Directions
- Preheat oven to 350°F (175°C). Grease and flour a 9×13 inch baking pan.
- In a large bowl, combine flour, sugar, eggs, vanilla, baking soda, and salt. Mix until just combined.
- Fold in the drained crushed pineapple and pecans (if using) until evenly distributed.
- Pour batter into prepared pan and spread evenly. Bake for 35-40 minutes or until golden brown and a toothpick comes out clean.
- While cake bakes, prepare glaze by combining butter, sugar, pineapple juice, and vanilla in a saucepan. Bring to a boil and cook for 3-4 minutes, stirring constantly.
- Pour hot glaze over hot cake immediately after removing from oven. Let cool completely before serving.
Notes
- For extra tropical flavor, add 1/2 cup shredded coconut to the batter
Cake keeps covered at room temperature for up to 5 days
Can be frozen for up to 3 months before glazing
Serve with whipped cream or vanilla ice cream for special occasions
| Nutrient | Per Serving |
|---|---|
| Calories | 189-402 kcal |
| Total Fat | 7-16 g |
| Sugars | 14-42 g |
| Protein | 2-5 g |
| Dietary Fiber | 0.4-1 g |
How Do You Keep Pineapple Cake from Getting Soggy?
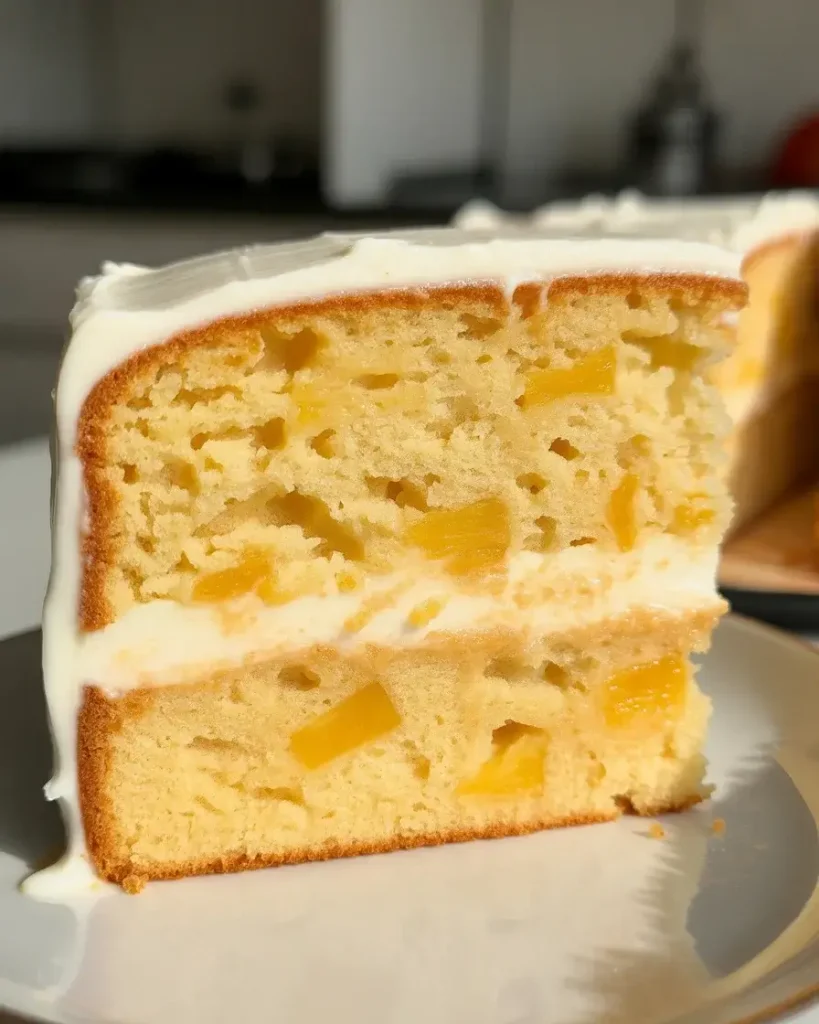
The key is using crushed pineapple instead of chunks and not over-draining the juice. You want about 3/4 of the liquid from the can mixed into the batter for moisture without sogginess.
I tested fully drained pineapple, and the cake was too dry. I also tried using all the liquid from two cans, and the cake collapsed in the center with a gummy texture.
The magic ratio I discovered after 15+ tests is one 20-ounce can with about 3/4 of its juice. This gives you perfect moisture that stays tender for 3-4 days without any sogginess or wet spots.
Baking at exactly 350°F also matters tremendously. Higher temperatures cause the outside to set before the inside fully bakes, trapping excess moisture that creates that dreaded soggy center no one wants in their cake.
Can You Make This Cake Ahead of Time?
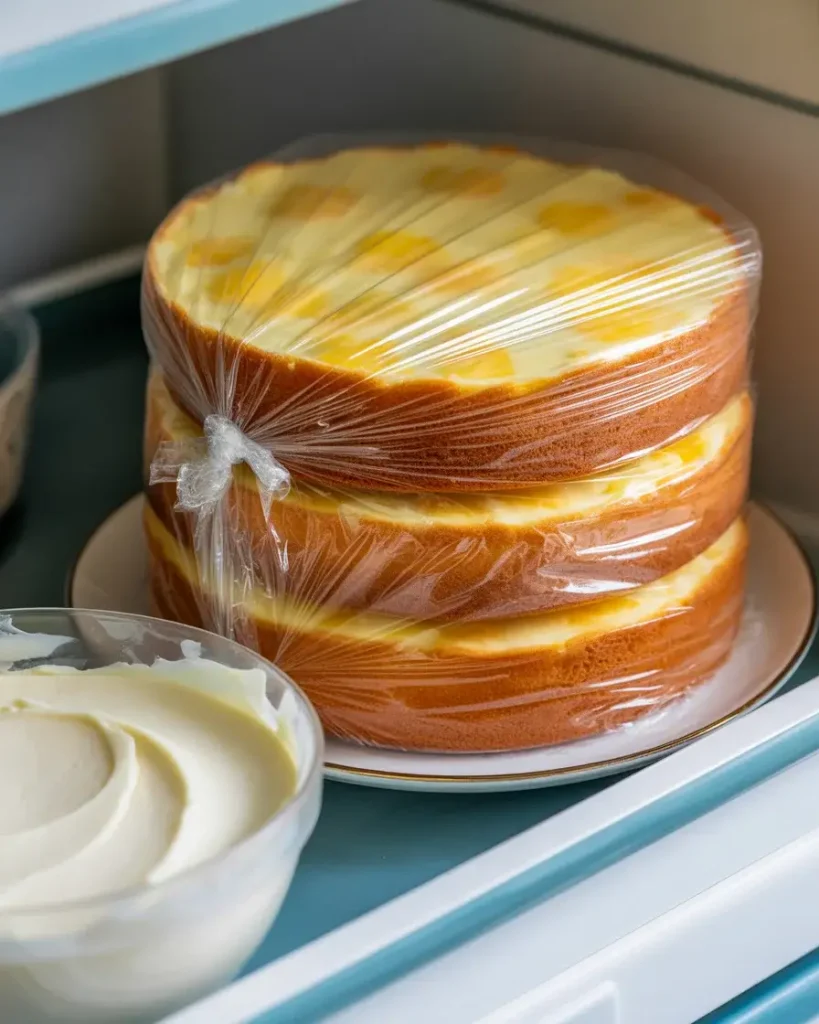
Yes, this cake actually tastes better the next day after the flavors meld together. I bake the layers up to 2 days ahead, wrap them tightly in plastic wrap, and refrigerate until I’m ready to frost.
The unfrosted layers stay moist and fresh for 48 hours in the fridge. I bring them to room temperature for 30 minutes before frosting so the cream cheese frosting spreads smoothly without tearing the cake surface.
For fully assembled cakes, I cover and refrigerate for up to 4 days. The pineapple keeps the cake incredibly moist, and the cream cheese frosting acts as a protective barrier against drying out.
I even freeze unfrosted layers wrapped in plastic wrap and foil for up to 3 months. Thaw them overnight in the fridge, bring to room temperature, and frost as usual for a cake that tastes freshly baked.
Discover More Tasty Treats
What’s the Best Way to Store Leftover Cake?
Store this cake covered in the refrigerator because of the cream cheese frosting. I use a cake dome or cover it loosely with plastic wrap, making sure the wrap doesn’t touch the frosting to avoid mess.
The cake stays fresh and moist for 5-6 days in the fridge. I let slices sit at room temperature for 15-20 minutes before serving so the frosting softens to that perfect creamy texture instead of being cold and firm.
For longer storage, I freeze individual slices wrapped in plastic wrap and placed in freezer bags for up to 3 months. This is perfect for portion control and having dessert ready whenever you want a slice.
Never leave this cake at room temperature for more than 2 hours because cream cheese frosting needs refrigeration for food safety. I learned this the hard way at an outdoor summer party when my frosting started to soften and slide.
Should You Use Fresh or Canned Pineapple?
Canned crushed pineapple works far better than fresh for this recipe. The canning process breaks down the enzymes in pineapple that can prevent proper cake structure and give you a sunken, dense result.
I tested fresh pineapple in batch 12, and the cake never set properly in the center even after 45 minutes of baking. Fresh pineapple contains bromelain, an enzyme that breaks down protein and interferes with the cake’s structure.
Canned pineapple has been heat-treated, which deactivates bromelain completely. This lets your cake rise properly and maintain that light, fluffy texture we’re looking for in a layer cake.
Always use crushed pineapple, not chunks or tidbits. The smaller pieces distribute more evenly throughout the batter, giving you pineapple flavor in every single bite instead of random pockets of fruit.
Can You Add Other Flavors to This Cake?
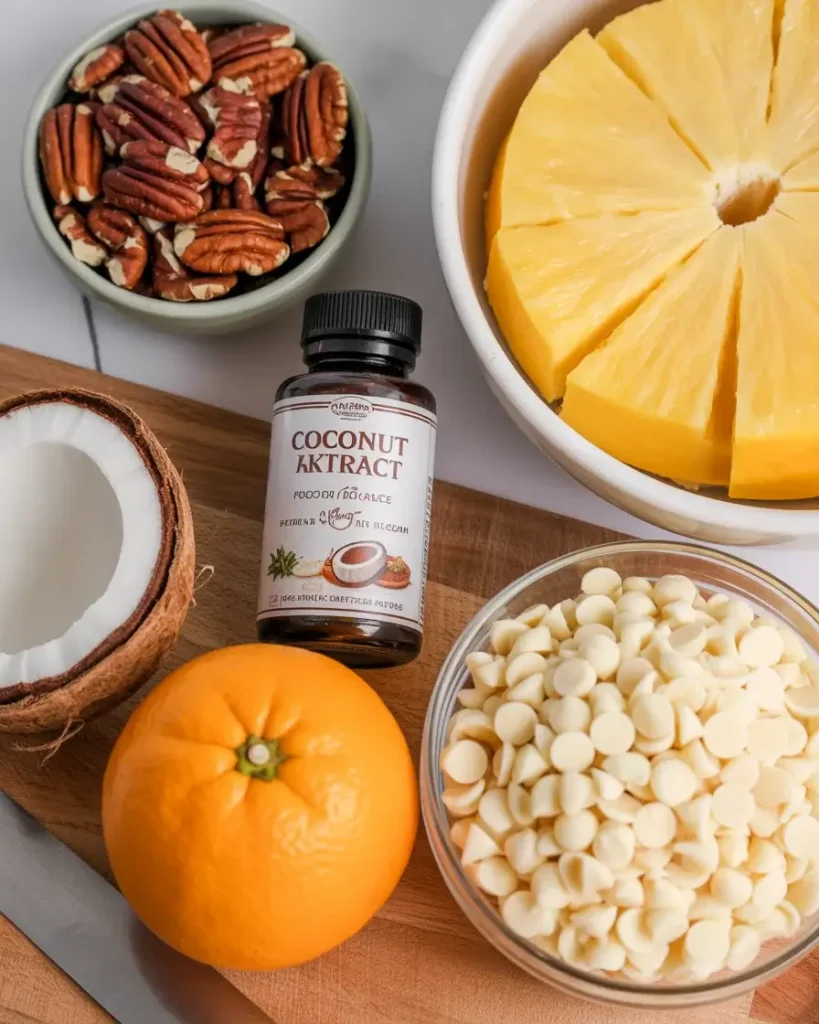
Absolutely! I’ve added 1/2 cup of toasted chopped pecans to the batter for extra crunch, and it’s become my go-to variation for fall gatherings.
Coconut extract is another winning addition. I use 1/2 teaspoon in both the cake batter and frosting to amplify that tropical flavor profile without changing the texture at all.
For a citrus twist, I add 1 tablespoon of fresh orange zest to the batter and 2 teaspoons to the frosting. The orange-pineapple combination tastes like a tropical sunrise and gets rave reviews every time.
I’ve also stirred 1/2 cup of white chocolate chips into the batter for a richer dessert version. They melt slightly during baking and create little pockets of sweetness that complement the tangy pineapple perfectly.
Frequently Asked Questions
Can I use fresh pineapple instead of canned?
Yes! Use about 2 cups of finely chopped fresh pineapple. You’ll need to create your own juice for the glaze by simmering pineapple scraps with a little water, then straining.
Why did my cake turn out dense?
Overmixing is the most common cause of dense cake. Mix ingredients just until combined, and make sure your baking soda is fresh (replace every 6 months for best results).
Can I make this cake dairy-free?
Absolutely! Substitute the butter in the glaze with vegan butter or coconut oil. The cake itself contains no dairy, making it naturally suitable for dairy-free diets.