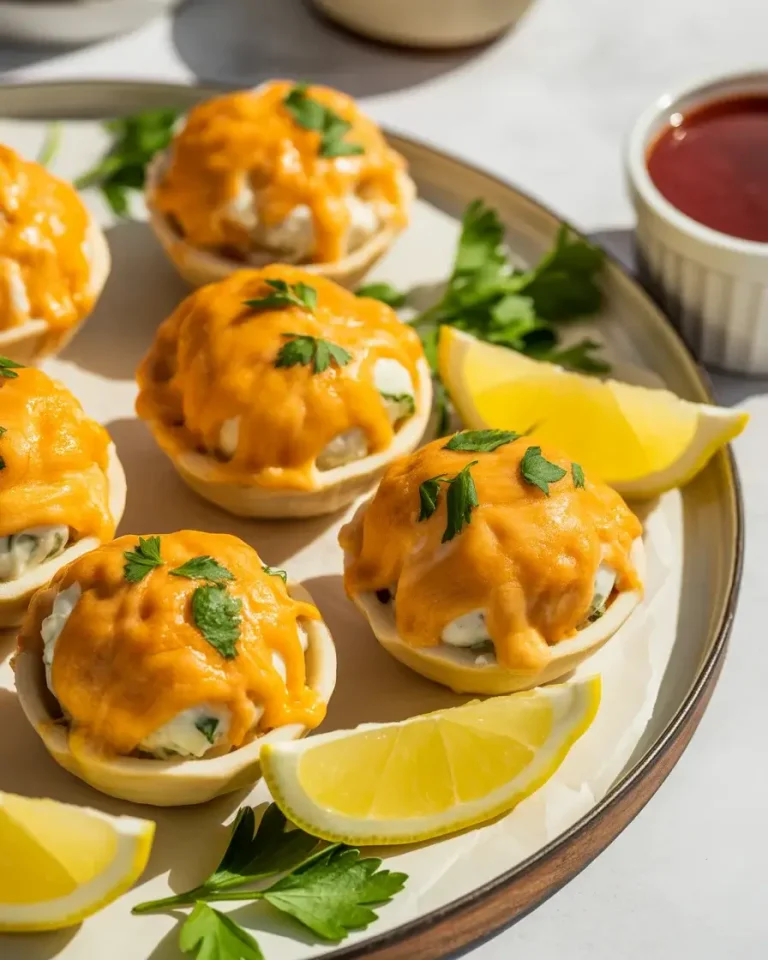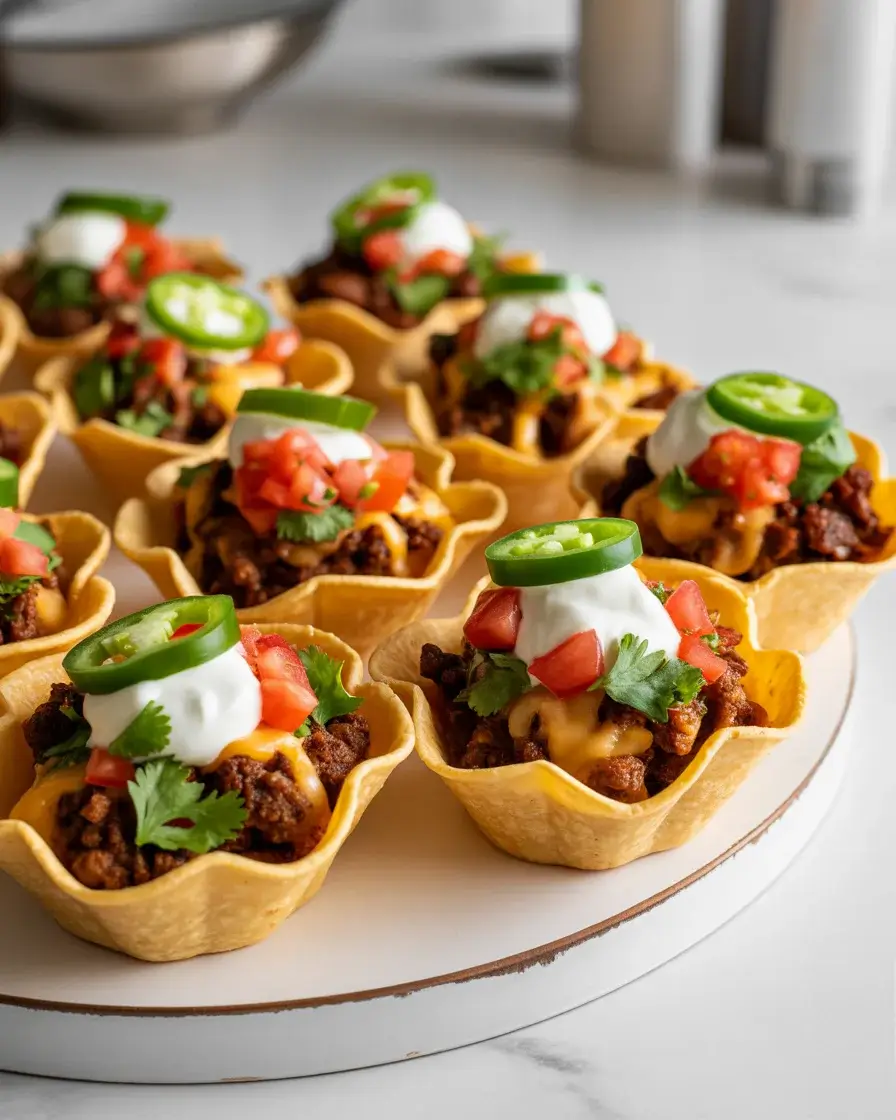
Taco Cups with Beef and Cheese
The first time I made taco cups, I burned an entire batch because I cranked the oven to 400°F and walked away. Charred edges, puffed-up shells, and a kitchen full of smoke. That failure taught me the exact temperature sweet spot – and now they come out perfectly golden every single time.
These taco cups are everything you love about tacos, but packed into crispy little wonton shells that hold their shape. They work as a party appetizer, a fun weeknight dinner, or a meal prep staple you can assemble in minutes.
Step-by-Step Instructions
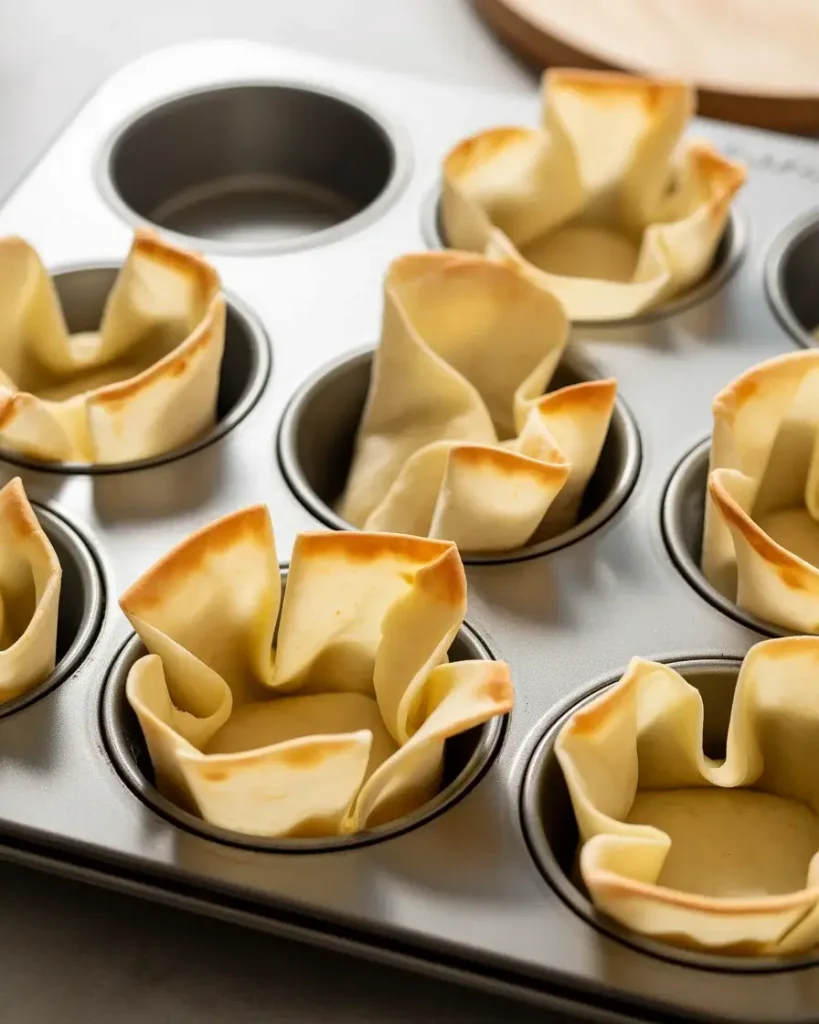
Step 1: Press the Wonton Wrappers
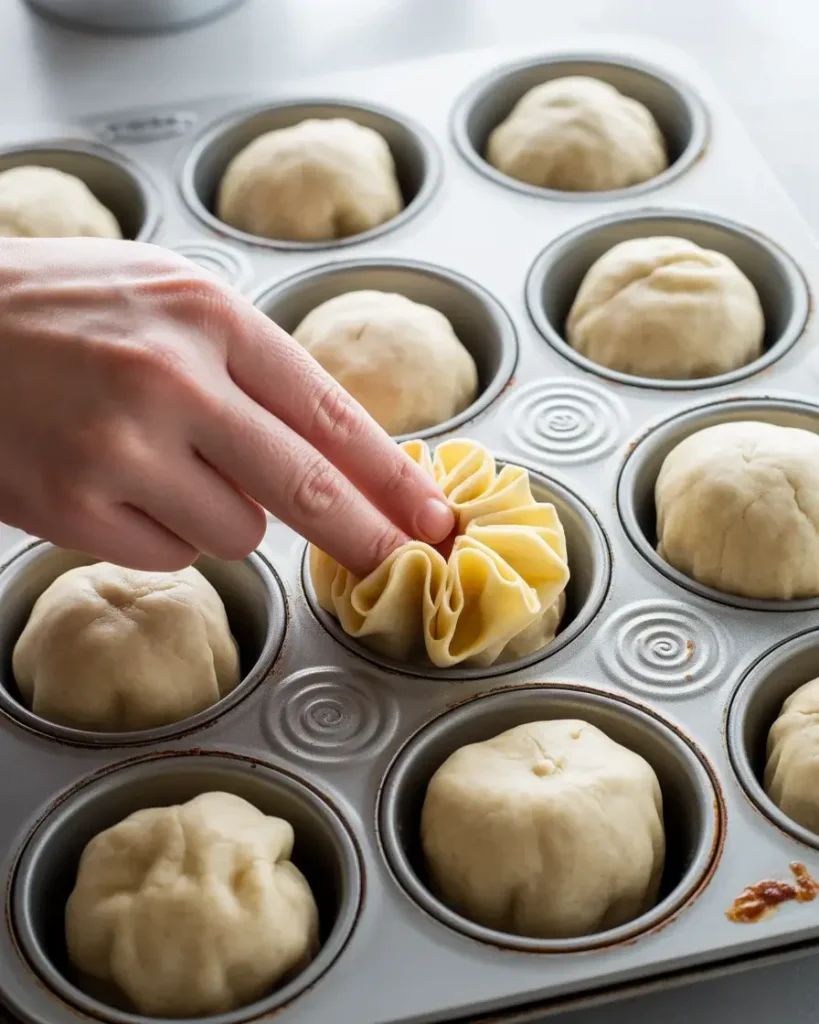
Preheat your oven to 375°F – not 400°F, trust me on this. Press one wonton wrapper into each cup of a standard 12-cup muffin tin, gently pushing the corners down to form a little nest shape.
I tested regular wonton wrappers versus egg roll wrappers cut into squares – the regular wonton size fits a muffin tin cup almost perfectly with just a little overhang. You want them slightly loose, not pressed flat, so they puff and crisp properly.
Step 2: Pre-Bake the Shells
Bake the empty wonton cups for 5 minutes at 375°F until they just start to turn pale gold at the edges. Pull them out even if they look underdone – they go back in the oven with filling, so you want them only partially crisped here.
I skipped this pre-bake step in my early tests and ended up with soggy bottoms soaked through with beef juices. Those 5 minutes are the difference between a crispy cup and a sad, floppy one. You should smell a faint nutty aroma when they’re ready.
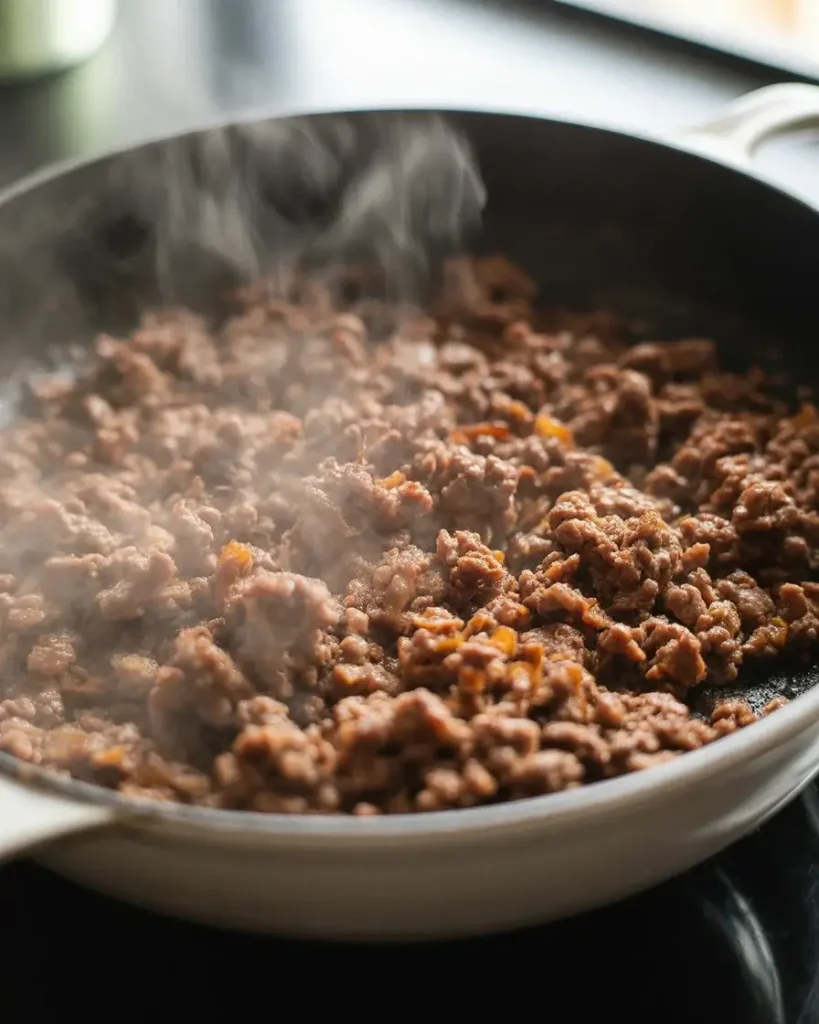
Step 3: Brown the Beef
Heat a large skillet over medium-high heat and add 1 pound of 80/20 ground beef. Break it into small pieces with a wooden spoon and cook for 7-8 minutes until you hear a steady sizzle and see no pink remaining.
I tested 90/10 lean beef once to cut fat – the cups were noticeably drier. The 80/20 fat content keeps the filling moist without making the shells greasy. Drain off about half the fat but leave a little for flavor and moisture. The beef should smell deeply savory and caramelized at the edges.
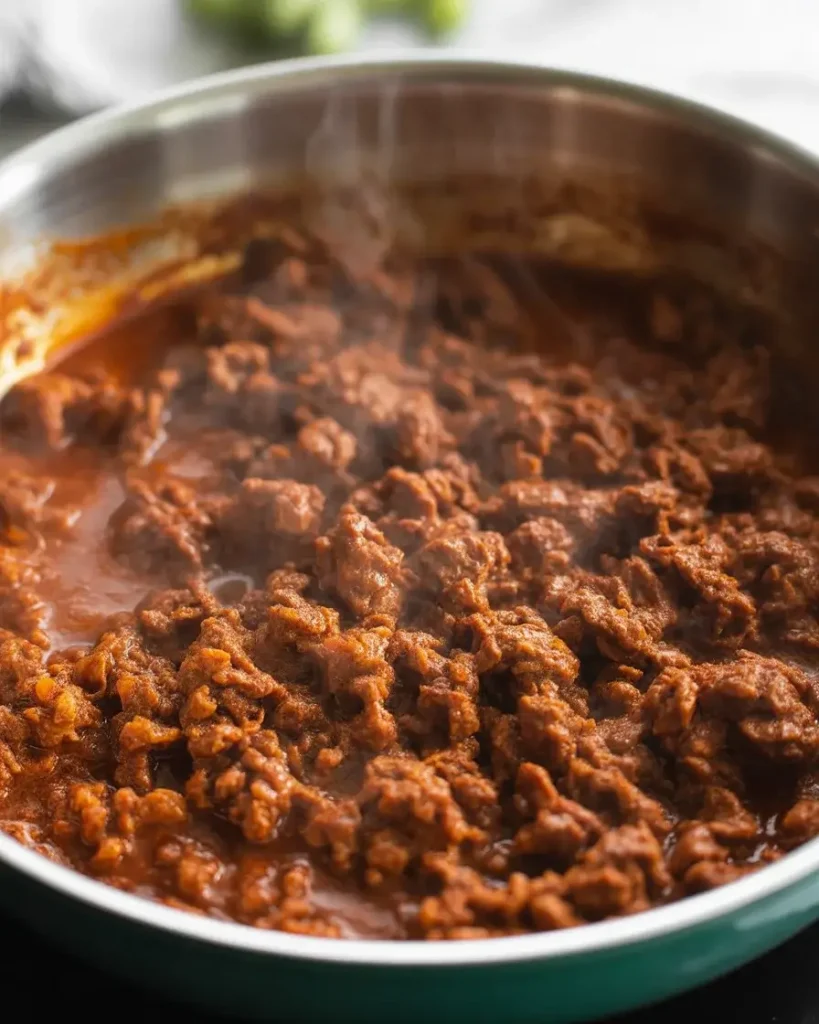
Step 4: Season the Meat
Add 2 tablespoons of taco seasoning, 1/4 cup of water, and stir to combine. Reduce heat to medium and simmer for 2-3 minutes until the liquid mostly absorbs and the beef looks glossy and coated.
After testing both store-bought and homemade seasoning blends, I found the biggest game-changer was adding 1/2 teaspoon of smoked paprika on top of regular taco seasoning. It gives the filling a deeper, slightly smoky flavor that makes these cups taste more complex than they actually are.
Step 5: Fill the Cups
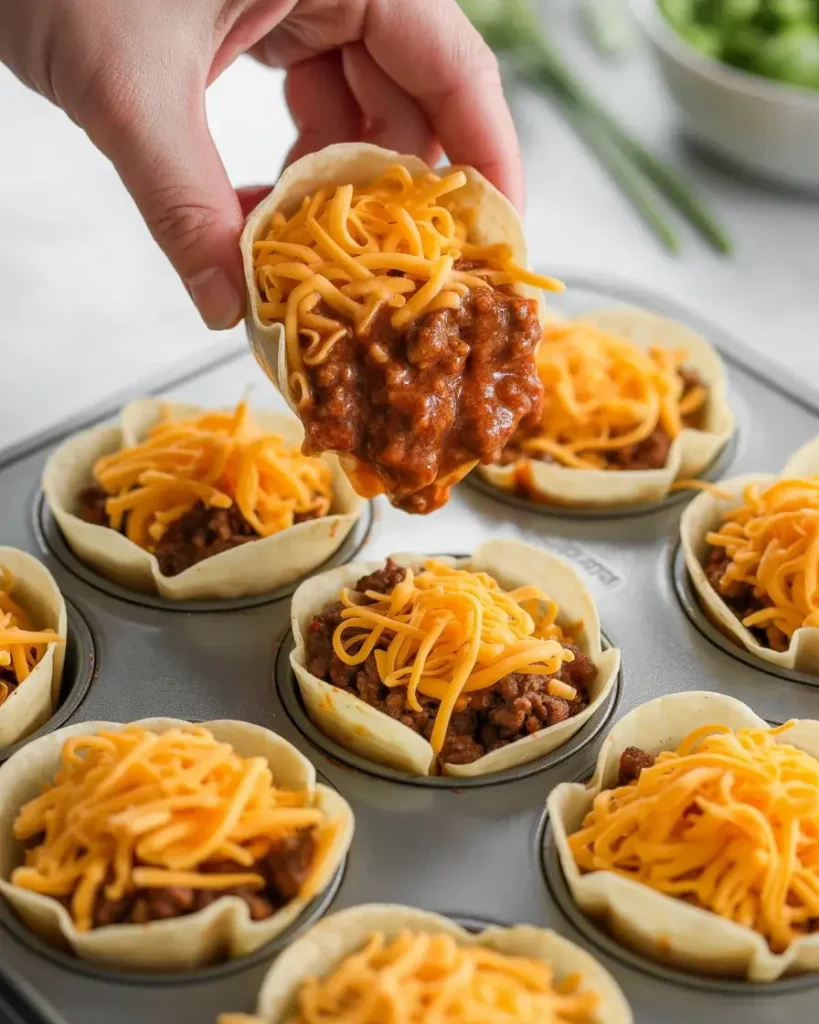
Spoon about 1 heaping tablespoon of seasoned beef into each pre-baked wonton cup. Don’t overfill – the filling should sit just below the rim so the cheese stays contained and doesn’t spill over the edges during baking.
I learned this the messy way. When I was generous with the filling and it hit the edges of the muffin tin, the dripped cheese burned and the cups were impossible to remove cleanly. Keep it flush and you’ll pop them out effortlessly with a butter knife.
Step 6: Add the Cheese and Bake
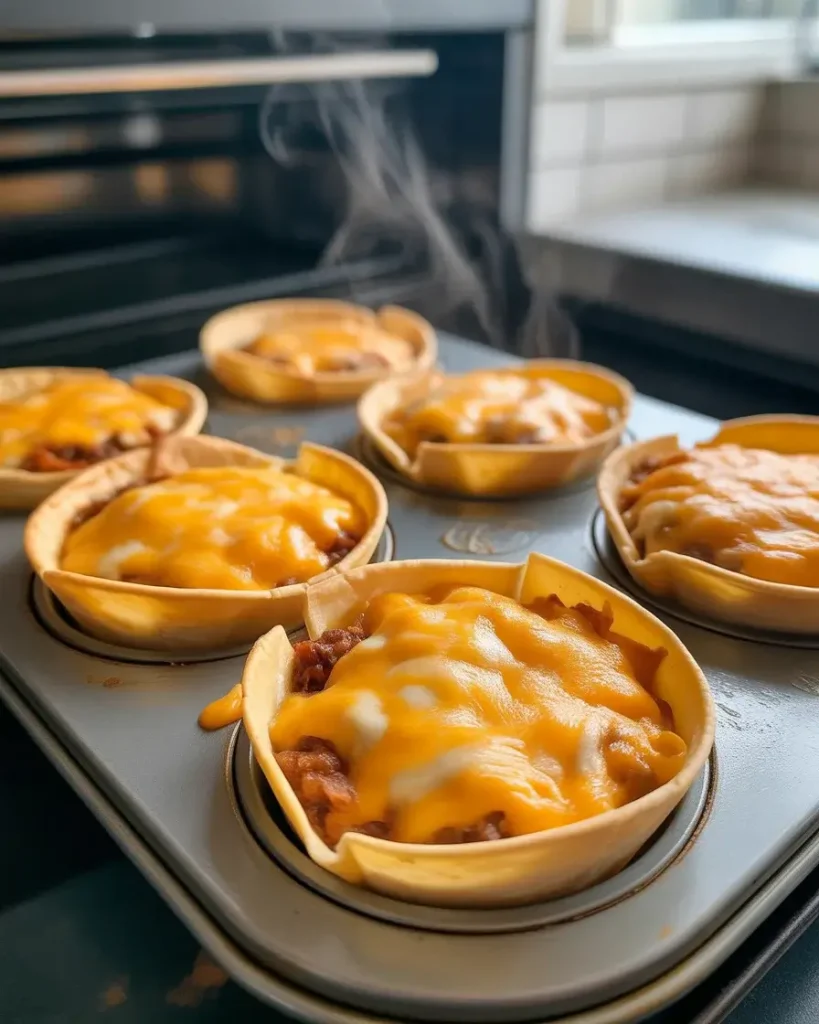
Top each cup with about 1 teaspoon of shredded Mexican blend or sharp cheddar cheese. Return the muffin tin to the 375°F oven and bake for 8-10 minutes until the shells are deep golden and the cheese is fully melted and just starting to bubble at the edges.
I tested mozzarella, pepper jack, and cheddar. Sharp cheddar won for flavor punch, but the Mexican blend melts more smoothly and stretches nicely when you pick a cup up. After 30+ test batches, I settled on mixing the two – half cheddar, half Mexican blend.
Discover Delicious Appetizers
Step 7: Top and Serve
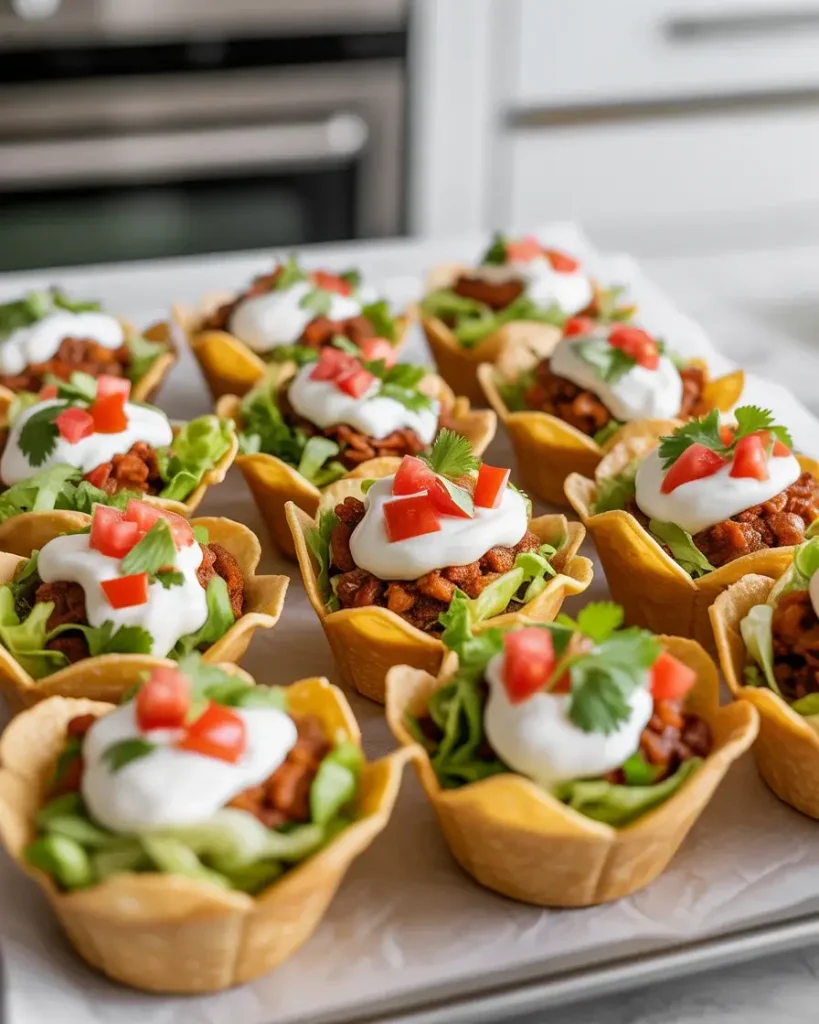
Let the cups cool in the tin for 2 minutes before removing – this rest time is crucial because the shells firm up significantly as they cool. Use a butter knife to gently lift each cup out and transfer to a serving plate.
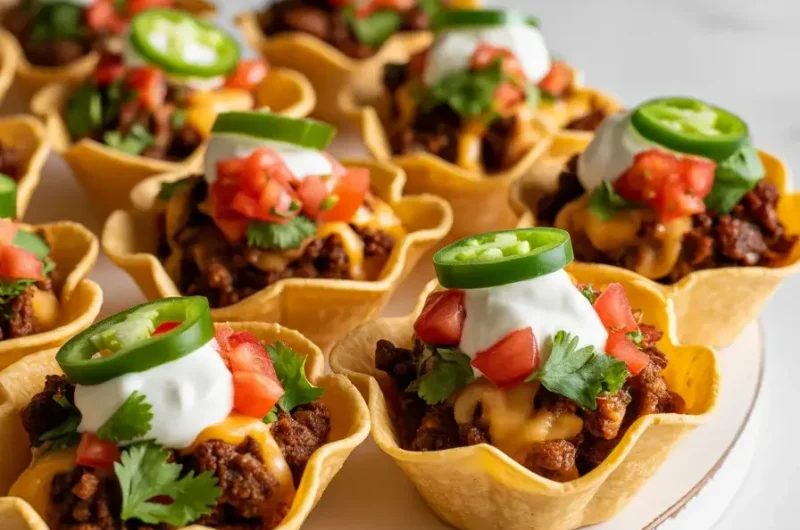
Add toppings right before serving: a small dollop of sour cream, diced fresh tomato, shredded lettuce, sliced jalapeños, or chopped cilantro. I always set out toppings in little bowls so guests can customize their own. The contrast of cool toppings against the hot, crispy cups is genuinely delicious.
Taco Cups with Beef and Cheese
Course: AppetizerCuisine: Mexican-AmericanDifficulty: Easy12
servings10
minutes20
minutes30
minutesCrispy baked wonton cups filled with seasoned ground beef and melted cheese, ready in 30 minutes. A perfect party appetizer or fun weeknight dinner the whole table will love.
Ingredients
12 wonton wrappers
1 lb 80/20 ground beef
2 tablespoons taco seasoning
1/2 teaspoon smoked paprika
1/4 cup water
3/4 cup shredded Mexican blend cheese
1/4 cup shredded sharp cheddar cheese
Sour cream, pico de gallo, shredded lettuce, jalapeños, lime – for serving
Directions
- Preheat oven to 375°F. Press wonton wrappers into a greased 12-cup muffin tin.
- Pre-bake empty shells for 5 minutes until just starting to turn golden.
- Brown ground beef in a skillet over medium-high heat for 7-8 minutes. Drain most of the fat.
- Add taco seasoning, smoked paprika, and water. Simmer 2-3 minutes until liquid absorbs.
- Spoon 1 heaping tablespoon of beef into each cup, keeping filling just below the rim.
- Top each cup with about 1 teaspoon of mixed shredded cheese.
- Bake 8-10 minutes until shells are deep golden and cheese is bubbly.
- Cool 2 minutes, remove with a butter knife, and top with desired toppings. Serve immediately.
Notes
- Storage: Store untopped cups uncovered in the fridge up to 24 hours. Reheat at 350°F for 6-8 minutes.
Substitution: Swap ground beef for ground turkey or chicken for a lighter version.
Make-ahead: Cook beef and pre-bake shells a day ahead. Do the final cheese-bake step the day of serving.
Air fryer: Cook at 350°F – 4 min empty, then 4-5 min with filling, using silicone muffin cups.
Nutrition (per cup, before toppings)
| Nutrient | Amount |
|---|---|
| Calories | 148 |
| Total Fat | 9g |
| Sugars | 0g |
| Protein | 11g |
For safe ground beef internal temperatures, see the USDA Safe Temperature Chart. For general safe food handling tips, visit FDA Safe Food Handling.
Can You Make Taco Cups Ahead of Time?
Yes – but with a smart strategy. Bake the filled, cheesy cups up to 24 hours ahead and store them uncovered in the refrigerator. Reheat at 350°F for 6-8 minutes directly from the fridge.
I tested storing them covered with foil versus uncovered. Covered cups trap steam and turn soggy within hours – the wonton shells completely lost their crunch. Uncovered, they held their texture overnight surprisingly well.
For parties, I now bake the shells and cook the beef a day ahead, then assemble and do the final bake the day of. That 10-minute final bake brings everything back to life and the shells come out perfectly crispy every time.
What Can You Use Instead of Wonton Wrappers?
Small flour tortillas cut into circles work great – use a 3-inch cookie cutter and press into the muffin cups. They bake up chewier than wonton wrappers but still hold the filling well at 375°F for about 10 minutes.
I tested corn tortilla rounds, flour tortilla rounds, wonton wrappers, and gyoza wrappers across multiple batches. Wonton wrappers gave the crispiest result. Gyoza wrappers came in a close second with a slightly thicker bite.
Corn tortilla rounds were the most fragile – they cracked at the edges when pressed into the tin cold. If you use corn tortillas, warm them for 20 seconds in the microwave first so they’re pliable enough to shape without cracking.
Flour tortilla rounds are the most accessible substitute if you already have them on hand. They just need an extra 2-3 minutes of baking time to fully crisp up.
How Do You Keep Taco Cups Crispy?
The two biggest crispy-cup killers are wet filling and covered storage. Pre-baking the shells for 5 minutes before adding filling creates a moisture barrier that prevents sogginess. Drain your beef well and don’t skip that pre-bake step.
I ruined my third batch by adding a spoonful of salsa directly into the filling before baking. The extra liquid made the bottoms soft within minutes of coming out of the oven. Keep wet ingredients as toppings, not filling.
Another thing I tested: parchment-lined muffin tins versus unlined. No difference in crispiness, but lined cups release much more cleanly. It also means less cleanup, so I always line now.
What Toppings Work Best for Taco Cups?
The best toppings are cool, fresh, and added right before eating – not before baking. Sour cream, pico de gallo, shredded romaine, diced avocado, pickled jalapeños, and fresh lime juice all work beautifully against the hot, crispy shell.
I hosted a taco cup party for 20 people and set out 8 different toppings in small bowls. The most popular combination by far was sour cream plus pickled jalapeños plus a squeeze of lime. That balance of creamy, tangy, and spicy is genuinely addictive.
One topping to avoid: fresh guacamole added before baking. It browns from the heat and turns an unappetizing gray-green. Always serve guac on the side. Cold, vibrant green guac spooned onto a hot cup right before eating is far better anyway.
Can You Make These in an Air Fryer?
Yes – and they come out exceptionally crispy. Use silicone muffin cups inside your air fryer basket, press in the wonton wrappers, and air fry at 350°F for 4 minutes before filling. Then add filling and cheese and air fry another 4-5 minutes.
I tested the air fryer method against the oven method 6 times. The air fryer produces crispier shells with more golden color, but you can only make 4-6 cups at a time depending on your basket size. For a party of 10+, the oven is more practical.
For a quick weeknight dinner for two, the air fryer wins every time – it heats up faster, produces crunchier cups, and cleanup is minimal. Just don’t skip the silicone muffin cups or the wonton wrappers will collapse and spread flat in the basket.
Frequently Asked Questions
Q: Can I freeze taco cups with beef and cheese?
Yes – freeze baked, untopped cups in a single layer, then transfer to a zip bag for up to 2 months. Reheat straight from frozen at 375°F for 10-12 minutes.
Avoid freezing them with toppings already on, as the moisture from sour cream or pico makes the shells soggy after tha
Q: How many taco cups do I need per person?
For a party appetizer, count on 2-3 cups per person. For a main dinner serving, plan 4-5 cups per adult alongside a side salad or rice.
This recipe doubles easily – just use two muffin tins and rotate them on different oven racks for even baking.
Q: Why are my taco cups soggy at the bottom?
The most common cause is skipping the pre-bake step or overfilling with wet ingredients. Always pre-bake empty shells for 5 minutes before adding any filling.
Keep wet toppings like salsa or sour cream on top after baking – never mix them into the beef filling before the final bake.