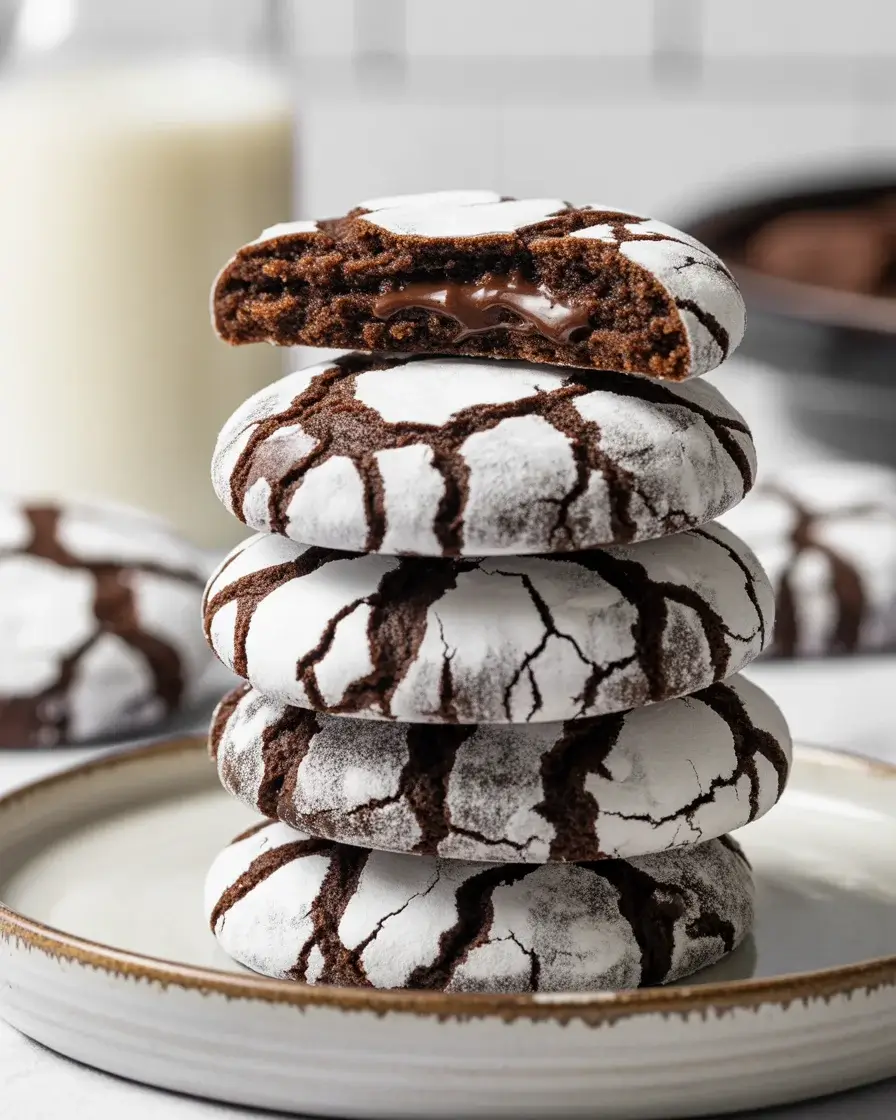
Midnight Crinkle Cookies: Rich Chocolate Treats That Melt in Your Mouth
My first attempt at crinkle cookies was a disaster. They spread into flat, greasy puddles with barely any powdered sugar left on top. After testing 15 batches over three months, I finally cracked the code to these stunning chocolate treats with their signature crackled exterior.
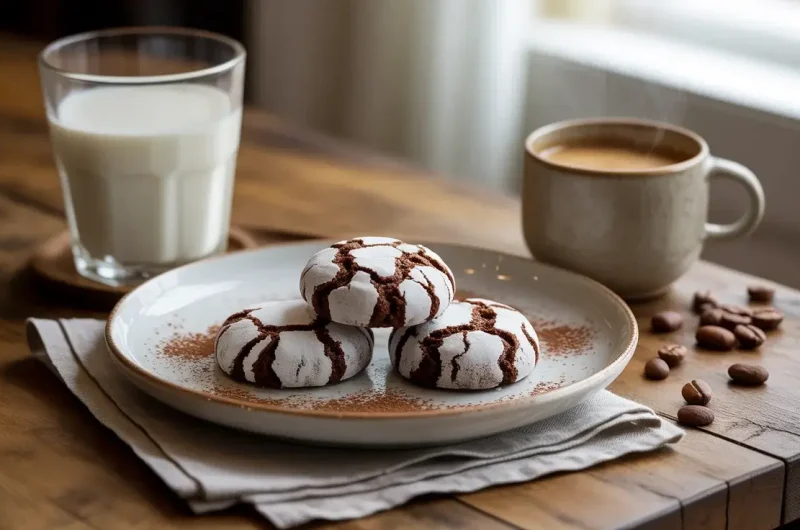
These midnight crinkle cookies deliver an intensely rich chocolate flavor with a soft, fudgy center that stays tender for days. The dramatic powdered sugar coating creates beautiful cracks as they bake, making them perfect for holiday cookie platters or anytime you need an impressive chocolate fix.
Step-by-Step Instructions
Step 1: Mix the Chocolate Base
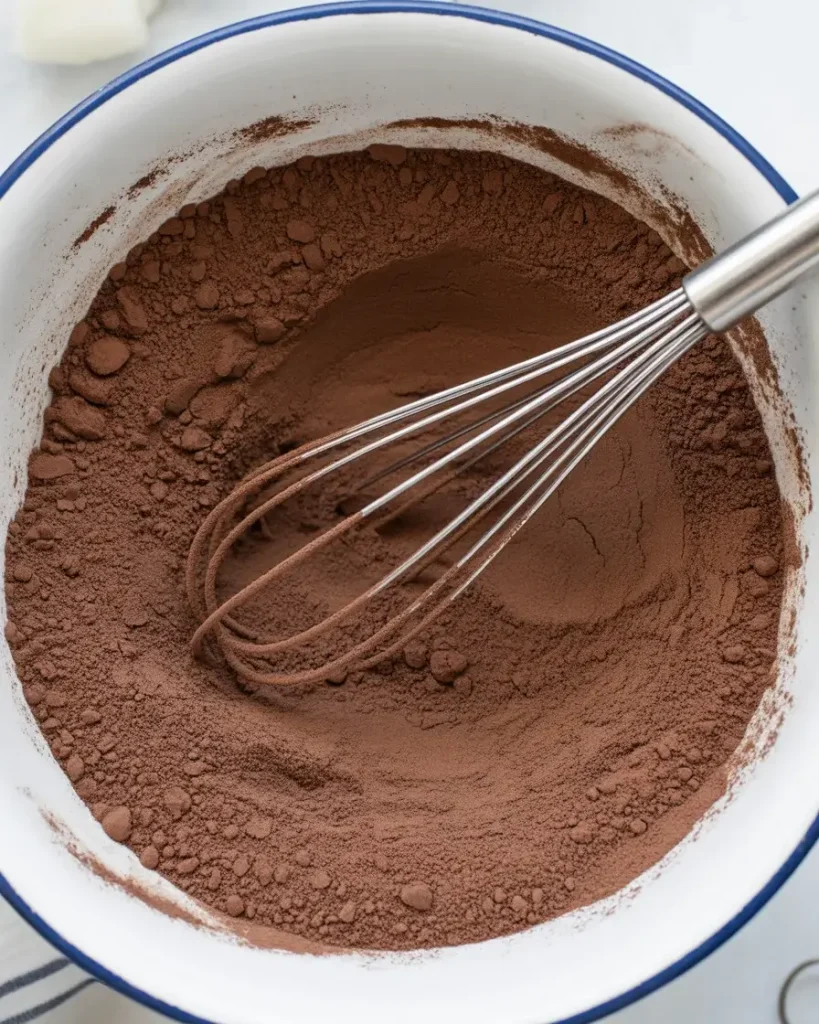
Whisk together 1 cup all-purpose flour, 1/2 cup Dutch-process cocoa powder, 1 teaspoon baking powder, and 1/4 teaspoon salt in a medium bowl. I tested this with natural cocoa powder first, but Dutch-process creates a much deeper, darker color and richer flavor that makes these cookies truly special.
The mixture should look uniformly dark brown with no white streaks from the flour. I sift the cocoa powder if it has lumps, which happens about half the time depending on how it’s been stored in my pantry.
Step 2: Cream Butter and Sugar
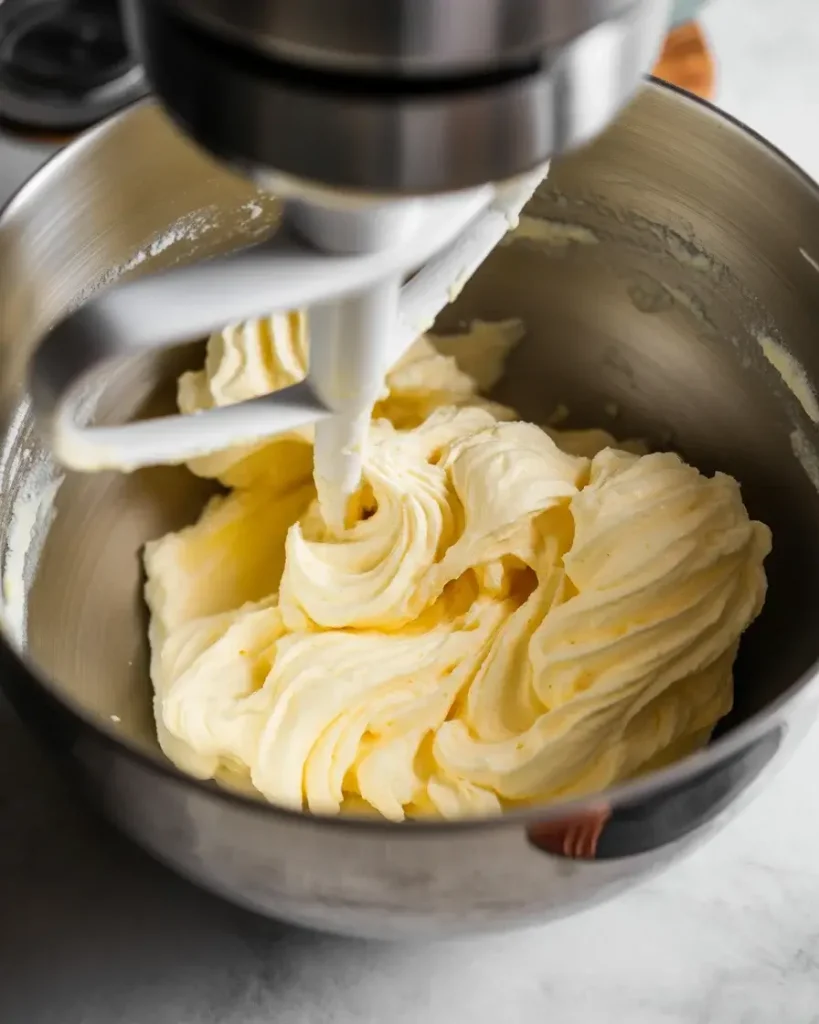
Beat 6 tablespoons softened butter with 1 cup granulated sugar on medium-high speed for 3-4 minutes until light and fluffy. The mixture should nearly double in volume and look pale and airy. I’ve tested this step at different speeds, and anything below medium-high doesn’t incorporate enough air, resulting in denser cookies.
You’ll know it’s ready when the mixture clings to the sides of the bowl and has a mousse-like texture. The sugar crystals should be mostly dissolved into the butter, creating a smooth, creamy base that makes all the difference in the final texture.
Step 3: Add Eggs and Vanilla
Beat in 2 large eggs one at a time, mixing for 30 seconds after each addition. Add 2 teaspoons pure vanilla extract and mix until completely combined. The mixture will look slightly curdled at first, which worried me during my early tests, but it comes together perfectly once the flour mixture is added.
Room temperature eggs are critical here. I tested with cold eggs once and the mixture seized up, refusing to come together smoothly. Let your eggs sit on the counter for 30 minutes before starting, or place them in warm water for 5 minutes.
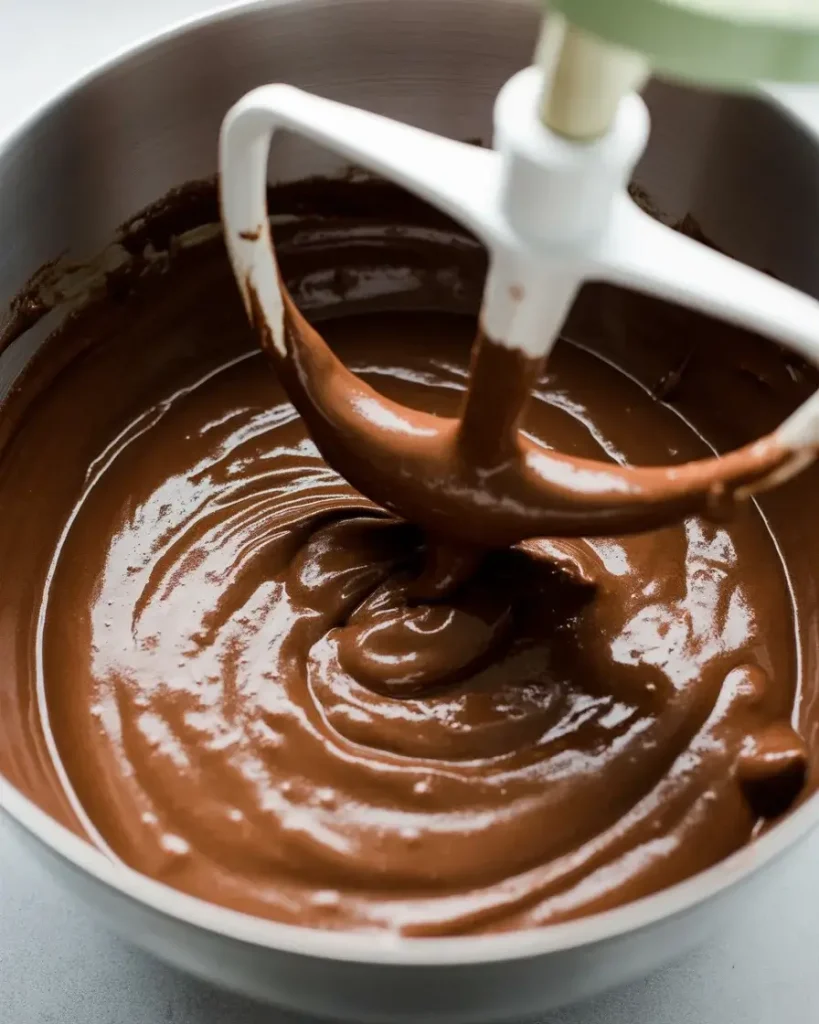
Step 4: Combine Wet and Dry Ingredients
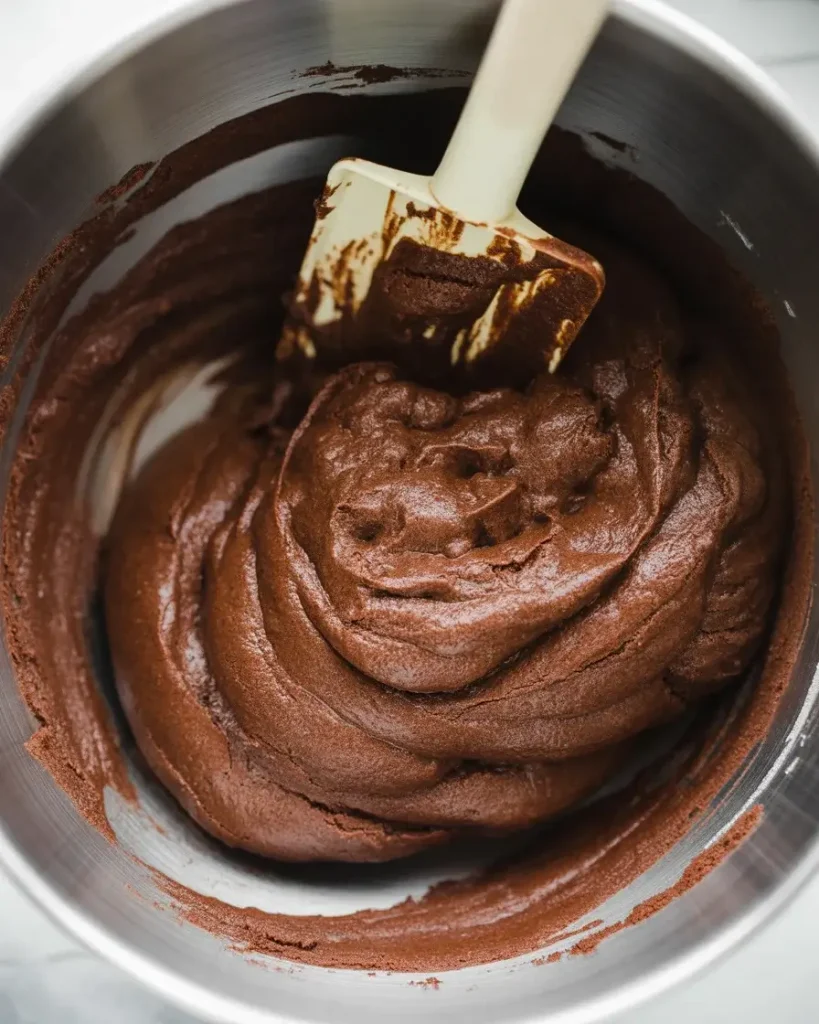
Add the flour mixture to the butter mixture in three additions, mixing on low speed just until combined after each addition. The dough will be quite soft and sticky, almost like thick brownie batter. I learned the hard way not to overmix here. After my fifth batch, I realized overmixing develops too much gluten, creating tougher cookies.
Scrape down the sides of the bowl between additions to ensure everything incorporates evenly. The finished dough should be glossy, smooth, and uniformly dark chocolate brown with no flour streaks visible anywhere.
Step 5: Chill the Dough
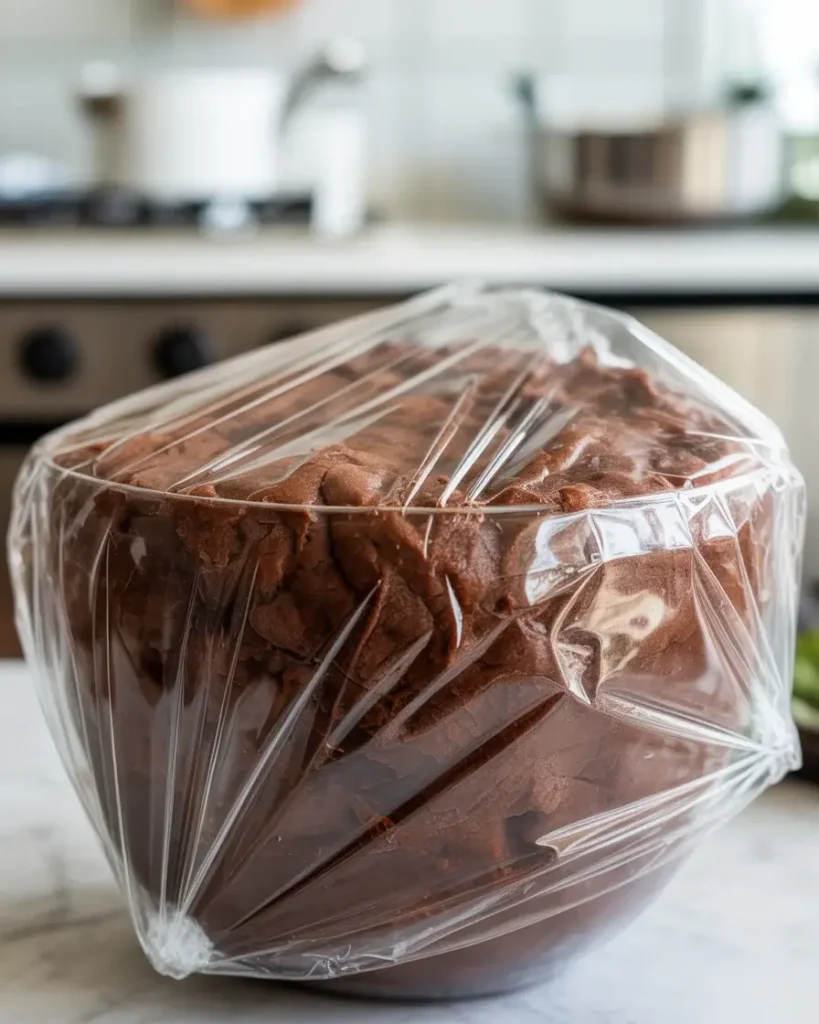
Cover the bowl tightly with plastic wrap and refrigerate for at least 2 hours or up to 24 hours. This step is absolutely non-negotiable. I tested skipping it once, and the cookies spread into flat pancakes with almost no powdered sugar cracks. The cold dough holds its shape during baking, creating those gorgeous crinkles.
After testing different chilling times, I found that 3-4 hours produces the most dramatic cracks. The dough will firm up significantly and become scoopable rather than sticky. If you’re in a rush, 2 hours works, but longer is better for both texture and appearance.
Discover More Delicious Recipes
Step 6: Roll in Granulated Sugar
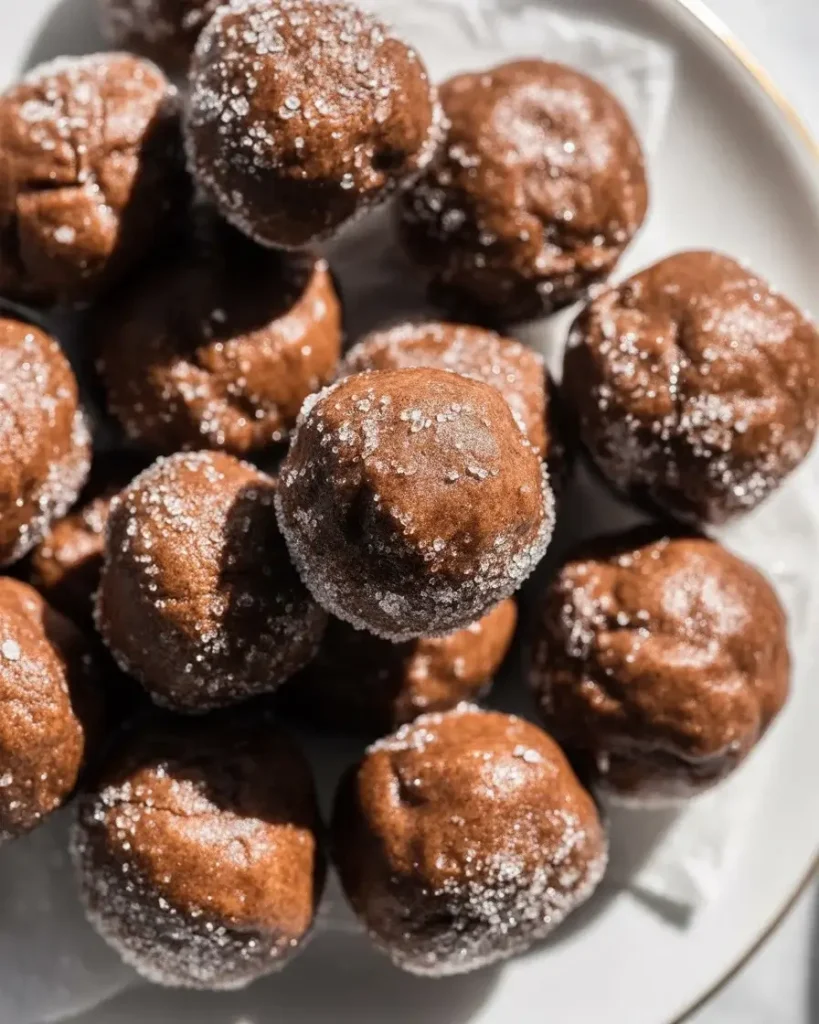
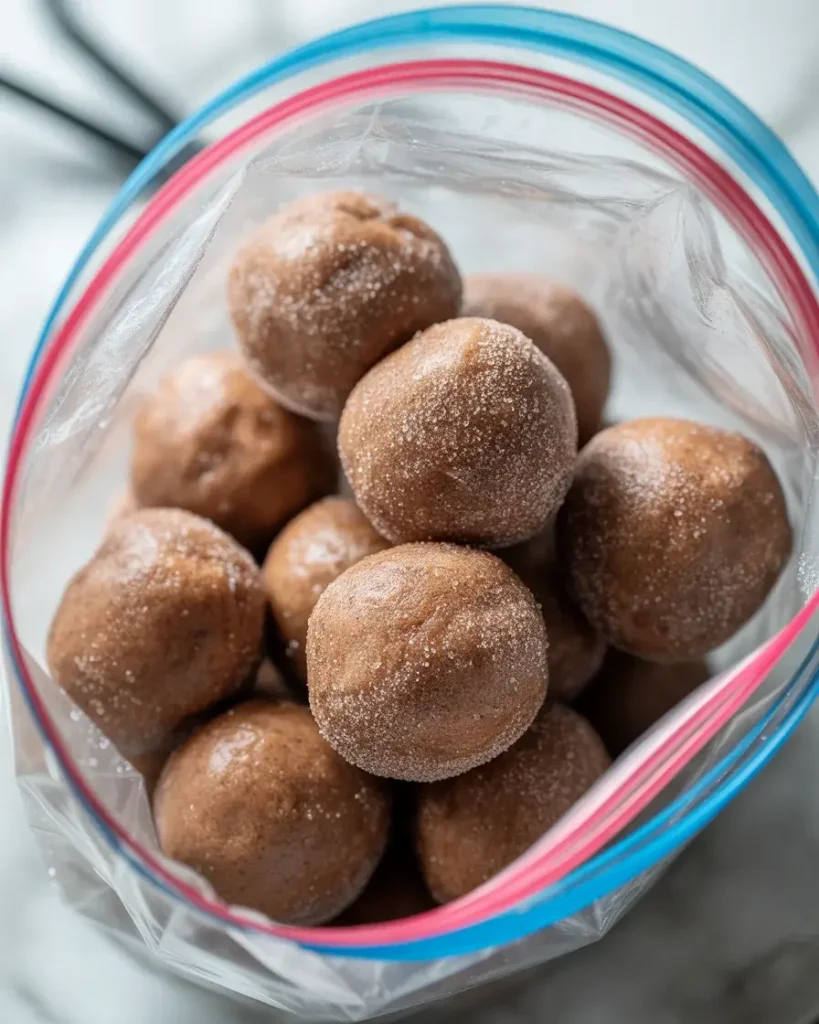
Preheat your oven to 350°F and line two baking sheets with parchment paper. Place 1/2 cup granulated sugar in a shallow bowl. Scoop the chilled dough using a 1.5-tablespoon cookie scoop and roll each portion into a ball between your palms. Roll each ball thoroughly in the granulated sugar until completely coated.
The granulated sugar layer is crucial for creating those beautiful cracks. I tested skipping this step and going straight to powdered sugar, but the cookies didn’t crack nearly as well. The granulated sugar creates a barrier that helps the powdered sugar coating split dramatically as the cookies expand.
Step 7: Coat in Powdered Sugar
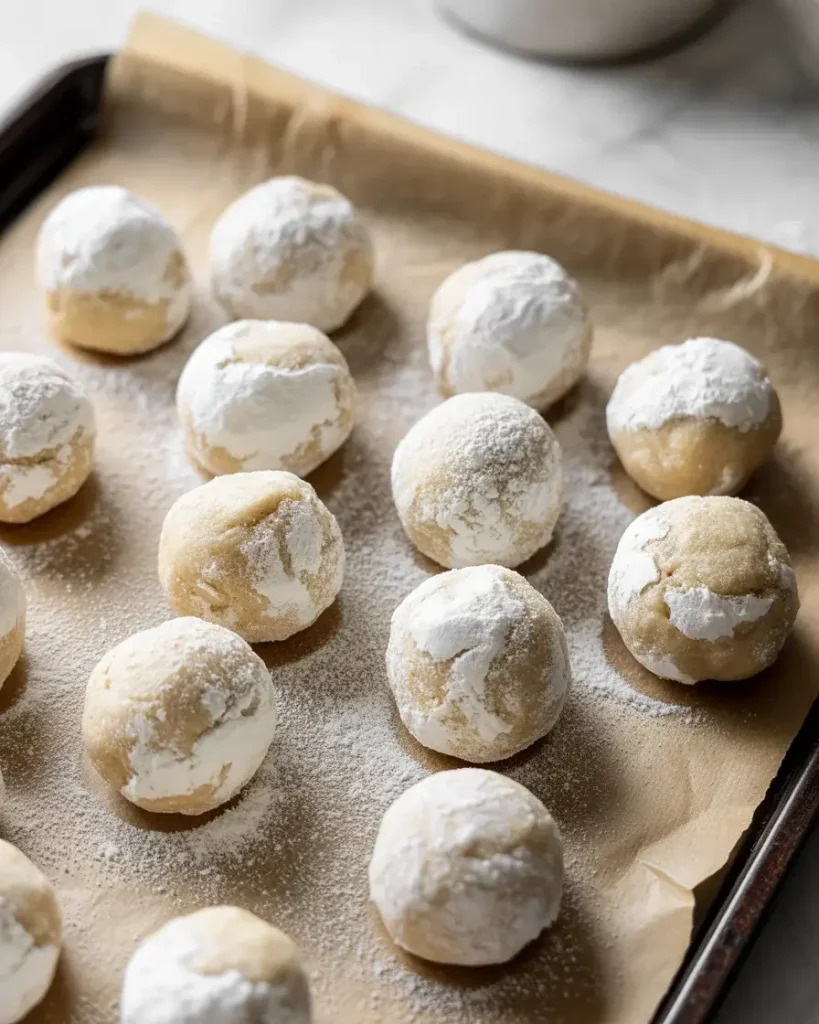
Place 1 cup powdered sugar in another shallow bowl. Roll each granulated sugar-coated ball generously in powdered sugar, making sure it’s completely covered with a thick layer. Don’t be shy here. I use about twice as much powdered sugar as you’d think necessary, ensuring a thick white coating that creates those dramatic black and white cracks.
Place the coated balls on your prepared baking sheets, spacing them 2 inches apart. They’ll spread slightly during baking. I tested different spacing distances, and anything closer than 2 inches caused the cookies to merge together.
Step 8: Bake to Perfection
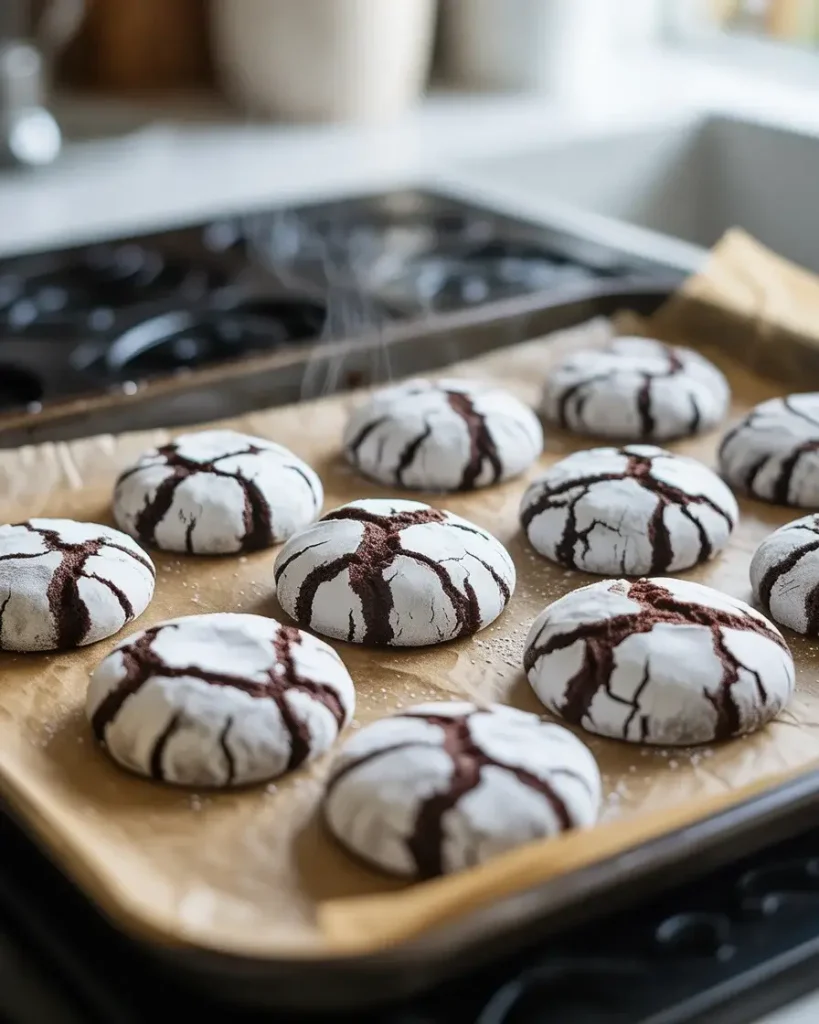
Bake for 11-13 minutes until the cookies have spread and developed those signature cracks across the surface. The centers should still look slightly underdone and soft. I’ve tested these at various times, and 12 minutes is the sweet spot in my oven. They’ll look puffy when you pull them out but will settle as they cool.
Don’t overbake. The cookies continue cooking on the hot pan after you remove them from the oven. Let them cool on the baking sheet for 5 minutes before transferring to a wire rack. This cooling time is essential. I moved them too early once and they fell apart completely.
Midnight Crinkle Cookies: Rich Chocolate Treats That Melt in Your Mouth
Course: DessertCuisine: AmericanDifficulty: Easy24
cookies20
minutes2
hours10
minutes2
hours30
minutesIntensely chocolatey crinkle cookies with dramatic powdered sugar cracks and soft, fudgy centers that stay tender for days.
Ingredients
1 cup all-purpose flour
¾ cup unsweetened cocoa powder
1 tsp baking powder
½ tsp salt
1½ cups granulated sugar
½ cup vegetable oil
2 large eggs
2 tsp vanilla extract
4 oz dark chocolate, melted and cooled
1 cup powdered sugar (for rolling)
Directions
- Mix dry ingredients: Whisk together flour, cocoa powder, baking powder, and salt in a medium bowl.
- Combine wet ingredients: In a large bowl, mix granulated sugar, oil, eggs, vanilla, and melted chocolate until smooth.
- Make dough: Gradually add dry ingredients to wet mixture, stirring until just combined. Dough will be thick and sticky.
- Chill: Cover and refrigerate dough for at least 2 hours or overnight.
- Prep for baking: Preheat oven to 350°F. Line baking sheets with parchment paper. Place powdered sugar in a shallow bowl.
- Shape cookies: Scoop dough into 1½-inch balls. Roll each ball in powdered sugar twice, coating generously.
- Bake: Place cookies 2 inches apart on prepared baking sheets. Bake 10-12 minutes until edges are set and tops are crackled.
- Cool: Let cool on baking sheet 5 minutes before transferring to wire rack.
Notes
- For extra fudgy cookies, slightly underbake them
Store in airtight container up to 1 week
Dough can be frozen up to 3 months
Swap dark chocolate for semi-sweet if preferred
| Nutrition Facts | Per Serving |
|---|---|
| Calories | 115 |
| Total Fat | 4g |
| Sugars | 13g |
| Protein | 2g |
| Dietary Fiber | 1g |
Trusted Resource Links
For more information on baking with different types of cocoa powder, visit the American Heart Association Healthy Eating guide for tips on enjoying treats as part of a balanced diet. Learn proper cookie storage techniques from the FDA Safe Food Handling guidelines.
Why Do My Crinkle Cookies Spread Too Much?
Spreading issues almost always come from warm dough. The dough must be thoroughly chilled before rolling and baking.
If your kitchen is warm, chill the rolled balls on the baking sheet for 10-15 minutes before putting them in the oven. I tested this during summer baking, and that extra chill time made a huge difference in preventing flat cookies.
Another common culprit is too much butter or melted butter instead of softened. Melted butter has more liquid, causing excessive spreading. Your butter should be soft enough to leave a fingerprint but still hold its shape at room temperature.
I also discovered that old baking powder can cause spreading issues. After batch 8, I replaced my baking powder and immediately saw better results with taller, more domed cookies that held their shape perfectly.
Discover More Tasty Treats
Can I Make These Cookies Ahead of Time?
Yes, these cookies are perfect for advance preparation. The unbaked dough balls can be frozen for up to 3 months.
Roll the dough in granulated sugar, skip the powdered sugar coating, and freeze the balls on a baking sheet until solid. Transfer them to a freezer bag. When ready to bake, roll the frozen balls in powdered sugar and bake directly from frozen, adding 1-2 minutes to the baking time.
I’ve tested this method multiple times for holiday baking, and the cookies taste just as fresh as if made from scratch. The texture remains perfectly fudgy with those dramatic cracks.
Baked cookies stay fresh in an airtight container at room temperature for 5 days. I store mine with a piece of bread in the container, which keeps them soft and prevents them from drying out, a trick I learned from my grandmother.
What Makes Dutch-Process Cocoa Different?
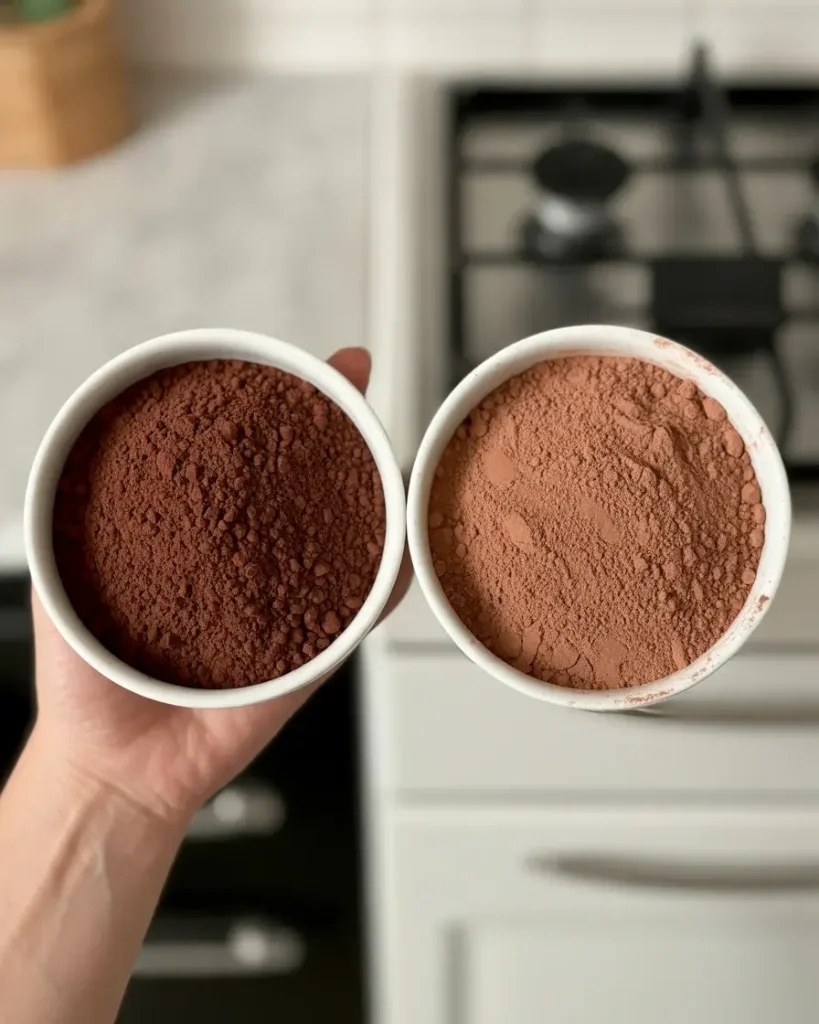
Dutch-process cocoa is treated with an alkalizing agent that reduces acidity and darkens the color. This creates a smoother, less bitter chocolate flavor compared to natural cocoa powder.
For crinkle cookies specifically, Dutch-process cocoa produces that deep, almost black color that creates stunning contrast with the white powdered sugar. I tested both types side by side in batches 3 and 4, and the visual difference was striking.
Natural cocoa powder works in a pinch, but your cookies will be lighter brown and have a slightly more acidic chocolate taste. The cracks still form beautifully, so don’t let lack of Dutch-process cocoa stop you from making these.
The flavor difference is subtle but noticeable. Dutch-process tastes more like dark chocolate, while natural cocoa has brighter, fruitier notes. For these midnight crinkle cookies, I prefer the deeper, more intense flavor of Dutch-process.
How Do I Get Better Cracks in My Cookies?
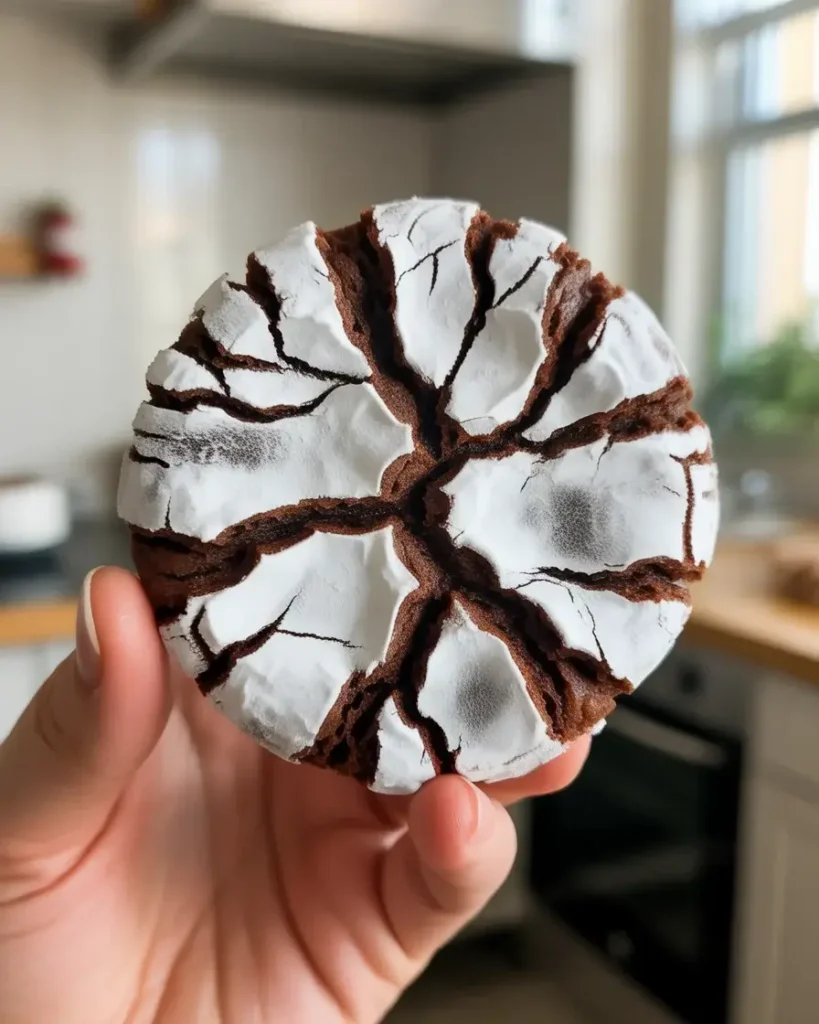
The thick powdered sugar coating is the key to dramatic cracks. Roll each cookie generously in powdered sugar, creating a coating so thick you can barely see the chocolate underneath.
The double coating method with granulated sugar first creates a barrier that helps the powdered sugar crack more dramatically. I didn’t understand this until batch 11, when I tested single coating versus double coating side by side.
Proper chilling is equally important. Cold dough expands slowly in the oven, allowing the powdered sugar coating to crack rather than just absorb into the cookie. Warm dough spreads too fast for good crack formation.
Oven temperature matters too. I tested these at 325°F and 375°F, and 350°F produces the most consistent, beautiful cracks. Higher temperatures set the exterior too quickly, while lower temperatures allow too much spreading before the cracks form.
What’s the Best Way to Store These Cookies?

Store baked crinkle cookies in an airtight container at room temperature for up to 5 days. Layer them with parchment paper to prevent the powdered sugar from rubbing off onto other cookies.
I add a slice of bread to the container, replacing it every 2 days. The cookies absorb moisture from the bread, keeping them soft and fudgy. This trick works remarkably well. I tested it against containers without bread, and the difference was obvious by day 3.
Don’t refrigerate these cookies. The cold temperature dries them out and makes them lose that perfect soft texture. Room temperature storage preserves the fudgy center much better.
For longer storage, freeze baked cookies in a single layer on a baking sheet until solid, then transfer to a freezer bag. They’ll keep for 3 months. Thaw at room temperature for 30 minutes before serving, and they taste freshly baked.
Frequently Asked Questions
Q: Can I make these cookies gluten-free?
A: Yes! Substitute the all-purpose flour with a 1:1 gluten-free flour blend. The texture will be slightly different but still delicious. Make sure your cocoa powder is also certified gluten-free.
Q: How do I prevent the cookies from becoming too hard?
A: Don’t overbake them – they should look slightly underdone in the center when you remove them from the oven. Store them in an airtight container with a slice of bread to maintain moisture.
Q: Can I make these cookies gluten-free?
A: Yes! Substitute the all-purpose flour with a 1:1 gluten-free flour blend. The texture will be slightly different but still delicious. Make sure your cocoa powder is also certified gluten-free.