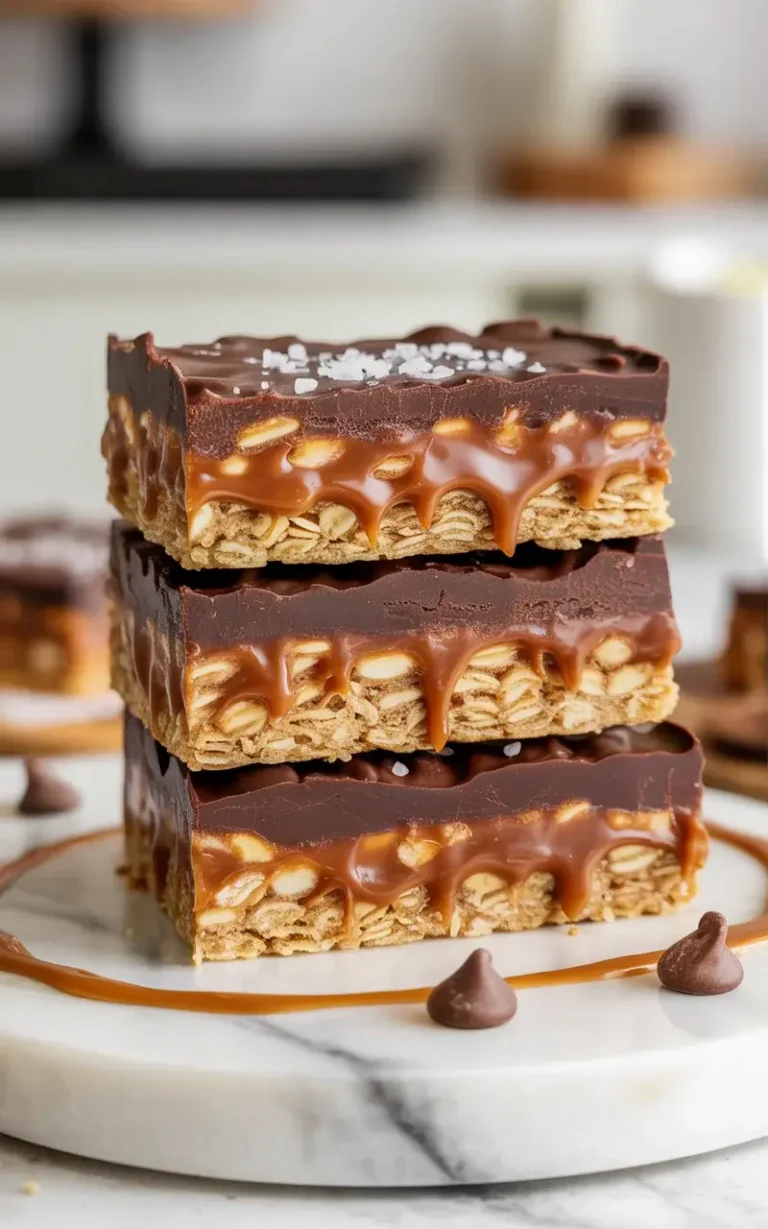
Salted Caramel Cracker Bites
The first time I made these, I accidentally burnt my caramel and had to start over – but that failure taught me the exact color to watch for. These salted caramel cracker bites have become my most-requested party treat, delivering that perfect sweet-salty crunch in every single bite.
After testing this recipe 15+ times, I found the ratio of butter to brown sugar is everything. Too little butter and the caramel turns grainy; too much and it never sets. This version nails the balance every single time.
Step-by-Step Instructions
Step 1: Line and Prep Your Pan
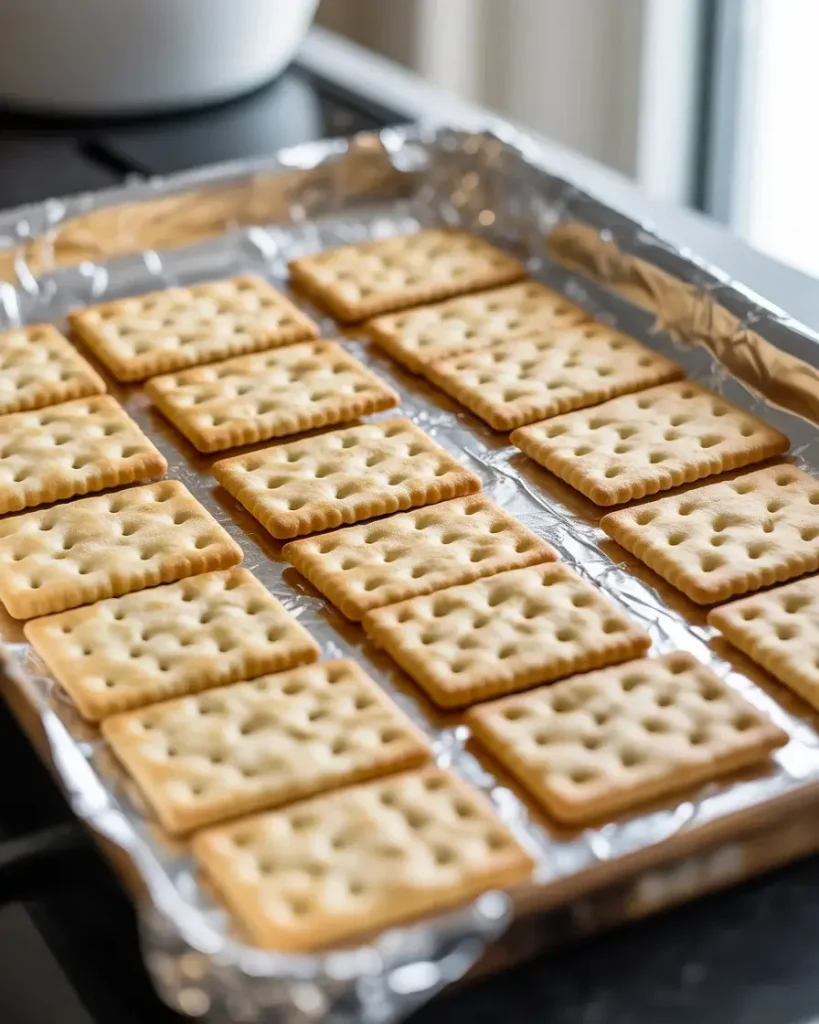
Preheat your oven to 350°F and line a rimmed baking sheet with foil, then spray lightly with cooking spray. This step is non-negotiable – I skipped the foil once and spent 20 minutes scraping hardened caramel off the pan.
Arrange your crackers in a single layer, fitting them snugly edge-to-edge so no caramel drips through. I tested both saltines and graham crackers across 8 batches – saltines give that iconic salty contrast better than any other base.
Step 2: Make the Caramel
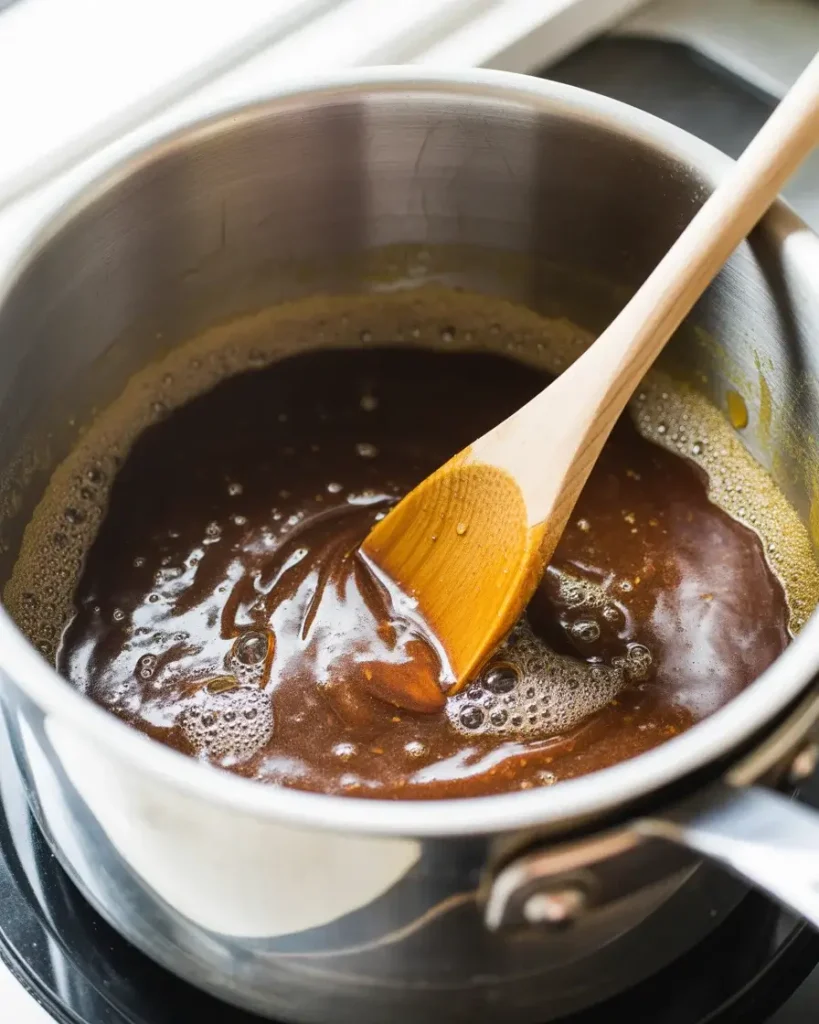
Melt 1 cup of unsalted butter in a medium saucepan over medium heat, then add 1 cup of packed dark brown sugar. Stir constantly for about 3-4 minutes until the mixture bubbles vigorously and turns a deep amber color.
The moment it smells like butterscotch and coats the back of a spoon thickly – that’s your cue. I tested light vs dark brown sugar across 6 batches and dark brown sugar wins every time for that deep, molasses-forward caramel flavor.
Step 3: Pour and Spread the Caramel
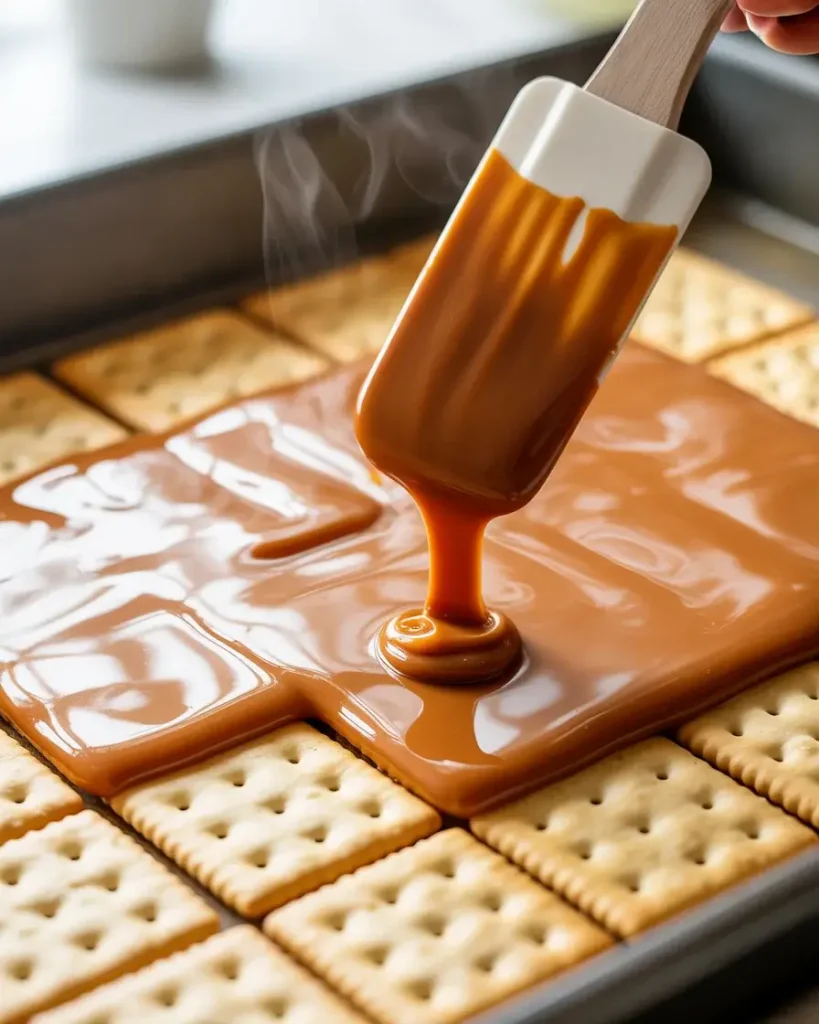
Carefully pour the hot caramel evenly over the crackers, then use a spatula to spread it to all edges within about 30 seconds before it starts to set. Work quickly – I learned the hard way that caramel firms up faster than you’d expect once it hits the cool crackers.
You want a thin, even layer covering every cracker completely. If you see any gaps, tilt the pan gently to let caramel flow into them. The surface should look glossy and smooth – that sheen means you’re good to go straight into the oven.
Step 4: Bake Until Bubbling
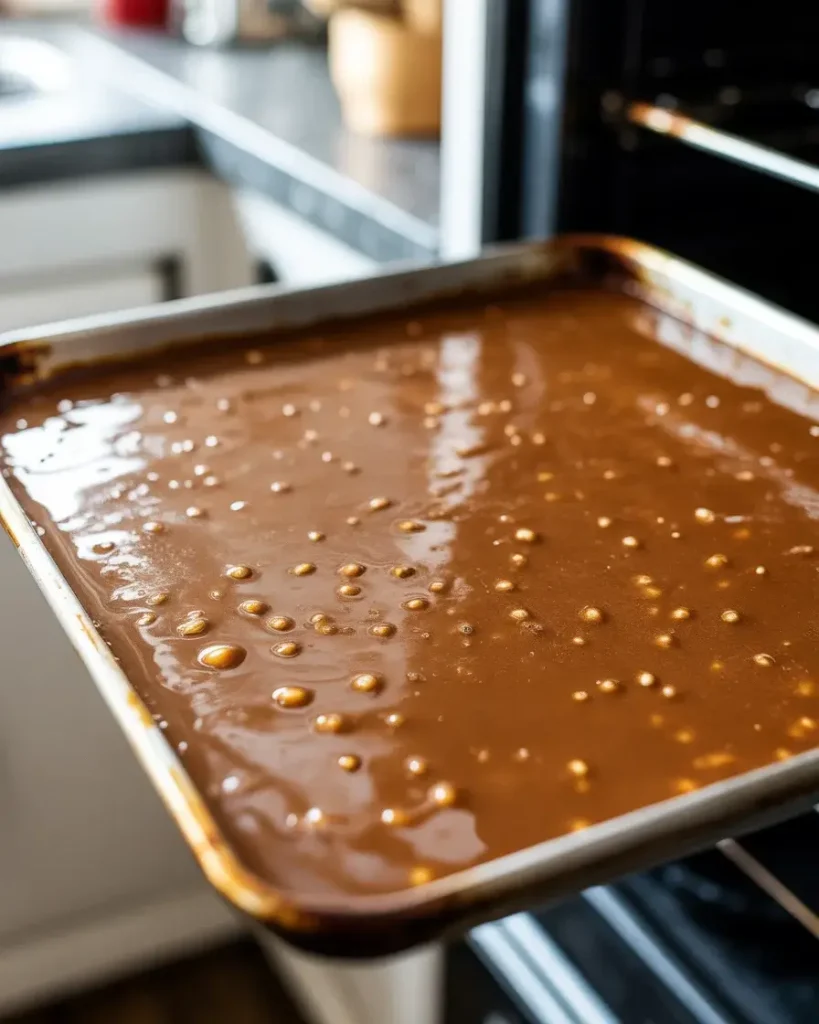
Bake at 350°F for exactly 5 minutes – no more, no less. You’ll see the caramel bubbling actively across the entire pan and smell that toasty, nutty caramel aroma filling your kitchen. Pull it the second it’s uniformly bubbling.
I tested baking times from 4 to 8 minutes across multiple batches. At 6 minutes the edges started to over-darken and taste slightly bitter. Five minutes is the sweet spot for caramel that stays pliable and chewy, not hard and brittle.
Step 5: Add Chocolate and Sea Salt
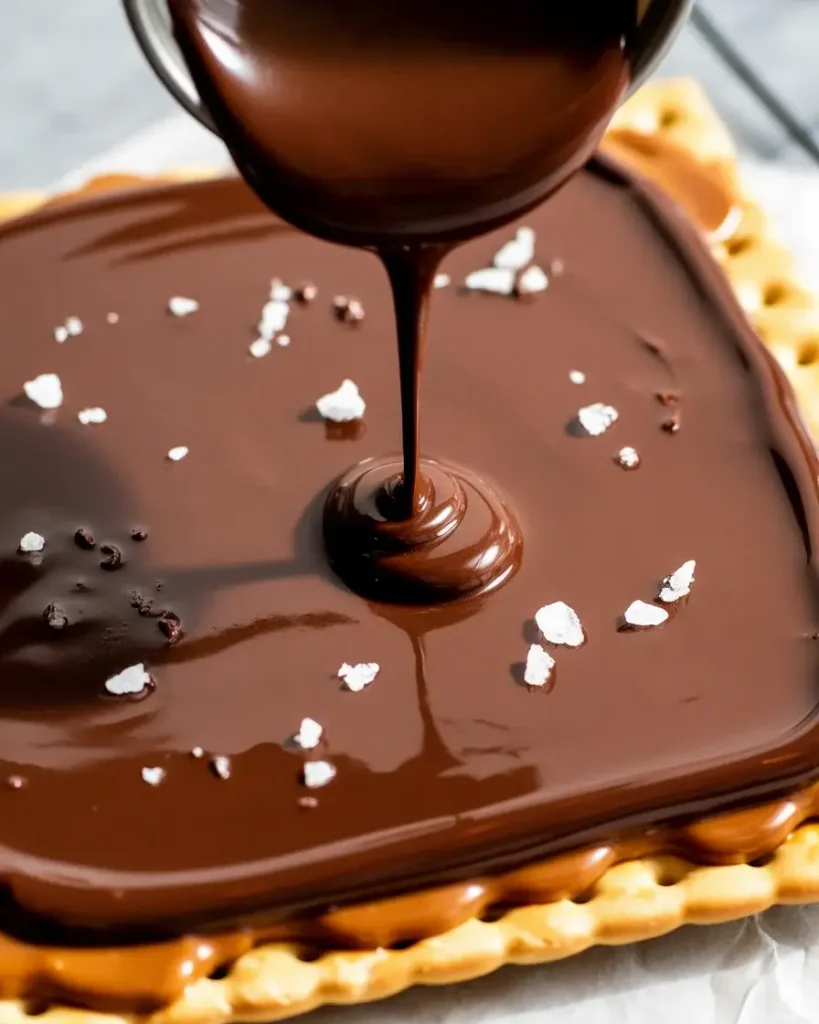
Immediately scatter 1.5 cups of semi-sweet chocolate chips evenly over the hot caramel. Wait 2 minutes don’t rush this – then spread the melted chocolate into a smooth layer with an offset spatula.
Sprinkle flaky sea salt generously before the chocolate sets. I tested fine table salt vs flaky Maldon sea salt and the difference is dramatic – flaky salt gives you visible crystals and those bold salty bursts that make these completely addictive.
Get More Dessert Bar Recipes
Step 6: Chill and Break Into Pieces
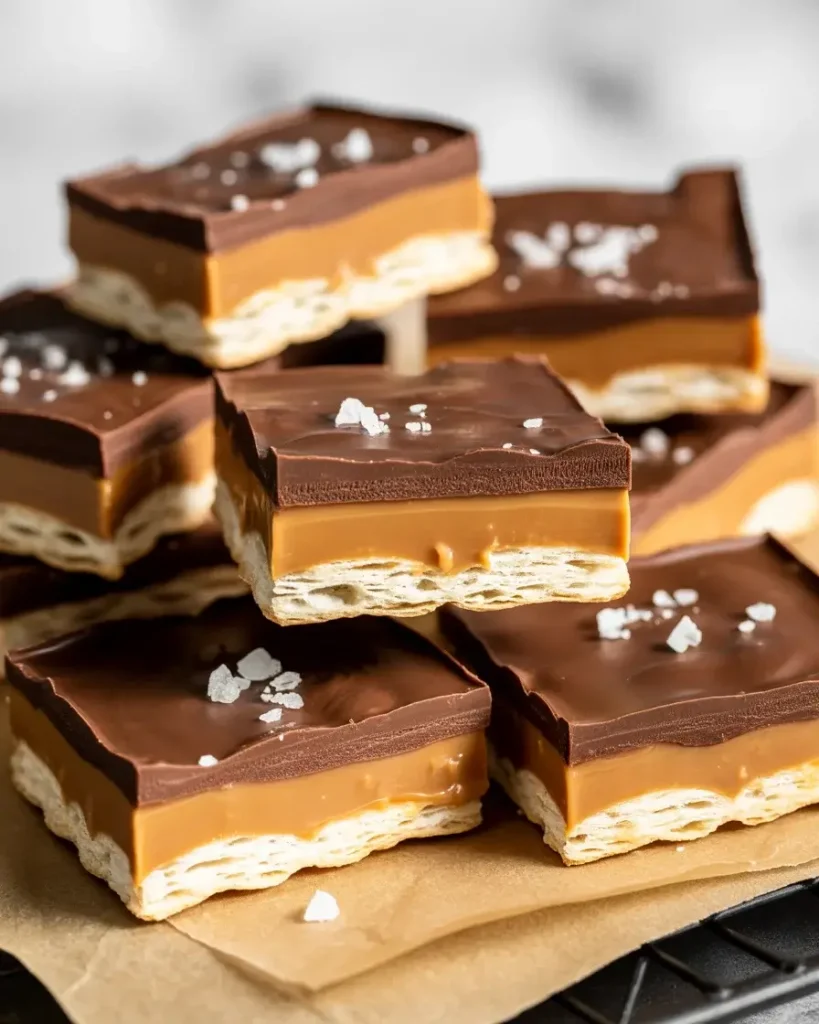
Transfer the pan to the refrigerator and chill for at least 45 minutes until fully set and firm. The chocolate should be completely hardened and matte-looking – if it still looks shiny, give it another 15 minutes.
Once set, lift the foil out and break into rustic, irregular pieces. Don’t try to cut them with a knife – breaking by hand gives those satisfying jagged edges that show off the caramel layer beautifully. Each bite should snap cleanly and smell like a candy shop.

Salted Caramel Cracker Bites
Course: DessertCuisine: AmericanDifficulty: Easy36
10
minutes5
minutes15
minutesButtery saltine crackers topped with homemade brown sugar caramel, silky melted chocolate, and flaky sea salt. A 5-ingredient treat that disappears at every party.
Ingredients
40 saltine crackers (approximately 1 sleeve)
1 cup unsalted butter, room temperature
1 cup packed dark brown sugar
1.5 cups semi-sweet chocolate chips
1 tsp flaky sea salt (Maldon recommended)
Directions
- Preheat oven to 350°F. Line a rimmed baking sheet with foil and spray lightly with cooking spray.
- Arrange saltine crackers in a single tight layer covering the entire pan.
- Melt butter in a saucepan over medium heat. Add brown sugar and stir constantly for 3-4 minutes until bubbling and deep amber.
- Pour caramel immediately over crackers and spread to edges with a spatula.
- Bake for exactly 5 minutes until caramel is actively bubbling across the pan.
- Remove from oven and scatter chocolate chips over the hot caramel. Wait 2 minutes, then spread melted chocolate smooth.
- Sprinkle flaky sea salt evenly over the chocolate layer.
- Refrigerate for 45 minutes until fully set. Break into pieces by hand and serve.
Notes
- Store in an airtight container with parchment between layers at room temperature for up to 5 days.
Substitute dark chocolate chips for a less sweet, more intense flavor.
Make up to 2 days ahead – flavor and texture improve overnight.
Freeze for up to 6 weeks; thaw 20 minutes at room temperature before serving.
Nutrition Table (per serving, approx. 3 pieces)
| Nutrient | Amount |
|---|---|
| Calories | 187 |
| Total Fat | 11g |
| Sugars | 16g |
| Protein | 1g |
Trusted Resource Links:
For food safety when handling hot caramel and storing confections, refer to the FDA Safe Food Handling guidelines. For mindful snacking and nutrition context, visit the American Heart Association Healthy Eating guide.
What Makes Salted Caramel Cracker Bites So Addictive?
The magic is the contrast – buttery crackers, chewy caramel, snappy chocolate, and flaky salt all hitting at once. This layered flavor experience triggers your brain’s reward system the same way a great candy bar does, but with a homemade depth store-bought candy can’t replicate.
I noticed after my 10th batch that people always reach for a second piece before finishing their first. That compulsive quality comes from the salt. Flaky sea salt on top doesn’t just add flavor – it resets your palate so each bite feels fresh and craveable all over again.
The cracker base plays a bigger role than you’d think. Its neutral, slightly salty flavor keeps the caramel from becoming cloyingly sweet, which is exactly why graham crackers feel one-note by comparison.
Can You Make Salted Caramel Cracker Bites Ahead of Time?
Yes – these are actually better made 1 day ahead. The caramel firms up overnight and the flavors meld in a way that freshly made bites can’t match.
Store them in an airtight container at room temperature for up to 5 days. I tested refrigerator storage vs room temperature and the fridge made the chocolate slightly chalky-looking after day 2. Room temperature keeps them glossy and snappy.
For longer storage, layer them between parchment sheets and freeze for up to 6 weeks. Thaw at room temperature for 20 minutes and they taste freshly made.
Why Is My Caramel Grainy or Crumbly?
Grainy caramel almost always comes from crystallization – usually caused by undissolved sugar or stirring too aggressively. I made this mistake twice in early testing before pinpointing the cause.
The fix is simple: stir constantly but gently during the butter-sugar melt phase. Once you see a smooth, cohesive mixture with no sugar granules visible, you’re safe. If it still looks grainy, add 1 teaspoon of light corn syrup – it disrupts crystal formation reliably.
Using cold butter straight from the fridge is another common culprit. Room temperature butter melts into the sugar more evenly and produces a silkier caramel every time.
What Crackers Work Best for This Recipe?
Standard saltine crackers are my top choice after testing 5 different bases. Their neutral flavor and thin, uniform thickness let the caramel shine without competing.
Graham crackers work but create a sweeter, dessert-bar style bite. Club crackers add a nice butteriness but can get slightly soggy under caramel. Ritz crackers are a fun variation – their richer flavor pairs surprisingly well with dark chocolate.
Avoid multigrain or whole wheat crackers. Their denser texture doesn’t let the caramel adhere as cleanly, and the earthy flavor clashes with the sweet caramel layer.
How Do You Store Salted Caramel Cracker Bites Without Them Sticking Together?
Layering is the key. Place a sheet of parchment or wax paper between each layer of bites in your storage container – this prevents the chocolate from sticking and keeps pieces intact.
Avoid plastic wrap directly on the chocolate surface. It pulls at the chocolate layer when removed and can crack your carefully set bites. Airtight containers with parchment layers are the only storage method I recommend after testing several options.
If humidity is an issue in your kitchen, a small silica gel packet in the container keeps moisture from making the caramel sticky.
Frequently Asked Questions
Q: Can I use salted butter instead of unsalted?
A: Yes, but reduce or skip the added sea salt on top. Salted butter adds about 1/4 tsp extra sodium per cup, which can make the finished bites overly salty rather than pleasantly balanced.
Q: Why did my chocolate not melt after adding chips?
A: The caramel cools quickly – if you wait more than 3 minutes to add chips, there isn’t enough residual heat. Add chips immediately out of the oven and tent with foil for 90 seconds to trap heat and melt them fully.
Q: Can I use white chocolate instead of semi-sweet
A: Absolutely. White chocolate with sea salt creates a sweeter, creamier version. I recommend adding a drizzle of dark chocolate over white for visual contrast and to balance the sweetness.