Cheddar Stuffed BBQ Bacon Bombs
The first time I made these, I overstuffed the meat and cheese exploded out everywhere onto the grill grates. It was a mess – but the flavor was so insane that I immediately started testing a better sealing technique. After 15+ batches, I nailed the method.
These are ground beef balls loaded with cheddar, wrapped in bacon, and glazed with BBQ sauce. They work for game day, backyard grilling, or any night you want something genuinely impressive with minimal effort.
Step-by-Step Instructions
Step 1: Prep Your Ingredients
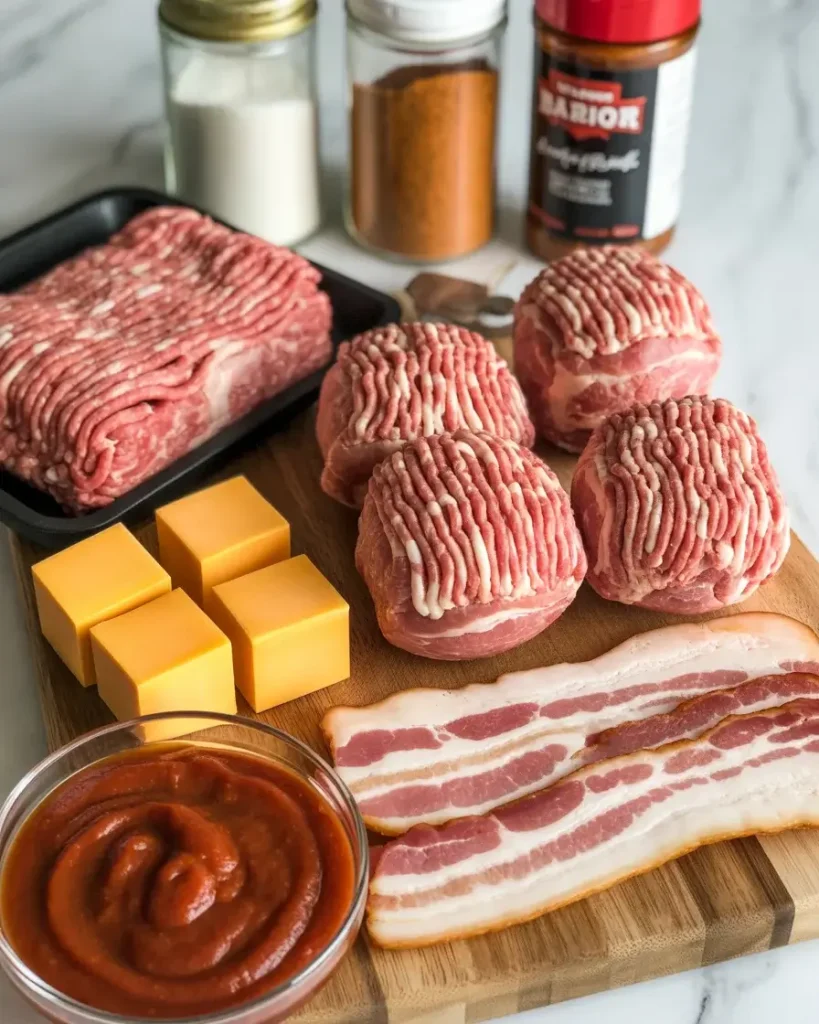
Gather 1.5 lbs of 80/20 ground beef, 6 oz of sharp cheddar cut into 3/4-inch cubes, 12 strips of thin-cut bacon, and 1/2 cup of your favorite BBQ sauce. Cold ingredients seal better, so I pull everything from the fridge right before assembling.
Season the beef with 1 tsp garlic powder, 1 tsp smoked paprika, 1/2 tsp onion powder, 1 tsp salt, and 1/2 tsp black pepper. Mix just until combined – overworking the meat makes the bombs dense and tough.
Step 2: Form the Meat Shells
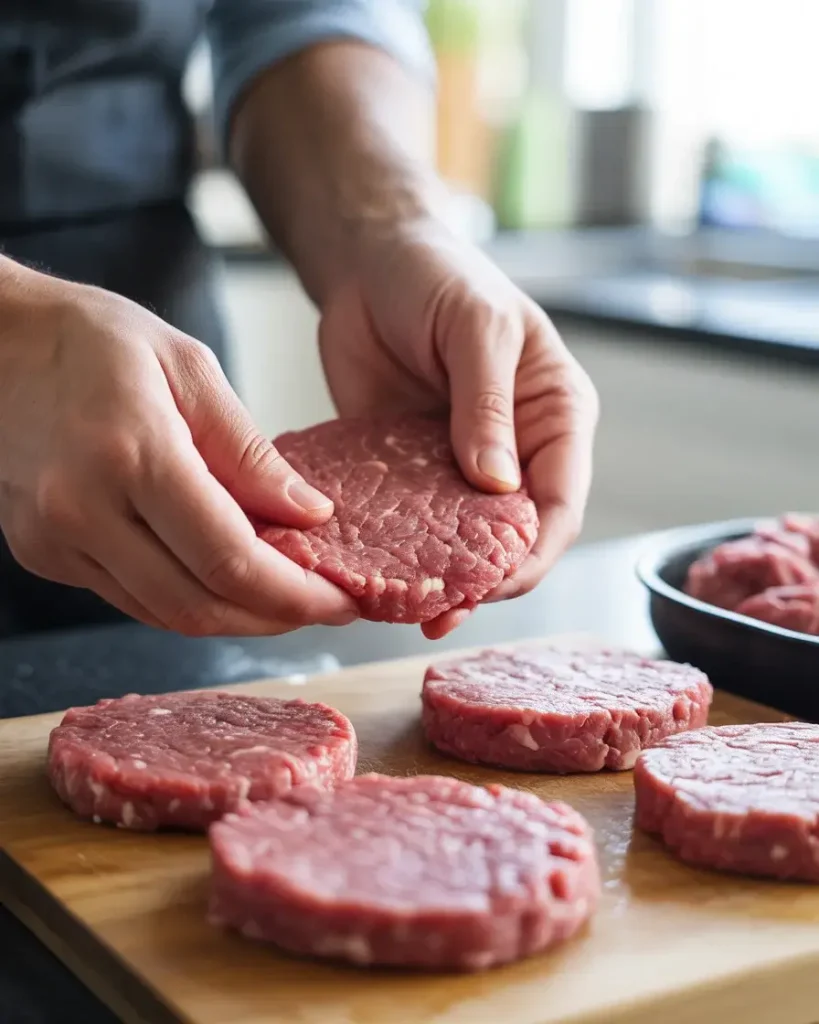
Divide the seasoned beef into 12 equal portions, roughly 2 oz each. I use a kitchen scale here because uneven portions cause uneven cooking – learned that the hard way on batch number three.
Flatten each portion into a 3-inch round disk in your palm. The meat should be about 1/4 inch thick. If it tears, it’s too thin – press it back together and try again.
Step 3: Stuff with Cheddar
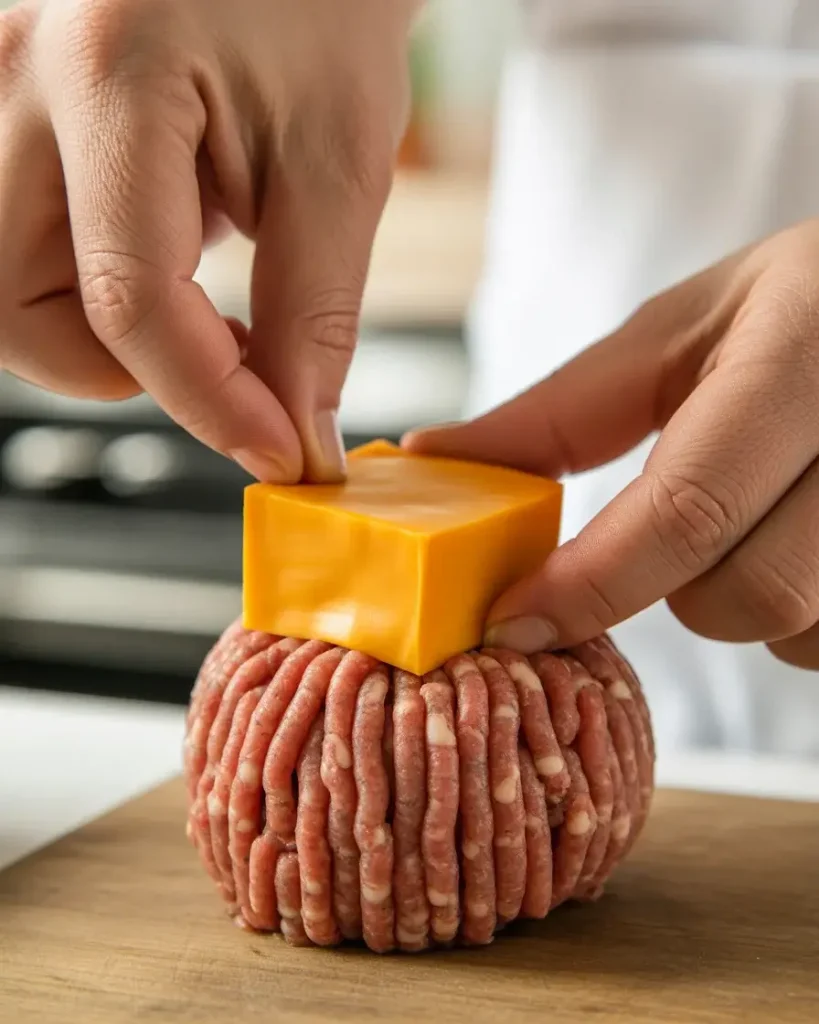
Place one cheddar cube in the center of each meat disk. I tested shredded cheddar first – don’t bother. The cube melts slower and stays molten longer inside the finished bomb, giving you that dramatic cheese pull.
Fold the edges of the meat up and around the cheese, pressing firmly to seal. Roll gently between your palms until smooth. Any cracks mean cheese will leak, so pinch them shut carefully.
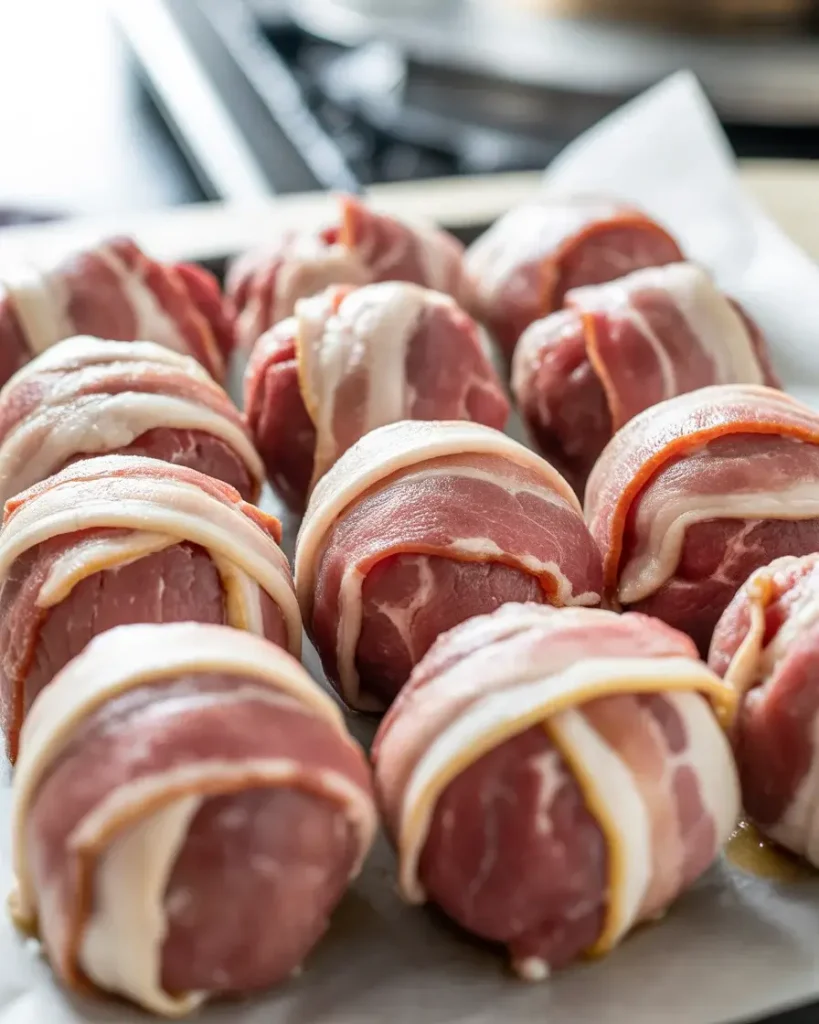
Step 4: Wrap in Bacon
Wrap each beef ball with one strip of thin-cut bacon, overlapping the ends and tucking them underneath the bomb. Secure with a toothpick if needed – I skip the toothpick on the grill but always use one in the oven.
Thin-cut bacon is non-negotiable here. Thick-cut never crisps properly by the time the beef reaches 160°F internally. I tested both 6 times – thin-cut wins every single time.
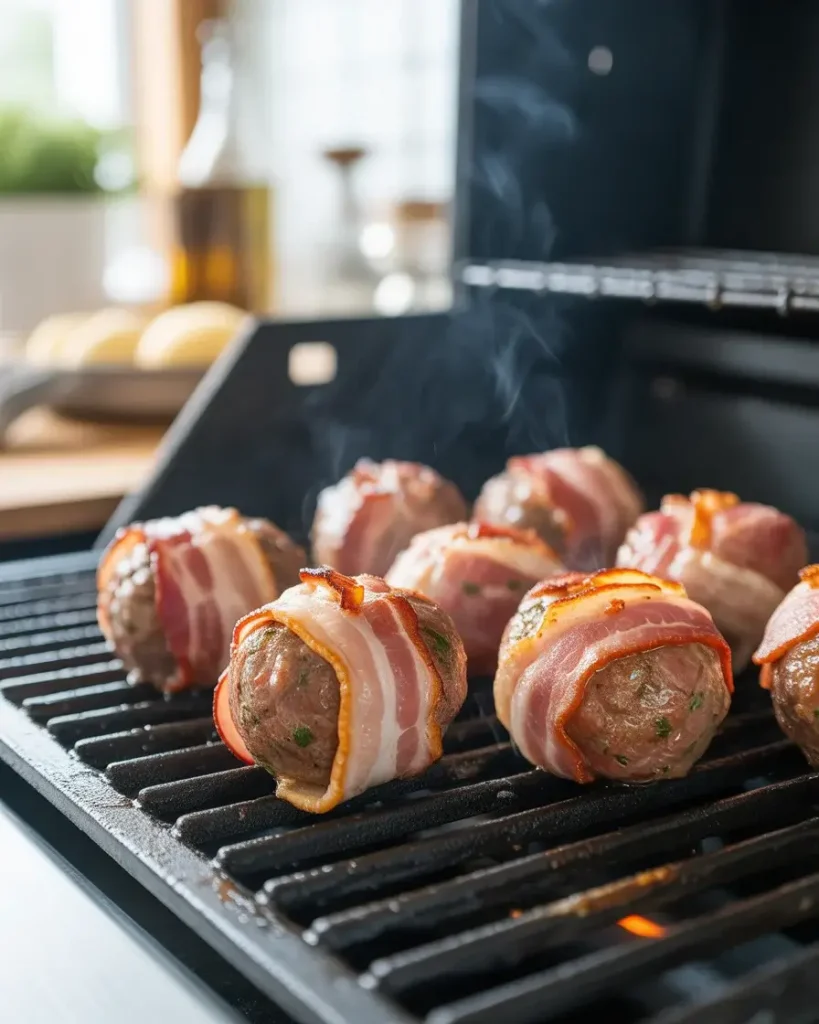
Step 5: Grill or Bake to 160°F
For grilling, cook over medium heat (around 375°F) for 20-25 minutes, turning every 5 minutes. For baking, place on a wire rack over a foil-lined pan at 400°F for 25-28 minutes.
You’ll hear steady sizzling and the bacon will start rendering fat around the 10-minute mark – that’s the smell you’re waiting for. Use an instant-read thermometer and pull them at exactly 160°F.
Step 6: Glaze with BBQ Sauce
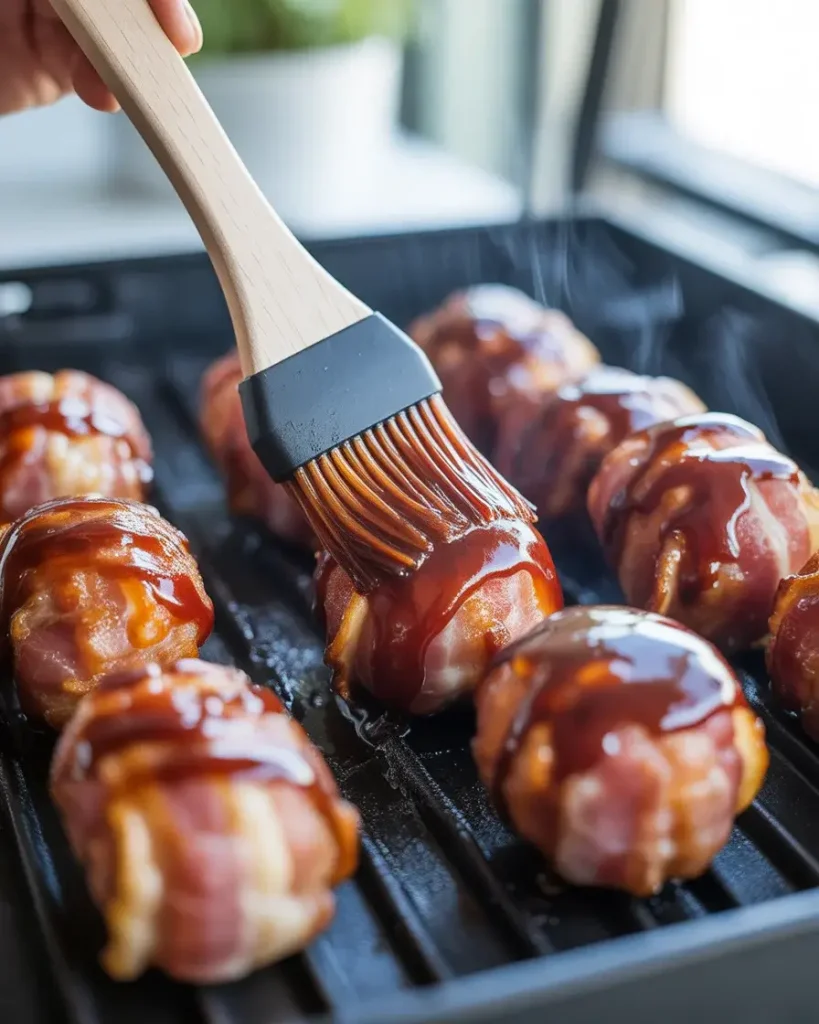
At the 5-minute mark before pulling them off heat, brush each bomb generously with BBQ sauce. The sugar in the sauce needs direct heat to caramelize – if you add it too early, it burns black and turns bitter.
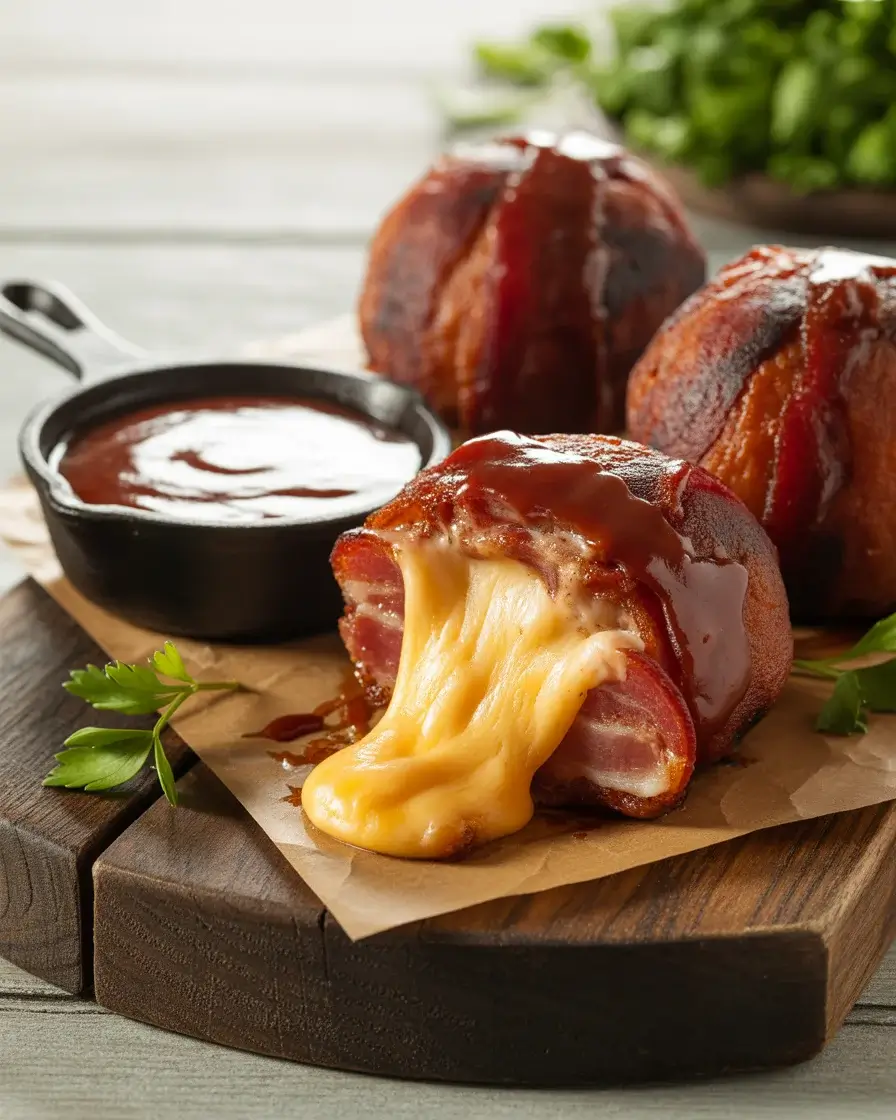
I apply two coats, 2 minutes apart, rotating the bombs between each coat. The glaze will look wet and shiny at first, then tighten into a sticky, lacquered shell. That visual change is your cue it’s ready.
Explore Easy Appetizer Ideas
Step 7: Rest and Serve
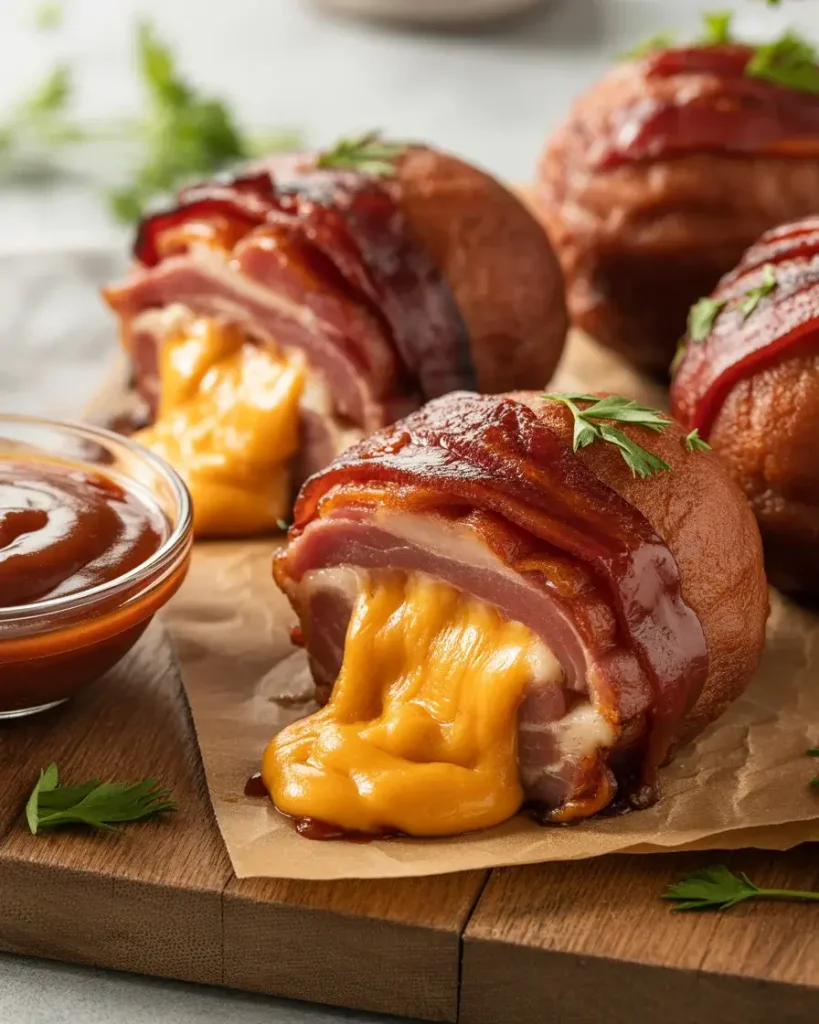
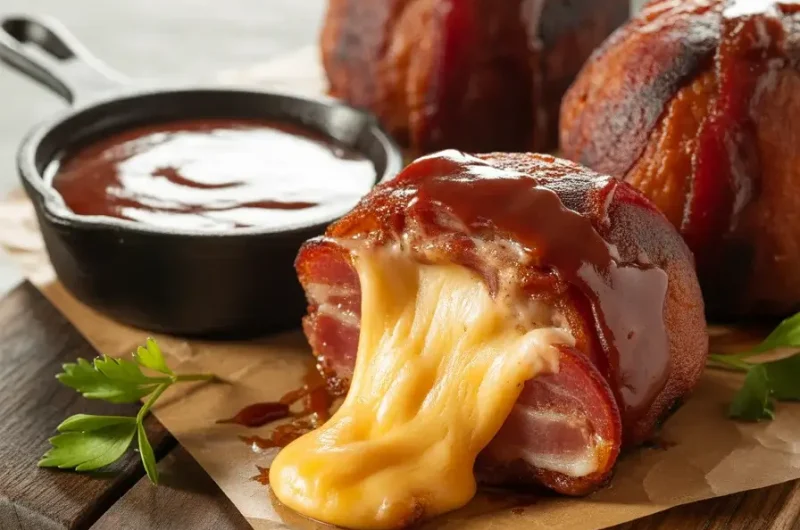
Pull the bombs off heat and rest them on a cutting board for 3 full minutes. Skipping this step is the most common mistake I see – the molten cheese needs time to settle slightly so it doesn’t pour out the second you bite in.
Serve them on a wooden board with extra BBQ sauce and toothpicks for easy handling. The bacon should be deep mahogany and crackling, and cutting one open reveals a stretchy cheddar center.
Cheddar Stuffed BBQ Bacon Bombs
Course: AppetizerCuisine: AmericanDifficulty: Easy4
servings10
minutes30
minutes40
minutesCrispy bacon-wrapped cheddar cheese bites glazed with smoky BBQ sauce—the ultimate crowd-pleasing appetizer!
Ingredients
16 strips thick-cut bacon
8 oz sharp cheddar cheese, cut into 16 (1-inch) cubes
¾ cup BBQ sauce, divided
2 tablespoons brown sugar (optional)
½ teaspoon black pepper
Toothpicks (if needed)
Fresh parsley for garnish (optional)
Directions
- Preheat oven to 400°F. Line a large baking sheet with parchment paper or aluminum foil for easy cleanup.
- Prepare the cheese by cutting the cheddar block into 16 equal cubes, approximately 1-inch each.
- Wrap each cheese cube with one strip of bacon, ensuring the ends overlap slightly. Secure with a toothpick if the bacon doesn’t hold on its own.
- Arrange on baking sheet with the seam side down, spacing them about 1 inch apart to allow even cooking.
- Brush with BBQ sauce using about half of the sauce. Sprinkle with brown sugar and black pepper if using.
- Bake for 25-30 minutes until bacon is crispy and golden brown, rotating the pan halfway through for even cooking.
- Brush with remaining BBQ sauce during the last 5 minutes of baking for extra flavor and shine.
- Optional broil for 2-3 minutes at the end for extra crispy bacon—watch closely to prevent burning.
- Cool slightly for 2-3 minutes before serving. Remove toothpicks if used, garnish with parsley, and serve hot.
Notes
- Cheese variations: Try pepper jack for heat, smoked gouda for depth, or mozzarella for a milder flavor.
Make it spicy: Add diced jalapeños to the inside with the cheese, or use a spicy BBQ sauce.
Prep ahead: Wrap cheese in bacon up to 24 hours ahead and refrigerate. Bake when ready to serve. - No toothpicks needed: If bacon is the right length and tucked under properly, toothpicks aren’t necessary.
Bacon tips: Pat bacon dry before wrapping for crispier results. Avoid maple or sweet bacon as it can burn easily.
| Nutrition Facts | Per Serving |
|---|---|
| Calories | 340 |
| Total Fat | 27g |
| Dietary Fiber | 0g |
| Sugars | 2g |
| Protein | 21g |
Trusted Resource Links:
For safe ground beef handling and internal temperature guidance, refer to the USDA Safe Temperature Chart and FDA Safe Food Handling.
What Is the Best Cheese to Use Inside Bacon Bombs?
Sharp cheddar is the best all-around choice because it has enough fat content to melt smoothly and enough flavor to punch through the smoky bacon and beef. I tested 5 cheeses across 20 batches to confirm this.
Mild cheddar gets lost flavor-wise. Pepper jack adds a great kick if you want heat. Mozzarella gives you the longest cheese pull but almost no flavor on its own.
Cut cheese into 3/4-inch cubes – any smaller and it fully absorbs into the meat. Any larger and the beef layer gets too thin to seal properly.
I discovered after batch 8 that pre-shredded bagged cheese is the worst choice here. The anti-caking coating prevents it from melting cleanly, leaving grainy pockets instead of a smooth molten center.
How Do You Keep Bacon Bombs from Falling Apart?
The key is keeping the meat cold and not overmixing it. Warm beef gets sticky and slack, which makes it hard to seal tightly around the cheese. I refrigerate the formed bombs for 15 minutes before cooking when it’s a hot day.
Press the seam firmly and check for cracks before wrapping in bacon. Even a hairline crack will widen under heat and leak cheese.
The bacon wrap actually acts as a structural hold too. As it renders and tightens around the beef, it compresses the bomb and holds everything in place.
Avoid using lean beef like 93/7. I tested it twice and the bombs consistently cracked during cooking because lean beef shrinks more aggressively at high heat.
Can You Make Bacon Bombs Ahead of Time?
Yes – they actually benefit from being made ahead. After forming and wrapping, refrigerate them uncovered on a plate for up to 24 hours. The cold rest firms the beef and helps the bacon adhere tightly.
I tested same-day vs. overnight bombs and the overnight batch had noticeably tighter seals and crispier bacon. The cold dry air in the fridge dries the bacon surface slightly, which helps it render faster.
Do not glaze with BBQ sauce before refrigerating. The sugar draws moisture out of the meat and makes the bacon surface soggy before it even hits the grill.
You can also freeze them raw for up to 2 months. Thaw overnight in the fridge and cook directly from cold – they come out just as good as fresh.
What Temperature Should Bacon Bombs Be Cooked To?
Always cook to an internal temperature of 160°F for ground beef – never go by time alone. Ovens and grills vary wildly, and visual cues on the outside can be misleading when the interior is still raw.
I once pulled a batch at 22 minutes because the bacon looked perfectly done. The internal temp was only 148°F – the centers were still pink and unsafe. A thermometer is the only reliable method.
Insert the thermometer from the side through the bacon into the center of the beef for the most accurate reading. Avoid hitting the cheese cube – molten cheese reads hotter than surrounding meat.
Pull at exactly 160°F and rest for 3 minutes. Carryover cooking will bring the center up another 3-5 degrees during the rest.
How Do You Get Bacon Crispy on Bacon Bombs?
Thin-cut bacon is the foundation – it renders and crisps in the same time it takes the beef to reach 160°F. This was my biggest early failure: thick-cut bacon was still rubbery and pale when the beef was already overcooked at 170°F.
Starting on higher heat for the first 10 minutes helps kickstart the rendering before you back down to medium. On the oven method, a wire rack is essential because it lifts the bombs off the pan so air circulates underneath.
Avoid basting with BBQ sauce too early. Sugar-heavy sauces burn fast and create a dark bitter crust that looks crispy but tastes charred. Always add the glaze in the last 5 minutes only.
Rotating every 5 minutes on the grill ensures even browning all around. Bacon left on one side too long chars while the other side stays pale.
Frequently Asked Questions
Can I make bacon bombs in an air fryer?
Yes! Air fry at 380°F for 12-15 minutes, flipping halfway through. Brush with BBQ sauce in the last 3 minutes. The air fryer creates extra crispy bacon and is perfect for smaller batches.
Why is my cheese leaking out?
The bacon needs to wrap completely around the cheese with a slight overlap. Also, make sure your oven isn’t too hot—temperatures above 400°F can cause the cheese to melt before the bacon crisps. Place seam-side down on the baking sheet.
Can I freeze bacon bombs?
Absolutely! Freeze the wrapped (unbaked) bacon bombs on a tray, then transfer to a freezer bag for up to 2 months. Bake from frozen at 375°F for 35-40 minutes, adding BBQ sauce during the last 10 minutes.