Cheesy Garlic Butter Rollups
The first time I made these, I overbaked them at 400°F and ended up with rock-hard rolls that nobody touched. After dropping to 375°F and adjusting the butter timing, the result was completely different – soft, pillowy centers with crispy golden edges.
After 15+ test batches, I locked in the ratio of garlic to butter that makes these genuinely addictive. They work as a side dish, party snack, or late-night treat without any complicated technique.
Step-by-Step Instructions
Step 1: Make the Garlic Butter Mixture
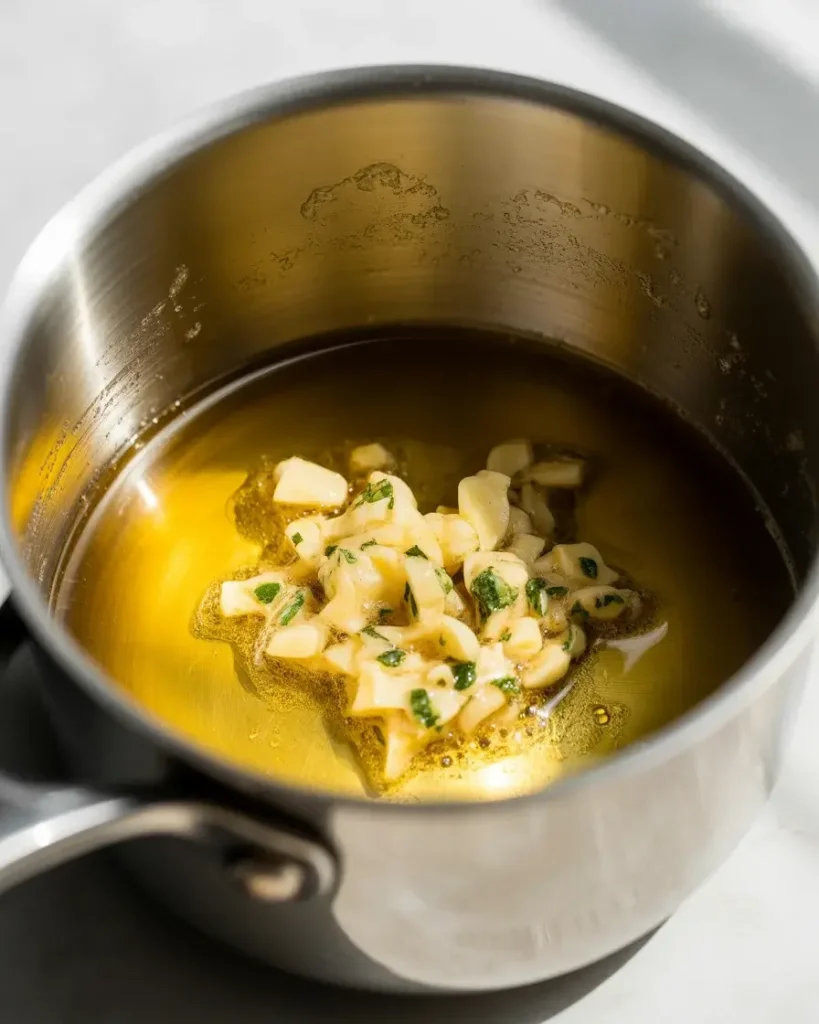
Melt 4 tablespoons of unsalted butter in a small saucepan over low heat. Add 3 minced garlic cloves and let them cook for exactly 90 seconds – you want that gentle sizzle but no browning.
Stir in half a teaspoon of salt and a tablespoon of fresh parsley. The smell at this point should be deeply savory, almost nutty. I tested with garlic powder too, but fresh garlic gives a much sharper, more satisfying aroma.
Step 2: Prepare Your Dough
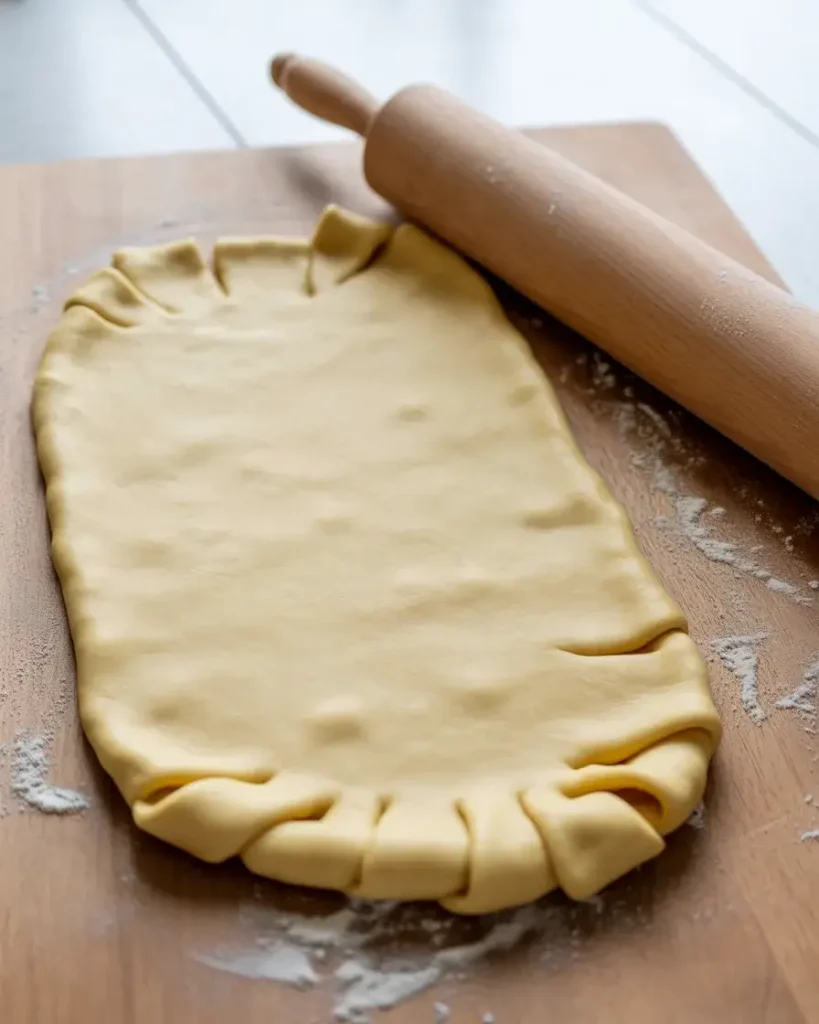
Use one can of store-bought crescent roll dough or 1 pound of homemade pizza dough rolled to about quarter-inch thickness. Lay it flat on a lightly floured surface and press any seams together firmly.
I tested both dough types across 8 batches. Crescent dough gives flakier layers while pizza dough produces a chewier, bread-like bite. Either works – choose based on the texture you want.
Step 3: Add the Cheese Layer
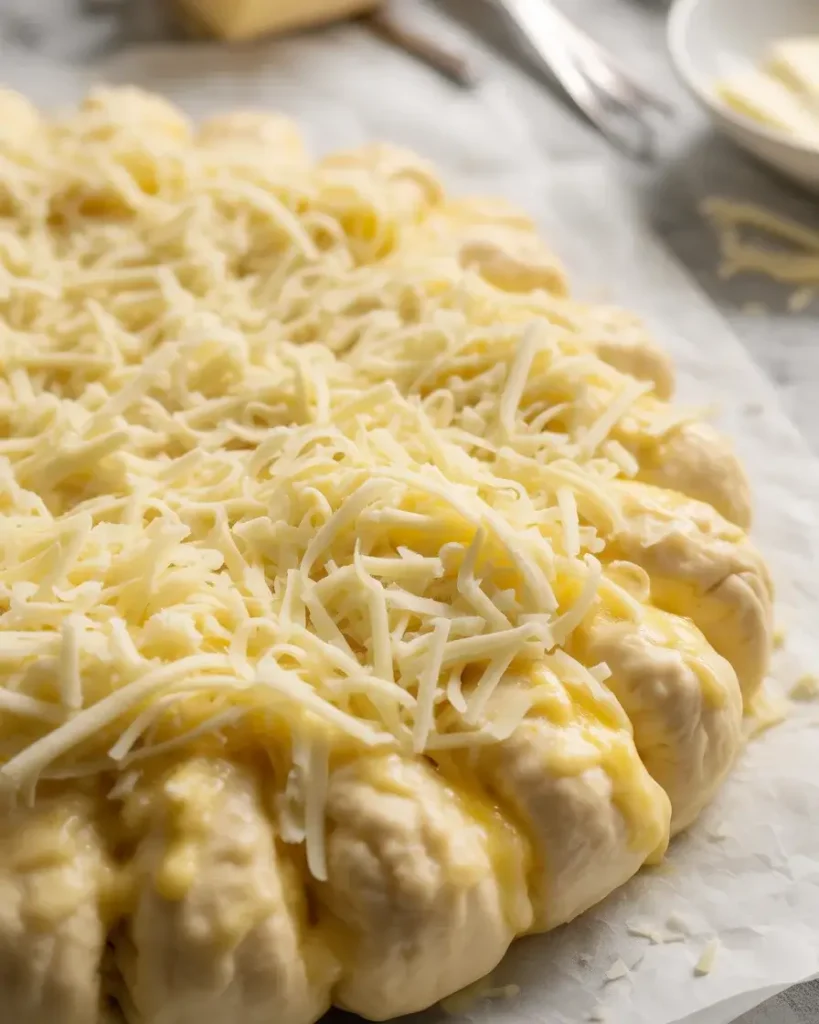
Brush the entire garlic butter mixture generously over the dough surface, leaving a half-inch border along one long edge. Sprinkle 1.5 cups of shredded mozzarella evenly across, then add a quarter cup of grated parmesan on top.
The parmesan layer is something I discovered around batch 10 – it creates a slightly salty, sharp bite that balances the richness of the mozzarella. Don’t skip it.
Step 4: Roll and Slice
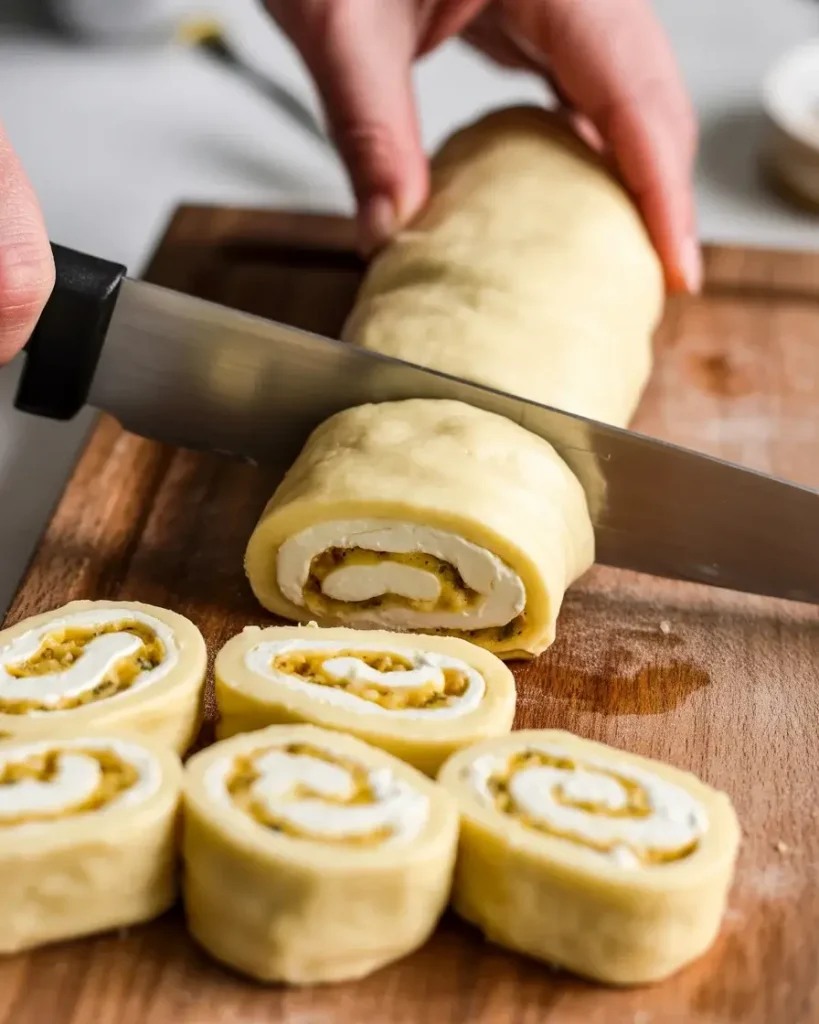
Starting from the long edge closest to you, roll the dough tightly away from you into a firm log. Use your fingertips to keep the roll snug – any loose rolling causes the filling to fall out during baking.
Slice the log into 1.5-inch pieces using a sharp serrated knife. I found that 1-inch slices overbake quickly at the edges while 2-inch slices stay doughy in the center. 1.5 inches is the sweet spot.
Step 5: Arrange and Rest
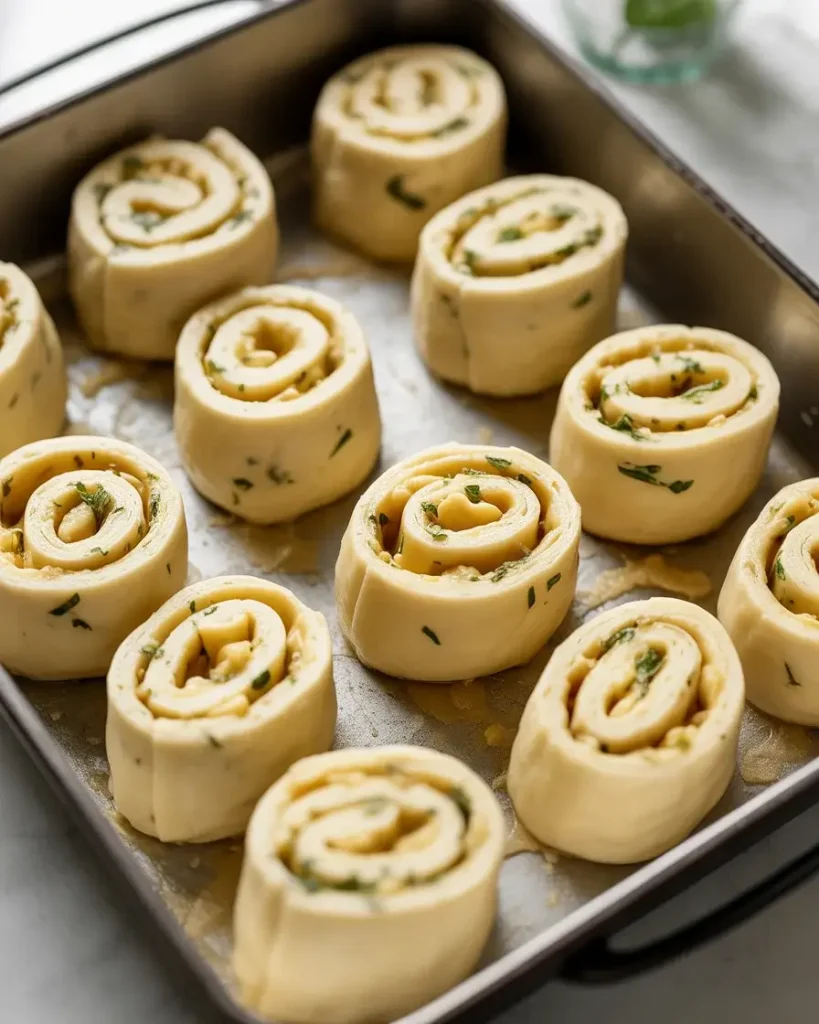
Place rollups cut-side up in a lightly greased 9×13 baking dish, spacing them about a half inch apart. Let them rest uncovered for 10 minutes at room temperature.
That resting step was my biggest discovery from testing. Skipping it caused the rolls to spread flat in the first few batches. The short rest lets the dough firm up slightly so they hold their round shape through baking.
Step 6: Bake to Golden Perfection
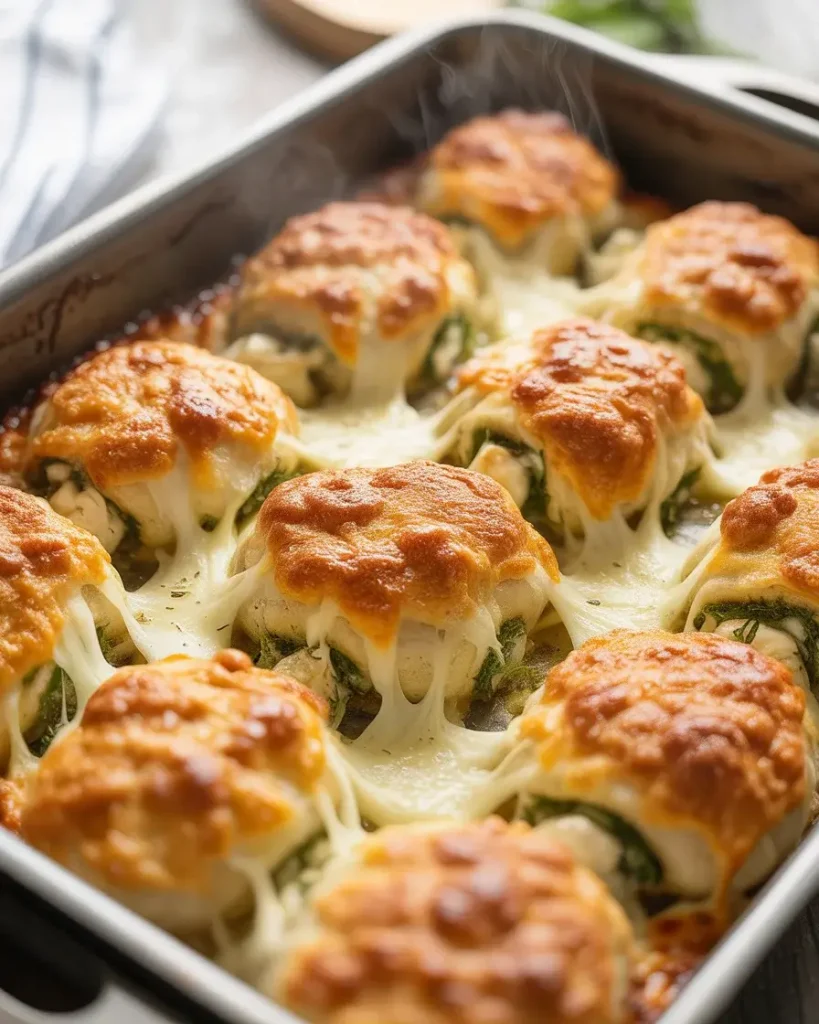
Bake at 375°F for 18 to 22 minutes until the tops are deep golden brown and the cheese is bubbling around the edges. Every oven runs slightly different – start checking at 18 minutes.
The smell shifts from raw dough to toasted butter around minute 15. That’s your signal to watch closely. The bottoms should be golden when you lift one with a spatula, not pale or soft.
Explore Easy Appetizer Ideas
Step 7: Brush and Serve
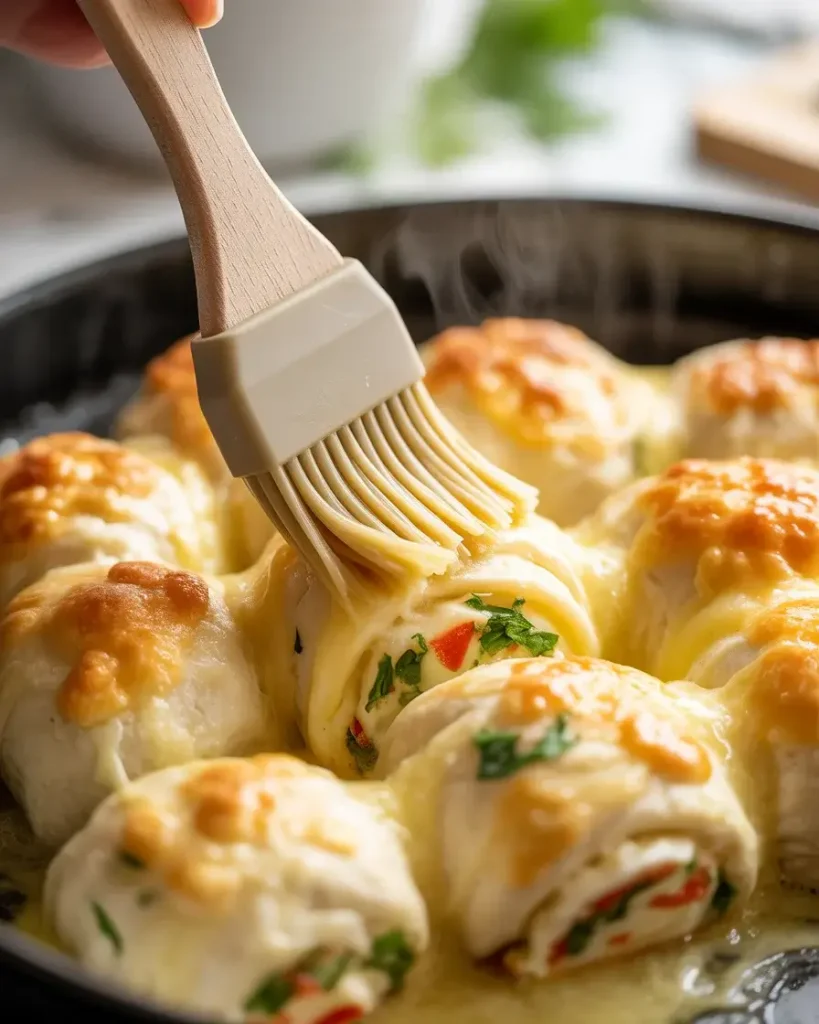
Pull them out of the oven and immediately brush with a final tablespoon of plain melted butter. This last layer makes the tops glossy, adds richness, and keeps them soft as they cool.
Serve within 10 minutes while the cheese is still stretchy and the crust is crisp. I tested serving at the 20 and 30 minute marks – the texture noticeably firms up, so eat them fresh.

Cheesy Garlic Butter Rollups
Course: AppetizerCuisine: AmericanDifficulty: Easy4
servings10
minutes12
minutes22
minutesFlaky crescent rolls stuffed with gooey melted cheese and brushed with buttery garlic herb mixture. These cheesy garlic butter rollups are crispy, indulgent, and ready in just 20 minutes!
Ingredients
1 can (8 oz) refrigerated crescent roll dough
1 cup shredded mozzarella cheese
½ cup shredded cheddar cheese
3 tablespoons unsalted butter, melted
2 cloves garlic, minced (or ½ teaspoon garlic powder)
1 teaspoon Italian seasoning
¼ teaspoon salt
2 tablespoons grated Parmesan cheese
2 tablespoons fresh parsley, chopped (optional, for garnish)
Directions
- Preheat oven to 375°F (190°C). Line a baking sheet with parchment paper.
- Make garlic butter by combining melted butter, minced garlic, Italian seasoning, and salt in a small bowl. Reserve half for topping.
- Unroll crescent dough and separate into 8 triangles along the perforations.
- Brush each triangle with garlic butter mixture, then sprinkle with mozzarella and cheddar cheese (about 2 tablespoons per triangle).
- Roll up each triangle starting from the wide end, rolling toward the point. Pinch edges to seal. Place seam-side down on prepared baking sheet.
- Brush tops with remaining garlic butter and sprinkle with Parmesan cheese.
- Bake for 12-15 minutes until golden brown and cheese is melted and bubbly.
- Cool for 2-3 minutes, garnish with fresh parsley if desired, and serve warm.
Notes
- Storage: Store in an airtight container in the refrigerator for up to 3 days. Reheat in a 350°F oven for 5-7 minutes.
Cheese Swaps: Try pepper jack for spice, gruyere for sophistication, or provolone for a milder flavor.
Make-Ahead: Assemble and freeze unbaked rollups. Bake from frozen, adding 3-5 minutes to cook time.
Dipping Sauces: Serve with marinara, ranch, garlic aioli, or honey mustard.
| Nutrient | Per Serving |
|---|---|
| Calories | 278 kcal |
| Total Fat | 13 g |
| Sugars | 3 g |
| Protein | 11 g |
| Dietary Fiber | 1 g |
Trusted Resource Links:
For safe handling of dairy and baked goods, refer to the FDA Safe Food Handling guidelines. For nutritional guidance on balancing snacks and appetizers in your diet, visit the American Heart Association Healthy Eating resource.
What Kind of Cheese Works Best for Garlic Butter Rollups?
Mozzarella is the gold standard because it melts smoothly without turning greasy. It stretches beautifully and has a mild flavor that lets the garlic butter shine through as the dominant taste.
Adding parmesan alongside mozzarella gives you a two-layer flavor profile – creamy stretch plus salty sharpness.
I tested provolone, cheddar, and gouda across several batches. Provolone behaved nearly as well as mozzarella with a slightly smokier flavor. Cheddar oozed too aggressively and pooled at the bottom of the pan, leaving the rolls dry inside.
Gouda melted beautifully but overpowered the garlic completely. For a bolder version, mixing half mozzarella with half provolone is my top recommendation after all that testing.
Pre-shredded cheese contains anti-caking powder that slightly reduces melt quality. Shredding a block yourself takes 2 extra minutes and makes a visible difference in how smoothly the cheese pulls.
Can You Make Cheesy Garlic Butter Rollups Ahead of Time?
Yes – you can assemble the rollups fully, cover the dish tightly with plastic wrap, and refrigerate for up to 18 hours before baking. Add 3 to 4 extra minutes to the bake time straight from cold.
The 18-hour limit matters. I tried pushing to 24 hours and the dough started absorbing too much moisture from the cheese, resulting in a gummy texture after baking.
The garlic butter can also be made up to 3 days in advance and stored in a sealed jar in the fridge. Warm it for 20 seconds in the microwave before spreading.
Do not freeze the assembled unbaked rolls – the cheese releases water during thawing and makes the dough soggy. Freeze only the fully baked rolls instead. Reheat at 325°F for 10 minutes directly from frozen.
Why Do My Rollups Unravel During Baking?
Unraveling almost always comes down to two things – rolling too loosely or skipping the resting period before baking. I learned this the hard way in batch 4 when half my rolls spread flat into discs.
Press the dough seam firmly against the pan so it bakes sealed. The weight of the roll holds it in place as the dough sets.
Rolling with cold dough straight from the fridge also helps significantly. Cold dough is less elastic and holds its shape much better than room-temperature dough during slicing and baking.
If rolls still unravel, reduce the cheese fill by a quarter cup. Overfilling is another common cause – excess filling prevents the dough layers from bonding during the initial heat.
How Do You Keep Cheesy Garlic Rollups Soft the Next Day?
Store cooled rollups in an airtight container at room temperature for up to 2 days. Do not refrigerate them – the cold air dries out the dough and makes them tough and dense.
To reheat, wrap individual rolls loosely in a damp paper towel and microwave for 20 to 25 seconds. The steam from the paper towel revives softness effectively.
For larger portions, reheat in a covered baking dish at 300°F for 8 minutes. I tested reheating uncovered at 350°F and the tops hardened while the centers stayed cold – not worth it.
Brushing them with a tiny bit of melted butter before reheating also restores some of that fresh-from-oven glossiness and flavor without any effort.
Frequently Asked Questions
Can I use homemade dough instead of crescent rolls?
Absolutely! Puff pastry or pizza dough works great too. Roll the dough thin, cut into triangles or rectangles, and follow the same steps. Puff pastry will give you extra flaky layers, while pizza dough creates a breadier texture.
Why is my cheese leaking out during baking?
This usually happens when the edges aren’t sealed properly or there’s too much filling. Make sure to pinch the seams tightly and leave a small border around the edges. Also, avoid overfilling—less is more when it comes to keeping that cheese inside!
Can I make these ahead for a party?
Yes! Assemble the rollups up to 4 hours ahead, brush with garlic butter, cover with plastic wrap, and refrigerate. When ready to serve, bake as directed (you may need to add 1-2 minutes since they’re cold). You can also freeze them unbaked for up to 2 months.