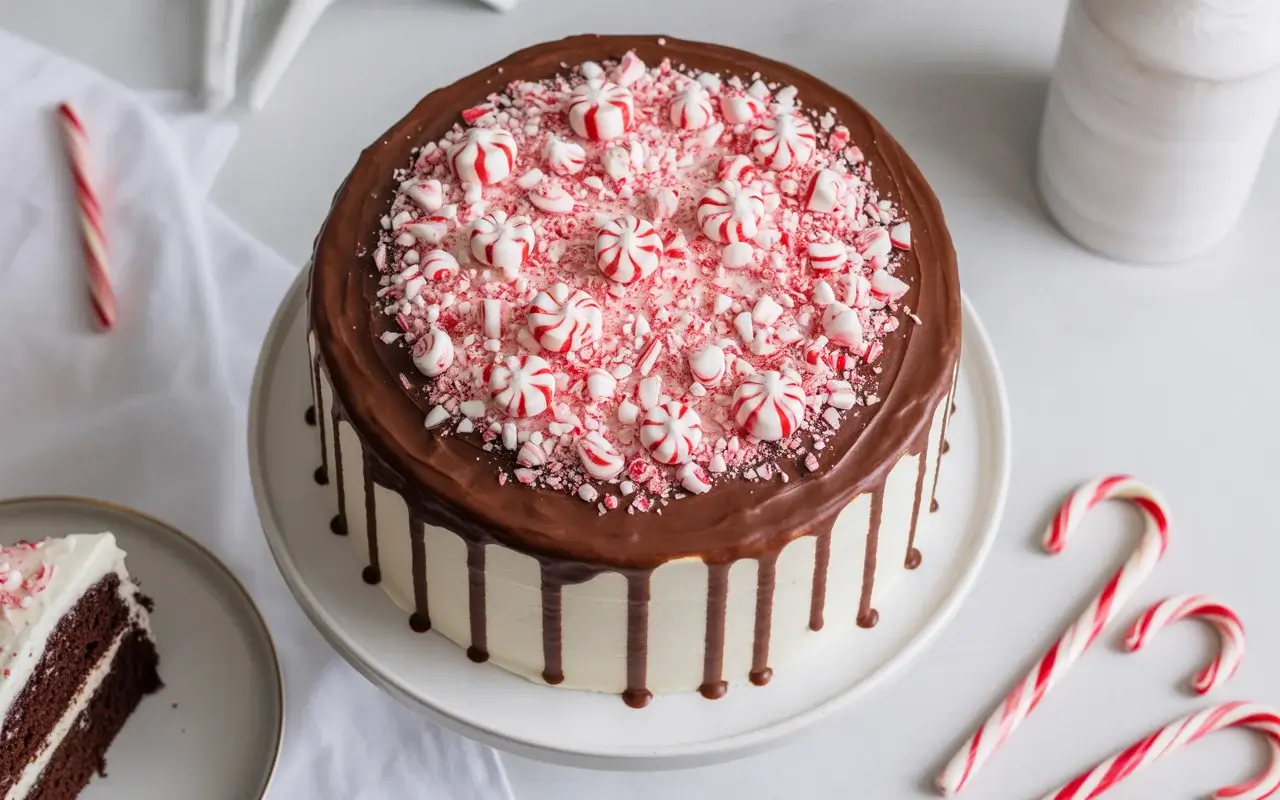
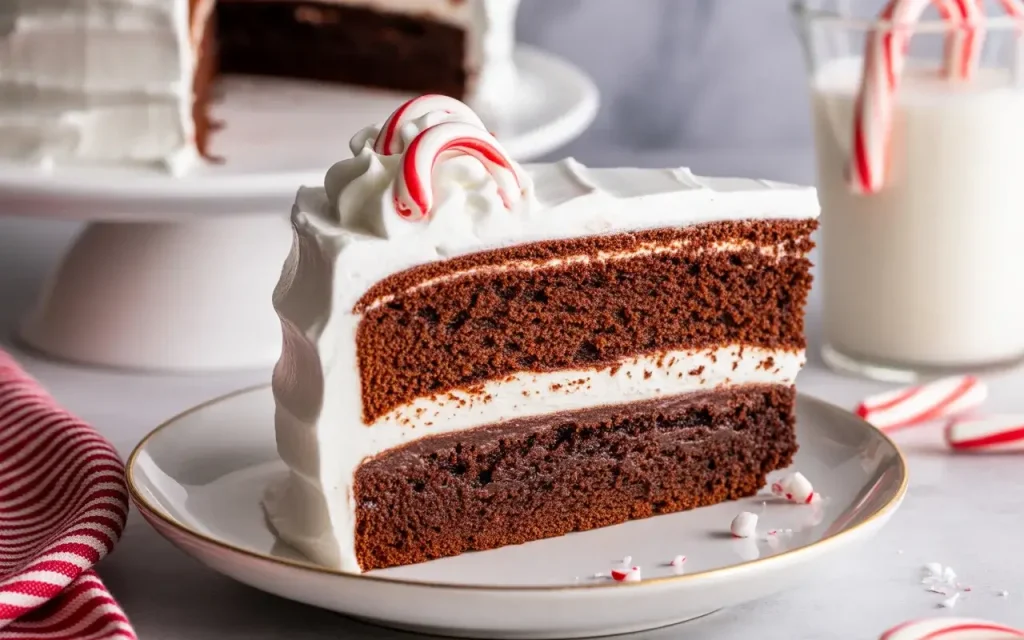
Chocolate Peppermint Dream Cake
There’s something magical about the combination of rich chocolate and cool peppermint. This chocolate peppermint dream cake brings together moist chocolate layers, fluffy peppermint frosting, and a festive finish that’s perfect for the holidays or any time you’re craving something special.
Whether you’re baking for a winter celebration or just want to treat yourself, this cake delivers on both flavor and presentation. The chocolate base is deeply cocoa-forward, while the peppermint adds a refreshing contrast that keeps each bite interesting.
Best of all, this recipe is surprisingly straightforward. Even if you’re new to layer cakes, you’ll find the steps easy to follow and the results impressive enough to wow any crowd.
Why You’ll Love This Recipe
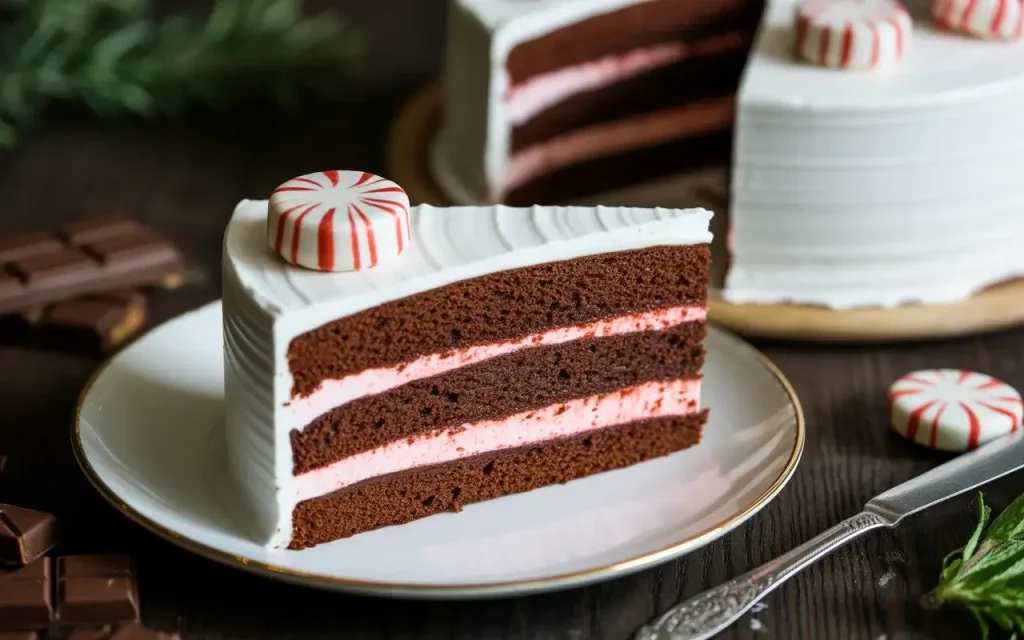
This chocolate peppermint dream cake checks all the boxes for a showstopping dessert. The cake layers stay incredibly moist thanks to a secret ingredient, while the peppermint buttercream is silky smooth and not too sweet.
The flavor balance is spot on. You get deep chocolate notes without any bitterness, and the peppermint is present but not overpowering. It’s refreshing without tasting like toothpaste, which can sometimes happen with peppermint desserts.
Plus, this cake actually tastes better the next day. The flavors meld together beautifully, and the texture becomes even more tender. Make it ahead for stress-free entertaining.
Key Ingredients
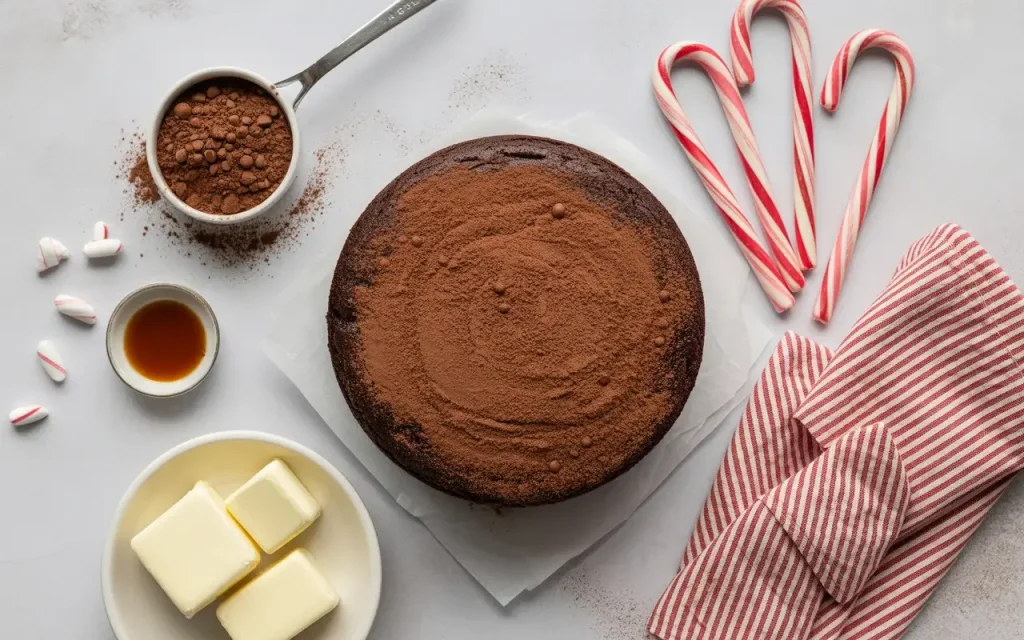
The chocolate cake base uses Dutch-process cocoa powder for the deepest flavor. Regular cocoa works too, but Dutch-process gives you that gorgeous dark color and rich taste. Buttermilk keeps everything tender and adds a subtle tang.
For the peppermint frosting, you’ll need quality peppermint extract, not imitation. Real extract makes a noticeable difference in flavor. Start with less than you think you need because peppermint can quickly become too intense.
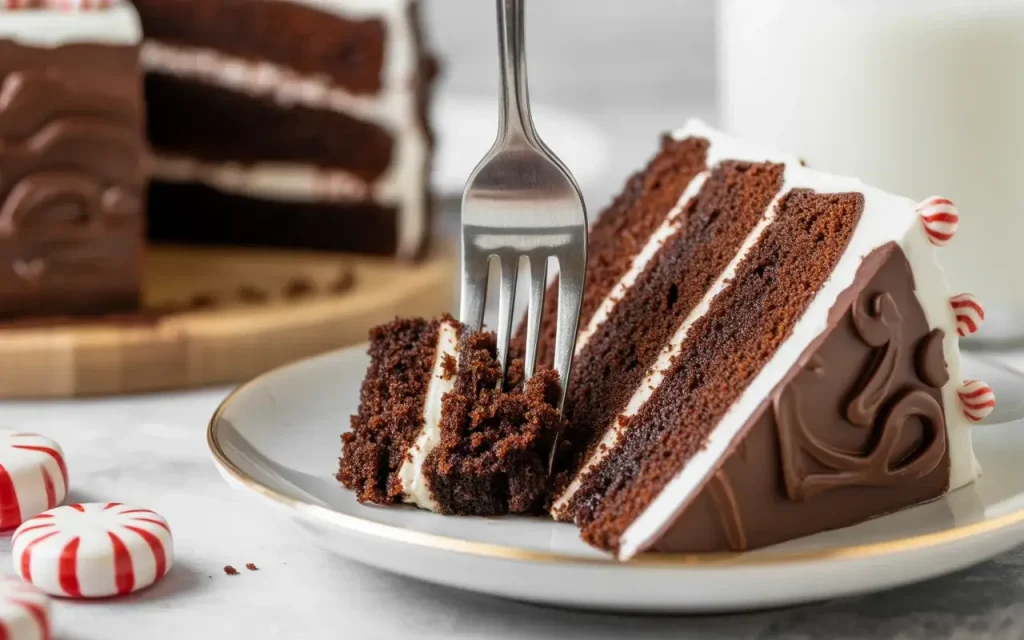
The finishing touches matter here. Crushed candy canes or peppermint candies add crunch and visual appeal. A drizzle of melted chocolate takes it over the top if you want extra decadence.
Read More: Purple Velvet Cake Recipe: A Stunning Twist on a Classic
How to Make It
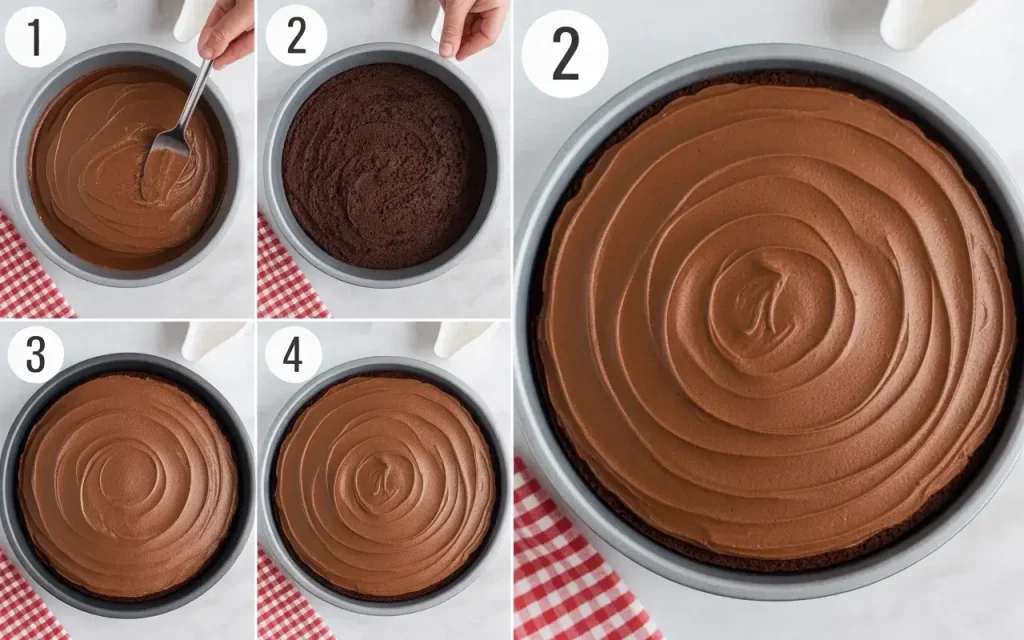
Start by preparing your cake pans properly. Grease them well, line with parchment, then grease again. This double insurance means your cakes will release perfectly every time, which is crucial for layer cakes.
Mix your dry ingredients separately from wet ingredients, then combine gently. Overmixing develops gluten and leads to tough cake, so stir just until no flour streaks remain. The batter will be thin, but that’s exactly what you want.
Bake until a toothpick comes out with just a few moist crumbs. Overbaking is the enemy of moist cake. Let the layers cool completely in the pans before turning them out, then chill them briefly before frosting for easier assembly.
Chocolate Peppermint Dream Cake
Course: DessertCuisine: AmericanDifficulty: Intermediate12
25
minutes1
35
minutes2
hoursA decadent chocolate layer cake with peppermint buttercream frosting and crushed candy cane topping. Moist, flavorful, and perfect for the holidays.
Ingredients
- For the Chocolate Cake
2 cups all-purpose flour
2 cups granulated sugar
¾ cup Dutch-process cocoa powder
2 teaspoons baking soda
1 teaspoon baking powder
1 teaspoon salt
2 large eggs, room temperature
1 cup buttermilk, room temperature
1 cup hot coffee (or hot water)
½ cup vegetable oil
2 teaspoons vanilla extract
- For the Peppermint Buttercream
1½ cups unsalted butter, softened
5 cups powdered sugar
¼ cup heavy cream
1 to 1½ teaspoons peppermint extract
Pinch of salt
Red or pink food coloring (optional)
- For Topping
½ cup crushed candy canes or peppermint candies
Fresh mint leaves (optional)
Directions
- Preheat oven
- Preheat your oven to 350°F. Grease two 9-inch round cake pans, line with parchment paper, and grease again.
- Mix dry ingredients
- Whisk together flour, sugar, cocoa powder, baking soda, baking powder, and salt in a large bowl until well combined.
- Mix wet ingredients
- In a separate bowl, whisk eggs, buttermilk, oil, and vanilla until smooth and well blended.
- Make the batter
- Pour wet ingredients into dry ingredients and stir until just combined. Slowly add hot coffee and mix until smooth. The batter will be very thin.
- Bake
- Divide batter evenly between prepared pans. Bake for 30–35 minutes until a toothpick inserted in the center comes out with a few moist crumbs.
- Cool
- Cool cakes in pans for 15 minutes, then turn out onto wire racks. Cool completely before frosting.
- Make the buttercream
- Beat softened butter on medium speed for 3 minutes until creamy and pale.
- Add powdered sugar one cup at a time, beating well after each addition. Add cream, peppermint extract, and salt. Beat on high for 3 minutes until light and fluffy.
- Adjust peppermint extract to taste. Add food coloring if desired and mix until evenly distributed.
- Assemble
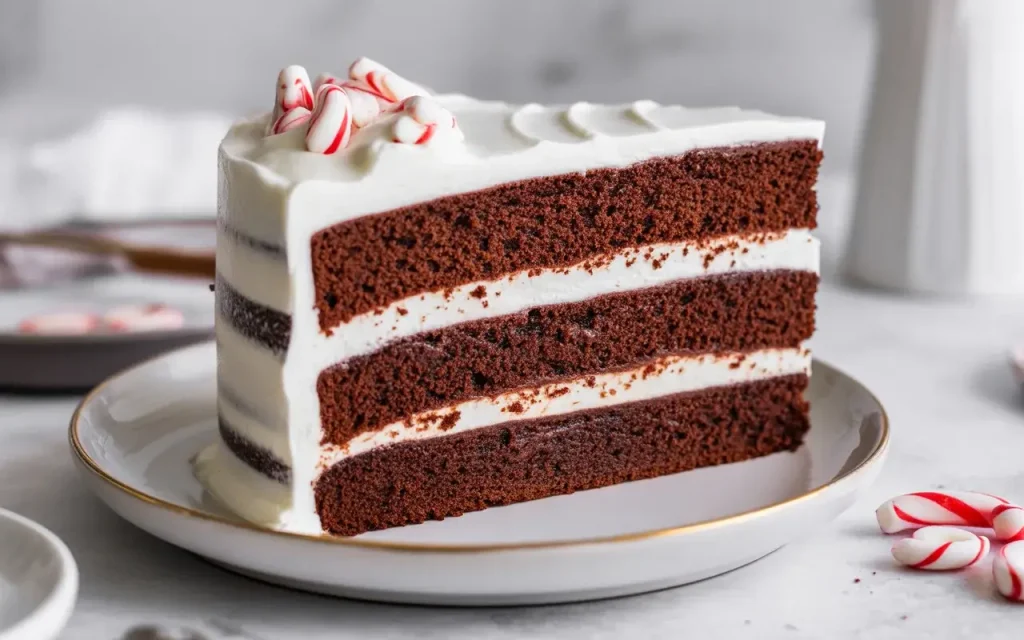
- Level cake layers if needed. Place one layer on your serving plate and spread with about 1 cup of frosting.
- Top with second layer and apply a thin crumb coat over the entire cake. Refrigerate for 20 minutes.
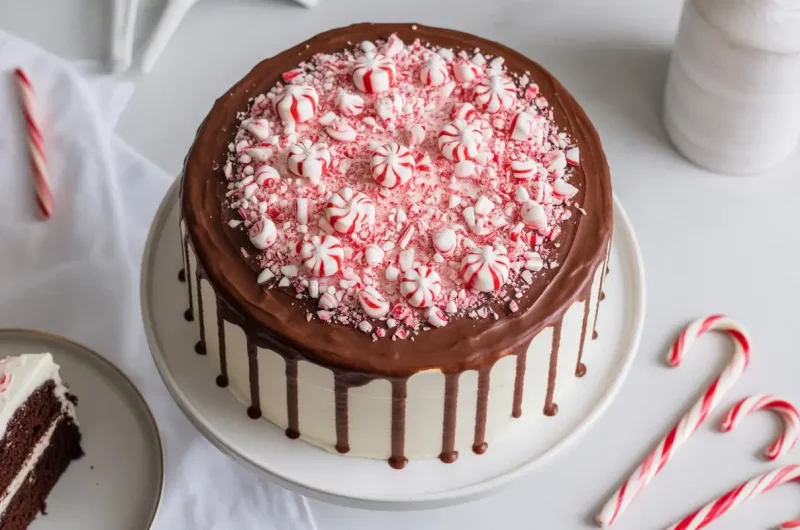
- Apply remaining frosting in a smooth, even layer. Decorate with crushed candy canes and mint leaves if using.
Notes
- Substitutions: You can use sour cream instead of buttermilk. For the coffee, strong brewed coffee enhances chocolate flavor, but hot water works fine too.
Peppermint Intensity: Start with 1 teaspoon of extract and taste the frosting. Add more gradually as peppermint can quickly become overpowering.
Make It Ahead: Bake cake layers up to two days in advance and store wrapped at room temperature. Frost the day of serving for best results.
Frosting Tip: If your frosting is too thick, add cream one tablespoon at a time. If too thin, add more powdered sugar.
Nutrition Information (Per Serving)
| Nutrient | Amount |
|---|---|
| Calories | 685 |
| Total Fat | 32g |
| Sugars | 78g |
| Protein | 5g |
Assembly Tips
Level your cake layers with a serrated knife or cake leveler for professional results. Those domed tops need to go so your layers stack evenly. Save the scraps for snacking or turn them into cake pops.
Apply a thin crumb coat first, then chill the cake for 20 minutes. This seals in any loose crumbs so your final frosting layer goes on smooth and clean. Don’t skip this step if you want that bakery-perfect look.
Use an offset spatula for the smoothest frosting application. Work from the center outward on the top, and use long strokes around the sides. Dip your spatula in hot water and wipe it clean between strokes for an ultra-smooth finish.
Decoration Ideas
Crushed candy canes are the classic choice and they’re perfect here. Pulse them in a food processor for fine pieces, or place them in a zip-top bag and smash with a rolling pin for a chunkier texture.
Fresh mint leaves add a pop of color and hint at the flavor inside. Arrange them artfully on top with some candy cane pieces for an elegant, natural look that photographs beautifully.
For extra drama, create a chocolate drip effect around the edges. Melt chocolate with a bit of cream, let it cool slightly, then drizzle it around the top edge so it runs down the sides naturally.
Storage and Make-Ahead
This cake keeps beautifully at room temperature for up to two days if covered loosely. The frosting forms a protective layer that locks in moisture. Just keep it away from direct sunlight and heat sources.
For longer storage, refrigerate for up to five days. Bring it to room temperature 30 minutes before serving for the best texture and flavor. Cold cake is dense; room temperature cake is tender and fluffy.
You can freeze unfrosted cake layers for up to three months. Wrap them tightly in plastic wrap, then foil. Thaw in the refrigerator overnight, then bring to room temperature before frosting and serving.
Frequently Asked Questions
Can I make this as cupcakes instead of a layer cake?
Absolutely! This batter makes about 24 cupcakes. Fill cupcake liners two-thirds full and bake at 350°F for 18 to 22 minutes. They’re perfect for parties and portion control, plus they’re easier to frost than a full layer cake.
How do I prevent the peppermint flavor from being too strong?
Always start with less extract than you think you need, around ¾ teaspoon, then taste and add more gradually. Peppermint extract is very concentrated, and it’s much easier to add more than to fix frosting that’s too minty. Let the frosting sit for a few minutes after mixing so the flavor can develop fully before deciding if you need more.
What’s the best way to get smooth frosting on the sides?
The key is a good crumb coat followed by chilling, then warming your offset spatula under hot water between strokes. Hold the spatula at a slight angle and use long, continuous motions around the cake while slowly rotating your cake stand. A turntable makes this much easier, but you can also rotate a regular plate carefully as you go.