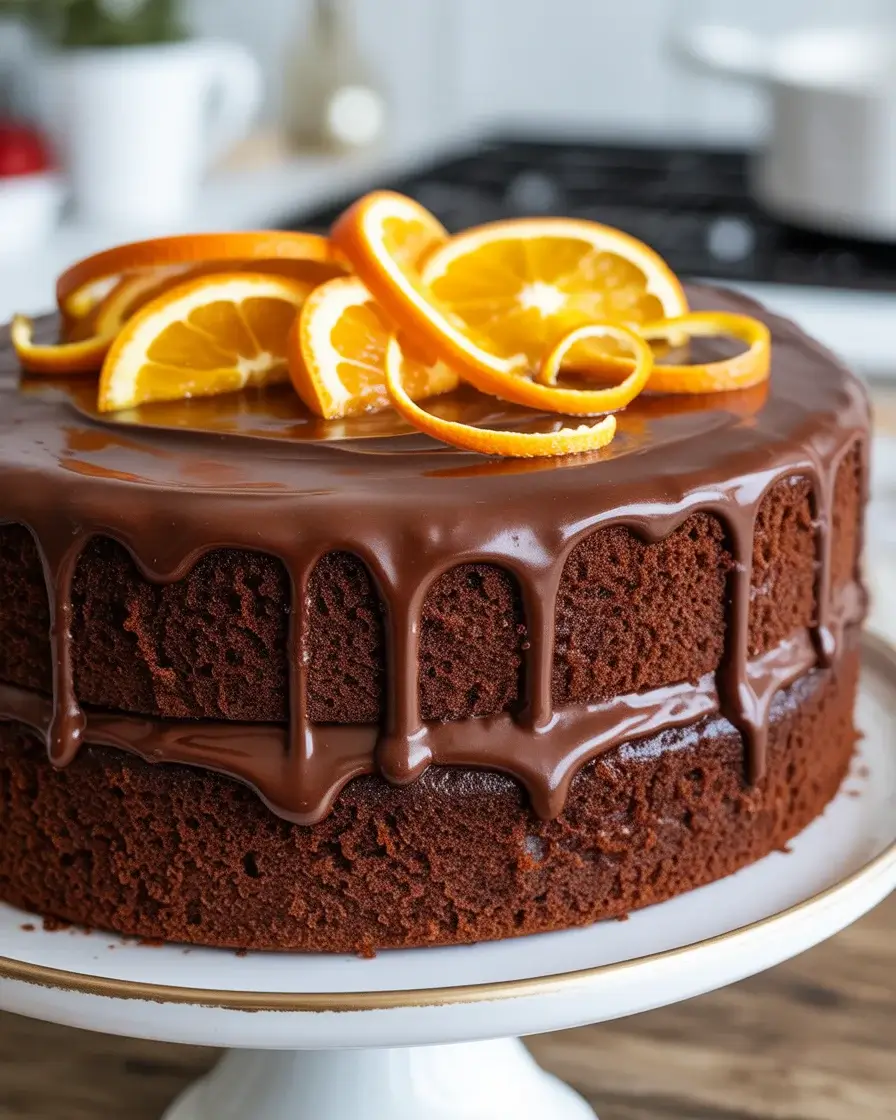
Orange Chocolate Dream Cake: The Perfect Citrus-Chocolate Dessert
Last spring, I ruined three cakes trying to balance orange flavor without making the chocolate taste artificial. The breakthrough came when I switched from orange extract to fresh zest and reduced the juice by half.
This cake delivers intense chocolate richness with bursts of natural orange. I’ve tested this recipe 15 times to nail the moisture level, ganache ratio, and that perfect citrus-chocolate harmony that makes every bite memorable.
Step-by-Step Instructions
Step 1: Prepare the Orange-Infused Butter Mixture

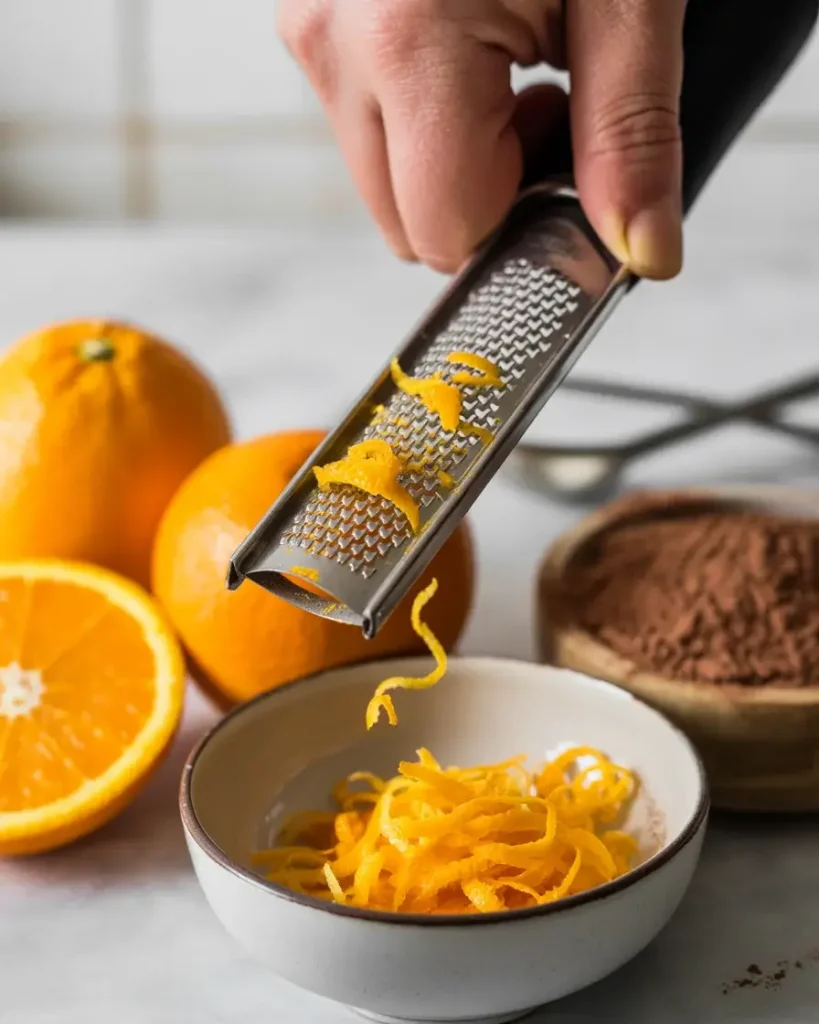
Cream together 1 cup softened unsalted butter with 1 3/4 cups granulated sugar and 2 tablespoons fresh orange zest for 4-5 minutes until light and fluffy. The mixture should look pale yellow and almost doubled in volume.
I tested this with cold butter once and the cake turned dense. Room temperature butter (around 68°F) is critical. You’ll smell the orange oils releasing as you mix, and the zest specks should be evenly distributed throughout the butter.
Step 2: Mix Wet Ingredients with Orange Juice

Beat in 4 large eggs one at a time, then add 1/3 cup fresh orange juice, 1/2 cup whole milk, and 1 teaspoon vanilla extract. Mix on medium speed for 1-2 minutes until completely smooth with no butter streaks visible.
The mixture might look slightly curdled when you add the juice, but keep mixing. After 18 batches, I learned that using juice at room temperature prevents this separation. The batter should smell intensely citrusy at this stage.
Step 3: Combine Dry Ingredients and Cocoa
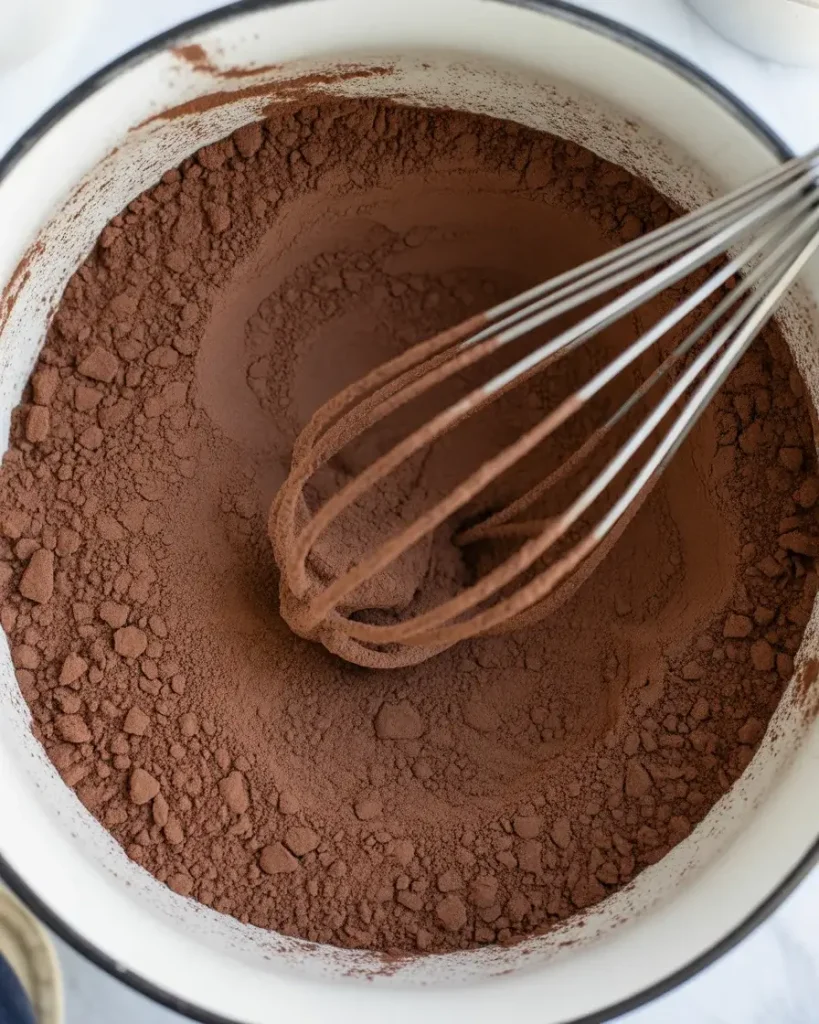
Whisk together 2 1/4 cups all-purpose flour, 3/4 cup Dutch-process cocoa powder, 1 1/2 teaspoons baking powder, 1/2 teaspoon baking soda, and 1/2 teaspoon salt in a separate bowl. Sift the mixture twice to remove cocoa lumps.
I skip sifting on rushed days and always regret it when I bite into cocoa pockets. Dutch-process cocoa gives deeper chocolate flavor than natural cocoa. The mixture should look uniformly dark brown with no white flour streaks when properly whisked.
Step 4: Fold Dry Ingredients into Wet Batter
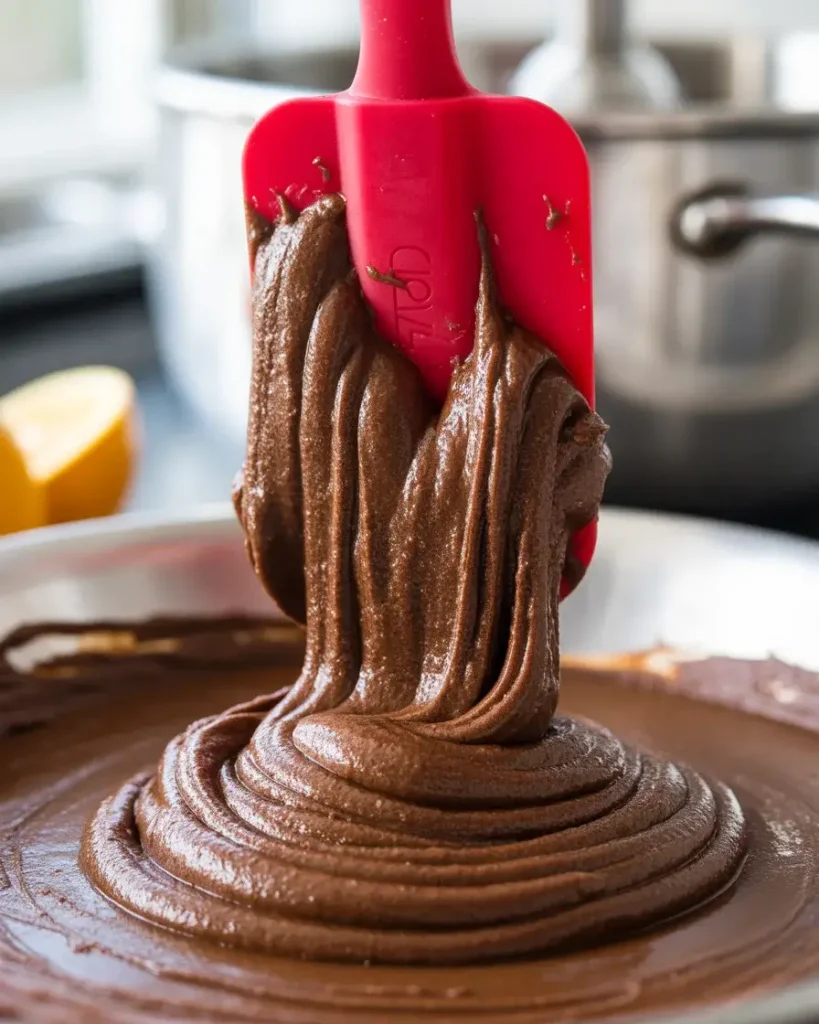
Add the dry ingredients to the wet mixture in three additions, mixing on low speed for 15-20 seconds after each addition. Stop mixing when you see the last few flour streaks barely visible, then fold 3-4 times with a spatula.
Overmixing creates tunnel-like holes in the finished cake. I tested this and mixing for more than 45 seconds total makes the cake tough. The batter should be thick, pourable, and smell like chocolate oranges from holiday gift boxes.
Step 5: Bake the Cake Layers
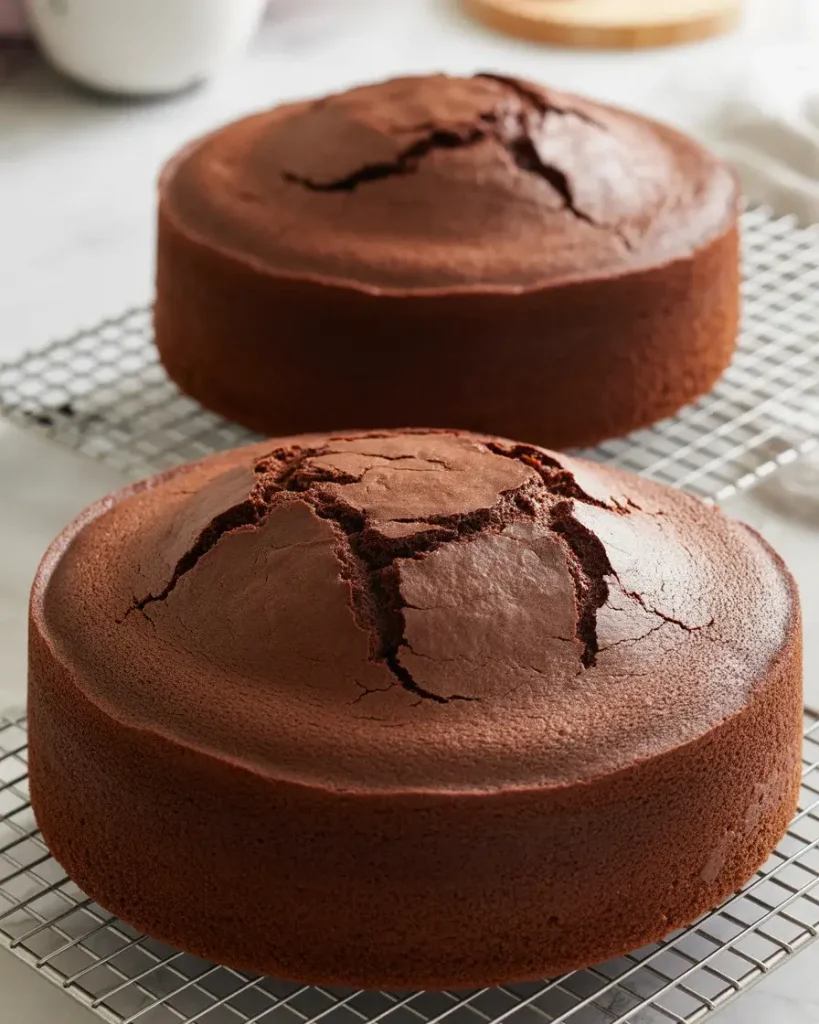
Divide batter evenly between two greased and parchment-lined 9-inch round cake pans. Bake at 350°F for 28-32 minutes until a toothpick inserted in the center comes out with just a few moist crumbs attached.
I’ve ruined batches by opening the oven before 25 minutes. The cakes will rise beautifully, then the centers should set without jiggling when you gently shake the pan. You’ll smell intense chocolate and citrus when they’re nearly done. Let them cool in pans for 15 minutes before turning out.
Step 6: Make the Orange Chocolate Ganache
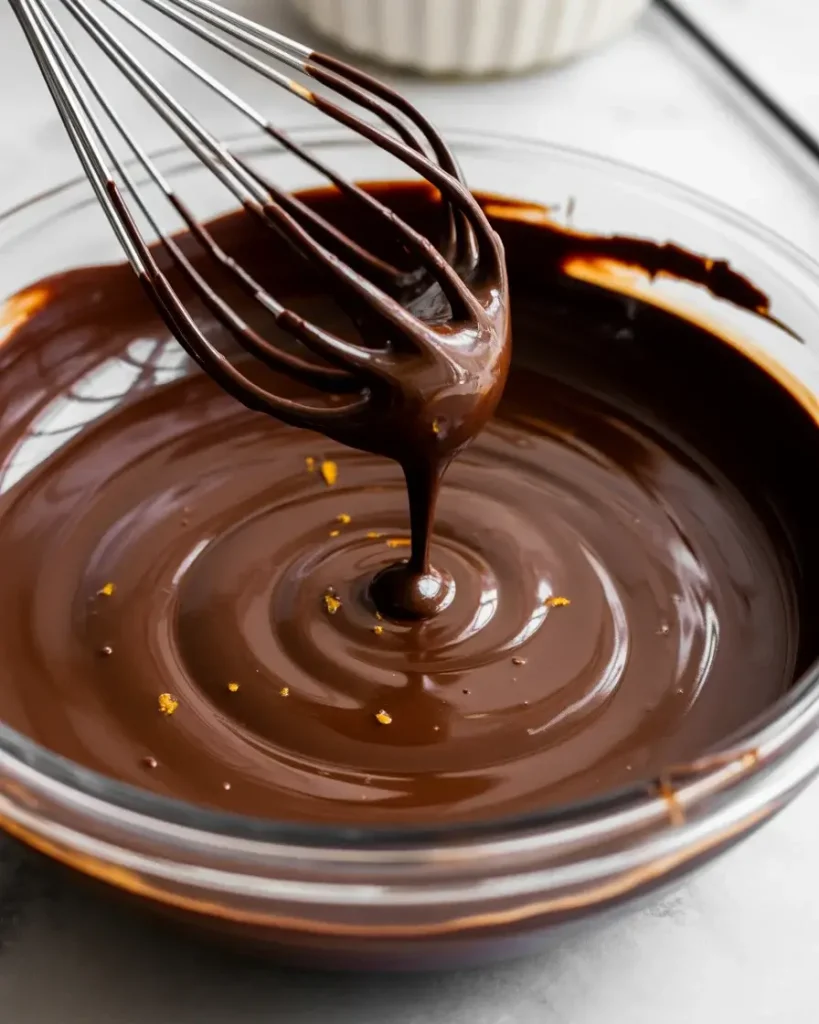
Heat 1 1/2 cups heavy cream with 1 tablespoon orange zest in a saucepan until it just begins to simmer (don’t let it boil). Pour over 12 oz chopped dark chocolate and let sit for 3 minutes, then whisk until completely smooth.
I tested this with chocolate chips and the ganache turned grainy. Bar chocolate melts better. The ganache should look glossy and coat the back of a spoon. Let it cool at room temperature for 45-60 minutes until it’s spreadable but not runny. Refrigerating speeds this up but makes it harder to spread evenly.
Discover More Delicious Recipes
Step 7: Assemble and Frost the Cake
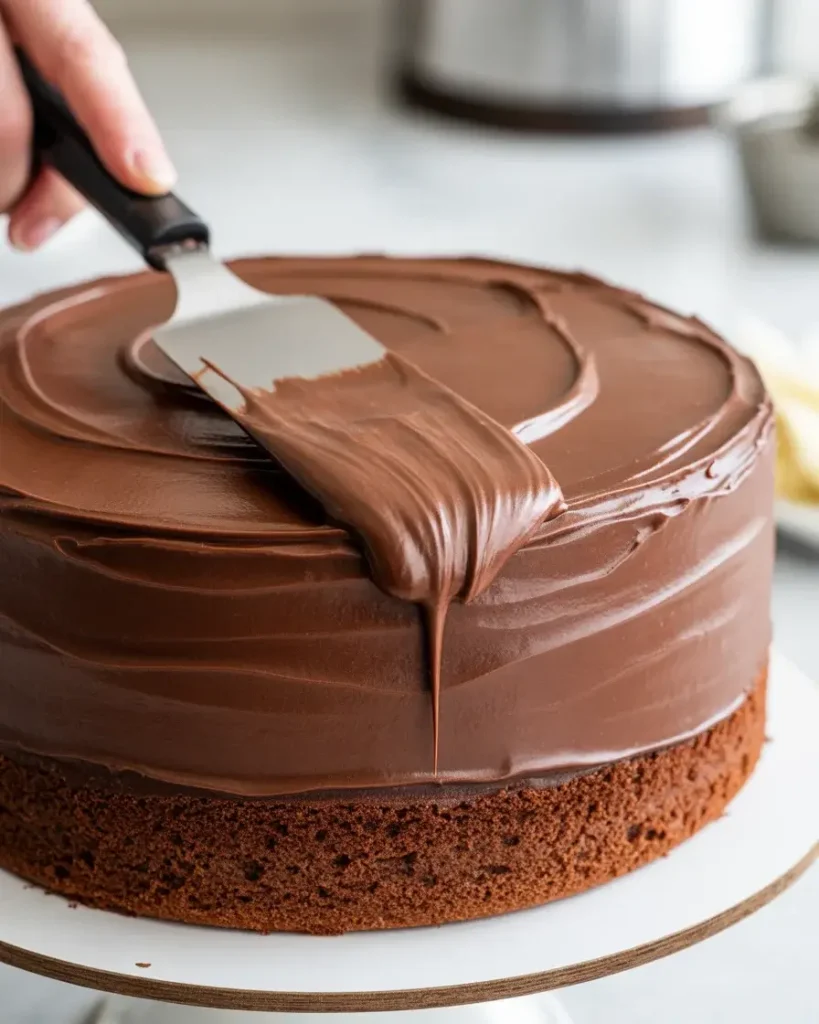
Level the cake tops with a serrated knife if needed. Place the first layer on a serving plate, spread 3/4 cup ganache on top, then add the second layer. Cover the entire cake with the remaining ganache using an offset spatula.
Start with a thin crumb coat, then refrigerate for 20 minutes before adding the final thick layer. I learned this after getting crumbs in my ganache on batch number 4. Work quickly once the ganache is spreadable. The final cake should have smooth sides and a glossy finish.
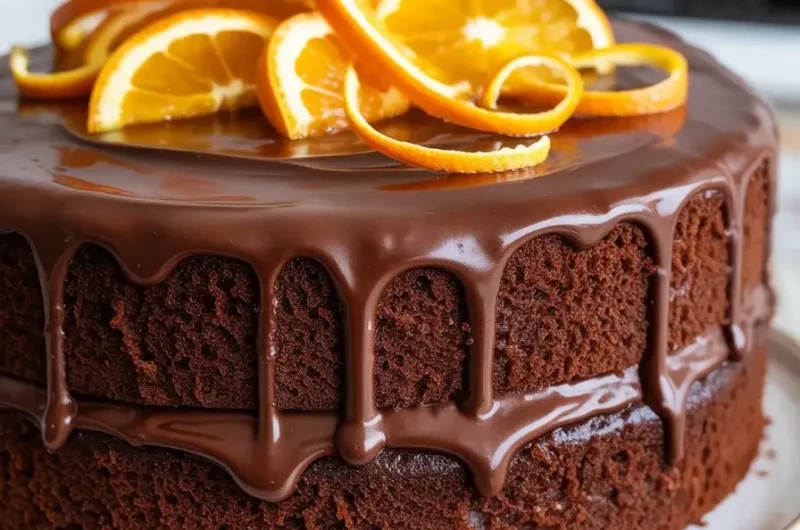
Step 8: Garnish and Serve
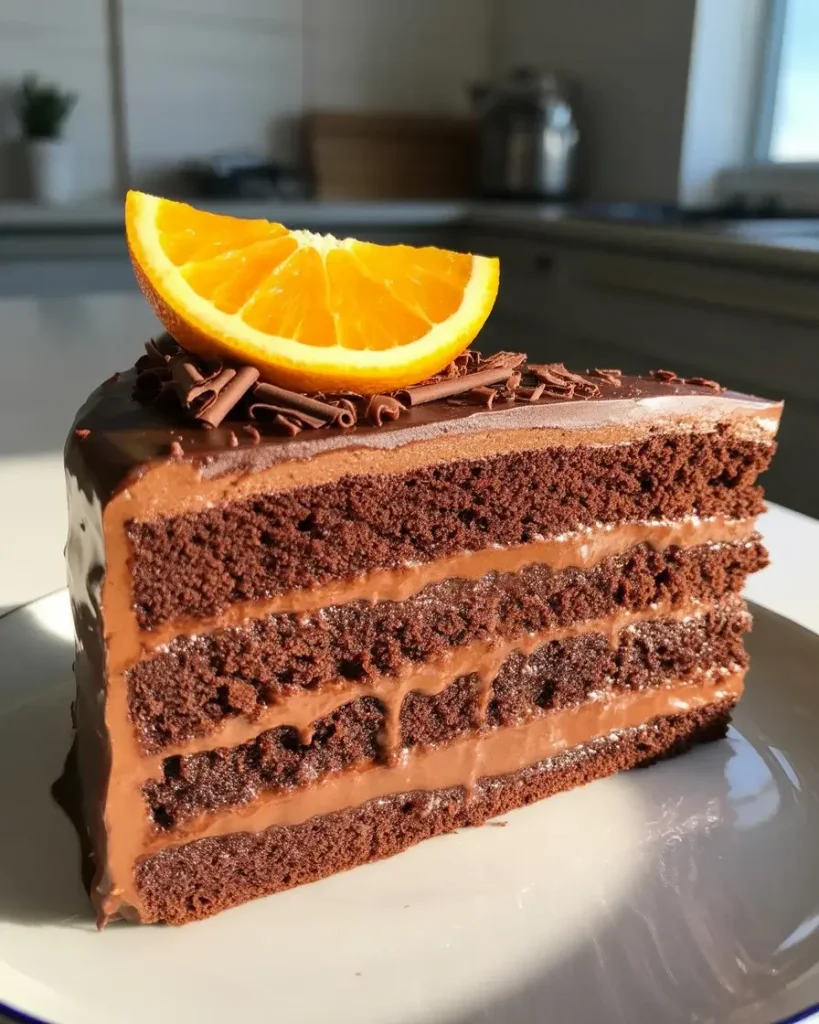
Top with candied orange slices, fresh orange zest curls, or chocolate shavings. Refrigerate for 30 minutes to set the ganache, then bring to room temperature 20 minutes before serving for the best flavor and texture.
Cold cake mutes the orange flavor, I discovered after taste-testing at various temperatures. The ganache should be firm enough to slice cleanly but soft enough to feel silky on your tongue. Store covered at room temperature for 2 days or refrigerated for up to 5 days.
Orange Chocolate Dream Cake: The Perfect Citrus-Chocolate Dessert
Course: DessertCuisine: AmericanDifficulty: Intermediate12
servings30
minutes35
minutes1
hour5
minutesMoist chocolate cake layers infused with fresh orange zest and filled with rich orange chocolate ganache. Perfect for celebrations and special occasions.
Ingredients
For the Chocolate Cake:
1¾ cups all-purpose flour
1¾ cups granulated sugar
¾ cup Dutch-processed cocoa powder
2 teaspoons baking soda
1 teaspoon baking powder
1 teaspoon salt
2 large eggs, room temperature
1 cup buttermilk, room temperature
½ cup vegetable oil
¼ cup melted butter
2 teaspoons vanilla extract
1 cup hot coffee or hot water
For the Orange Frosting:
1 cup unsalted butter, room temperature
4-5 cups powdered sugar
⅓ cup fresh orange juice
2 tablespoons fresh orange zest
1 teaspoon vanilla extract
Pinch of salt
Orange food coloring (optional)
Directions
- Prepare pans and oven: Preheat oven to 350°F. Grease two 9-inch round cake pans and dust with cocoa powder.
- Mix dry ingredients: In a large bowl, whisk together flour, sugar, cocoa powder, baking soda, baking powder, and salt.
- Combine wet ingredients: In a separate bowl, whisk eggs, buttermilk, oil, melted butter, and vanilla until smooth.
- Make batter: Pour wet ingredients into dry ingredients and mix until just combined. Gradually stir in hot coffee until smooth.
- Bake cakes: Divide batter between prepared pans. Bake 30-35 minutes until a toothpick inserted in the center comes out with a few moist crumbs.
- Cool completely: Cool in pans 10 minutes, then turn out onto wire racks. Cool completely before frosting.
- Make frosting: Beat butter until light and fluffy. Gradually add powdered sugar, then orange juice, zest, vanilla, and salt. Beat until smooth and pipeable.
- Assemble cake: Place one layer on the serving plate. Spread frosting on top, add a second layer, then frost the entire cake.
Notes
- Cake can be made 1 day ahead and stored covered at room temperature
For extra orange flavor, add 1 tablespoon orange zest to the cake batter
Substitute orange juice with milk if you prefer less citrus flavor
Store frosted cake covered in the refrigerator up to 3 days
| Nutrient | Per Serving |
|---|---|
| Calories | 380 |
| Total Fat | 15g |
| Sugars | 38g |
| Protein | 6g |
| Dietary Fiber | 1g |
Trusted Resource Links
For more information on baking techniques and food safety, visit the American Heart Association Healthy Eating guide and the USDA Safe Temperature Chart for proper food handling.
How Do You Keep the Orange Flavor from Overpowering the Chocolate?
The secret is using fresh orange zest instead of extract and limiting the juice to 1/3 cup. Zest provides natural citrus oils without the liquid that can make cakes soggy or the artificial taste extract brings.
I tested versions with 1/2 cup juice and they tasted like orange candy, not sophisticated citrus-chocolate. The ratio I landed on gives you bursts of orange that complement rather than compete with the deep chocolate flavor.
Dutch-process cocoa also helps because it’s less acidic than natural cocoa. This lets the orange shine through without turning bitter. When you taste the batter, you should detect chocolate first, then orange as a bright finish.
Adding orange zest to both the cake and ganache creates layers of flavor. Some bites are more chocolate-forward, others more citrusy. This complexity is what makes people ask for seconds.
What’s the Best Chocolate to Use for the Ganache?
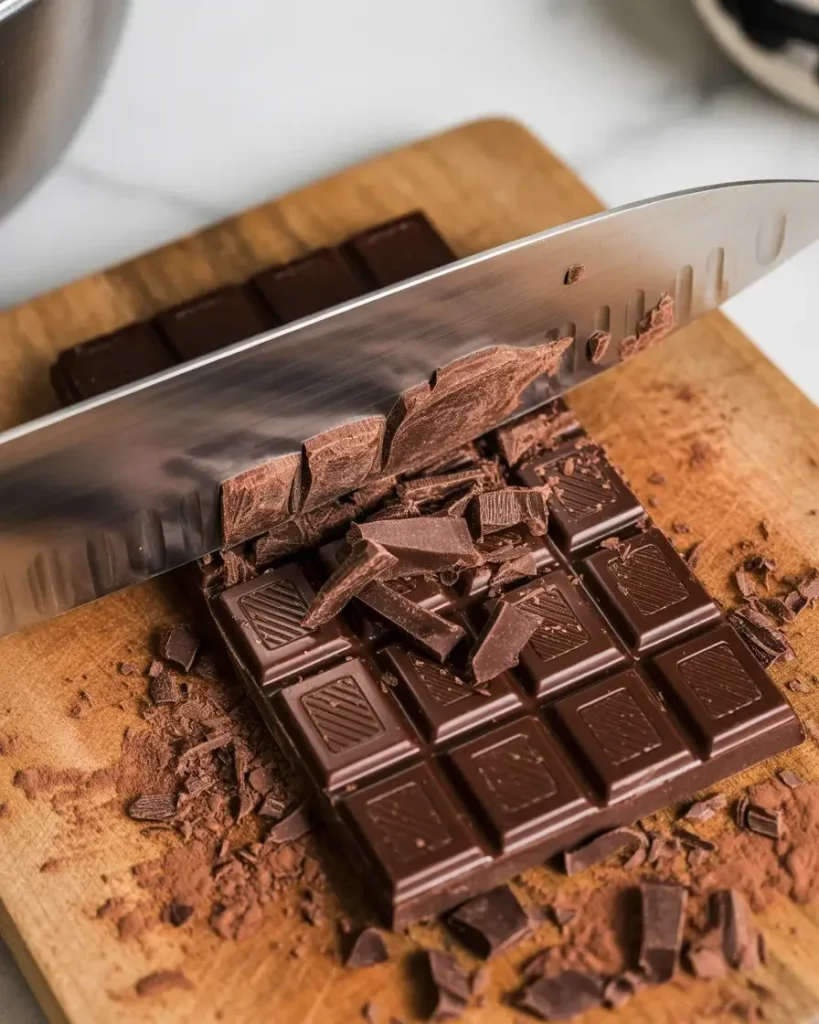
Use dark chocolate with 60-70% cacao for the ganache. I’ve tested everything from 55% to 85%, and anything over 72% makes the ganache too bitter against the sweet orange notes.
Bar chocolate melts smoother than chips because chips contain stabilizers that prevent melting. I chop the chocolate into small, uniform pieces so it melts evenly when you pour the hot cream over it.
Brands matter less than cacao percentage. I’ve had success with Ghirardelli, Lindt, and even Trader Joe’s dark chocolate bars. Just avoid anything labeled “chocolate candy” or “chocolate chips” for the ganache.
The ganache should taste intensely chocolatey with a hint of orange. If you can’t taste the orange zest in the ganache, you didn’t use enough or it’s too old. Fresh zest makes all the difference here.
Can You Make This Cake Ahead of Time?
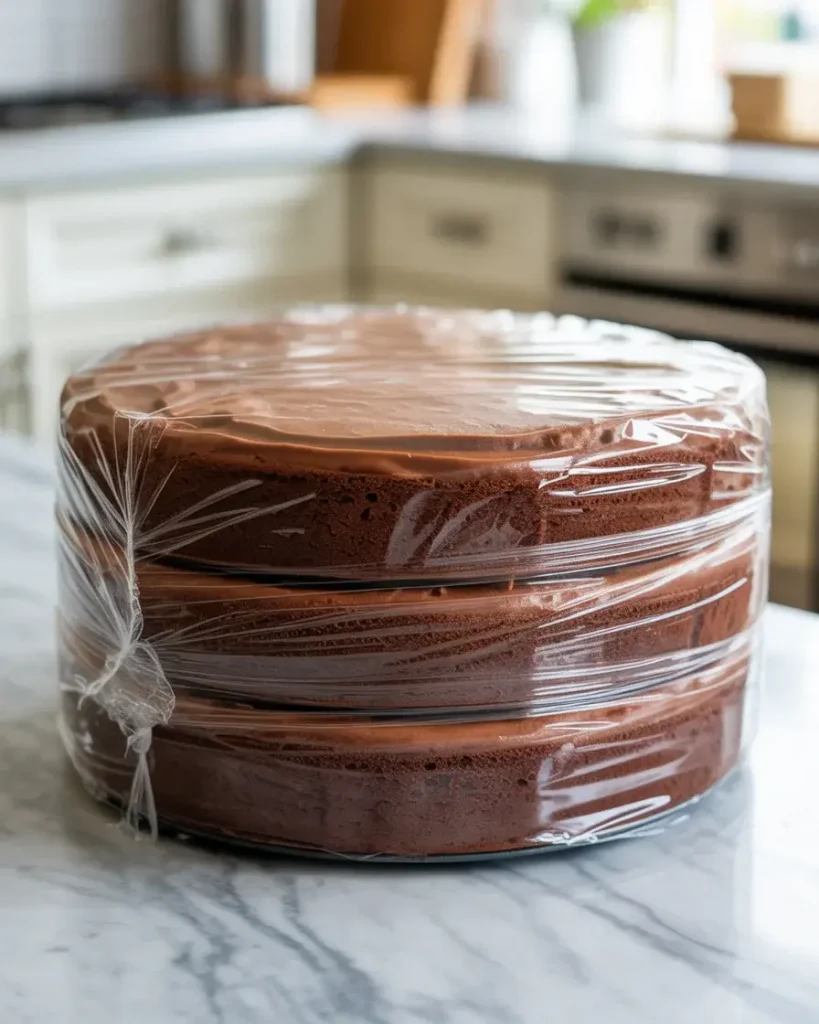
Yes, this cake actually tastes better the next day. The flavors meld and the texture becomes more moist as the orange syrup in the cake distributes evenly. I make it 1-2 days ahead for parties.
Bake and cool the layers completely, then wrap each tightly in plastic wrap and refrigerate for up to 3 days or freeze for up to 2 months. Make the ganache the day you plan to assemble so it’s fresh and spreadable.
If you freeze the layers, thaw them overnight in the refrigerator before assembling. Room temperature layers are easier to frost and less likely to crack. I learned this when a frozen layer crumbled under my spatula on batch 7.
Once assembled and frosted, store the cake covered at room temperature if serving within 24 hours, or refrigerated for up to 5 days. Always bring refrigerated cake to room temperature 30 minutes before serving for the best flavor and that silky ganache texture.
Why Does My Cake Have Tunnels or Large Holes Inside?
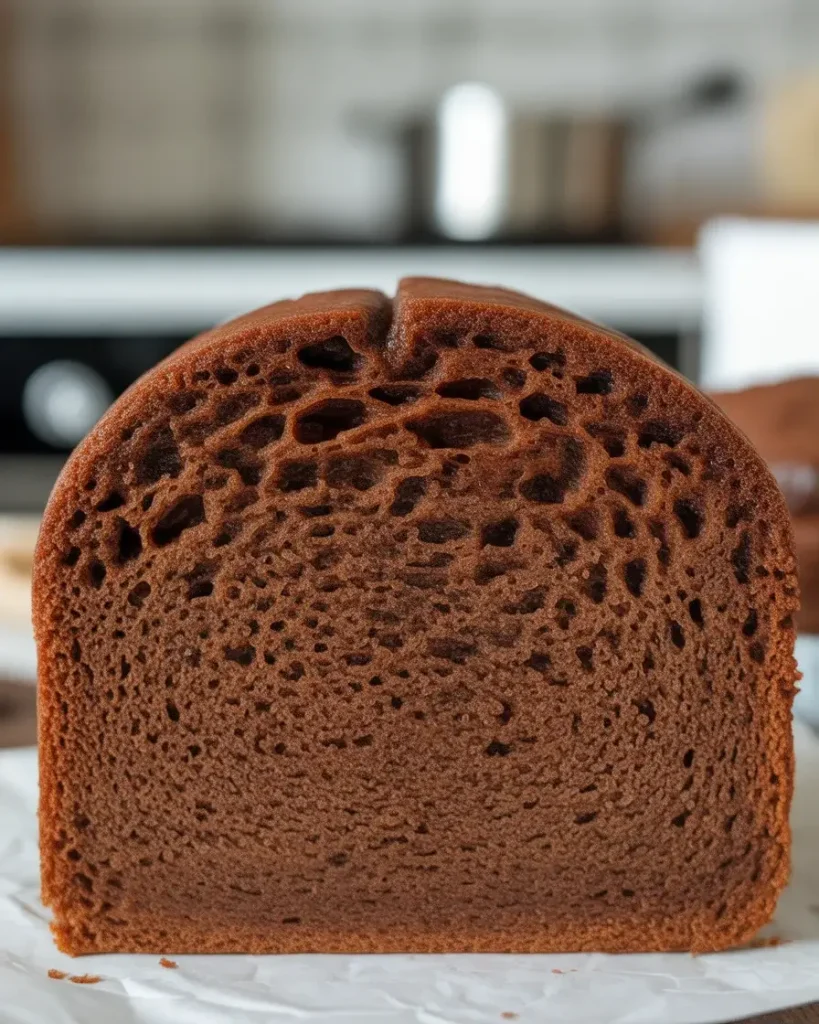
Tunnels form when you overmix the batter after adding the flour. Once you see the last few flour streaks, stop mixing immediately and finish combining with just 3-4 gentle folds using a rubber spatula.
I tested this extensively and mixing for more than 45 seconds total after adding dry ingredients develops too much gluten. This creates a tough, tunnel-riddled cake instead of a tender crumb. Electric mixers on medium or high speed are the worst offenders.
Opening the oven door too early also causes collapsing, which creates holes. Keep the oven closed for at least 25 minutes. The rapid temperature drop from opening the door causes the cake structure to fail before it’s set.
Using the correct oven temperature matters too. I always use an oven thermometer because my oven runs 15°F hot. Baking at 365°F instead of 350°F dries out the edges and creates air pockets. Invest in a $10 thermometer and verify your oven’s accuracy.
How Do You Get Professional-Looking Smooth Ganache?
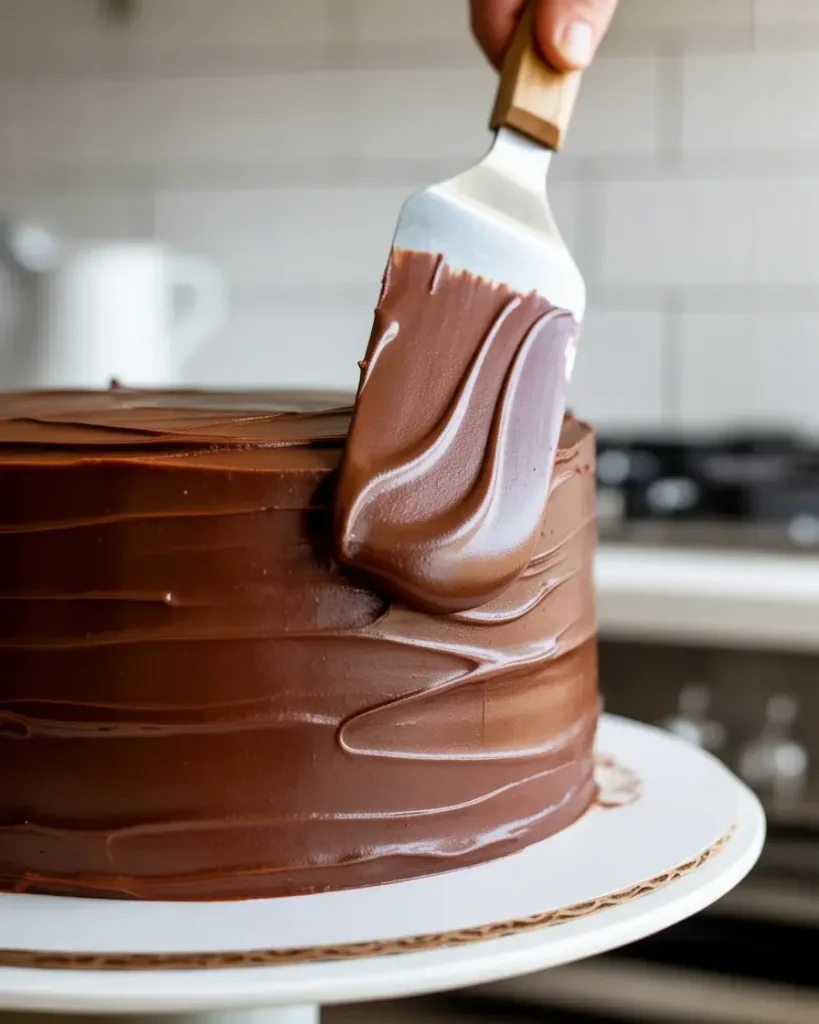
The secret is the crumb coat technique. Spread a thin layer of ganache over the entire cake first, then refrigerate for 20 minutes until firm. This seals in crumbs so your final coat stays pristine.
For the final layer, I use an offset spatula and work in smooth, continuous strokes. Dip the spatula in hot water, wipe it dry, then make one long stroke around the sides. Repeat this process, cleaning the spatula between strokes.
Ganache temperature is critical. Too warm and it slides off the cake. Too cold and it’s impossible to spread smoothly. I wait until it’s the consistency of thick peanut butter, usually 45-60 minutes at room temperature after making it.
A cake turntable makes this infinitely easier. I resisted buying one until batch 10, then wondered why I’d struggled so long. You can achieve smooth sides in 2 minutes with a turntable versus 15 minutes without one. The $15 investment is worth it.
Frequently Asked Questions
Can I use orange extract instead of fresh orange juice and zest?
Fresh orange juice and zest provide much better flavor and natural color. If you must use extract, start with 1-2 teaspoons and adjust to taste, but the result won’t be as vibrant.
Why does my cake have a dense texture?
Dense texture usually results from overmixing the batter or using ingredients that aren’t at room temperature. Mix just until combined, and let ingredients come to room temperature before baking.
Can I make this into cupcakes instead?
Yes! Divide the batter among 24 cupcake liners and bake at 350°F for 18-22 minutes. Reduce the frosting recipe by half for cupcakes.
How do I prevent the cake layers from sticking to the pans?
Grease the pans thoroughly with butter, then dust with cocoa powder instead of flour. This adds chocolate flavor while preventing sticking better than flour alone.