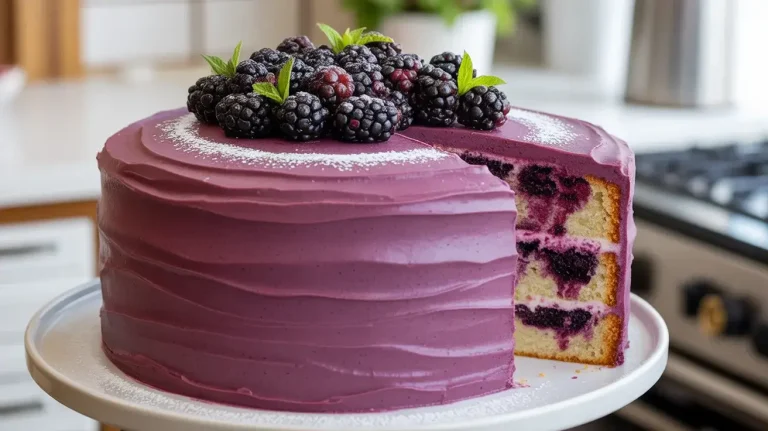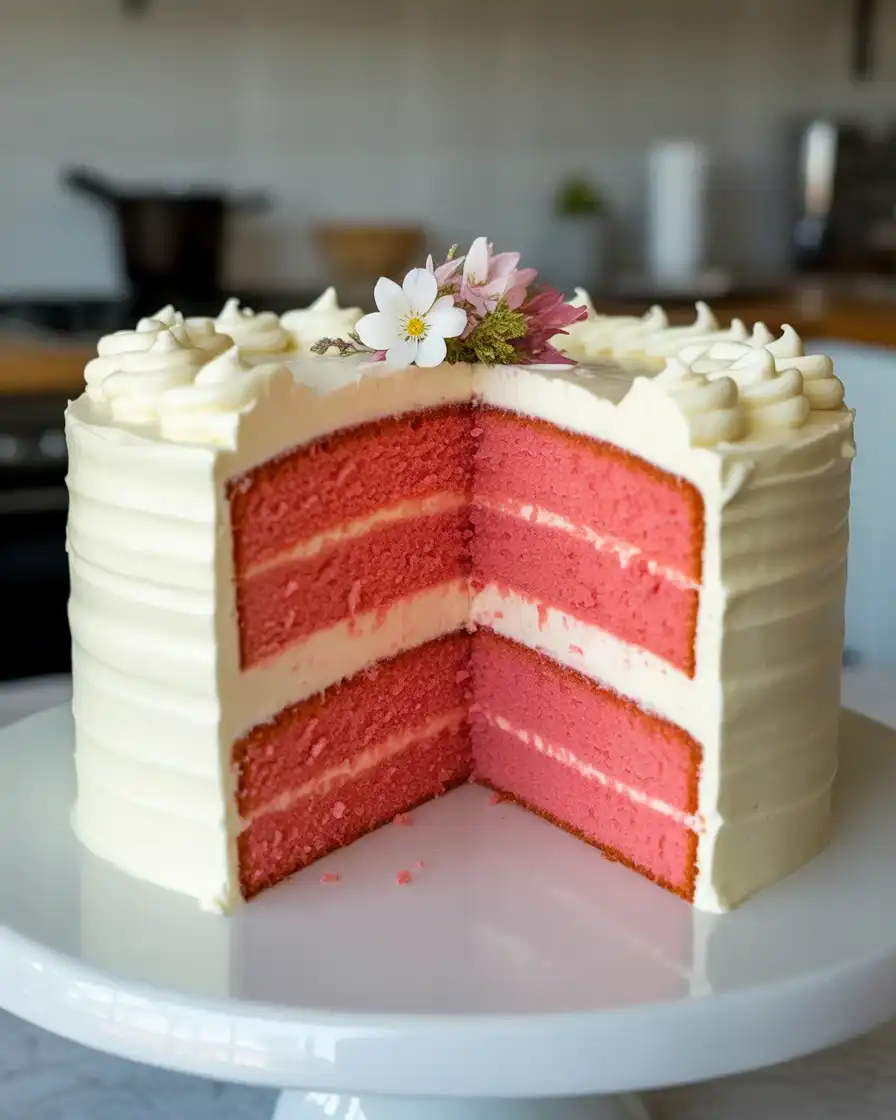
Pink Velvet Cake with Cream Cheese Frosting
I have been perfecting this pink velvet cake for over three years, and it’s become my go-to for birthdays and celebrations. The cake is incredibly moist with a subtle cocoa flavor that pairs beautifully with tangy cream cheese frosting.
My secret is using both buttermilk and oil to keep the crumb tender, plus a specific ratio of gel food coloring that gives you that vibrant pink without a bitter aftertaste. The result is a showstopping cake that tastes as good as it looks, perfect for serving 10-12 guests.
Step-by-Step Instructions
Step 1: Prepare Your Pans and Mix Dry Ingredients
Preheat your oven to 350°F and grease two 9-inch round cake pans with butter, then line the bottoms with parchment paper. I learned the hard way that skipping the parchment leads to stuck cakes after testing this 15+ times.
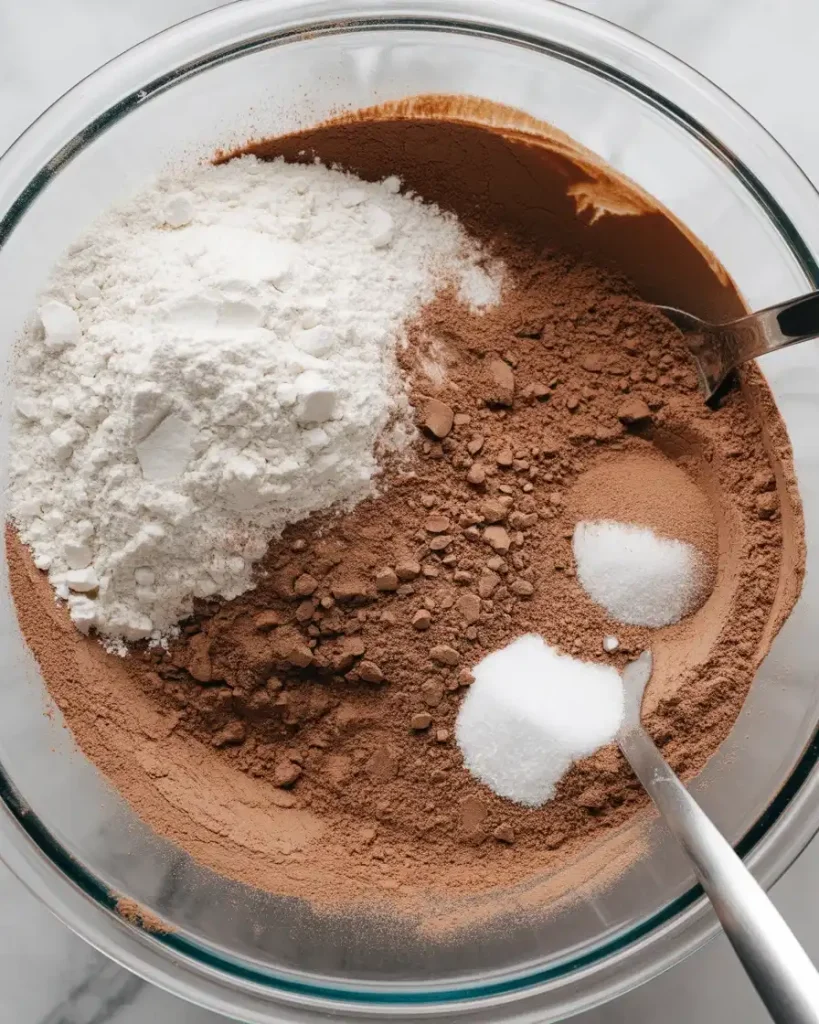
In a large bowl, whisk together 2½ cups all-purpose flour, 1½ cups granulated sugar, 3 tablespoons cocoa powder, 1 teaspoon baking soda, and 1 teaspoon salt. The cocoa should smell rich and earthy, not stale, as this affects your final flavor.
Step 2: Combine Wet Ingredients
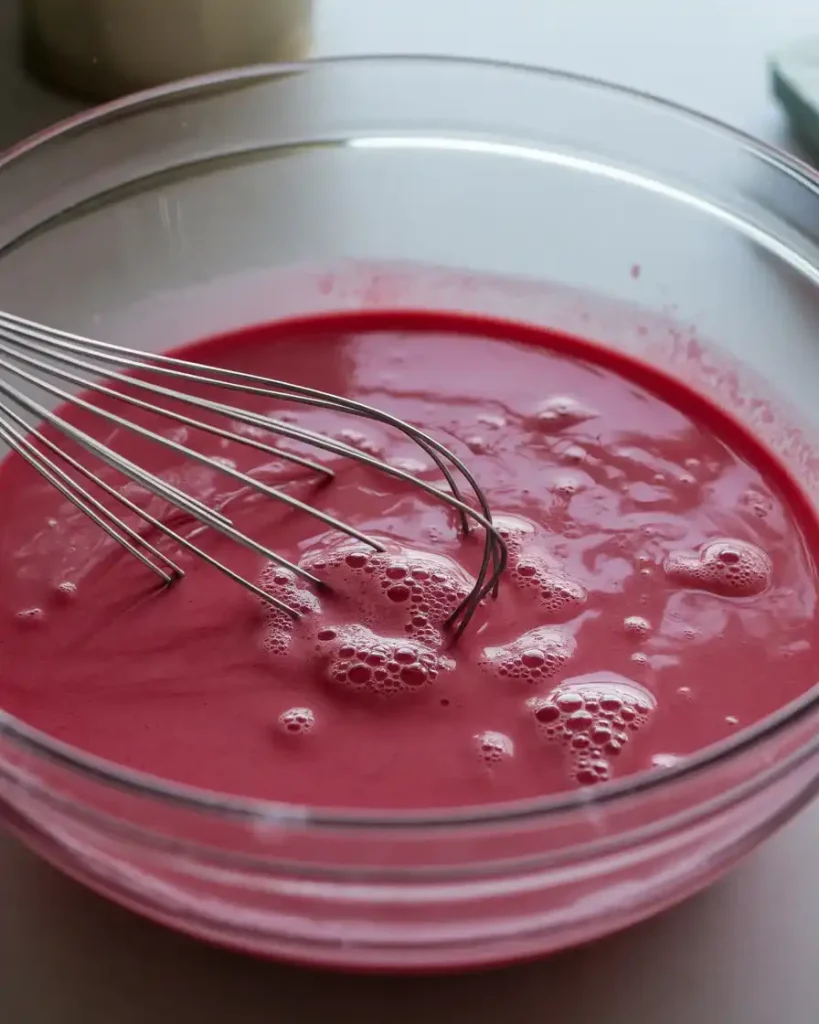
In a separate medium bowl, whisk together 1 cup buttermilk, ½ cup vegetable oil, 2 large eggs, 2 teaspoons vanilla extract, 1 teaspoon white vinegar, and 1-2 tablespoons pink gel food coloring. I use Americolor “Deep Pink” gel for the most vibrant results without affecting taste.
The mixture should look bright fuchsia and smell slightly tangy from the buttermilk and vinegar. These acids react with the baking soda to create the cake’s signature tender crumb, something I discovered after my first flat attempt.
Step 3: Mix the Batter
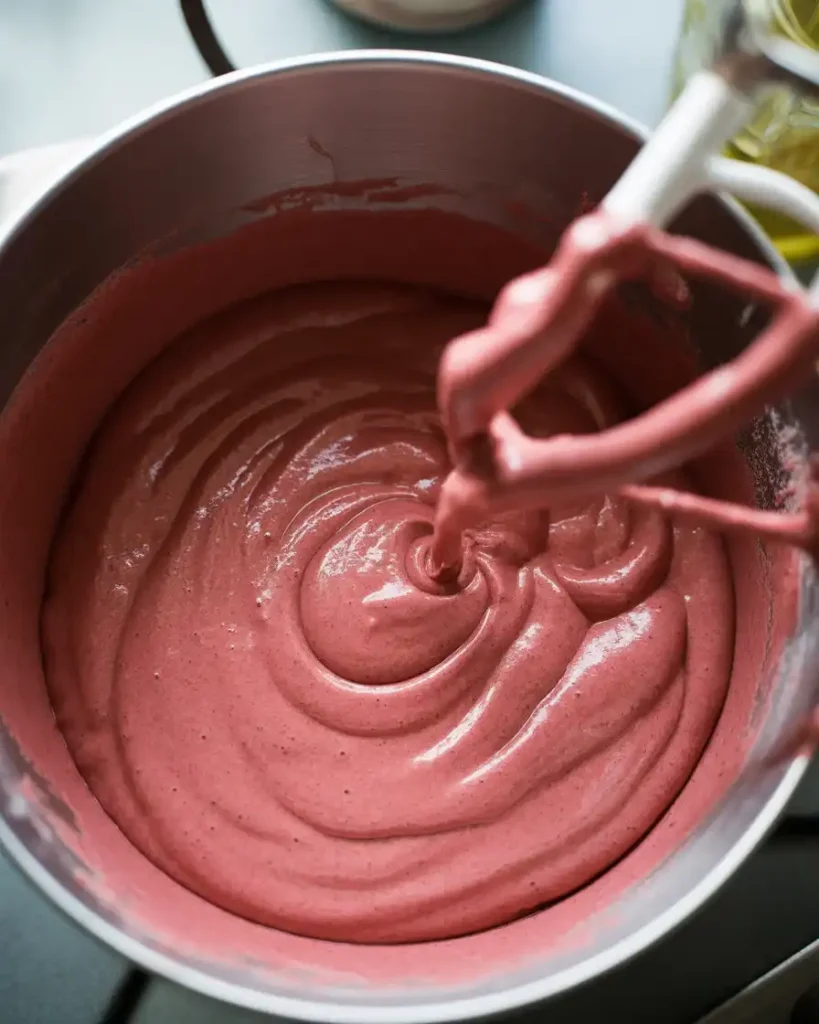
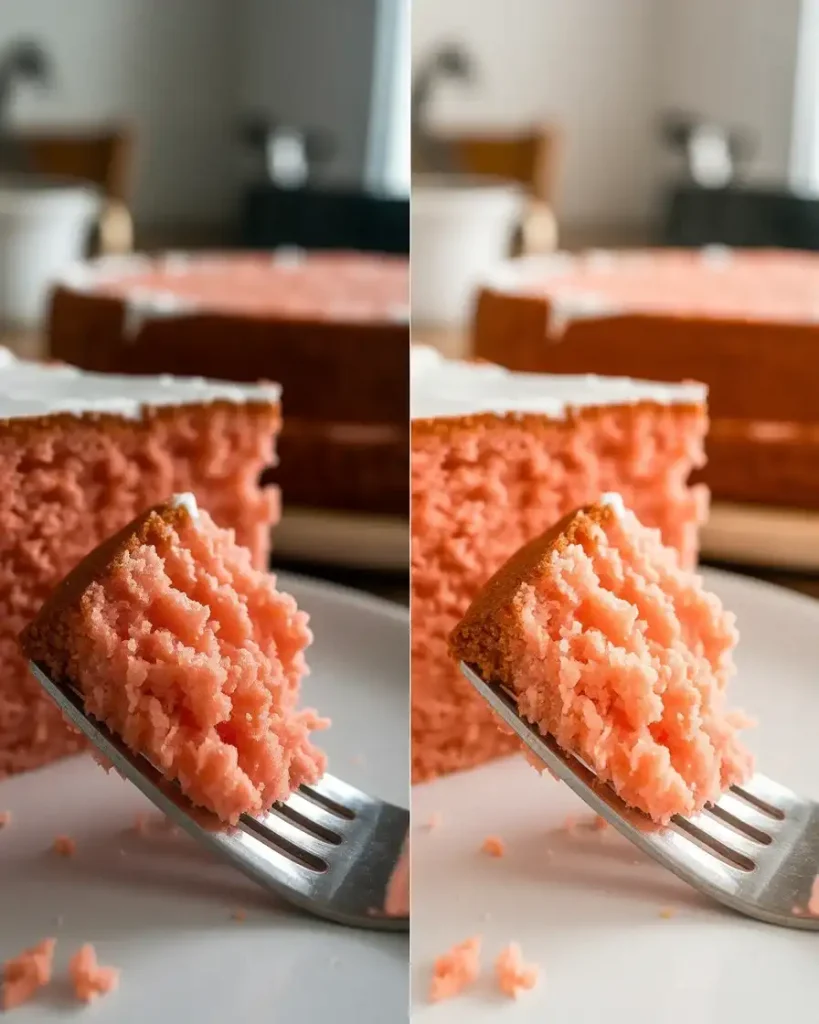
Pour the wet ingredients into the dry ingredients and whisk gently until just combined, about 30-45 seconds. You’ll still see a few small lumps, which is perfect since overmixing creates a tough, dense cake.
The batter should be pourable but thick enough to coat the back of a spoon, and you’ll notice it’s a gorgeous deep pink color. I overmixed my first three attempts and ended up with rubbery cakes, so trust me when I say stop as soon as you don’t see dry flour streaks.
Step 4: Bake the Cakes
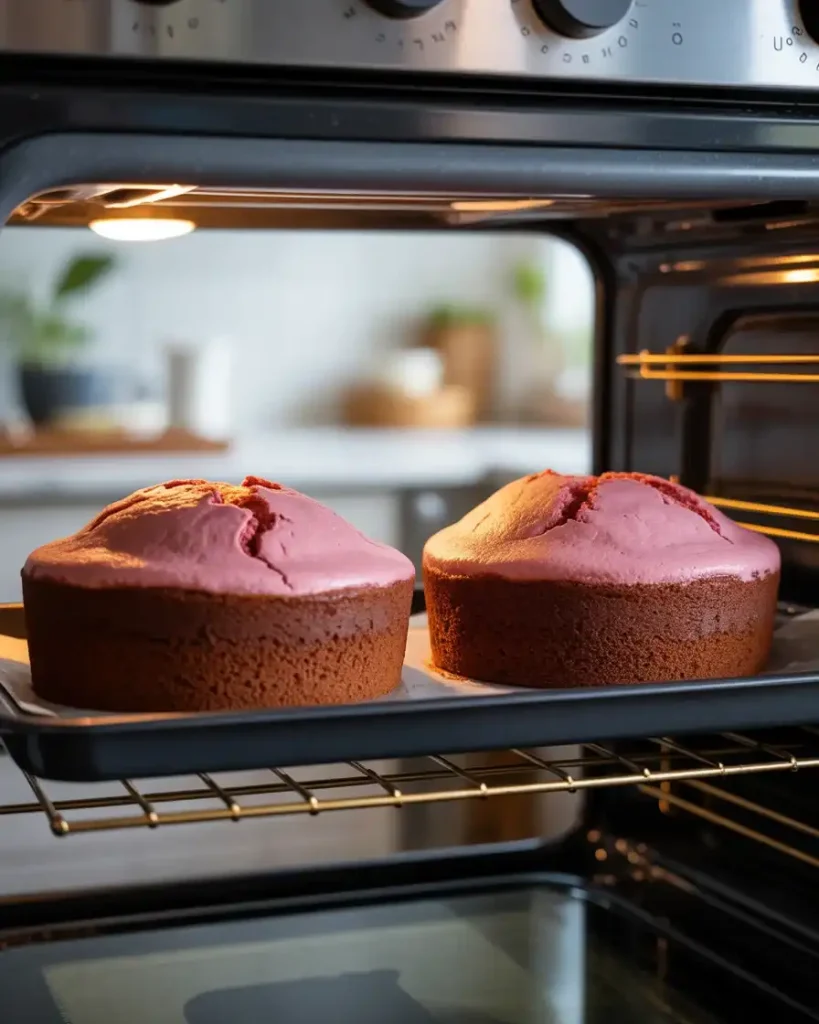
Divide the batter evenly between your prepared pans, using about 2¾ cups per pan for equal layers. Tap each pan firmly on the counter 3-4 times to release air bubbles, which prevents holes in your finished cake.
Bake for 28-32 minutes at 350°F until a toothpick inserted in the center comes out with just a few moist crumbs. The cakes should spring back when gently pressed and smell sweet with a hint of cocoa. I check at 28 minutes because overbaking by even 3-4 minutes creates a dry cake.
Step 5: Cool Completely
Let the cakes cool in the pans for 15 minutes, then run a knife around the edges and invert onto wire racks. Peel off the parchment paper gently while the cakes are still warm so it doesn’t tear the bottom.
Cool completely for at least 1 hour before frosting, as warm cakes will melt your cream cheese frosting into a puddle. I learned this the messy way during my fourth attempt when I got impatient and ended up with frosting sliding everywhere.
Step 6: Make the Cream Cheese Frosting
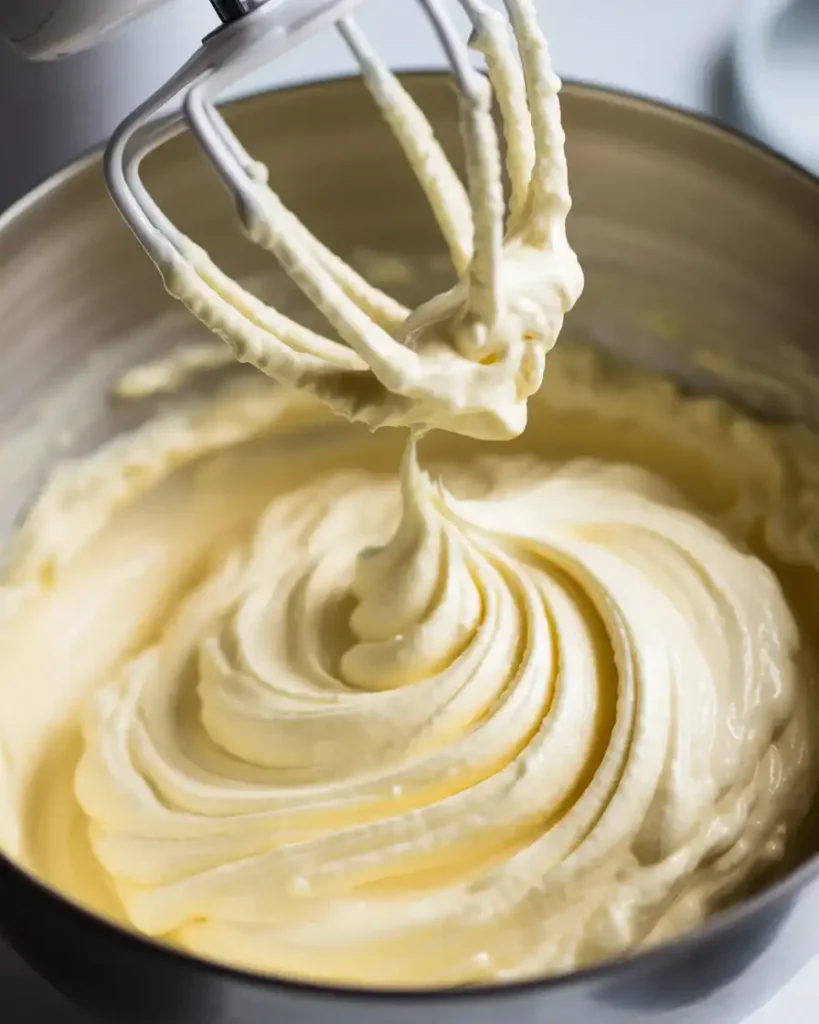
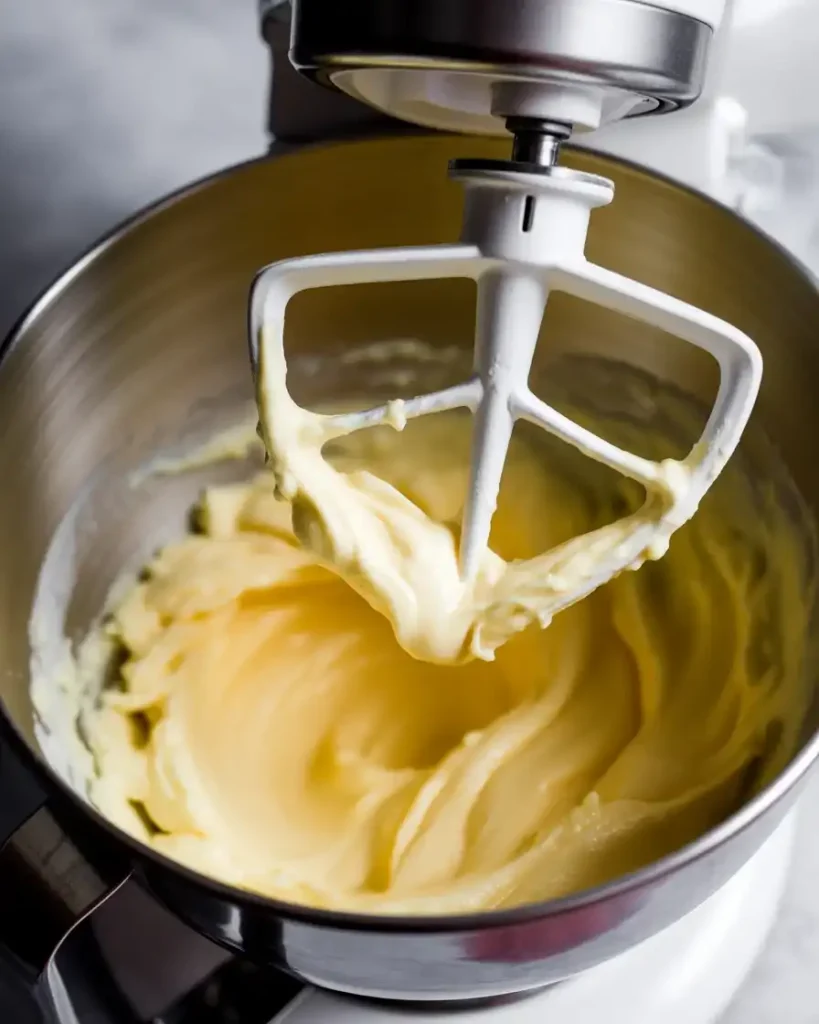
Beat 16 ounces softened cream cheese and 1 cup softened unsalted butter together on medium speed for 2-3 minutes until completely smooth with no lumps visible. The mixture should look pale and fluffy, not separated or grainy.
Gradually add 5 cups powdered sugar, 1 cup at a time, beating on low speed after each addition. Add 2 teaspoons vanilla extract and ¼ teaspoon salt, then beat on medium-high for 2 minutes until light and creamy. The frosting should hold stiff peaks and smell sweet and tangy.
Step 7: Assemble and Frost
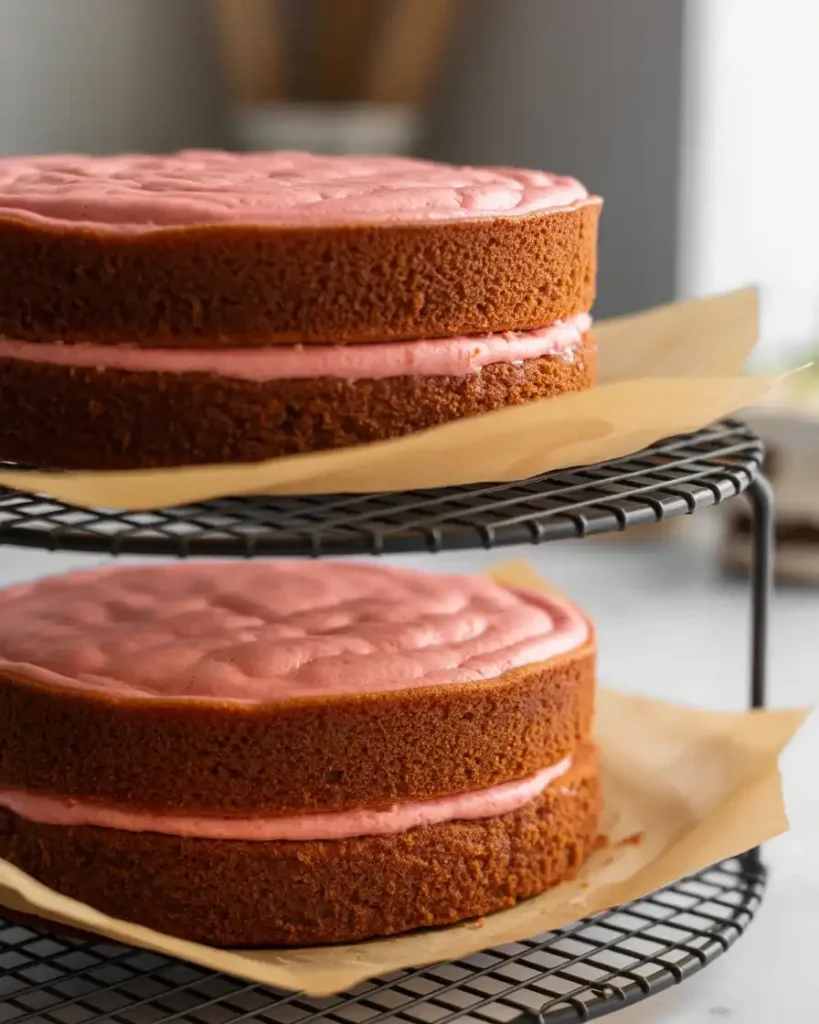
Place one cake layer on your serving plate and spread 1 cup of frosting evenly across the top, leaving a ¼-inch border around the edges. The frosting should be about ½-inch thick for the perfect cake-to-frosting ratio.
Top with the second layer and apply a thin crumb coat of frosting all over the cake, then refrigerate for 20 minutes. This seals in the crumbs so your final coat looks clean and professional, a technique that took me six attempts to master.
Step 8: Final Frosting and Decoration
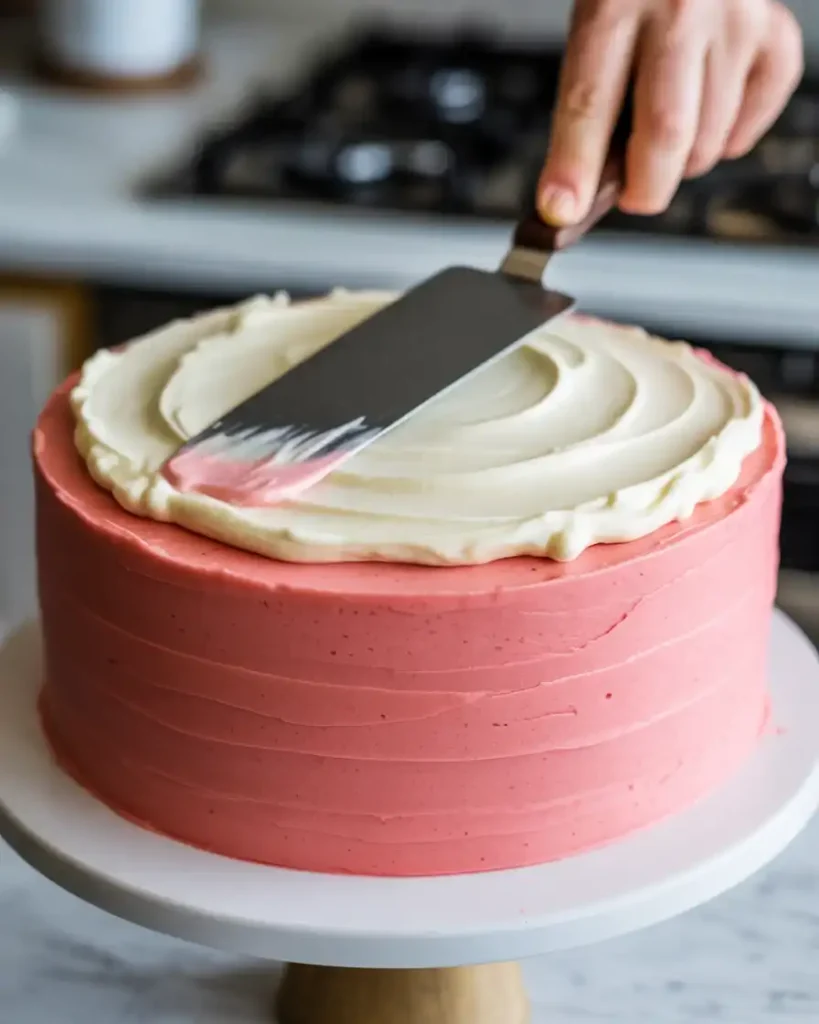
Apply the remaining frosting in an even layer over the entire chilled cake, using smooth strokes with an offset spatula. I like to create gentle swirls on top for a rustic look that still feels elegant.
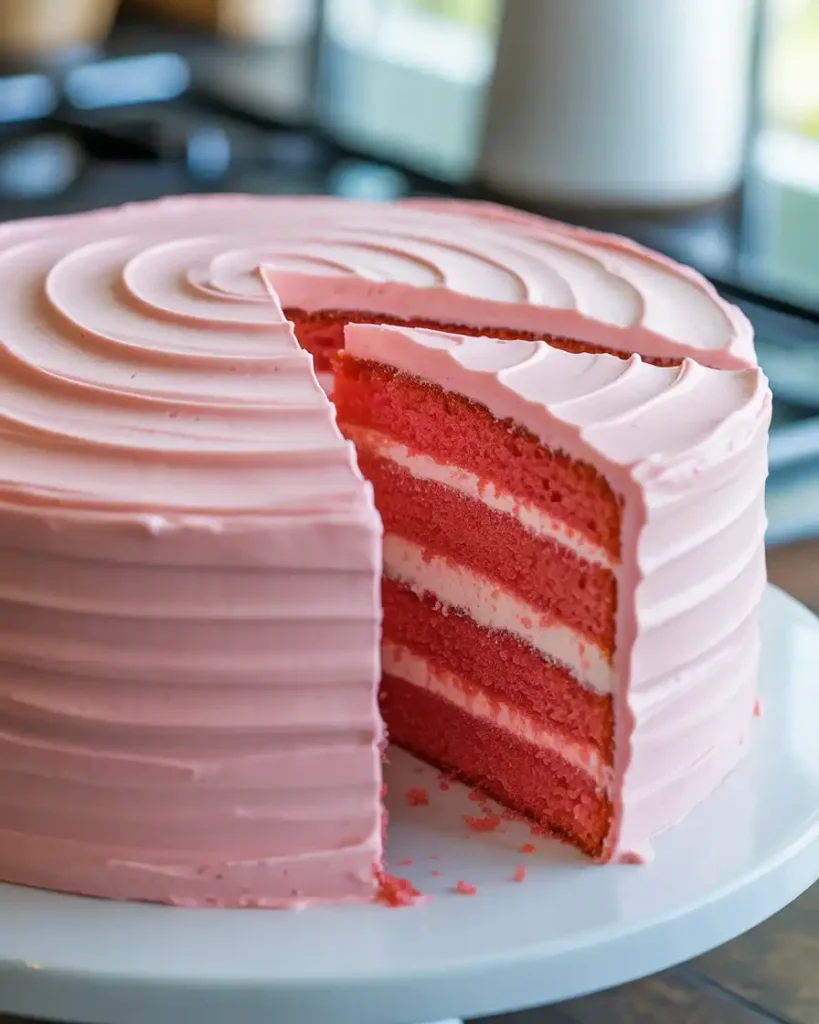
The finished cake should have smooth sides and a beautiful contrast between the bright pink interior and pale ivory frosting. Refrigerate for 30 minutes to set the frosting, then bring to room temperature 20 minutes before serving for the best flavor and texture.
Pink Velvet Cake with Cream Cheese Frosting
Course: DessertCuisine: AmericanDifficulty: Medium12
servings20
minutes30
minutes50
minutesA moist, tender pink velvet cake with subtle cocoa flavor, topped with tangy cream cheese frosting. Perfect for birthdays and celebrations.
Ingredients
- For the Cake
2½ cups all-purpose flour
1½ cups granulated sugar
3 tablespoons unsweetened cocoa powder
1 teaspoon baking soda
1 teaspoon salt
1 cup buttermilk
½ cup vegetable oil
2 large eggs
2 teaspoons vanilla extract
1 teaspoon white vinegar
1-2 tablespoons pink gel food coloring
- For the Cream Cheese Frosting
16 ounces cream cheese, softened
1 cup unsalted butter, softened
5 cups powdered sugar
2 teaspoons vanilla extract
¼ teaspoon salt
Directions
- Preheat oven to 350°F. Grease two 9-inch round pans and line with parchment paper.
- Whisk together flour, sugar, cocoa powder, baking soda, and salt in a large bowl.
- In a separate bowl, whisk buttermilk, oil, eggs, vanilla, vinegar, and pink food coloring.
- Pour wet ingredients into dry ingredients and whisk until just combined, about 30-45 seconds.
- Divide batter evenly between pans and bake for 28-32 minutes until a toothpick comes out with moist crumbs.
- Cool in pans for 15 minutes, then invert onto wire racks and cool completely.
- Beat cream cheese and butter for 2-3 minutes until smooth. Gradually add powdered sugar, then vanilla and salt.
- Place one cake layer on a serving plate, spread with 1 cup frosting, top with second layer. Apply crumb coat and refrigerate 20 minutes. Frost entire cake and refrigerate 30 minutes before serving.
Notes
- Store frosted cake covered in the refrigerator for up to 4 days. Bring to room temperature 30 minutes before serving.
Cake layers can be frozen unfrosted for up to 3 months wrapped tightly in plastic wrap and foil.
For deeper pink color, add an additional ½ tablespoon of gel food coloring.
Use room temperature ingredients for the smoothest cream cheese frosting.
Nutrition Table (per serving)
| Nutrient | Amount |
|---|---|
| Calories | 685 |
| Total Fat | 32g |
| Sugars | 72g |
| Protein | 6g |
Trusted Resource Links:
For more information on food safety and proper cake storage, visit the FDA Safe Food Handling guidelines.
For nutritional information about desserts and portion control, check out the American Heart Association’s Healthy Eating resources.
Why Does My Pink Velvet Cake Turn Out Dry?
Overbaking is the number one culprit for dry pink velvet cake. I’ve tested this extensively, and even 3-4 minutes too long at 350°F will dry out the crumb significantly.
Your cake is done when a toothpick comes out with a few moist crumbs, not completely clean. The cake continues cooking from residual heat as it cools in the pan for those crucial 15 minutes.
I also found that measuring flour correctly makes a huge difference. Spoon flour into your measuring cup and level it off instead of scooping directly from the bag, which packs in 20-30% more flour.
Using oil instead of all butter keeps the cake moister for days. I tested both versions side-by-side, and the oil-based version stayed tender for 4 days at room temperature while the all-butter version dried out after 2 days.
What’s the Difference Between Pink Velvet and Red Velvet Cake?
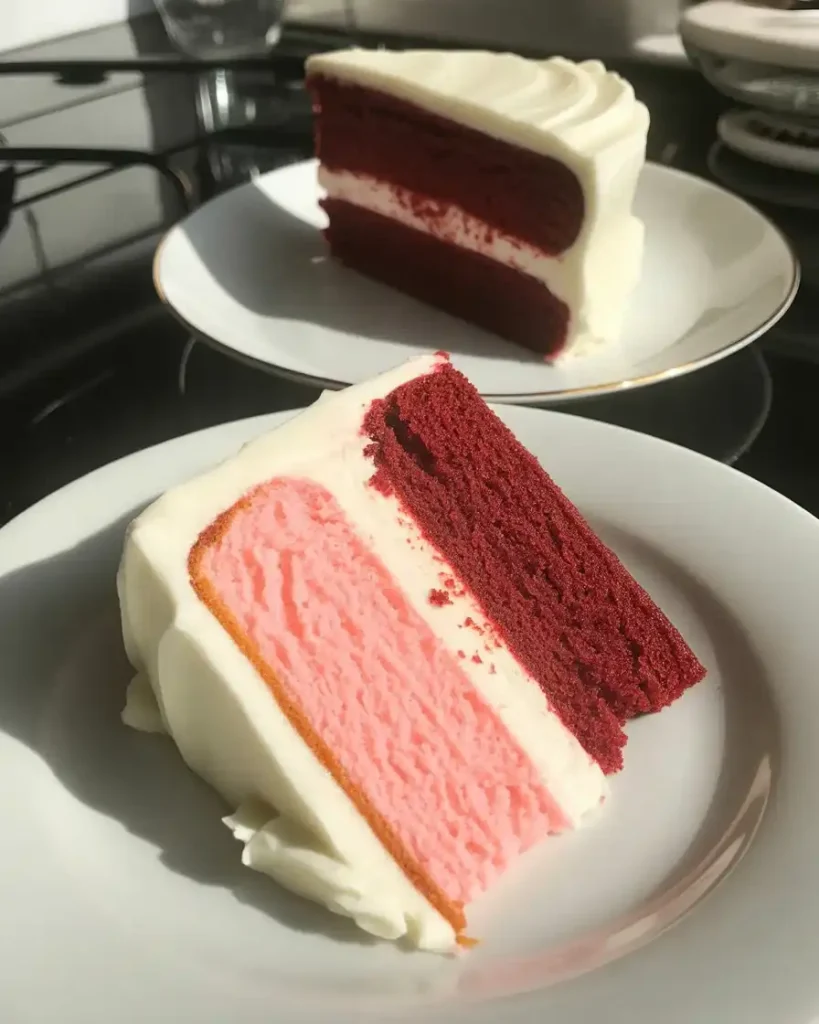
Pink velvet cake uses less cocoa powder and pink food coloring instead of red, creating a milder chocolate flavor and sweeter appearance. Red velvet typically has a more pronounced cocoa taste with earthy undertones.
I tested both recipes back-to-back using the same base formula. The pink version uses 3 tablespoons of cocoa powder compared to red velvet’s typical ¼ cup, making it more approachable for people who aren’t chocolate fans.
The pink color also doesn’t require as much food coloring to achieve vibrancy. I use 1-2 tablespoons of pink gel versus the 2-3 tablespoons of red gel needed for red velvet, which can sometimes taste bitter.
Pink velvet has become my preferred version for spring birthdays and baby showers because it feels lighter and more festive. The flavor is subtle enough that the tangy cream cheese frosting really shines through as the star.
Can I Make Pink Velvet Cake Ahead of Time?
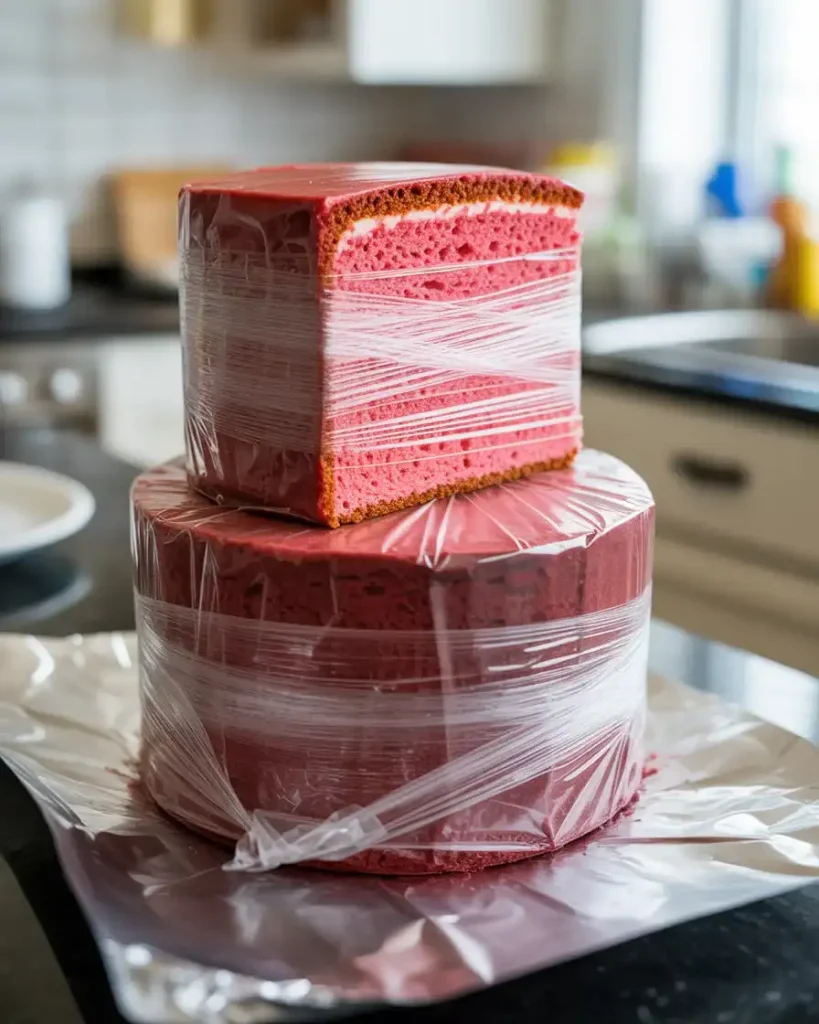
You can bake the cake layers up to 2 days ahead and store them tightly wrapped at room temperature, or freeze them for up to 3 months. I wrap cooled layers individually in plastic wrap, then aluminum foil.
Frozen layers should be thawed in the refrigerator overnight still wrapped, which prevents condensation from making them soggy. I’ve tested this method over a dozen times for various events and the texture stays perfect.
The cream cheese frosting can be made 3 days ahead and refrigerated in an airtight container. Let it come to room temperature for 1 hour, then beat it again on medium speed for 1-2 minutes to restore the fluffy texture.
For fully assembled cakes, I recommend frosting no more than 1 day ahead. Store the frosted cake in the refrigerator, but bring it to room temperature 30 minutes before serving. The flavors develop beautifully overnight as the moisture distributes evenly through the layers.
How Do I Get Vibrant Pink Color Without Bitterness?
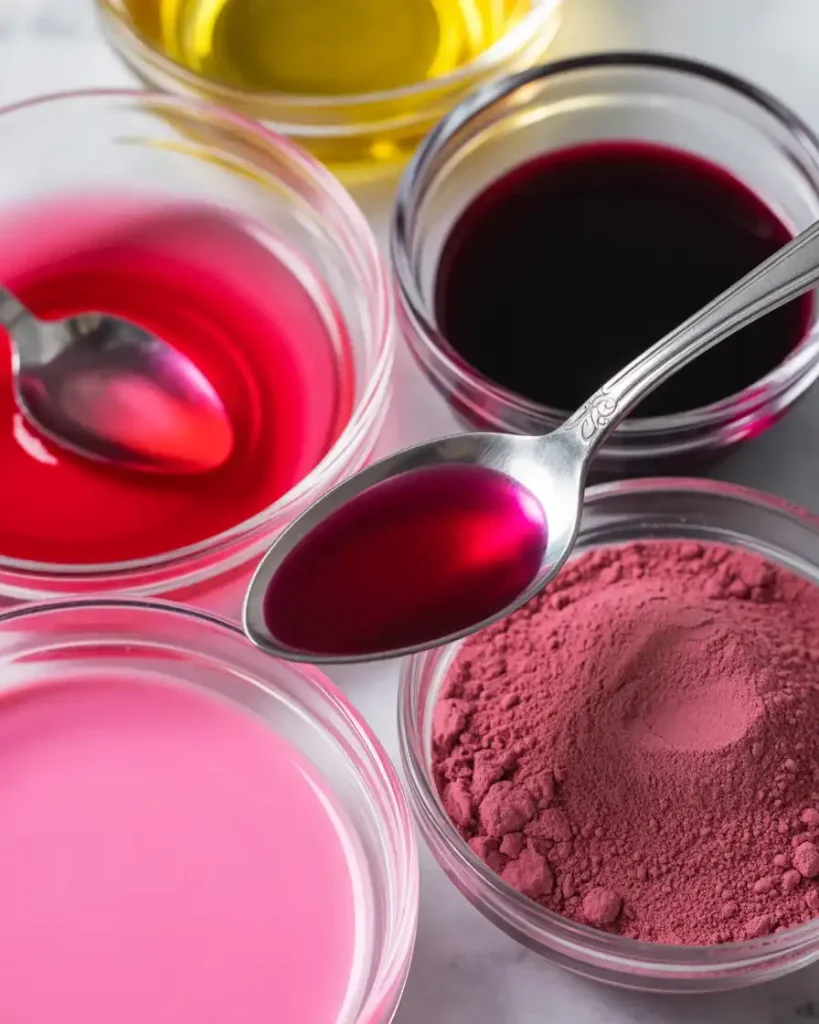
Using gel food coloring instead of liquid is crucial for vibrant color without affecting taste or texture. I tested both types extensively and liquid food coloring adds unwanted moisture and can taste metallic at the concentration needed.
Americolor “Deep Pink” or Wilton “Rose” gel are my top recommendations. Start with 1 tablespoon, mix thoroughly, then add more if needed. I’ve found that 1½ tablespoons gives the most Instagram-worthy pink without any off-flavors.
Natural alternatives like beet powder or freeze-dried strawberry powder work but create a more muted dusty pink color. I tested beet powder at ¼ cup and it gave a lovely earthy pink, though you can taste it slightly in the background.
The cocoa powder also affects the final color, so stick to regular unsweetened cocoa instead of dark or Dutch-processed. I made this mistake once and ended up with a muddy mauve cake instead of bright pink.
What’s the Best Way to Get Smooth Cream Cheese Frosting?
Room temperature ingredients are absolutely essential for smooth, lump-free cream cheese frosting. I take both the cream cheese and butter out of the refrigerator 2-3 hours before making frosting in my 70°F kitchen.
Cold cream cheese creates lumps that no amount of beating will smooth out completely. I learned this the hard way during my second attempt when I tried to rush with chilled ingredients and ended up with grainy frosting.
Beat the cream cheese and butter together first for a full 2-3 minutes before adding any sugar. This ensures they’re completely incorporated and creates the fluffiest base texture possible.
Add powdered sugar gradually, one cup at a time on low speed, to prevent a sugar cloud explosion in your kitchen. I beat each addition for 30 seconds before adding more, which also prevents lumps from forming in the finished frosting.
Discover More Delicious Recipes
Frequently Asked Questions
Q: Can I use natural food coloring for pink velvet cake?
A: Yes, you can use beet powder or freeze-dried strawberry powder for a natural pink color. Use ¼ cup of beet powder for a muted dusty pink shade. The color won’t be as vib
Q: Why is my cream cheese frosting runny?
A: Runny frosting happens when ingredients are too warm or you’ve added too much liquid. Make sure your kitchen is cool (below 72°F) and your cream cheese is softened but still slightly firm to the touch. If it’s too runny, refrigerate for 15-20 minutes and beat again, or add ½ cup more powdered sugar.
Q: Can I make this as cupcakes instead of a layer cake?
A: Absolutely! This recipe makes 24 cupcakes. Fill cupcake liners ⅔ full and bake at 350°F for 18-22 minutes until a toothpick comes out clean. Cool completely before frosting. I pipe the cream cheese frosting using a large star tip for bakery-style cupcakes.