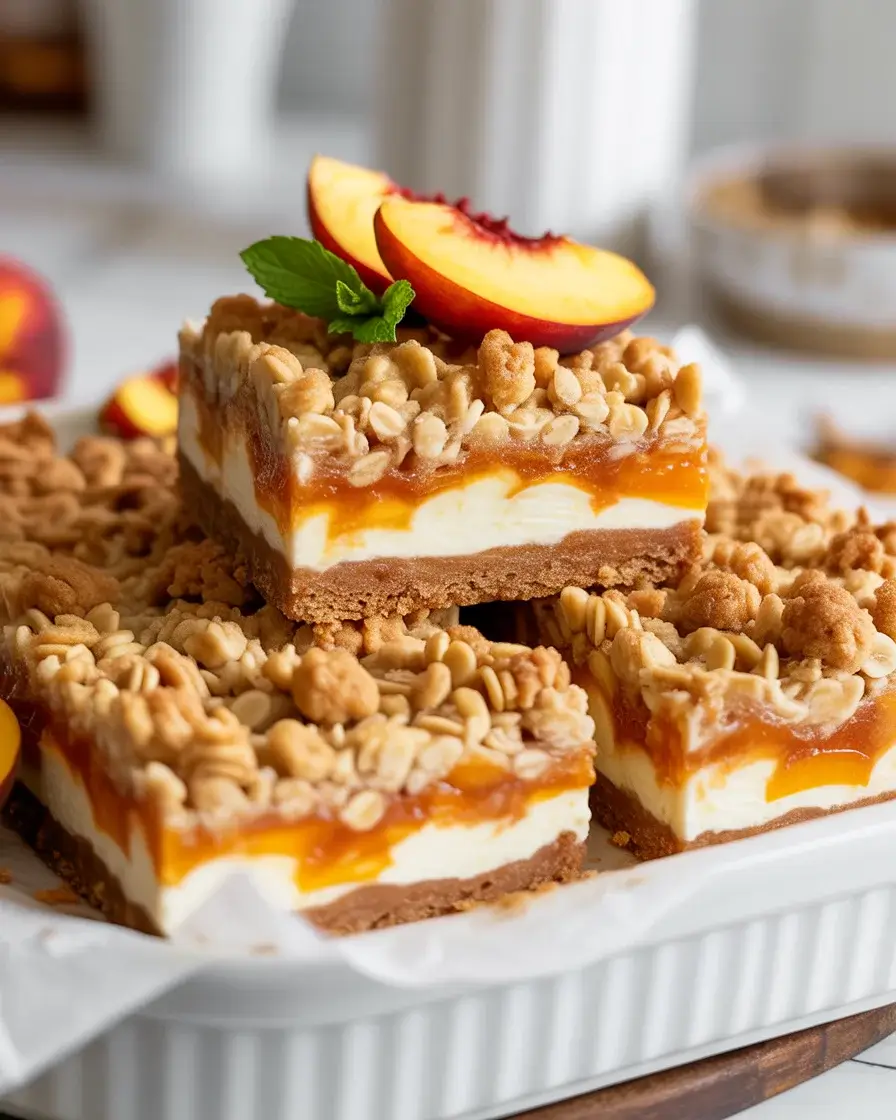
Peaches and Cream Crumble Bars
My first batch of these bars turned into a soggy mess because I didn’t pre-cook the peaches. After that disaster, I spent weeks testing different methods and discovered that a quick 5-minute simmer transforms fresh peaches into the perfect filling that won’t make your bars watery.
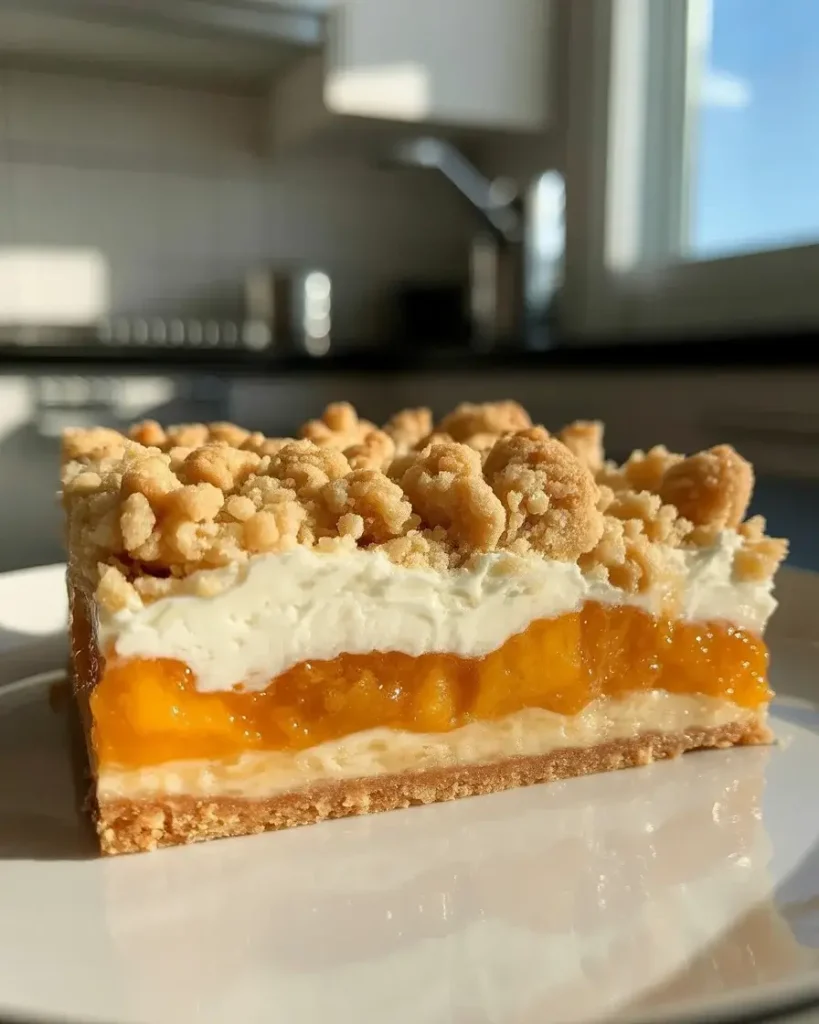
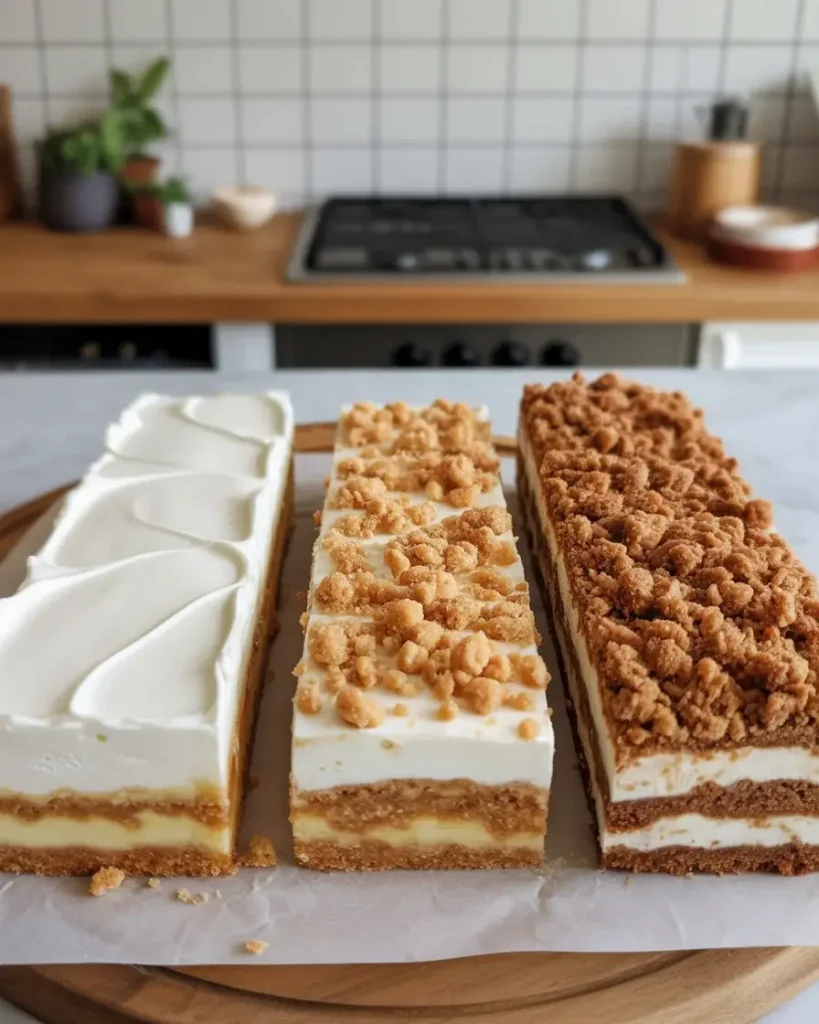
These peach crumble bars combine a buttery oat crust, tangy cream cheese layer, and sweet cinnamon peaches topped with a golden crumble. I’ve made them for summer barbecues, church potlucks, and family gatherings, and they disappear within minutes every single time.
Step-by-Step Instructions
Step 1: Prepare the Crust and Crumble
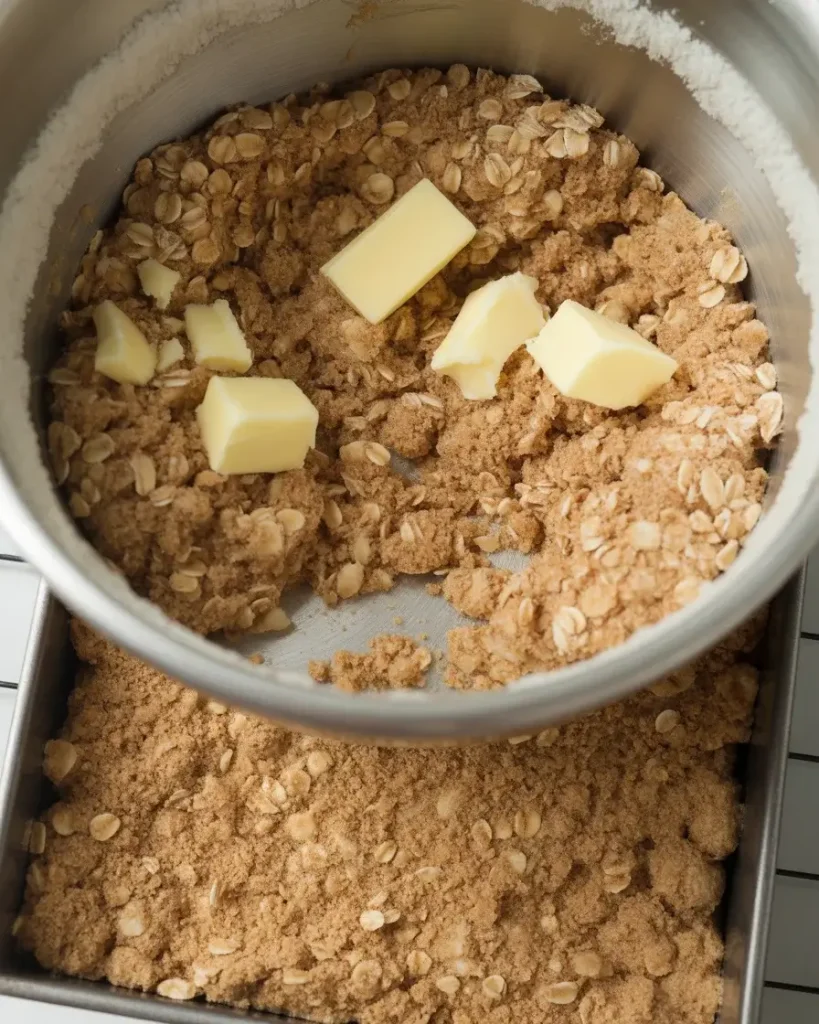
Mix 2 cups all-purpose flour, 1.5 cups old-fashioned oats, 3/4 cup packed brown sugar, 1/2 teaspoon baking soda, 1/2 teaspoon salt, and 1/2 teaspoon cinnamon in a large bowl. Cut in 1 cup cold unsalted butter using a pastry cutter or fork until the mixture resembles coarse crumbs with pea-sized pieces.
Reserve 1.5 cups of this mixture for the topping and press the remaining crumbs firmly into a greased 9×13-inch pan. I press down hard with the bottom of a measuring cup to create a solid base that won’t crumble when you cut the bars. Bake at 350°F for 15 minutes until the edges just start to turn golden.
Step 2: Make the Cream Cheese Layer

Beat 8 ounces softened cream cheese with 1/3 cup granulated sugar and 1 large egg until completely smooth and fluffy, about 2-3 minutes with an electric mixer. Scrape down the sides of the bowl twice during mixing to avoid lumps.
The cream cheese must be at room temperature or you’ll end up with a lumpy layer that looks terrible. I learned this the hard way on batch number 4. Let it sit out for 30-45 minutes, or microwave it in 10-second bursts until it’s soft enough to spread easily.
Step 3: Prepare the Peach Filling

Combine 4 cups diced fresh peaches (about 4-5 medium peaches), 1/4 cup granulated sugar, 2 tablespoons cornstarch, 1 teaspoon vanilla extract, 1/2 teaspoon cinnamon, and 1 tablespoon lemon juice in a medium saucepan. Cook over medium heat for 5-7 minutes, stirring frequently, until the peaches release their juices and the mixture thickens slightly.
This pre-cooking step is absolutely critical. I tested batches with raw peaches, and they released too much liquid during baking, making the bars soggy and impossible to cut cleanly. The mixture should look glossy and syrupy but not mushy. You’ll smell the warm cinnamon and sweet peaches when it’s ready.
Discover More Delicious Recipes
Step 4: Assemble the Bars
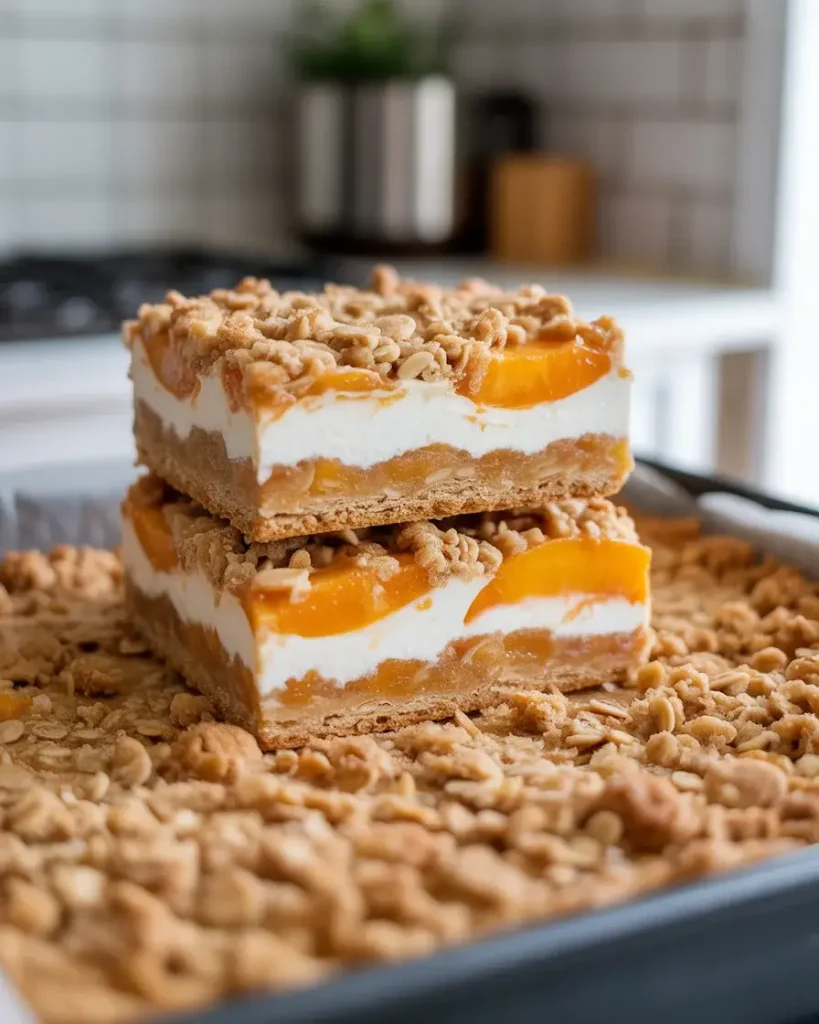
Spread the cream cheese mixture evenly over the warm pre-baked crust using an offset spatula or the back of a spoon. Work gently so you don’t disturb the crust underneath. Spoon the cooled peach filling over the cream cheese layer and spread it evenly, leaving a small border around the edges.
I let the peach filling cool for 10 minutes before adding it because hot filling can cause the cream cheese to melt and mix together, ruining the distinct layers. Sprinkle the reserved crumble topping evenly over the peaches, breaking up any large clumps with your fingers.
Step 5: Bake and Cool
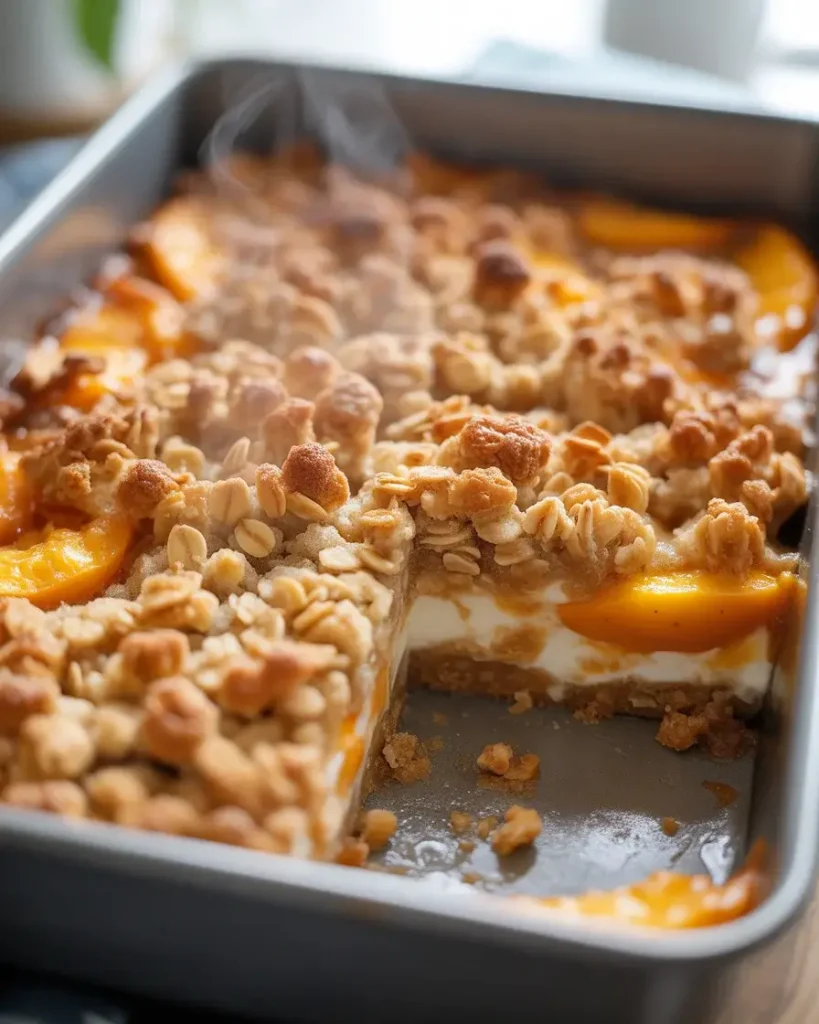
Bake at 350°F for 35-40 minutes until the crumble topping turns deep golden brown and you can see the peach filling bubbling around the edges. The smell of caramelized peaches and butter will fill your kitchen around the 30-minute mark.
Let the bars cool completely in the pan on a wire rack for at least 2 hours, or refrigerate for 1 hour for faster cooling. I know it’s tempting to cut into them right away, but warm bars will fall apart. After testing this 15+ times, I learned that patience is essential for clean, beautiful cuts that hold their shape.

Peaches and Cream Crumble Bars
Course: DessertCuisine: AmericanDifficulty: Easy24
50
minutes1
10
minutes2
hoursButtery oat crumble bars layered with tangy cream cheese and cinnamon peaches. The perfect summer dessert that’s easy to make and feeds a crowd.
Ingredients
- For the Crust and Crumble
2 cups all-purpose flour
1.5 cups old-fashioned oats
3/4 cup packed brown sugar
1/2 teaspoon baking soda
1/2 teaspoon salt
1/2 teaspoon ground cinnamon
1 cup unsalted butter, cold and cut into pieces
- For the Cream Cheese Layer
8 ounces cream cheese, softened to room temperature
1/3 cup granulated sugar
1 large egg
- For the Peach Filling
4 cups diced fresh peaches (4-5 medium peaches)
1/4 cup granulated sugar
2 tablespoons cornstarch
1 teaspoon vanilla extract
1/2 teaspoon ground cinnamon
1 tablespoon fresh lemon juice
Directions
- Preheat oven to 350°F and grease a 9×13-inch baking pan.
- Mix flour, oats, brown sugar, baking soda, salt, and cinnamon. Cut in cold butter until crumbly.
- Reserve 1.5 cups of mixture for topping. Press remaining mixture into prepared pan and bake for 15 minutes.
- Beat cream cheese, sugar, and egg until smooth and fluffy, about 2-3 minutes.
- Cook peaches with sugar, cornstarch, vanilla, cinnamon, and lemon juice for 5-7 minutes until thickened. Let cool 10 minutes.
- Spread cream cheese mixture over warm crust, then add cooled peach filling.
- Sprinkle reserved crumble topping evenly over peaches.
- Bake for 35-40 minutes until golden brown and bubbling at edges.
- Cool completely in pan for 2 hours or refrigerate for 1 hour before cutting.
Notes
- Store covered in refrigerator for up to 3 days
Freeze individual bars for up to 3 months
Substitute frozen peaches (thawed and drained) with extra tablespoon cornstarch
Use room temperature cream cheese to avoid lumps
Pre-cooking peaches prevents soggy bars
Nutrition Table (per serving)
| Nutrient | Amount |
|---|---|
| Calories | 185 |
| Total Fat | 9g |
| Sugars | 15g |
| Protein | 3g |
Trusted Resource Links:
For more information on selecting and storing fresh peaches, visit the USDA Food Safety guidelines. Learn about balanced dessert nutrition from the American Heart Association’s healthy eating resources.
How Do I Keep the Bars from Getting Soggy?
Pre-cooking the peaches with cornstarch is the key to preventing soggy bars. Raw peaches release too much liquid during baking, which seeps into the crust and makes everything mushy.
I tested this with side-by-side batches and the difference was dramatic. The pre-cooked version had a firm, sliceable texture while the raw peach version was a disaster I had to eat with a spoon. The cornstarch acts as a thickener that captures the peach juices and creates a jammy filling that stays put.
Make sure you also let the peach mixture cool slightly before adding it to the cream cheese layer. Hot filling can melt the cream cheese and create steam that makes everything soggy. I wait about 10 minutes, which is just enough time to let it cool while staying spreadable.
Can I Use Frozen or Canned Peaches?
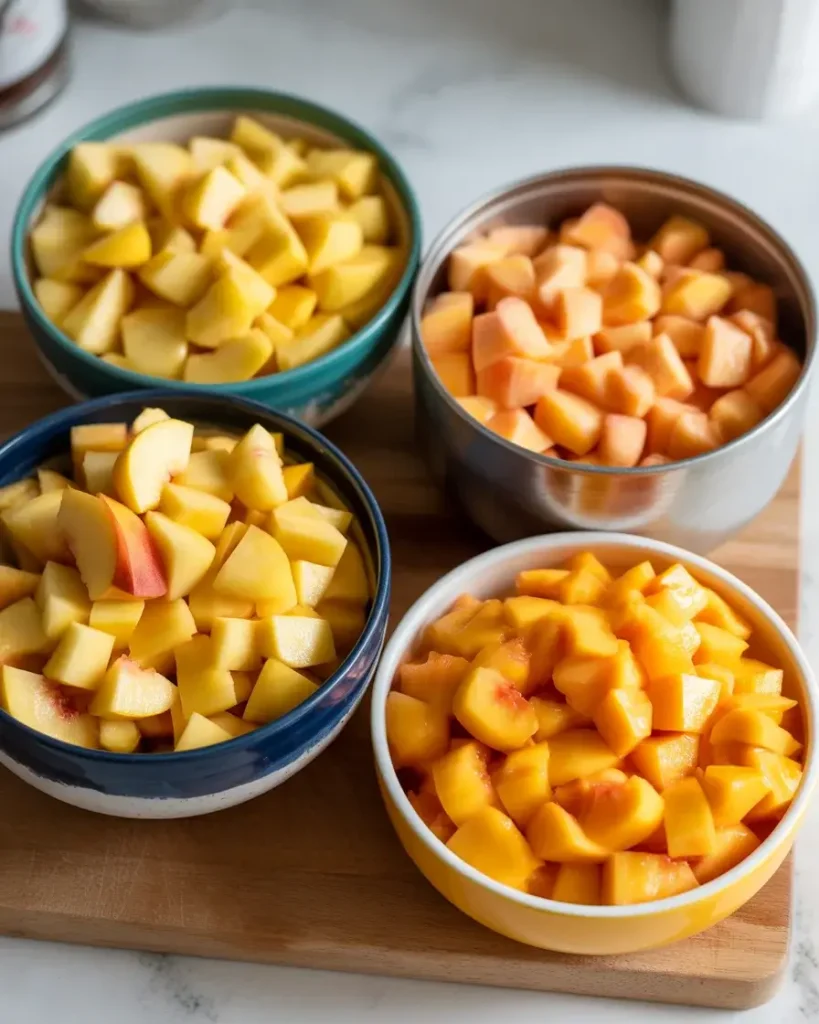
Yes, both work well with slight adjustments. Frozen peaches should be thawed completely and drained of excess liquid before cooking. I add an extra tablespoon of cornstarch when using frozen because they tend to be juicier.
Canned peaches work in a pinch, but use peaches canned in juice (not heavy syrup) and drain them thoroughly. I pat them dry with paper towels and reduce the added sugar to 2 tablespoons since canned peaches are already sweetened. The texture won’t be quite as fresh-tasting, but they still make delicious bars.
For frozen peaches, increase the cooking time to 8-10 minutes to evaporate the extra moisture. I tested this on batch 12 after a reader question, and the extra cook time made all the difference. The filling should look thick and glossy, not watery or thin.
How Far in Advance Can I Make These?
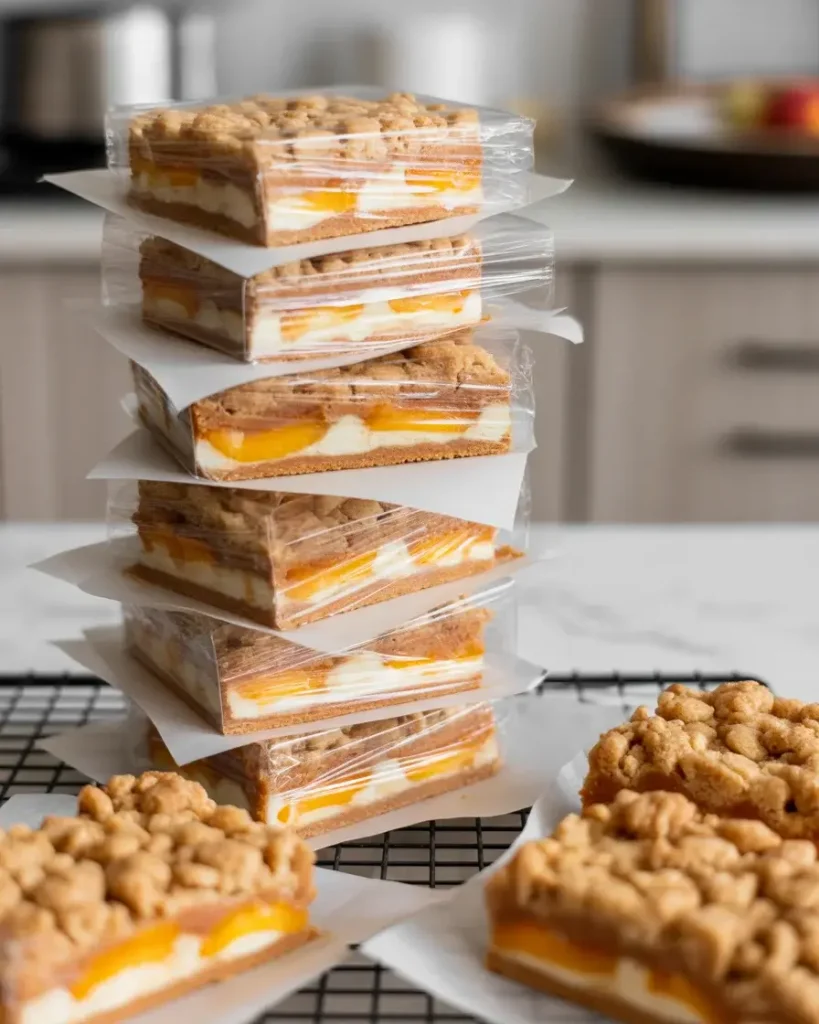
These bars taste best within 2 days but can be made up to 3 days ahead if stored properly in the refrigerator. I cover the pan tightly with plastic wrap or transfer cut bars to an airtight container with parchment paper between layers.
The crumble topping softens slightly in the fridge, but you can revive it by placing bars on a baking sheet and warming them at 300°F for 5-7 minutes. I tested this technique for a party where I needed to prep everything two days early, and guests couldn’t tell they weren’t freshly baked.
For longer storage, freeze individual bars wrapped in plastic wrap and placed in a freezer bag for up to 3 months. Thaw overnight in the fridge and warm briefly in the oven before serving. The cream cheese layer holds up surprisingly well in the freezer without becoming grainy or watery.
What’s the Best Way to Cut Clean Bars?

Use a sharp chef’s knife wiped clean between each cut, and make sure the bars are completely cool or slightly chilled. I run my knife under hot water, dry it thoroughly, then make one clean cut in a single motion without sawing back and forth.
After 15+ batches, I found that chilling the bars for 30 minutes makes cutting significantly easier. The cream cheese layer firms up and the bars hold their shape beautifully. If you try to cut them while warm, the layers will smush together and look messy.
For serving at a party, I cut the bars into 24 squares (4 rows by 6 columns) which gives you perfect two-bite portions. Larger bars tend to fall apart when people pick them up, but these smaller squares stay intact and look more professional on a platter.
Can I Substitute the Cream Cheese Layer?
The cream cheese layer adds tangy richness that balances the sweet peaches perfectly, but you can use alternatives if needed. Greek yogurt mixed with an egg and sugar creates a similar tangy layer, though it’s slightly less rich.
I tested a version with mascarpone cheese for an Italian twist, using the same measurements, and it created an ultra-creamy, slightly sweeter bar that my family loved. Mascarpone is more expensive but gives you a luxurious texture that feels fancy.
If you want to skip the cream cheese entirely, you can add a thin layer of vanilla custard or simply make them as double-crumble peach bars with extra oat topping. I tested this for a dairy-free friend using coconut cream, but the texture wasn’t quite right, so I’d recommend sticking with cream cheese or mascarpone for best results.
Frequently Asked Questions
Q: Why did my bars turn out soggy?
A: You likely skipped pre-cooking the peaches or didn’t use enough cornstarch. Raw peaches release too much liquid during baking. Always simmer the peach filling for 5-7 minutes until thick and glossy, and make sure it cools slightly before adding to prevent steam buildup.
Q: Can I make these bars gluten-free?
A: Yes, substitute the all-purpose flour with a 1:1 gluten-free baking blend and use certified gluten-free oats. I tested this version twice and it worked perfectly with no texture changes. Make sure your baking soda and other ingredients are also certified gluten-free.
Q: How do I know when the bars are done baking?
A: The crumble topping should be deep golden brown and the peach filling should be visibly bubbling around the edges. If the topping is browning too quickly, tent with foil for the last 10 minutes. The bars will firm up significantly as they cool.