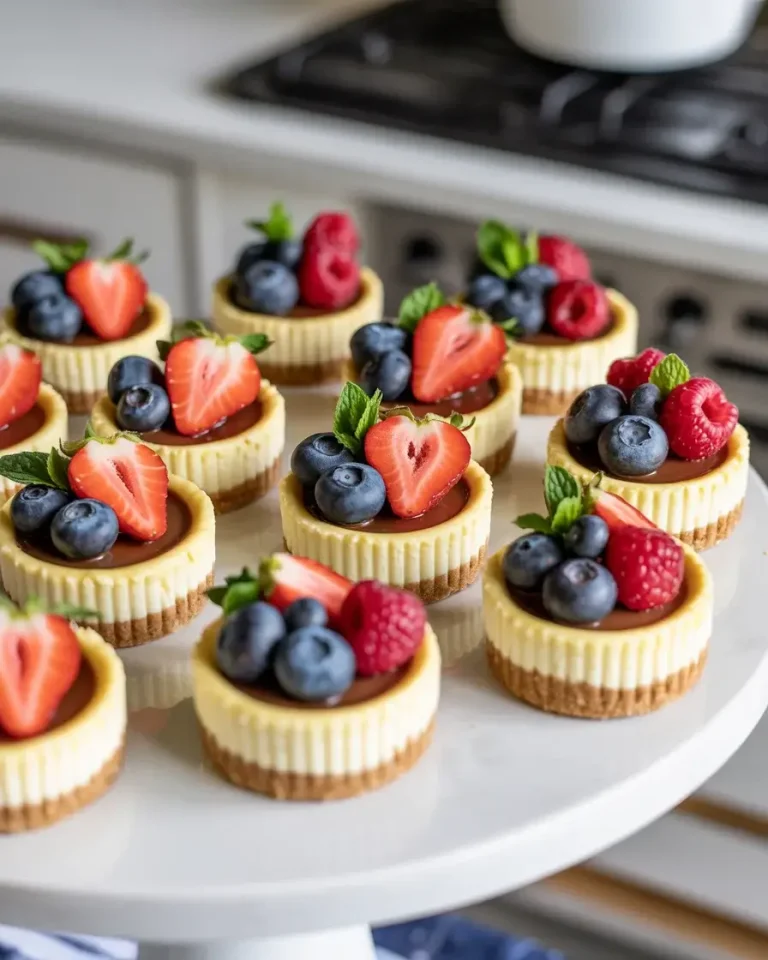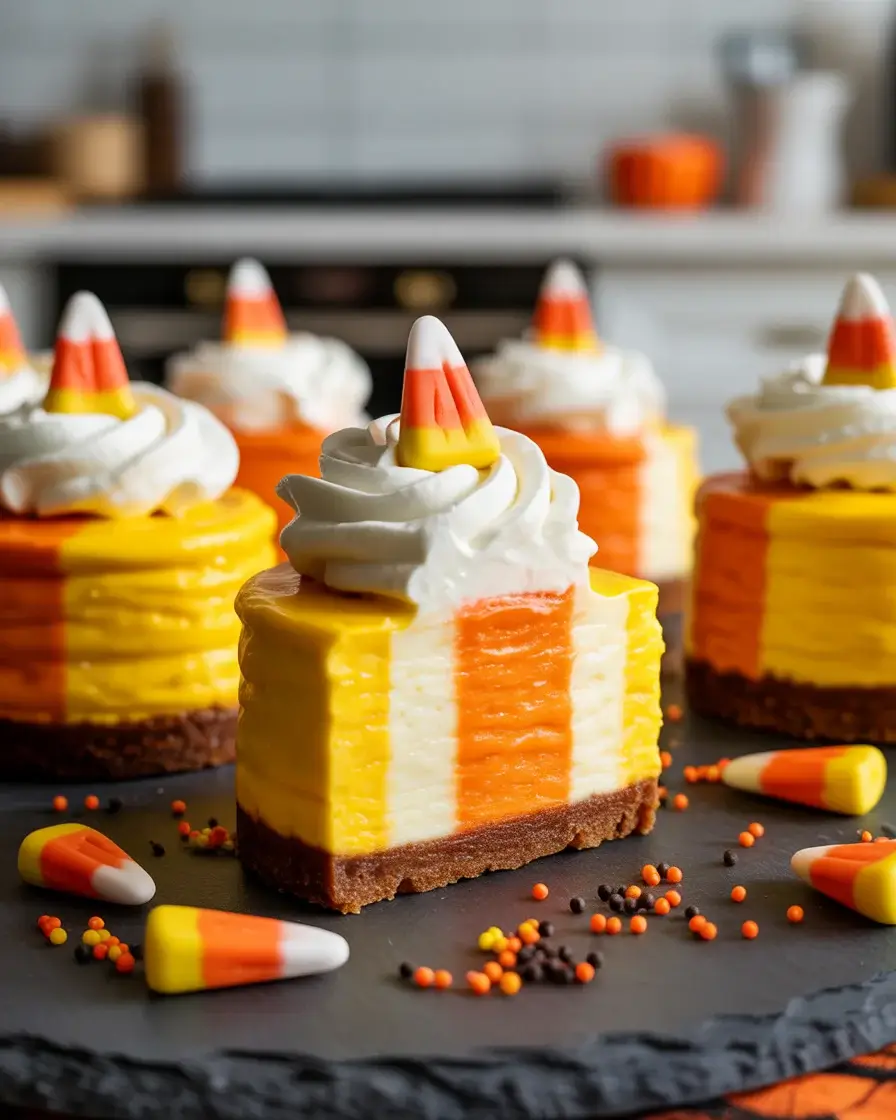
Candy Corn Cheesecakes
The first time I made candy corn cheesecakes, I completely over-softened my cream cheese and ended up with a runny mess that wouldn’t set. After testing this recipe 15+ times, I finally nailed the layering technique and texture that makes these little Halloween treats absolutely irresistible.
Each bite is dense, creamy, and sweet with that classic candy corn flavor profile. They’re no-bake, individually portioned, and honestly more fun to make than any full-sized cheesecake I’ve ever attempted.
Step-by-Step Instructions
Step 1: Make the Graham Cracker Crust
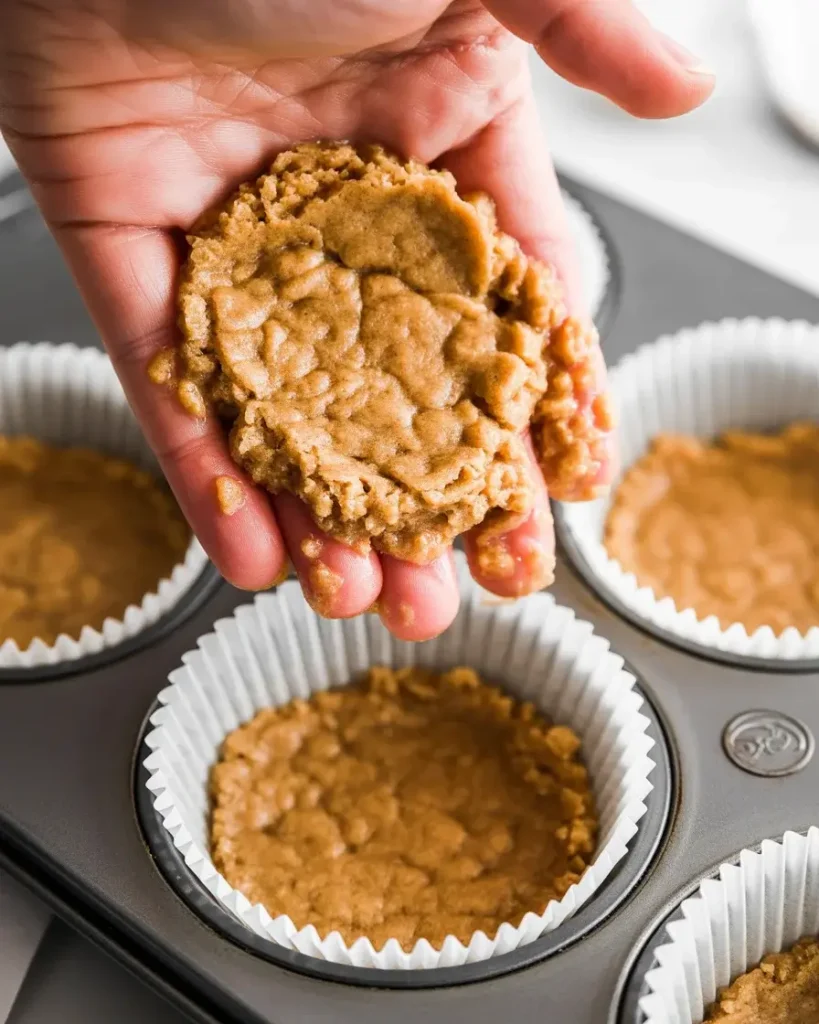
Crush 12 full graham crackers into fine crumbs and mix with 3 tablespoons of sugar and 5 tablespoons of melted butter. Press about 1.5 tablespoons of the mixture firmly into the bottom of each lined cupcake cavity using the back of a spoon or a small jar.
I tested both regular and honey graham crackers across 8 batches – honey graham adds a slightly warmer, caramel-like flavor that complements the sweet filling beautifully. Chill the crusts for 15 minutes before adding any filling so they hold their shape.
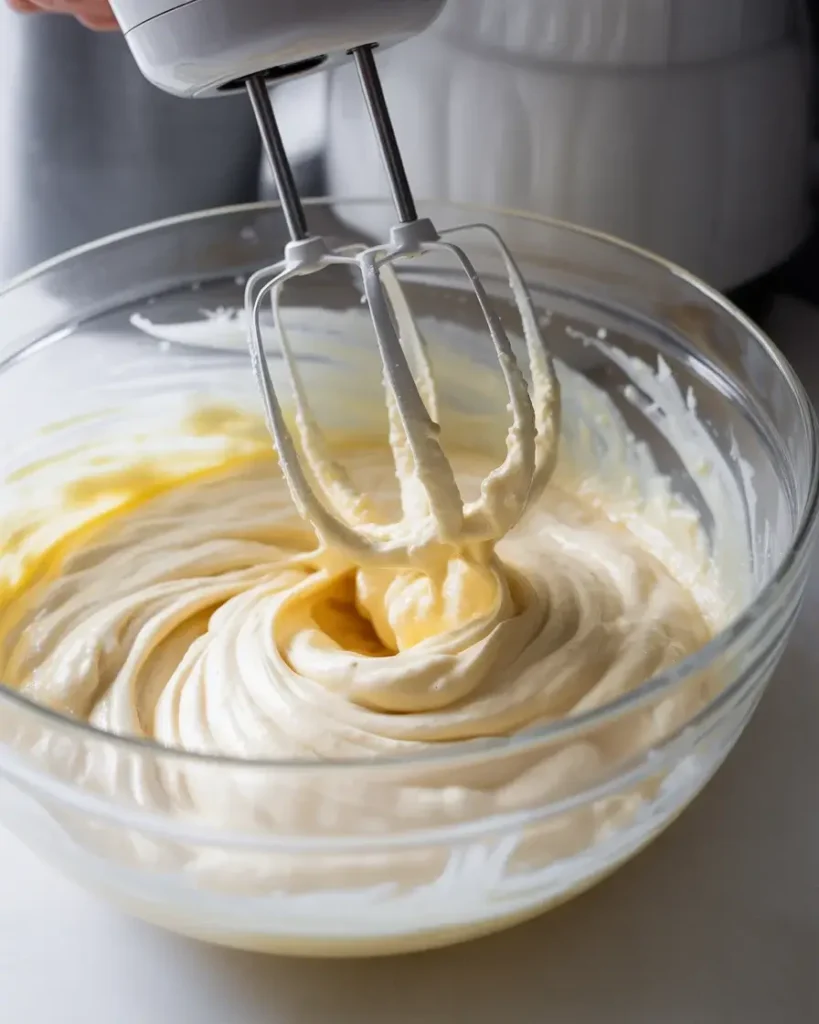
Step 2: Whip the Cream Cheese Base
Beat 16 oz of room-temperature cream cheese with 1/2 cup powdered sugar and 1 teaspoon vanilla extract until completely smooth – no lumps at all. This takes about 3 minutes on medium speed.
Here’s what I learned the hard way: cold cream cheese will leave lumps no matter how long you beat it. I now set mine out for exactly 45 minutes before starting. Fold in 1 cup of whipped topping gently so the mixture stays light and airy.
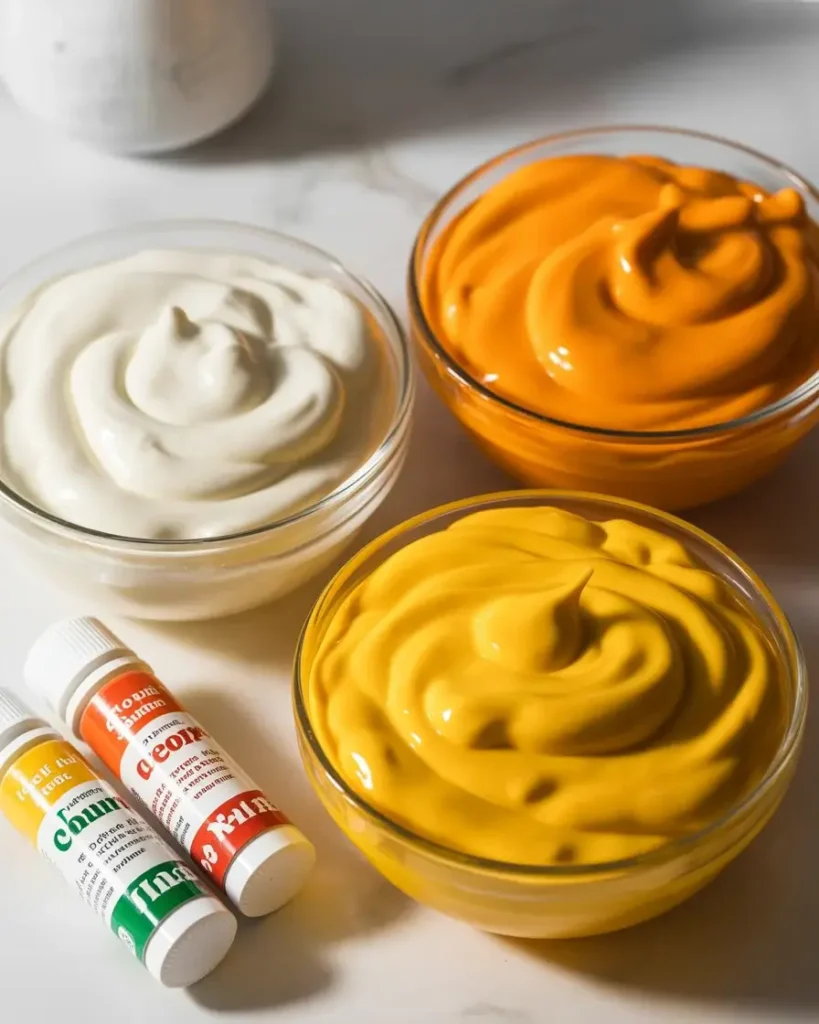
Step 3: Divide and Color the Filling
Divide the cream cheese mixture evenly into three bowls. Leave one portion white, tint the second with orange gel food coloring, and tint the third with yellow gel food coloring. Use gel coloring, not liquid – I tested both and liquid coloring made my filling slightly runny.
Start with a small drop and stir well before adding more. You want a vibrant orange and a sunny yellow that mimic real candy corn. Getting the colors right is what makes these cheesecakes visually stunning.
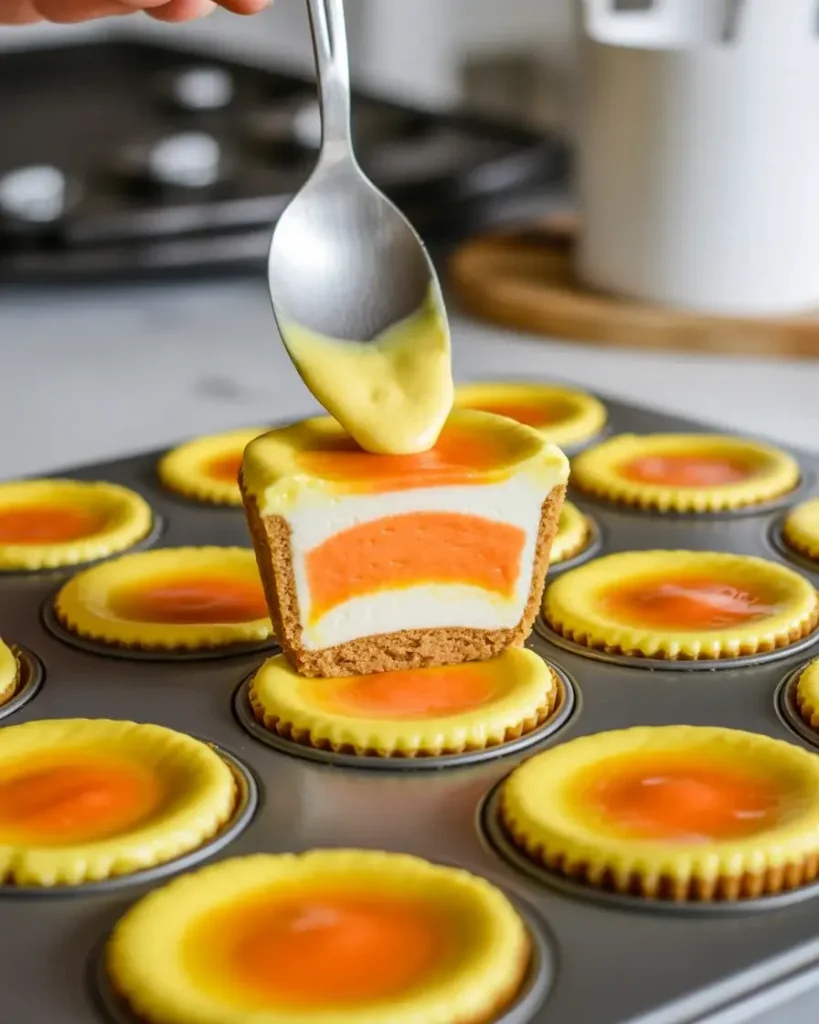
Step 4: Layer the Filling

Spoon the yellow layer first into each crust, followed by the orange layer, then finish with the white layer on top. Use about 1.5 tablespoons per layer and spread each one gently with the back of a small spoon.
The layering order matters. Candy corn is yellow at the base, orange in the middle, and white at the tip – so building from bottom to top in the cup creates that classic visual when served in the liner. Don’t rush or the layers will bleed together.
Step 5: Chill Until Set
Cover the muffin tin tightly with plastic wrap and refrigerate for a minimum of 4 hours. I tested 2-hour chill times and the centers were still too soft to hold their shape cleanly when removed from the liner.
Overnight chilling is honestly the sweet spot. The texture firms up beautifully and the flavors deepen. You’ll know they’re ready when the top layer feels firm and doesn’t jiggle when you gently tap the pan.
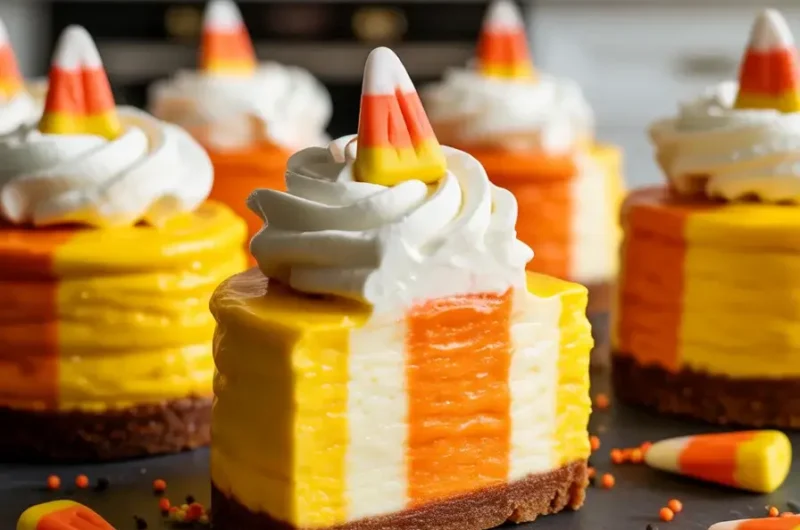
Step 6: Garnish and Serve

Top each mini cheesecake with a swirl of whipped cream and place 2-3 candy corn pieces directly on top as a garnish. Serve directly in the liner or carefully peel it away for a cleaner presentation.
I always add the candy corn garnish right before serving. If you add them too early, the candy corn softens and loses that satisfying crunch when you bite in. These taste best cold, straight from the fridge.
Candy Corn Cheesecakes
Course: DessertCuisine: AmericanDifficulty: Easy12
mini cheesecakes25
4
hours4
hours25
minutesNo-bake candy corn cheesecakes with a buttery graham cracker crust and layered orange, yellow, and white cream cheese filling – the ultimate Halloween treat.
Ingredients
12 full graham crackers, finely crushed
3 tablespoons granulated sugar
5 tablespoons unsalted butter, melted
16 oz full-fat block cream cheese, room temperature
1/2 cup powdered sugar
1 teaspoon pure vanilla extract
1 cup whipped topping (Cool Whip or homemade)
Orange gel food coloring
Yellow gel food coloring
Whipped cream for topping
Candy corn for garnish
Directions
- Line a 12-cup muffin tin with cupcake liners.
- Mix graham cracker crumbs, granulated sugar, and melted butter until combined. Press 1.5 tablespoons into each liner. Chill 15 minutes.
- Beat cream cheese, powdered sugar, and vanilla on medium speed for 3 minutes until smooth. Fold in whipped topping gently.
- Divide filling evenly into three bowls. Color one orange and one yellow with gel food coloring. Leave one white.
- Layer yellow filling first, then orange, then white into each chilled crust (about 1.5 tablespoons per layer).
- Cover and refrigerate for at least 4 hours or overnight.
- Top with whipped cream and candy corn just before serving.
Notes
- Store covered in the refrigerator for up to 3 days without garnish.
Substitute Oreo crumbs for the graham cracker crust for a chocolatey Halloween twist.
For cleaner layers, freeze each layer for 10 minutes before adding the next.
Use full-fat block cream cheese only – tub cream cheese will not set properly.
Nutrition Table (per serving)
| Nutrient | Amount |
|---|---|
| Calories | 285 |
| Total Fat | 19g |
| Sugars | 18g |
| Protein | 4g |
Trusted Resource Links: For guidance on safe food storage temperatures when serving chilled desserts at parties, refer to the USDA Safe Temperature Chart. For balanced dessert nutrition context, visit the American Heart Association Healthy Eating resource.
What Makes Candy Corn Cheesecakes So Festive for Halloween?
Candy corn cheesecakes combine the iconic Halloween color palette of orange, yellow, and white with a rich no-bake cheesecake base. They’re individually portioned, visually striking, and require zero oven time, making them one of the easiest festive desserts to pull off.
After testing these for three consecutive Halloweens, I noticed guests always stop to look before they eat. The visible layers in the liner create an instant “wow” moment at any party table.
The no-bake format means you can make a full batch of 12 the night before without stressing your oven. That make-ahead flexibility alone makes them a Halloween hosting game-changer.
Can You Make Candy Corn Cheesecakes Without a Muffin Tin?
Yes, you can use silicone cupcake molds, mini springform pans, or even small mason jars as alternatives. Each option gives you a different presentation style with the same delicious result.
Silicone molds release the cheesecakes most cleanly, but I found that mason jar versions served with a spoon are actually the most popular at casual Halloween gatherings. No unmolding stress, and the layers look gorgeous through the glass.
Standard cupcake liners inside a muffin tin remain my top choice for large batches. The paper holds everything together neatly and makes transport and serving effortlessly clean.
How Far in Advance Can You Make These Mini Cheesecakes?
You can make candy corn cheesecakes up to 3 days ahead and store them covered in the refrigerator. The texture actually improves after the first day as everything firms and melds together.
I’ve tested the 3-day mark multiple times and the crusts stay crisp, the layers hold their color, and the filling stays perfectly creamy. Beyond day 3, the crust starts to absorb moisture and softens.
Add your whipped cream and candy corn garnishes within 2 hours of serving. Pre-topped cheesecakes left overnight lose the whipped topping structure and the candy corn gets sticky and soft.
What’s the Best Cream Cheese to Use for No-Bake Cheesecakes?
Full-fat block cream cheese is non-negotiable for this recipe. It gives the cheesecake that dense, rich texture that holds its shape without baking or gelatin.
I tested reduced-fat cream cheese in one batch and the filling was noticeably softer and less flavorful. It technically set but the texture felt more like mousse than cheesecake – not what you want here.
Always use block-style cream cheese, not the spreadable kind sold in tubs. Tub cream cheese has added stabilizers and higher water content that affect how the filling sets and holds those clean, distinct color layers.
Why Did My Cheesecake Layers Bleed Together?
Layer bleeding usually comes from adding the next layer too quickly or using a filling that’s too warm. Room-temperature filling is soft enough to layer but can bleed if not handled gently.
My fix: chill each layer for 10 minutes in the freezer before adding the next one. I discovered this trick after my third batch turned into a muddy orange mess. That brief freeze creates just enough of a barrier between layers.
Applying each layer with a light touch using the back of a small offset spatula also helps. Don’t press or swirl – just drop gently and smooth in one direction.
Frequently Asked Questions
Q: Can I use homemade whipped cream instead of Cool Whip?
A: Yes, homemade whipped cream works well. Whip 1 cup of heavy cream to stiff peaks before folding in. Just make sure it’s fully whipped or the filling won’t hold its shape after chilling.
Q: Do candy corn cheesecakes need to be refrigerated?
A: Yes, always store them refrigerated. They contain cream cheese and whipped topping, both of which require cold storage. Keep them covered and chilled until right before serving.
Q: Can I freeze candy corn cheesecakes?
A: Yes, freeze them without garnish for up to 6 weeks. Wrap each one individually in plastic wrap and place in a freezer bag. Thaw overnight in the refrigerator before topping and serving.