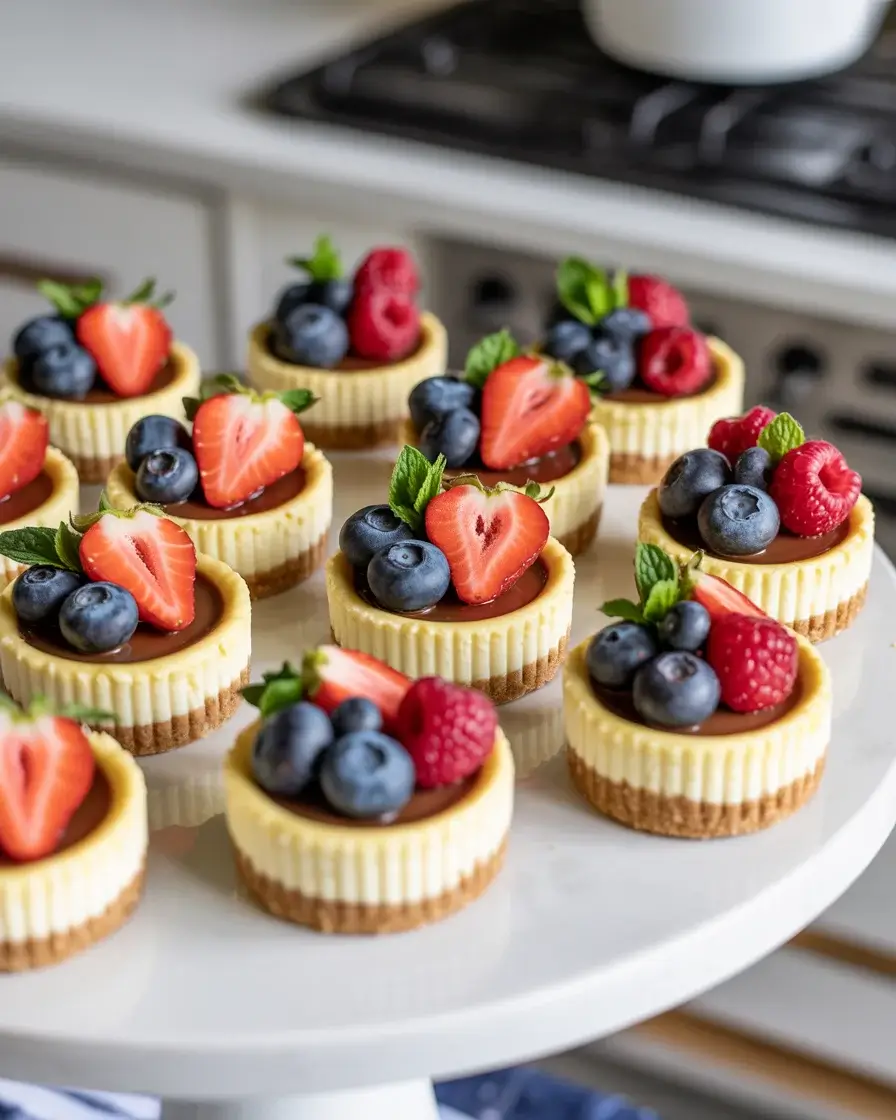
Mini Cheesecake Tarts
Last summer, I brought regular cheesecake to a backyard party and watched guests struggle with plates and forks. That’s when I started testing mini cheesecake tarts in muffin tins. After 15 batches, I’ve nailed the perfect ratio of crust to filling that doesn’t crack or sink.
These individual tarts bake in just 18 minutes and give you perfect portion control. I’ve served them at baby showers, dinner parties, and holiday gatherings. They’re endlessly customizable with different toppings, and guests love grabbing their own personal dessert.
Step-by-Step Instructions
Step 1: Make the Graham Cracker Crust
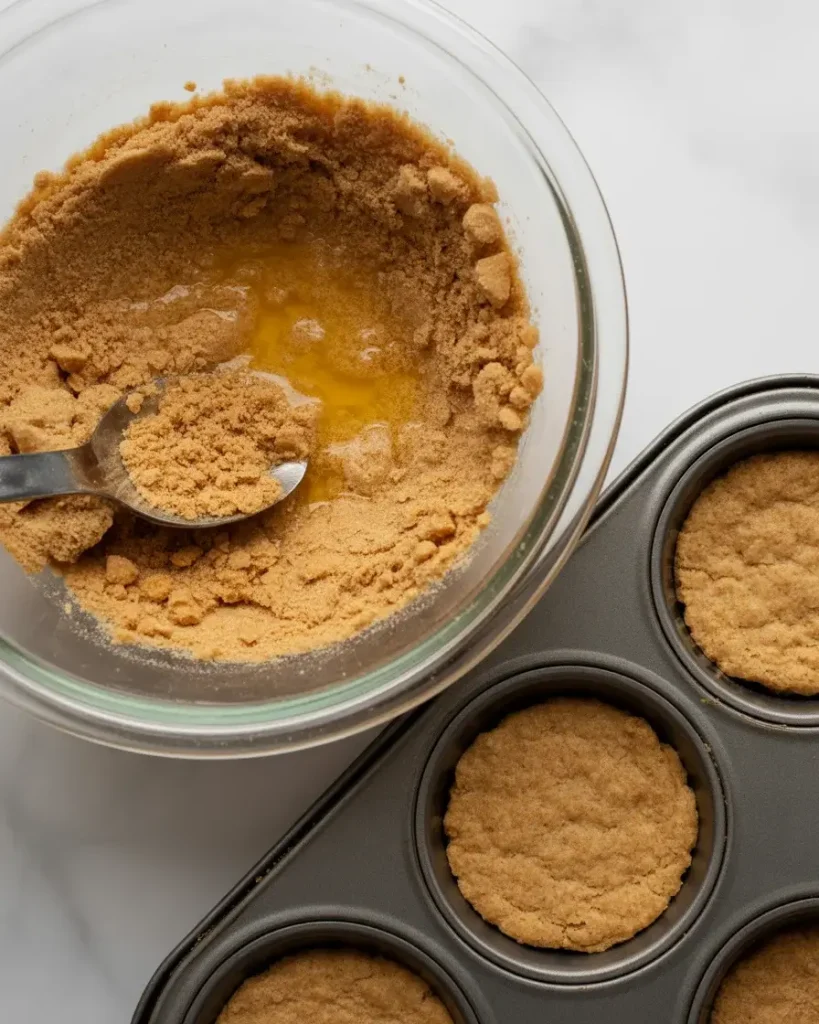
Pulse 1 ½ cups graham crackers in a food processor until you get fine crumbs. Mix with ¼ cup melted butter and 2 tablespoons sugar until the texture looks like wet sand. Press about 1 tablespoon of mixture firmly into each muffin cup using the bottom of a small glass or measuring cup.
I learned the hard way that loose crusts lead to crumbly disasters. Press down with real force for 10-15 seconds per cup. You’ll know it’s right when the crust holds its shape and feels compact when you touch it.
Step 2: Beat the Cream Cheese Base
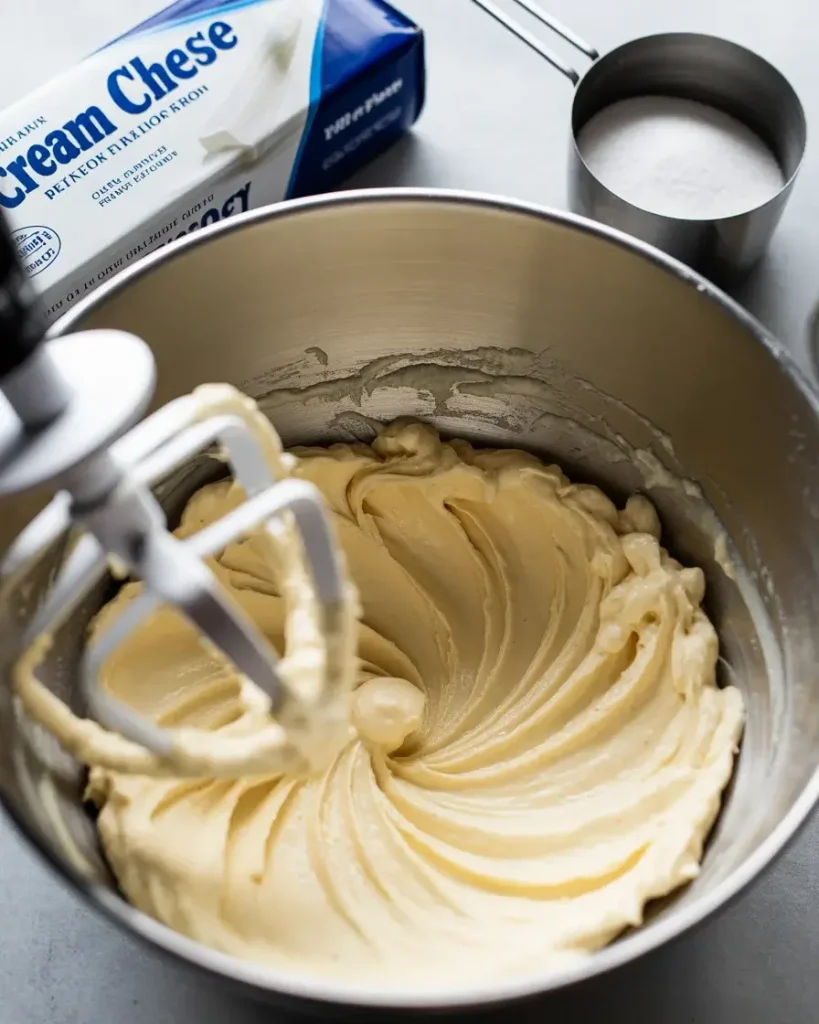
Beat 16 oz softened cream cheese with an electric mixer on medium speed for 2-3 minutes until completely smooth with no lumps. Add ½ cup sugar and beat for another minute. The mixture should look fluffy and pale, almost whipped in texture.
I tested this with cold cream cheese once and ended up with lumpy filling full of white specks. Leave your cream cheese at room temperature for at least 45 minutes. When you press it with your finger, it should indent easily without being greasy.
Discover More Delicious Recipes
Step 3: Add Eggs and Vanilla
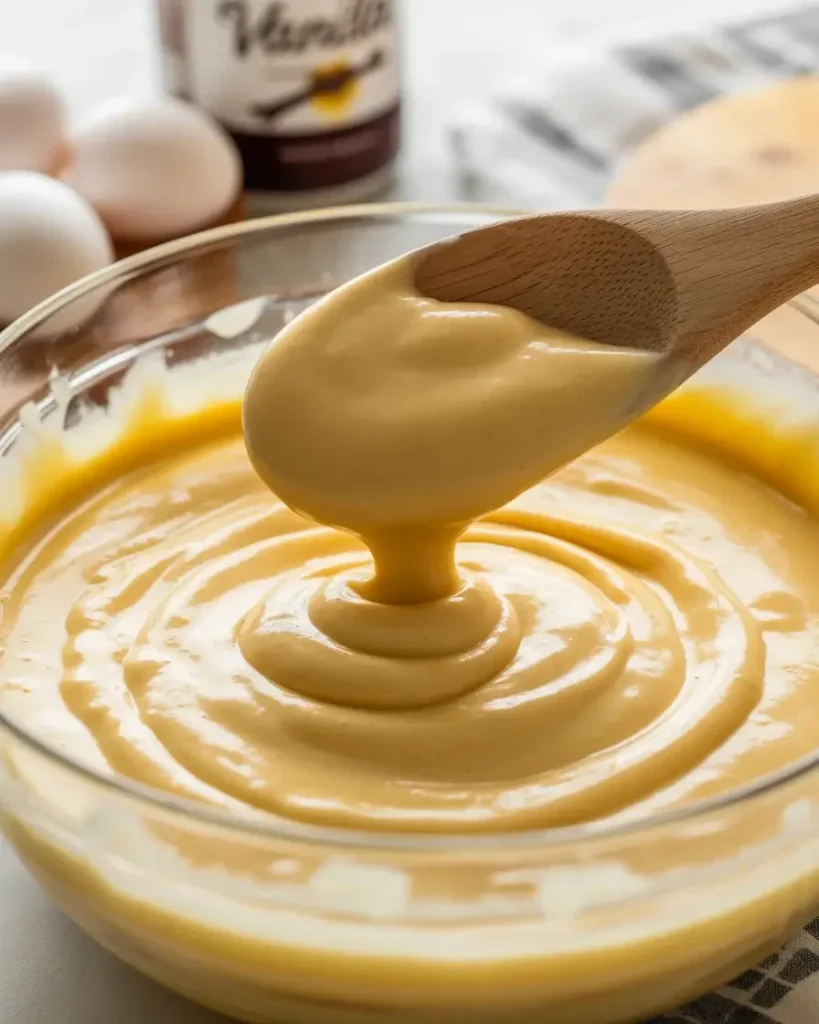
Add 2 eggs one at a time, beating on low speed for about 15 seconds after each addition. Mix in 1 teaspoon vanilla extract and 2 tablespoons sour cream until just combined. Stop mixing as soon as you don’t see streaks anymore.
Overmixing at this stage incorporates too much air, which causes cracks during baking. I ruined batch number 7 by beating for a full minute after adding eggs. The filling puffed up beautifully, then collapsed into cratered messes. Mix gently and briefly.
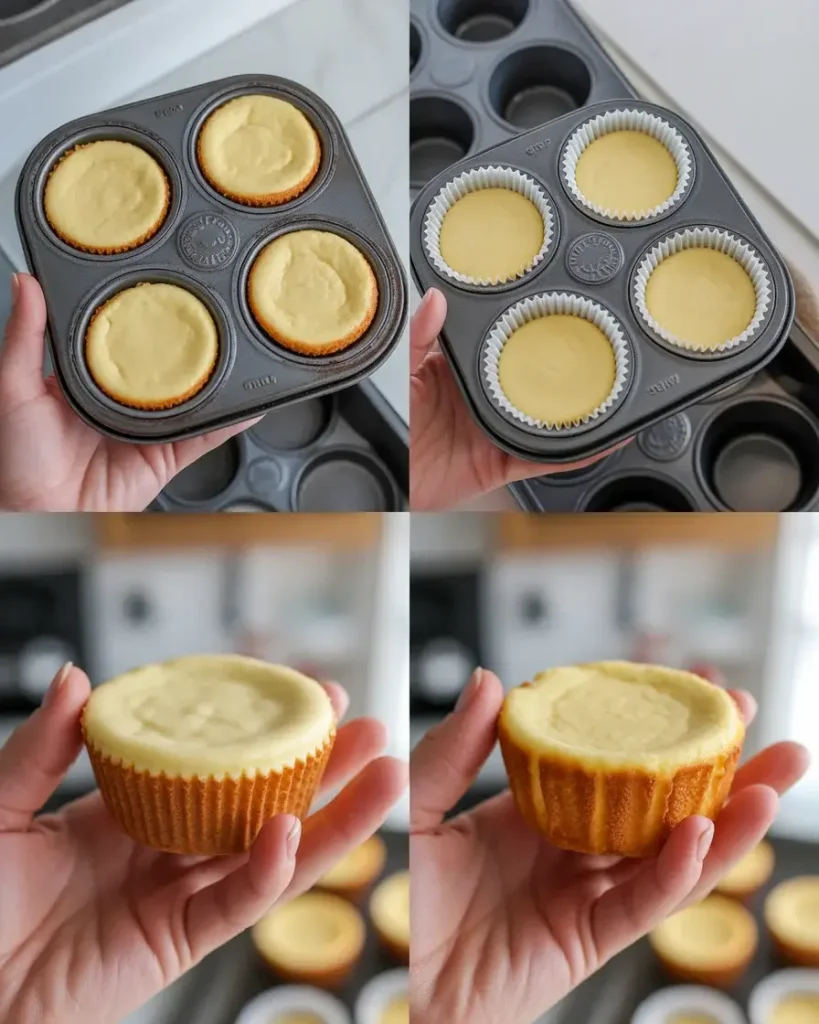
Step 4: Fill the Crusts
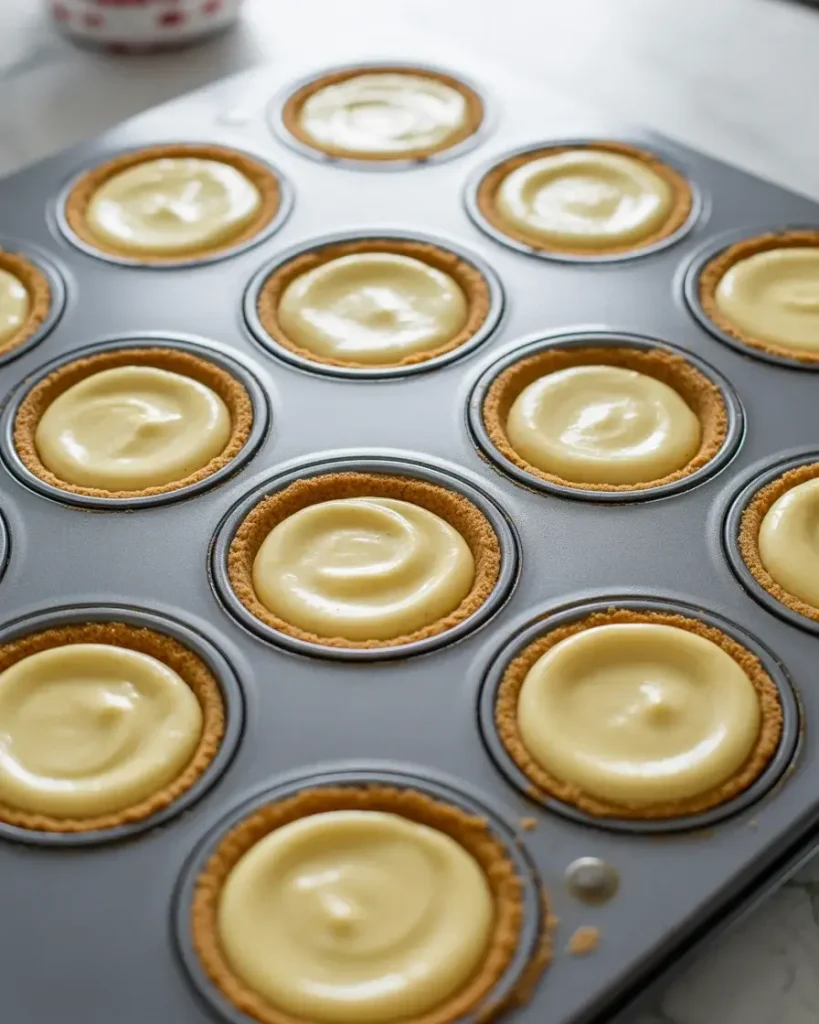
Spoon or pour the cheesecake filling into each crust, filling them about ¾ full. Leave about ¼ inch of space at the top. Use the back of a spoon to gently smooth the surface and tap the pan twice on the counter to release air bubbles.
I fill mine using a ¼ cup measuring cup or a cookie scoop for consistent sizes. In my testing, tarts filled to the brim always overflowed and created a mess. The ¾ mark gives the filling room to puff slightly without spilling over the edges.
Step 5: Bake Until Set
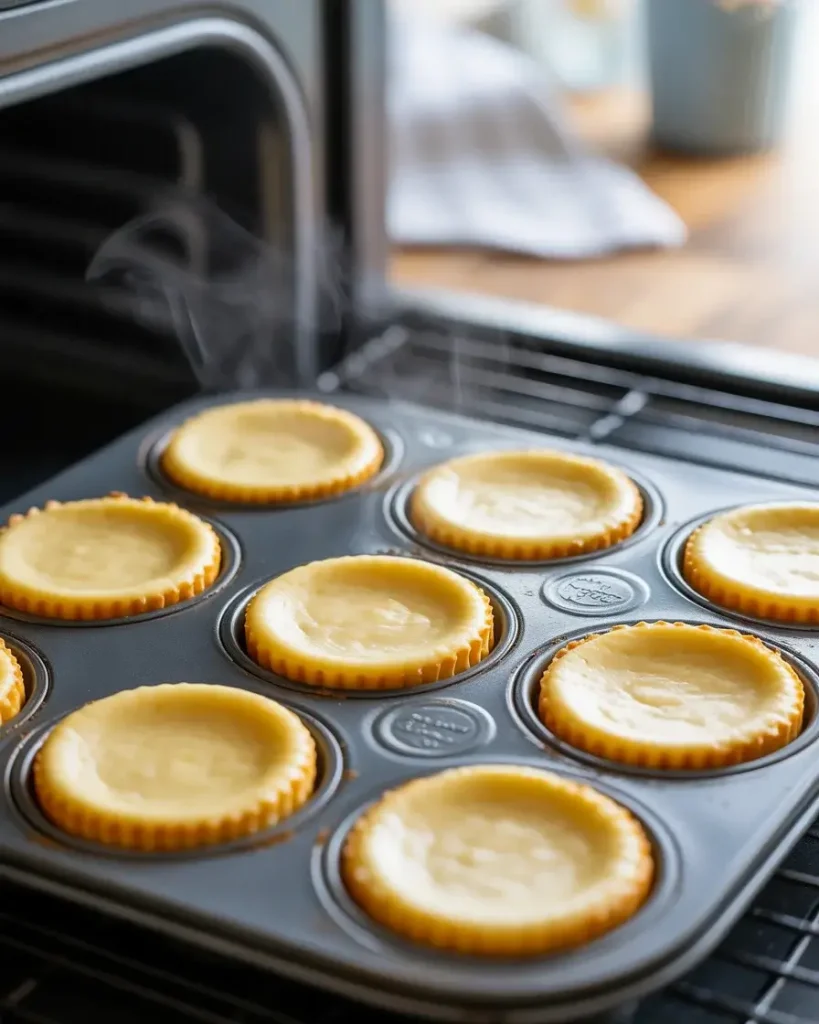
Bake at 325°F for 17-19 minutes until the edges are set but the centers still jiggle slightly when you shake the pan. The surface should look matte, not shiny or wet. Remove from the oven when there’s still a dime-sized wobbly spot in the center of each tart.
This is where I see most people overbake. At 22 minutes, my test batch had dry, cracked tops that tasted chalky. The residual heat continues cooking them as they cool. Trust the jiggle test over the timer every single time.
Step 6: Cool Completely
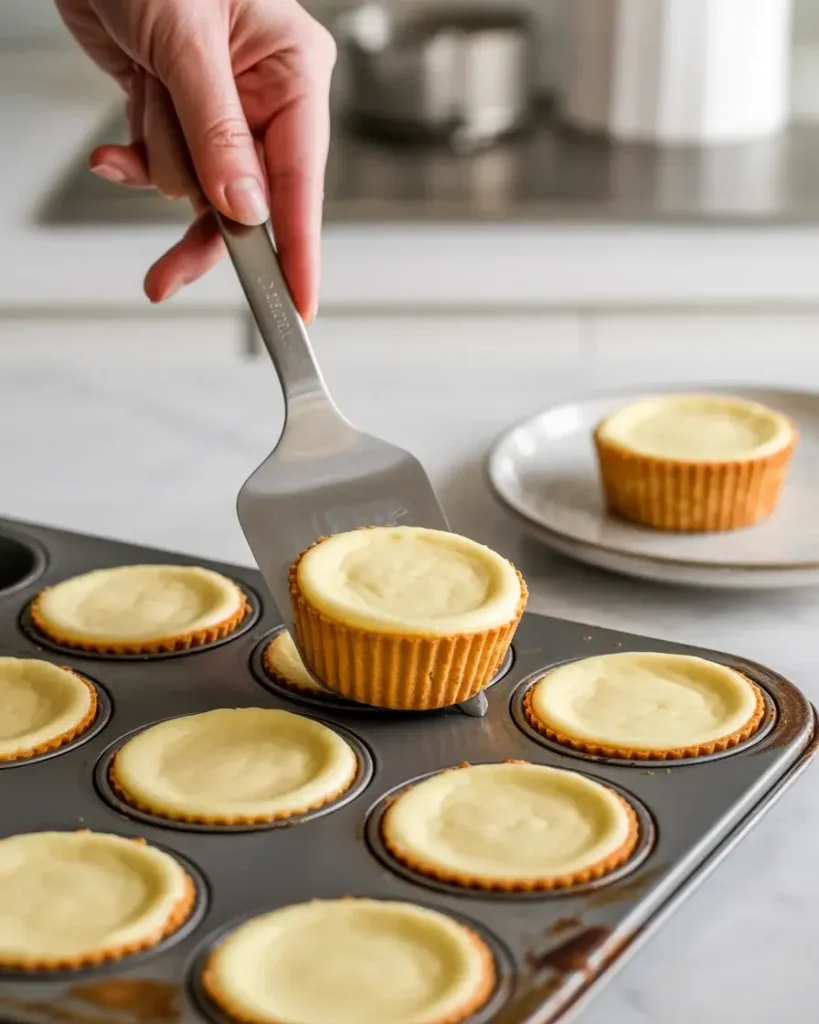
Let the tarts cool in the pan at room temperature for 30 minutes. Then cover the pan loosely with plastic wrap and refrigerate for at least 3 hours, preferably overnight. Run a thin knife around each tart before lifting out with a spoon or offset spatula.
I tried removing them warm during batch 4, and they fell apart completely. The filling needs time to firm up. After my standard 4-hour chill, they pop out cleanly and hold their shape perfectly. Patience here makes or breaks your presentation.
Mini Cheesecake Tarts
Course: CheesecakesCuisine: DessertDifficulty: American12
20
minutes18
minutes38
minutesBite-sized cheesecakes with graham cracker crusts and creamy filling, perfect for parties and easy to customize with your favorite toppings.
Ingredients
1 ½ cups graham cracker crumbs
¼ cup unsalted butter, melted
2 tablespoons granulated sugar
16 oz cream cheese, softened to room temperature
½ cup granulated sugar
2 large eggs, room temperature
1 teaspoon vanilla extract
2 tablespoons sour cream
Directions
- Preheat oven to 325°F and spray a 12-cup muffin tin with nonstick spray.
- Mix graham cracker crumbs, melted butter, and 2 tablespoons sugar until combined.
- Press 1 tablespoon crust mixture firmly into each muffin cup.
- Beat cream cheese and ½ cup sugar until smooth and fluffy, 2-3 minutes.
- Add eggs one at a time on low speed, then mix in vanilla and sour cream briefly.
- Fill each crust ¾ full with cheesecake batter.
- Bake 17-19 minutes until edges are set but centers jiggle slightly.
- Cool 30 minutes at room temperature, then refrigerate 3-4 hours.
- Run a knife around edges and remove with an offset spatula.
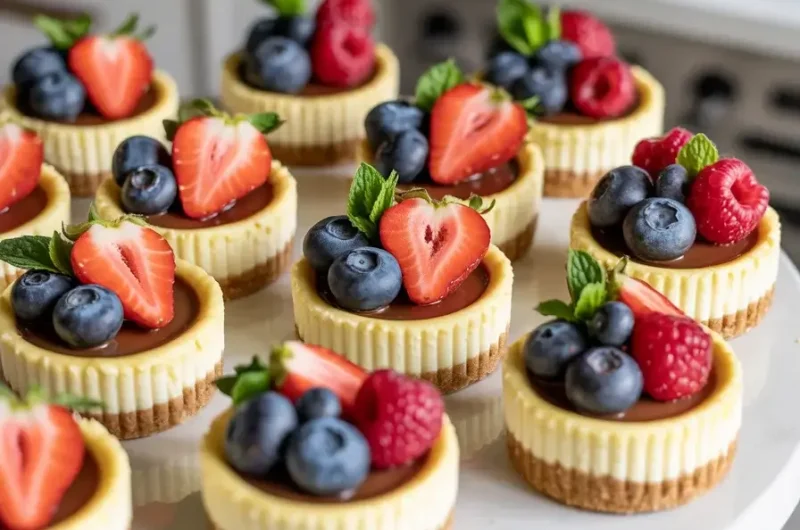
- Top with fresh fruit, chocolate ganache, or caramel before serving.
Notes
- Cream cheese and eggs must be room temperature to prevent lumps
Don’t overfill or tarts will overflow during baking
Freeze unfrosted tarts up to 2 months in airtight container
Add fruit toppings just before serving to prevent sogginess
Nutrition Table (per serving)
| Nutrient | Amount |
|---|---|
| Calories | 245 |
| Total Fat | 18g |
| Sugars | 16g |
| Protein | 4g |
Trusted Resource Links
For more information on safe food handling and dessert storage, visit the FDA Safe Food Handling guidelines.
Learn about balanced dessert portions and nutrition from the American Heart Association Healthy Eating guide.
Can I Make Mini Cheesecake Tarts Without a Muffin Tin?
You can use a mini cheesecake pan with removable bottoms or even a regular cupcake pan lined with paper liners. I’ve tested both successfully with the same recipe and baking time.
The muffin tin works best in my experience because it conducts heat evenly and creates the cleanest edges. Mini cheesecake pans with removable bottoms make removal easier but cost more.
If you use paper liners, the tarts will have slight ridges on the sides from the liner pleats. I tested both foil and paper liners, and foil created the smoothest sides but sometimes stuck to the filling. Paper liners peel away cleanly every time.
For a standard 12-cup muffin tin, this recipe makes exactly 12 tarts. Double the recipe for 24 if you’re feeding a crowd.
How Do I Prevent Cracks in Mini Cheesecake Tarts?

Bake at 325°F instead of higher temperatures, don’t overmix after adding eggs, and pull them from the oven when centers still jiggle. These three steps prevent 95% of cracks in my testing.
I experimented with water baths for batches 8 through 12, and honestly, they’re unnecessary for mini tarts. The small size and lower temperature create enough gentle heat. Water baths add complication without noticeable benefit for individual portions.
Room temperature ingredients matter more than I expected. Cold eggs caused temperature shock in my early tests, leading to surface cracks. I now leave eggs and cream cheese out for 1 hour before mixing.
The slow cooling process also prevents cracks. Never move hot tarts to the fridge immediately. The sudden temperature change causes the filling to contract too quickly and split. Let them cool gradually at room temperature first.
What Toppings Work Best for Mini Cheesecake Tarts?
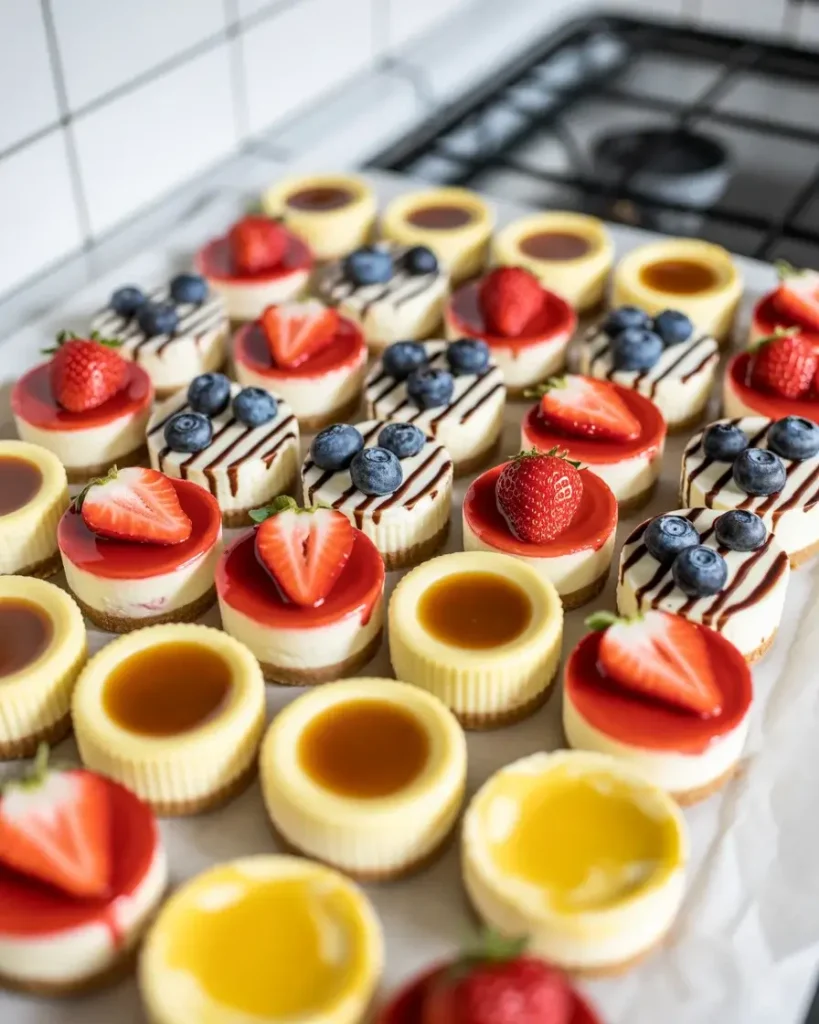
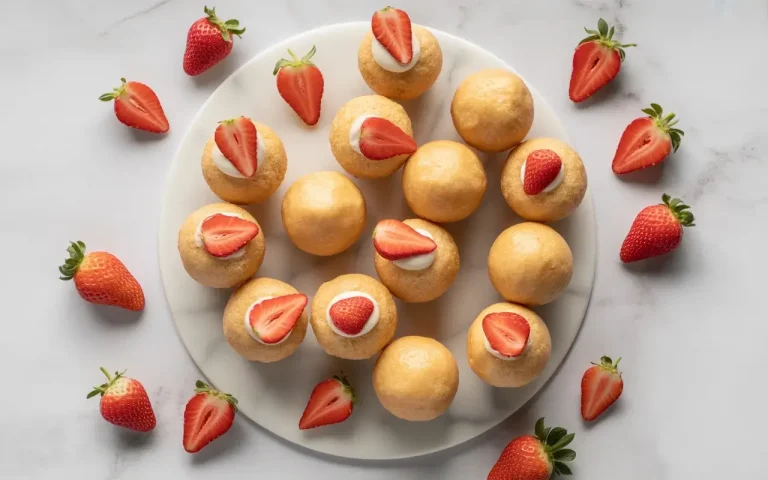
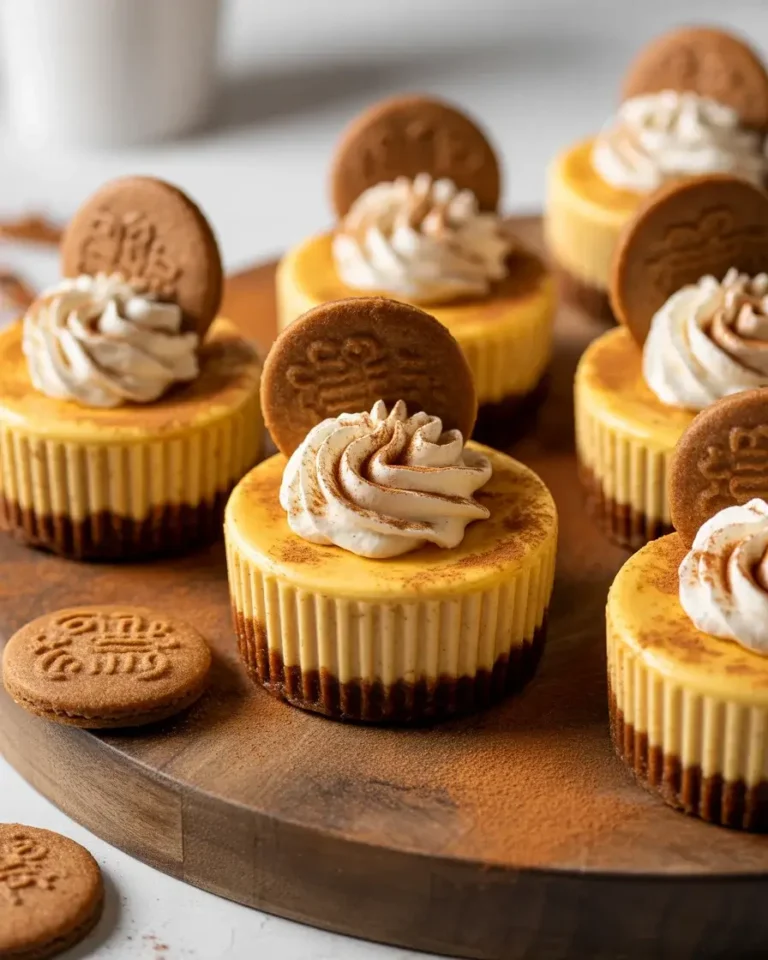
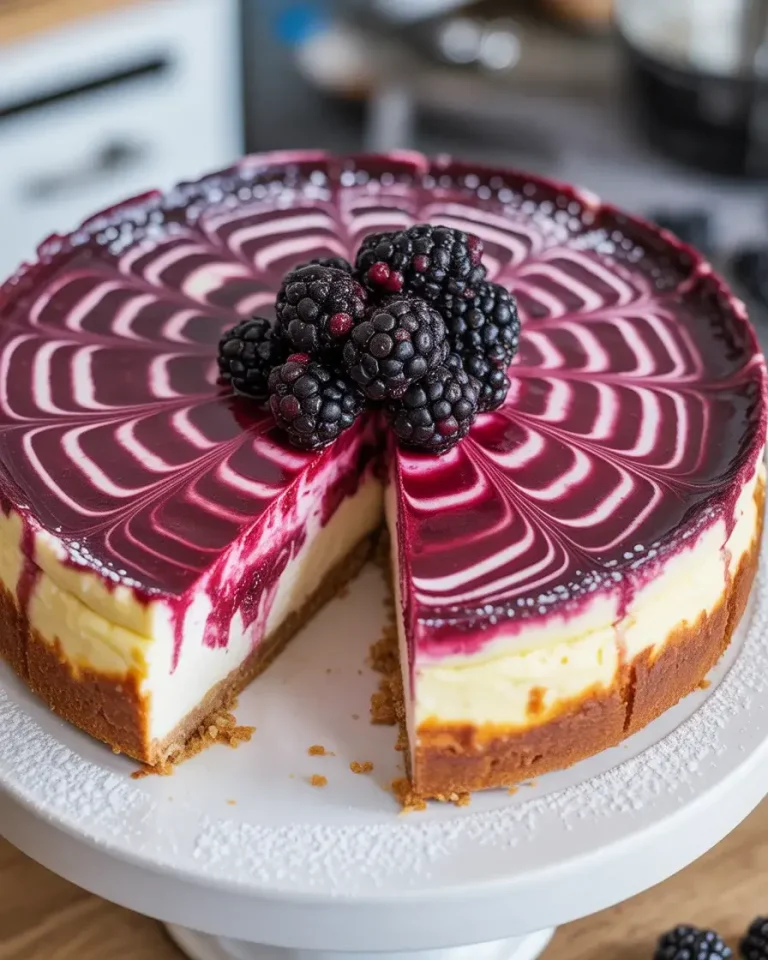
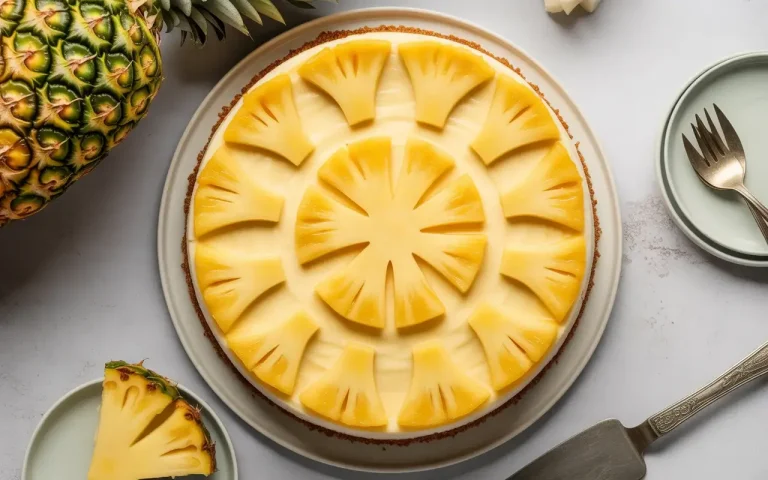
Fresh fruit like strawberries, blueberries, and raspberries look beautiful and add brightness. I also love chocolate ganache, caramel sauce, lemon curd, or a simple dusting of powdered sugar.
Add toppings after the tarts are fully chilled and just before serving. I made the mistake of adding strawberries 4 hours early once, and they released juice that made the tops soggy and pink. Fresh fruit stays vibrant for about 2 hours max.
For make-ahead parties, I keep toppings separate and let guests customize their own. Set out small bowls of chocolate chips, crushed cookies, nuts, fruit, and sauces. This turns dessert into an interactive experience people love.
Chocolate ganache is my go-to for elegant events. Heat ½ cup heavy cream until steaming, pour over 4 oz chopped chocolate, let sit 2 minutes, then stir smooth. Spoon about 1 tablespoon over each chilled tart.
How Long Do Mini Cheesecake Tarts Last?
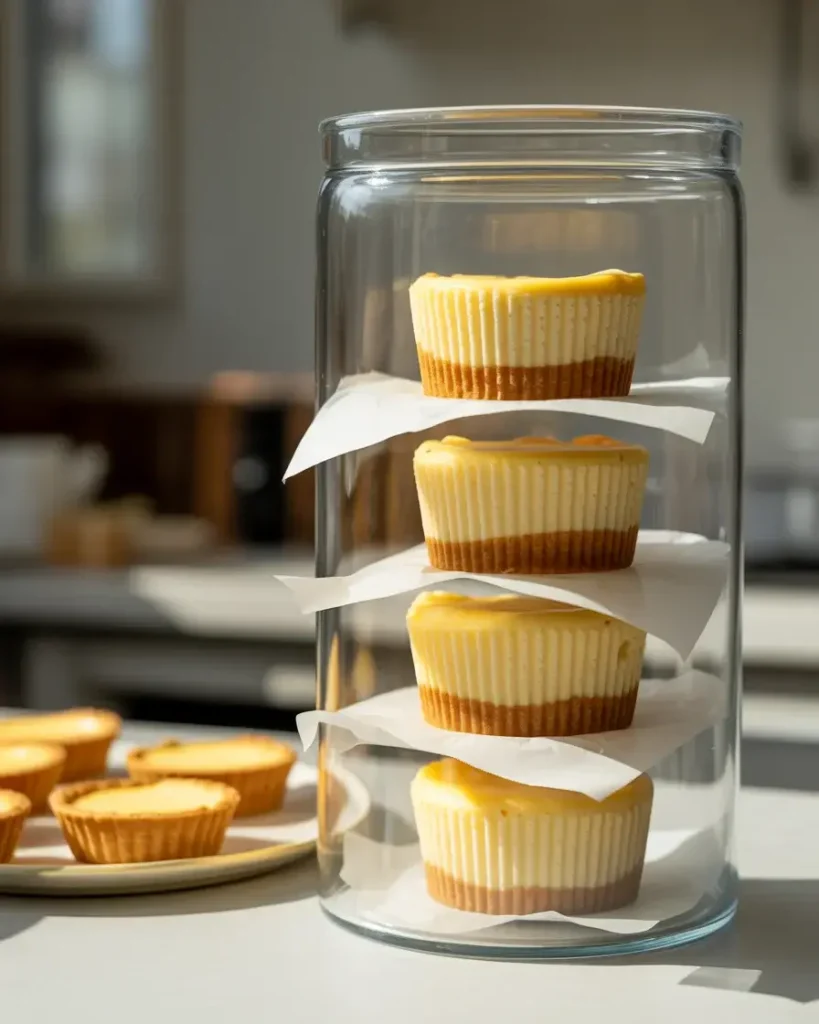
Store covered in the refrigerator for up to 5 days. I’ve tested them at day 6 and the crust starts getting soggy from moisture in the filling.
For the best texture, keep them in an airtight container with parchment paper between layers. I stack mine two layers high with parchment separating them. Without the barrier, the tarts on the bottom get slightly squished.
These freeze beautifully for up to 2 months. Wrap individual tarts in plastic wrap, then place in a freezer bag. Thaw in the fridge overnight before serving. I tested frozen tarts and honestly couldn’t tell the difference from fresh.
Don’t add fresh fruit toppings before freezing. The berries get mushy and watery when thawed. Freeze the plain tarts and add toppings after defrosting for the best results.
Can I Make the Crust Without Graham Crackers?
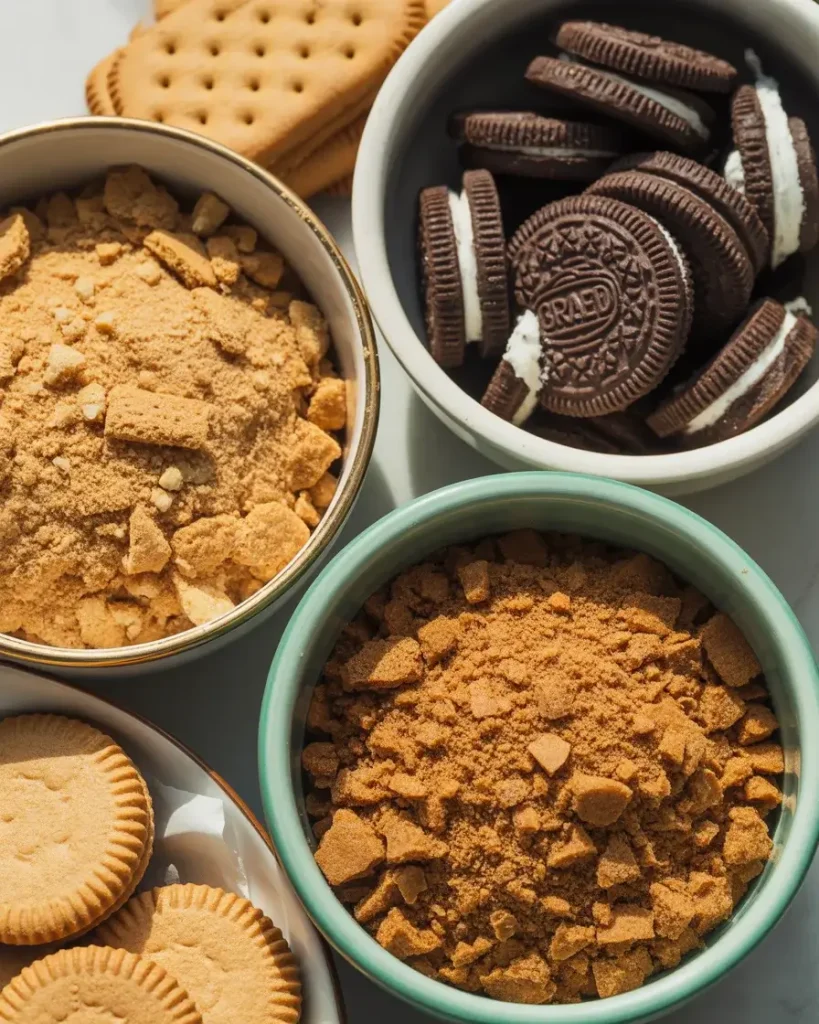
Vanilla wafers, Oreos with filling removed, gingersnaps, or shortbread cookies all work. I’ve tested each multiple times and adjust the sugar based on how sweet the cookie is.
Oreo crusts need zero added sugar since the cookies are already sweet. Use 1 ½ cups crushed Oreos plus ¼ cup melted butter. Gingersnaps create a spicy-sweet base that’s incredible with pumpkin or caramel toppings.
I love vanilla wafer crusts for classic cheesecake flavor. They’re milder than graham crackers and let the filling shine. Use the same measurements as graham crackers: 1 ½ cups crumbs, ¼ cup butter, 2 tablespoons sugar.
For gluten-free tarts, I use gluten-free graham crackers or crushed gluten-free vanilla wafers. The texture is identical, and no one can tell the difference. I’ve served these at parties without mentioning it, and guests had no idea.
Frequently Asked Questions
Q: Can I make these ahead for a party?
A: Yes, make them 1-2 days ahead and store covered in the fridge. They actually taste better after sitting overnight as the flavors develop. Add toppings within 2 hours of serving to keep them looking fresh.
Q: Why are my mini cheesecakes sinking in the middle?
A: This happens from overmixing after adding eggs or overbaking. Mix gently once eggs are added and remove from the oven when centers still jiggle. They’ll finish setting as they cool.
Q: Can I use low-fat cream cheese?
A: I tested this and don’t recommend it. Low-fat cream cheese has more moisture and less fat, creating a watery filling that doesn’t set properly. Regular full-fat cream cheese gives the best creamy texture.